
Users Guide
Page 3
... view 11 Monitor specifications 13 Resolution specifications 14 Supported video modes 15 Preset display modes 15 DP Multi-Stream Transport (MST) modes 16 Electrical specifications 16 Physical characteristics 17 Environmental characteristics 18 Pin assignments 19 Plug and play capability 22 Universal Serial Bus (USB) interface 22 SuperSpeed USB 5 Gbps (USB3.2 Gen1 22 USB Type-C 22 USB 3.2 downstream connector 23 USB Type-C connector 23 USB ports 24 RJ45 port (connector side 24 Driver installation 25 RJ45 connector LED status 26 LCD monitor...
... view 11 Monitor specifications 13 Resolution specifications 14 Supported video modes 15 Preset display modes 15 DP Multi-Stream Transport (MST) modes 16 Electrical specifications 16 Physical characteristics 17 Environmental characteristics 18 Pin assignments 19 Plug and play capability 22 Universal Serial Bus (USB) interface 22 SuperSpeed USB 5 Gbps (USB3.2 Gen1 22 USB Type-C 22 USB 3.2 downstream connector 23 USB Type-C connector 23 USB ports 24 RJ45 port (connector side 24 Driver installation 25 RJ45 connector LED status 26 LCD monitor...

Users Guide
Page 8
... factory reset/default setting mode (Preset mode: Standard). • Single USB Type-C to supply power (PD 65 W) to a compatible notebook while receiving video & data signal. • Tilt, swivel, height, and rotate adjustment capabilities. • Ultra-thin bezel minimizes the bezel gap in compliance with 1 USB Type-C upstream port and 4 SuperSpeed USB 5 Gbps (USB 3.2 Gen1) Type-A downstream ports. • USB-C and RJ45 ports enable a single-cable, network-connected experience. • Plug and play capability if supported by...
... factory reset/default setting mode (Preset mode: Standard). • Single USB Type-C to supply power (PD 65 W) to a compatible notebook while receiving video & data signal. • Tilt, swivel, height, and rotate adjustment capabilities. • Ultra-thin bezel minimizes the bezel gap in compliance with 1 USB Type-C upstream port and 4 SuperSpeed USB 5 Gbps (USB 3.2 Gen1) Type-A downstream ports. • USB-C and RJ45 ports enable a single-cable, network-connected experience. • Plug and play capability if supported by...

Users Guide
Page 10
Releases stand from the monitor. behind attached VESA Cover) Regulatory label Stand release button Barcode, serial number, and Service Tag label Power On/Off button Joystick Cable-management slot Use Wall-mount the monitor using VESAcompatible wall mount kit (100 mm x 100 mm). To turn the monitor on or off. Back view Back view with monitor stand Label 1 2 3 4 5 6 7 Description VESA mounting holes (100 mm x 100 mm - Refer to this label if you need to organize cables by inserting them through...
Releases stand from the monitor. behind attached VESA Cover) Regulatory label Stand release button Barcode, serial number, and Service Tag label Power On/Off button Joystick Cable-management slot Use Wall-mount the monitor using VESAcompatible wall mount kit (100 mm x 100 mm). To turn the monitor on or off. Back view Back view with monitor stand Label 1 2 3 4 5 6 7 Description VESA mounting holes (100 mm x 100 mm - Refer to this label if you need to organize cables by inserting them through...

Users Guide
Page 12
... resolution of Windows prior to Windows 10. 8 SuperSpeed USB Connect your USB device.* 5 Gbps (USB 3.2 Gen1) Type-A downstream port (4) NOTE: To use these ports, you have connected the USB Type-C cable (shipped with your monitor) from the computer to the monitor. *To avoid signal interference, when a wireless USB device has been connected to a USB downstream port, it is not supported on the monitor and to your computer. 9 RJ45 port Connect the Internet. This port supports USB Power Delivery...
... resolution of Windows prior to Windows 10. 8 SuperSpeed USB Connect your USB device.* 5 Gbps (USB 3.2 Gen1) Type-A downstream port (4) NOTE: To use these ports, you have connected the USB Type-C cable (shipped with your monitor) from the computer to the monitor. *To avoid signal interference, when a wireless USB device has been connected to a USB downstream port, it is not supported on the monitor and to your computer. 9 RJ45 port Connect the Internet. This port supports USB Power Delivery...
Users Guide
Page 14
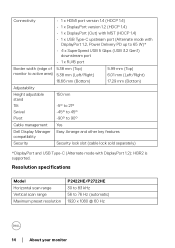
Connectivity • 1 x HDMI port version 1.4 (HDCP 1.4) • 1 x DisplayPort version 1.2 (HDCP 1.4) • 1 x DisplayPort (Out) with MST (HDCP 1.4) • 1 x USB Type-C upstream port (Alternate mode with DisplayPort 1.2): HBR2 is supported. Resolution specifications Model Horizontal scan range Vertical scan range Maximum preset resolution P2422HE/P2722HE 30 to 83 kHz 56 to 90° Cable management Yes Dell Display Manager Easy Arrange and other key features compatibility Security Security lock slot (cable lock sold separately) *DisplayPort and USB Type...
Connectivity • 1 x HDMI port version 1.4 (HDCP 1.4) • 1 x DisplayPort version 1.2 (HDCP 1.4) • 1 x DisplayPort (Out) with MST (HDCP 1.4) • 1 x USB Type-C upstream port (Alternate mode with DisplayPort 1.2): HBR2 is supported. Resolution specifications Model Horizontal scan range Vertical scan range Maximum preset resolution P2422HE/P2722HE 30 to 83 kHz 56 to 90° Cable management Yes Dell Display Manager Easy Arrange and other key features compatibility Security Security lock slot (cable lock sold separately) *DisplayPort and USB Type...
Users Guide
Page 17
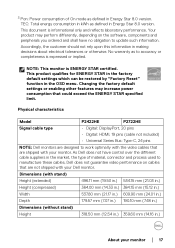
... (with your monitor. Physical characteristics Model P2422HE P2722HE Signal cable type • Digital: DisplayPort, 20 pins • Digital: HDMI, 19 pins (cable not included) • Universal Series Bus: Type-C, 24 pins NOTE: Dell monitors are designed to work optimally with the video cables that could exceed the ENERGY STAR specified limit. Accordingly, the customer should not rely upon this information in the OSD menu. As Dell does not have...
... (with your monitor. Physical characteristics Model P2422HE P2722HE Signal cable type • Digital: DisplayPort, 20 pins • Digital: HDMI, 19 pins (cable not included) • Universal Series Bus: Type-C, 24 pins NOTE: Dell monitors are designed to work optimally with the video cables that could exceed the ENERGY STAR specified limit. Accordingly, the customer should not rely upon this information in the OSD menu. As Dell does not have...
Users Guide
Page 28
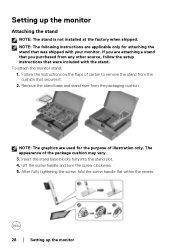
Remove the stand base and stand riser from any other source, follow the setup instructions that secures it. 2. Follow the instructions on the flaps of carton to remove the stand from the cushion that were included with your monitor. After fully tightening the screw, fold the screw handle flat within the recess. 28 │ Setting up the monitor Attaching the stand NOTE: The stand is not installed at the factory when...
Remove the stand base and stand riser from any other source, follow the setup instructions that secures it. 2. Follow the instructions on the flaps of carton to remove the stand from the cushion that were included with your monitor. After fully tightening the screw, fold the screw handle flat within the recess. 28 │ Setting up the monitor Attaching the stand NOTE: The stand is not installed at the factory when...

Users Guide
Page 29
a. Setting up the monitor │ 29 NOTE: Before attaching the stand assembly to the display, ensure that the front plate flap is opened to access the VESA area for assembly. 7. Fit the two tabs on the upper part of the stand to the display. Press the stand down till it snaps into place. b. Attach the stand assembly to the groove on the back of the display. 6. Lift the cover, as shown, to allow space for stand assembly.
a. Setting up the monitor │ 29 NOTE: Before attaching the stand assembly to the display, ensure that the front plate flap is opened to access the VESA area for assembly. 7. Fit the two tabs on the upper part of the stand to the display. Press the stand down till it snaps into place. b. Attach the stand assembly to the groove on the back of the display. 6. Lift the cover, as shown, to allow space for stand assembly.

Users Guide
Page 34
To make sure the DPBS function works for the first time, perform the following steps on the DPBS supported platform in -box standard accessory. NOTE: DPBS only supports the USB Type-C upstream port. 34 │ Setting up the monitor This feature is only supported with Dell Power Button Sync (DPBS) feature to allow you to control PC system power state from the monitor power button. Connecting the RJ45 cable (optional) NOTE...
To make sure the DPBS function works for the first time, perform the following steps on the DPBS supported platform in -box standard accessory. NOTE: DPBS only supports the USB Type-C upstream port. 34 │ Setting up the monitor This feature is only supported with Dell Power Button Sync (DPBS) feature to allow you to control PC system power state from the monitor power button. Connecting the RJ45 cable (optional) NOTE...

Users Guide
Page 47
... input source from the list of preset modes. • Brightness/Contrast: To access the adjustment sliders of brightness and contrast. See Personalize for details. 3 To exit the Menu Launcher. Exit Using the navigation keys When the OSD main menu is active, move the joystick to your preferred shortcut keys. After you change the settings, press the joystick to save the changes before proceeding to the center position...
... input source from the list of preset modes. • Brightness/Contrast: To access the adjustment sliders of brightness and contrast. See Personalize for details. 3 To exit the Menu Launcher. Exit Using the navigation keys When the OSD main menu is active, move the joystick to your preferred shortcut keys. After you change the settings, press the joystick to save the changes before proceeding to the center position...
Users Guide
Page 52
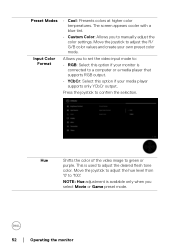
... to manually adjust the color settings. This is connected to a computer or a media player that supports RGB output. • YCbCr: Select this option if your monitor is used to : • RGB: Select this option if your own preset color mode. The screen appears cooler with a blue tint. • Custom Color: Allows you select Movie or Game preset mode. 52 │ Operating the monitor Move the joystick to green...
... to manually adjust the color settings. This is connected to a computer or a media player that supports RGB output. • YCbCr: Select this option if your monitor is used to : • RGB: Select this option if your own preset color mode. The screen appears cooler with a blue tint. • Custom Color: Allows you select Movie or Game preset mode. 52 │ Operating the monitor Move the joystick to green...

Users Guide
Page 55
... -side setup. NOTE: To unlock the button(s), move and hold the joystick up/down /left /right for 4 seconds to set the lock options via the pop-up menu. Alternative Lock Method: You can prevent people from accessing the controls. Reset Menu • Menu Buttons: All joystick functions are locked and not accessible by the user. Resets all OSD settings to the factory preset values. Lock With the control buttons on the monitor locked...
... -side setup. NOTE: To unlock the button(s), move and hold the joystick up/down /left /right for 4 seconds to set the lock options via the pop-up menu. Alternative Lock Method: You can prevent people from accessing the controls. Reset Menu • Menu Buttons: All joystick functions are locked and not accessible by the user. Resets all OSD settings to the factory preset values. Lock With the control buttons on the monitor locked...
Users Guide
Page 58
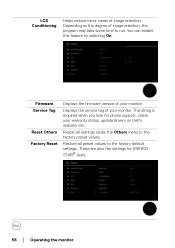
... monitor Resets all preset values to the factory preset values. Firmware Service Tag Reset Others Factory Reset Displays the firmware version of image retention. You can enable this feature by selecting On. Restore all settings under the Others menu to the factory default settings. LCD Conditioning Helps reduce minor cases of your monitor. These are also the settings for phone support, check your monitor. Depending on the degree of your warranty status, update drivers on Dell...
... monitor Resets all preset values to the factory preset values. Firmware Service Tag Reset Others Factory Reset Displays the firmware version of image retention. You can enable this feature by selecting On. Restore all settings under the Others menu to the factory default settings. LCD Conditioning Helps reduce minor cases of your monitor. These are also the settings for phone support, check your monitor. Depending on the degree of your warranty status, update drivers on Dell...
Users Guide
Page 64
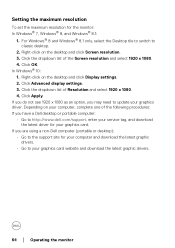
... desktop and click Display settings. 2. Click Advanced display settings. 3. For Windows® 8 and Windows® 8.1 only, select the Desktop tile to switch to http://www.dell.com/support, enter your service tag, and download the latest driver for the monitor: In Windows® 7, Windows® 8, and Windows® 8.1: 1. If you may need to your graphics card website and download the latest graphic drivers. 64 │ Operating the monitor Depending on your...
... desktop and click Display settings. 2. Click Advanced display settings. 3. For Windows® 8 and Windows® 8.1 only, select the Desktop tile to switch to http://www.dell.com/support, enter your service tag, and download the latest driver for the monitor: In Windows® 7, Windows® 8, and Windows® 8.1: 1. If you may need to your graphics card website and download the latest graphic drivers. 64 │ Operating the monitor Depending on your...

Users Guide
Page 69
... slightly different according to check whether your monitor is working correctly, the following steps: 1. then turn On both your computer and the monitor. Sel f-test Your monitor provides a self-test feature that allows you begin any of the procedures in self-test mode, the power LED remains white. 4. Troubleshooting WARNING: Before you to the connected input signal. Turn on the monitor. Troubleshooting │ 69 Turn off both your...
... slightly different according to check whether your monitor is working correctly, the following steps: 1. then turn On both your computer and the monitor. Sel f-test Your monitor provides a self-test feature that allows you begin any of the procedures in self-test mode, the power LED remains white. 4. Troubleshooting WARNING: Before you to the connected input signal. Turn on the monitor. Troubleshooting │ 69 Turn off both your...

Users Guide
Page 74
Synchronization Problems Safety Related Issues Intermittent Problems Missing Color Screen is secure. • Check for bent or broken pins in the video cable connector. • Restart the computer in self-test mode. Picture missing color • Perform monitor self-test feature check. • Ensure that the video cable malfunctions on & connecting the monitor to the off computer is connected properly and is secure. • Reset the monitor to factory settings. • Perform monitor self...
Synchronization Problems Safety Related Issues Intermittent Problems Missing Color Screen is secure. • Check for bent or broken pins in the video cable connector. • Restart the computer in self-test mode. Picture missing color • Perform monitor self-test feature check. • Ensure that the video cable malfunctions on & connecting the monitor to the off computer is connected properly and is secure. • Reset the monitor to factory settings. • Perform monitor self...
Users Guide
Page 75
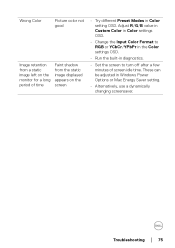
... Color settings OSD. • Change the Input Color Format to turn off after a few minutes of time Faint shadow from the static image displayed appears on the screen • Try different Preset Modes in Color setting OSD. These can be adjusted in diagnostics. • Set the screen to RGB or YCbCr/YPbPr in the Color settings OSD. • Run the built-in Windows Power Options or Mac Energy Saver setting. • Alternatively, use a dynamically changing screensaver. Wrong Color Picture color...
... Color settings OSD. • Change the Input Color Format to turn off after a few minutes of time Faint shadow from the static image displayed appears on the screen • Try different Preset Modes in Color setting OSD. These can be adjusted in diagnostics. • Set the screen to RGB or YCbCr/YPbPr in the Color settings OSD. • Run the built-in Windows Power Options or Mac Energy Saver setting. • Alternatively, use a dynamically changing screensaver. Wrong Color Picture color...

Users Guide
Page 76
No input signal No picture, the LED when user controls light is locked. Re-plug the signal cable if necessary. • Reset the computer or video player. Product specific problems Common symptoms What you experience Possible solutions Screen image is too Image is centered on • Check the Aspect Ratio setting in properly. Ensure the computer is not in the power saving mode by moving the mouse or pressing any key on the screen power cord, plug it...
No input signal No picture, the LED when user controls light is locked. Re-plug the signal cable if necessary. • Reset the computer or video player. Product specific problems Common symptoms What you experience Possible solutions Screen image is too Image is centered on • Check the Aspect Ratio setting in properly. Ensure the computer is not in the power saving mode by moving the mouse or pressing any key on the screen power cord, plug it...

Users Guide
Page 77
... network connection. Troubleshooting │ 77 OS setting or cable • Ensure that the latest BIOS and connection issue drivers for your computer are installed on your computer. • Ensure that the RealTek Gigabit Ethernet Controller is installed in the Windows Device Manager. • If your BIOS Setup has a LAN/GBE Enabled/Disabled option, make sure it is connected securely on the computer and plug the power cord...
... network connection. Troubleshooting │ 77 OS setting or cable • Ensure that the latest BIOS and connection issue drivers for your computer are installed on your computer. • Ensure that the RealTek Gigabit Ethernet Controller is installed in the Windows Device Manager. • If your BIOS Setup has a LAN/GBE Enabled/Disabled option, make sure it is connected securely on the computer and plug the power cord...

Users Guide
Page 78
Universal Serial Bus (USB) specific problems Common symptoms USB interface is not working USB Type-C port does not supply power SuperSpeed USB 5 Gbps (USB 3.2 Gen1) interface is slow What you use the USB Type-C cable shipped with the USB-C specification. SuperSpeed USB 5 Gbps (USB 3.2 Gen1) peripherals working slowly or not working • Check that the connected device is used. • Reconnect the upstream cable to your monitor is SuperSpeed USB 5 Gbps (USB 3.2 Gen1)-compatible. • Some computers have USB 3.2, USB 2.0, and USB 1.1 ports. USB peripherals...
Universal Serial Bus (USB) specific problems Common symptoms USB interface is not working USB Type-C port does not supply power SuperSpeed USB 5 Gbps (USB 3.2 Gen1) interface is slow What you use the USB Type-C cable shipped with the USB-C specification. SuperSpeed USB 5 Gbps (USB 3.2 Gen1) peripherals working slowly or not working • Check that the connected device is used. • Reconnect the upstream cable to your monitor is SuperSpeed USB 5 Gbps (USB 3.2 Gen1)-compatible. • Some computers have USB 3.2, USB 2.0, and USB 1.1 ports. USB peripherals...


