User Guide
Page 1
Dell™ OptiPlex™ GX260 Systems User's Guide Documentation for Your Computer Finding Information for Your Computer Technical Specifications System Board Components Cleaning Your Computer Advanced Features LegacySelect Technology ... and DVI Adapter Cards Battery Memory PCI Cards and Serial Port Adapters Drives Microprocessor Telephony Applications Programming Interface (TAPI) Closing the Computer Cover Small Desktop Computer About Your Computer Front View Back View Inside Your Computer Attaching and Removing the Computer Stand Adding and Removing Parts Opening the Computer Cover...
Dell™ OptiPlex™ GX260 Systems User's Guide Documentation for Your Computer Finding Information for Your Computer Technical Specifications System Board Components Cleaning Your Computer Advanced Features LegacySelect Technology ... and DVI Adapter Cards Battery Memory PCI Cards and Serial Port Adapters Drives Microprocessor Telephony Applications Programming Interface (TAPI) Closing the Computer Cover Small Desktop Computer About Your Computer Front View Back View Inside Your Computer Attaching and Removing the Computer Stand Adding and Removing Parts Opening the Computer Cover...
User Guide
Page 36
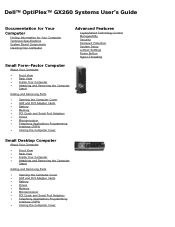
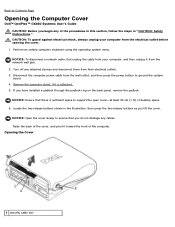
Back to Contents Page Opening the Computer Cover Dell™ OptiPlex™ GX260 Systems User's Guide CAUTION: Before you begin any of desktop space. 6. NOTICE: To disconnect a network cable, first unplug the cable from your computer from the wall outlet, and then press the power button to support ...
Back to Contents Page Opening the Computer Cover Dell™ OptiPlex™ GX260 Systems User's Guide CAUTION: Before you begin any of desktop space. 6. NOTICE: To disconnect a network cable, first unplug the cable from your computer from the wall outlet, and then press the power button to support ...
User Guide
Page 78
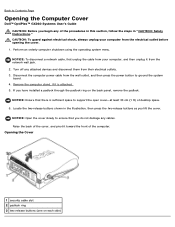
Back to Contents Page About Your Computer Dell™ OptiPlex™ GX260 Systems User's Guide Front View Back View Inside Your Computer Attaching and Removing the Computer Stand Front View Small Desktop Computer 1 CD-drive Press this button to eject a disk from the floppy drive. The light might also be on the computer. Instead, perform...
Back to Contents Page About Your Computer Dell™ OptiPlex™ GX260 Systems User's Guide Front View Back View Inside Your Computer Attaching and Removing the Computer Stand Front View Small Desktop Computer 1 CD-drive Press this button to eject a disk from the floppy drive. The light might also be on the computer. Instead, perform...
User Guide
Page 84
Back to Contents Page Adding and Removing Small Desktop Computer Parts Dell™ OptiPlex™ GX260 Systems User's Guide Opening the Computer Cover AGP and DVI Adapter Cards Battery Drives Memory Microprocessor PCI Cards and Serial Port Adapters Telephony Applications Programming Interface (TAPI) Closing the Computer Cover Back to Contents Page
Back to Contents Page Adding and Removing Small Desktop Computer Parts Dell™ OptiPlex™ GX260 Systems User's Guide Opening the Computer Cover AGP and DVI Adapter Cards Battery Drives Memory Microprocessor PCI Cards and Serial Port Adapters Telephony Applications Programming Interface (TAPI) Closing the Computer Cover Back to Contents Page
User Guide
Page 85
..., always unplug your computer, and then unplug it toward the front of desktop space. 6. If you lift the cover. NOTICE: Open the cover slowly to ensure that there is attached. 5. Back to Contents Page Opening the Computer Cover Dell™ OptiPlex™ GX260 Systems User's Guide CAUTION: Before you do not damage any cables...
..., always unplug your computer, and then unplug it toward the front of desktop space. 6. If you lift the cover. NOTICE: Open the cover slowly to ensure that there is attached. 5. Back to Contents Page Opening the Computer Cover Dell™ OptiPlex™ GX260 Systems User's Guide CAUTION: Before you do not damage any cables...
User Guide
Page 127
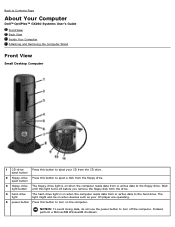
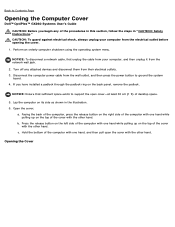
Back to Contents Page Opening the Computer Cover Dell™ OptiPlex™ GX260 Systems User's Guide CAUTION: Before you have installed a padlock through the padlock ring on its side as shown in "CAUTION: Safety Instructions." CAUTION: To guard ..., press the release button on the right side of the computer with one hand, and then pull open cover-at least 30 cm (1 ft) of desktop space. 5. Press the release button on the left side of the computer with one hand while pulling up on the top of the computer with...
Back to Contents Page Opening the Computer Cover Dell™ OptiPlex™ GX260 Systems User's Guide CAUTION: Before you have installed a padlock through the padlock ring on its side as shown in "CAUTION: Safety Instructions." CAUTION: To guard ..., press the release button on the right side of the computer with one hand, and then pull open cover-at least 30 cm (1 ft) of desktop space. 5. Press the release button on the left side of the computer with one hand while pulling up on the top of the computer with...
User Guide
Page 182
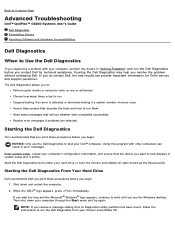
... you print these procedures before you begin . 1. Running the Dell Diagnostics may help you see the Windows desktop. Back to Contents Page Advanced Troubleshooting Dell™ OptiPlex™ GX260 Systems User's Guide Dell Diagnostics Reinstalling Drivers Resolving Software and Hardware Incompatibilities Dell Diagnostics When to Use the Dell Diagnostics If you experience a problem with other computers can provide...
... you print these procedures before you begin . 1. Running the Dell Diagnostics may help you see the Windows desktop. Back to Contents Page Advanced Troubleshooting Dell™ OptiPlex™ GX260 Systems User's Guide Dell Diagnostics Reinstalling Drivers Resolving Software and Hardware Incompatibilities Dell Diagnostics When to Use the Dell Diagnostics If you experience a problem with other computers can provide...
User Guide
Page 201
...and information topics covering the use a single print command to Contents Page Microsoft® Windows® XP Features Dell™ OptiPlex™ GX260 Systems User's Guide Overview New User Interface Files and Settings Transfer Wizard Application and Device Compatibility System Restore User ... the home page, you can use of your computer. New User Interface Key new Windows XP features include: An improved desktop and user interface Files and Settings Transfer Wizard Application program compatibility enhancements System Restore Fast User Switching* Expanded home and small...
...and information topics covering the use a single print command to Contents Page Microsoft® Windows® XP Features Dell™ OptiPlex™ GX260 Systems User's Guide Overview New User Interface Files and Settings Transfer Wizard Application and Device Compatibility System Restore User ... the home page, you can use of your computer. New User Interface Key new Windows XP features include: An improved desktop and user interface Files and Settings Transfer Wizard Application program compatibility enhancements System Restore Fast User Switching* Expanded home and small...
Service Manual
Page 2
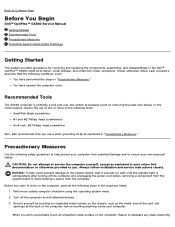
Back to Contents Page Before You Begin Dell™ OptiPlex™ GX260 Service Manual Getting Started Recommended Tools Precautionary Measures Protecting Against Electrostatic Discharge Getting Started This section provides procedures for removing and replacing the... on the chassis, such as the metal around the card-slot openings at the back of the following steps in the Dell™ OptiPlex™ GX260 small form-factor, small desktop, and small mini-tower computers. Always follow installation and service instructions closely. NOTICE: To help protect your computer from the...
Back to Contents Page Before You Begin Dell™ OptiPlex™ GX260 Service Manual Getting Started Recommended Tools Precautionary Measures Protecting Against Electrostatic Discharge Getting Started This section provides procedures for removing and replacing the... on the chassis, such as the metal around the card-slot openings at the back of the following steps in the Dell™ OptiPlex™ GX260 small form-factor, small desktop, and small mini-tower computers. Always follow installation and service instructions closely. NOTICE: To help protect your computer from the...
Service Manual
Page 4
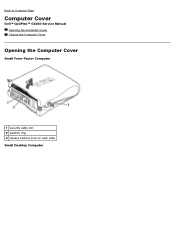
Back to Contents Page Computer Cover Dell™ OptiPlex™ GX260 Service Manual Opening the Computer Cover Closing the Computer Cover Opening the Computer Cover Small Form-Factor Computer 1 security cable slot 2 padlock ring 3 release buttons (one on each side) Small Desktop Computer
Back to Contents Page Computer Cover Dell™ OptiPlex™ GX260 Service Manual Opening the Computer Cover Closing the Computer Cover Opening the Computer Cover Small Form-Factor Computer 1 security cable slot 2 padlock ring 3 release buttons (one on each side) Small Desktop Computer
Service Manual
Page 7
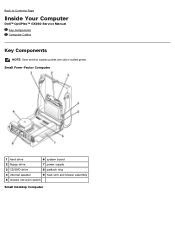
Small Form-Factor Computer 1 hard drive 6 system board 2 floppy drive 7 power supply 3 CD/DVD drive 8 padlock ring 4 internal speaker 9 heat sink and blower assembly 5 chassis intrusion switch Small Desktop Computer Back to Contents Page Inside Your Computer Dell™ OptiPlex™ GX260 Service Manual Key Components Computer Cables Key Components NOTE: User service access points are color-coded green.
Small Form-Factor Computer 1 hard drive 6 system board 2 floppy drive 7 power supply 3 CD/DVD drive 8 padlock ring 4 internal speaker 9 heat sink and blower assembly 5 chassis intrusion switch Small Desktop Computer Back to Contents Page Inside Your Computer Dell™ OptiPlex™ GX260 Service Manual Key Components Computer Cables Key Components NOTE: User service access points are color-coded green.
Service Manual
Page 13
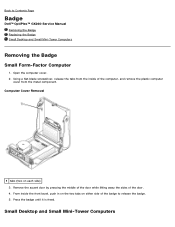
... door by pressing the middle of the door while lifting away the sides of the badge to Contents Page Badge Dell™ OptiPlex™ GX260 Service Manual Removing the Badge Replacing the Badge Small Desktop and Small Mini-Tower Computers Removing the Badge Small Form-Factor Computer 1. Using a flat-blade screwdriver, release the tabs...
... door by pressing the middle of the door while lifting away the sides of the badge to Contents Page Badge Dell™ OptiPlex™ GX260 Service Manual Removing the Badge Replacing the Badge Small Desktop and Small Mini-Tower Computers Removing the Badge Small Form-Factor Computer 1. Using a flat-blade screwdriver, release the tabs...
Service Manual
Page 18
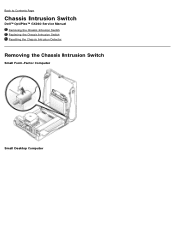
Back to Contents Page Chassis Intrusion Switch Dell™ OptiPlex™ GX260 Service Manual Removing the Chassis Intrusion Switch Replacing the Chassis Intrusion Switch Resetting the Chassis Intrusion Detector Removing the Chassis Intrusion Switch Small Form-Factor Computer Small Desktop Computer
Back to Contents Page Chassis Intrusion Switch Dell™ OptiPlex™ GX260 Service Manual Removing the Chassis Intrusion Switch Replacing the Chassis Intrusion Switch Resetting the Chassis Intrusion Detector Removing the Chassis Intrusion Switch Small Form-Factor Computer Small Desktop Computer
Service Manual
Page 28
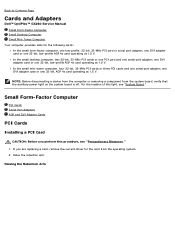
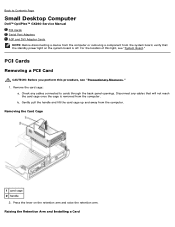
one DVI adapter card or one serial port adapter; If you perform this light, see "Precautionary Measures." 1. In the small desktop computer, two 32-bit, 33-MHz PCI cards or one PCI card and one 32-bit, AGP 4x card operating at 1.5 V. For the ...bit, low-profile AGP 4x card operating at 1.5 V. Raising the Retention Arm Back to Contents Page Cards and Adapters Dell™ OptiPlex™ GX260 Service Manual Small Form-Factor Computer Small Desktop Computer Small Mini-Tower Computer Your computer provides slots for the card from the system board, verify that the auxiliary power...
one DVI adapter card or one serial port adapter; If you perform this light, see "Precautionary Measures." 1. In the small desktop computer, two 32-bit, 33-MHz PCI cards or one PCI card and one 32-bit, AGP 4x card operating at 1.5 V. For the ...bit, low-profile AGP 4x card operating at 1.5 V. Raising the Retention Arm Back to Contents Page Cards and Adapters Dell™ OptiPlex™ GX260 Service Manual Small Form-Factor Computer Small Desktop Computer Small Mini-Tower Computer Your computer provides slots for the card from the system board, verify that the auxiliary power...
Service Manual
Page 35
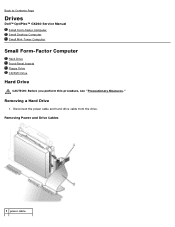
Back to Contents Page Drives Dell™ OptiPlex™ GX260 Service Manual Small Form-Factor Computer Small Desktop Computer Small Mini-Tower Computer Small Form-Factor Computer Hard Drive Front-Panel Inserts Floppy Drive CD/DVD Drive Hard Drive CAUTION: Before you perform this procedure, see "Precautionary Measures." Removing Power and Drive Cables 1 power cable Removing a Hard Drive 1. Disconnect the power cable and hard-drive cable from the drive.
Back to Contents Page Drives Dell™ OptiPlex™ GX260 Service Manual Small Form-Factor Computer Small Desktop Computer Small Mini-Tower Computer Small Form-Factor Computer Hard Drive Front-Panel Inserts Floppy Drive CD/DVD Drive Hard Drive CAUTION: Before you perform this procedure, see "Precautionary Measures." Removing Power and Drive Cables 1 power cable Removing a Hard Drive 1. Disconnect the power cable and hard-drive cable from the drive.
Service Manual
Page 63
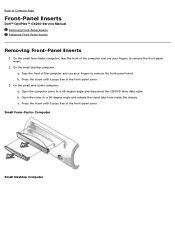
... until it pops free of the front-panel cover. Open the cover to Contents Page Front-Panel Inserts Dell™ OptiPlex™ GX260 Service Manual Removing Front-Panel Inserts Replacing Front-Panel Inserts Removing Front-Panel Inserts 1. Press the insert until... it pops free of the front-panel cover. 3. Back to a 90-degree angle and release the insert tabs from inside the chassis. b. Small Form-Factor Computer Small Desktop...
... until it pops free of the front-panel cover. Open the cover to Contents Page Front-Panel Inserts Dell™ OptiPlex™ GX260 Service Manual Removing Front-Panel Inserts Replacing Front-Panel Inserts Removing Front-Panel Inserts 1. Press the insert until... it pops free of the front-panel cover. 3. Back to a 90-degree angle and release the insert tabs from inside the chassis. b. Small Form-Factor Computer Small Desktop...

Service Manual
Page 72
... it as you lift it is attached to Contents Page Microprocessor Dell™ OptiPlex™ GX260 Service Manual Removing and Installing the Heat-Sink Assembly and Microprocessor Small Form-Factor and Small Desktop Computers Small Mini-Tower Computer Small Form-Factor and Small Desktop Computers 1. Disconnect the 12-volt power cable from the 12VPOWER connector...
... it as you lift it is attached to Contents Page Microprocessor Dell™ OptiPlex™ GX260 Service Manual Removing and Installing the Heat-Sink Assembly and Microprocessor Small Form-Factor and Small Desktop Computers Small Mini-Tower Computer Small Form-Factor and Small Desktop Computers 1. Disconnect the 12-volt power cable from the 12VPOWER connector...
Service Manual
Page 81
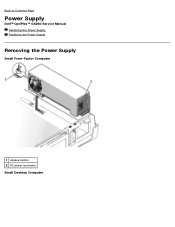
Back to Contents Page Power Supply Dell™ OptiPlex™ GX260 Service Manual Removing the Power Supply Replacing the Power Supply Removing the Power Supply Small Form-Factor Computer 1 release button 2 AC power connector Small Desktop Computer
Back to Contents Page Power Supply Dell™ OptiPlex™ GX260 Service Manual Removing the Power Supply Replacing the Power Supply Removing the Power Supply Small Form-Factor Computer 1 release button 2 AC power connector Small Desktop Computer
Service Manual
Page 88
... any cables that the standby power light on the retention arm and raise the retention arm. Disconnect any cables connected to Contents Page Small Desktop Computer Dell™ OptiPlex™ GX260 Service Manual PCI Cards Serial Port Adapters AGP and DVI Adapter Cards NOTE: Before disconnecting a device from the computer or removing a component from...
... any cables that the standby power light on the retention arm and raise the retention arm. Disconnect any cables connected to Contents Page Small Desktop Computer Dell™ OptiPlex™ GX260 Service Manual PCI Cards Serial Port Adapters AGP and DVI Adapter Cards NOTE: Before disconnecting a device from the computer or removing a component from...


