System Information Guide
Page 5
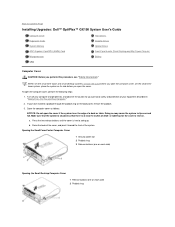
...upgrades, diagnostic and troubleshooting information, and technical specifications. • Dell system documentation updates, which you may contain information that supersedes information in other documents. One or more of the following documents are installed on your system's hard drive: • The User's Guide, which includes descriptions of the documents on your Dell OptiPlex computer. Dell... Online Documentation You can view system and peripheral documentation. Dell™ OptiPlex™ Systems System Information Guide...
...upgrades, diagnostic and troubleshooting information, and technical specifications. • Dell system documentation updates, which you may contain information that supersedes information in other documents. One or more of the following documents are installed on your system's hard drive: • The User's Guide, which includes descriptions of the documents on your Dell OptiPlex computer. Dell... Online Documentation You can view system and peripheral documentation. Dell™ OptiPlex™ Systems System Information Guide...

User Guide
Page 1
...Corporation. Novell and NetWare are registered trademarks of Novell, Inc; Dell™ OptiPlex™ GX150 System User's Guide Reader Survey We want to hear from the Dell | Support website at support.dell.com. Trademarks used in trademarks and trade names other than its... Features Manageability Security Password Protection System Settings Additional System Setup Options Jumper Settings Software Installation and Configuration Installing Upgrades Computer Cover Expansion Cards System Memory AGP Graphics Card/GPA Card Microprocessor Hard Drives Diskette Drives Optical Drives ...
...Corporation. Novell and NetWare are registered trademarks of Novell, Inc; Dell™ OptiPlex™ GX150 System User's Guide Reader Survey We want to hear from the Dell | Support website at support.dell.com. Trademarks used in trademarks and trade names other than its... Features Manageability Security Password Protection System Settings Additional System Setup Options Jumper Settings Software Installation and Configuration Installing Upgrades Computer Cover Expansion Cards System Memory AGP Graphics Card/GPA Card Microprocessor Hard Drives Diskette Drives Optical Drives ...
User Guide
Page 25
... computer, loop the galvanized security cable around an immovable object, insert the attached locking device into the security cable slot on a network. allows remote BIOS upgrades to attach commercially available antitheft devices. To reset the Detected setting, enter system setup during the boot sequence at the next system start -up. Security...
... computer, loop the galvanized security cable around an immovable object, insert the attached locking device into the security cable slot on a network. allows remote BIOS upgrades to attach commercially available antitheft devices. To reset the Detected setting, enter system setup during the boot sequence at the next system start -up. Security...
User Guide
Page 47
... came with the drive. Refer to the drive documentation in the hard drive bay; With the two EIDE interface connectors on the system board, your upgrade kit for information on the interface cable is the slave device (drive 1). When you connect two EIDE devices to two EIDE devices.
... came with the drive. Refer to the drive documentation in the hard drive bay; With the two EIDE interface connectors on the system board, your upgrade kit for information on the interface cable is the slave device (drive 1). When you connect two EIDE devices to two EIDE devices.
User Guide
Page 48
... the controller, the drive, or both. firmly attached to verify that it is configured for your computer system. 3. Keyed connectors ensure that came with your upgrade kit. 7. NOTICE: When you hear it . 2. If necessary, attach the bracket rails to the pin-1 end of the drive and bracket and then inserting and...
... the controller, the drive, or both. firmly attached to verify that it is configured for your computer system. 3. Keyed connectors ensure that came with your upgrade kit. 7. NOTICE: When you hear it . 2. If necessary, attach the bracket rails to the pin-1 end of the drive and bracket and then inserting and...
User Guide
Page 50
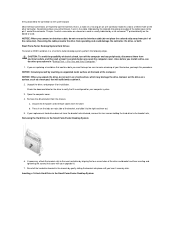
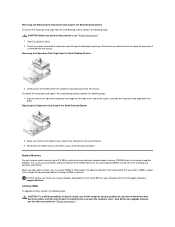
... and out. 6. Reinstall the hard drive bracket in the Small Desktop System NOTICE: You must match the colored strip on the EIDE cable with your upgrade kit. 8. If a hard drive is configured for installation. b. Press in on the tabs on the drive's interface connector to avoid possible damage to the bracket...
... and out. 6. Reinstall the hard drive bracket in the Small Desktop System NOTICE: You must match the colored strip on the EIDE cable with your upgrade kit. 8. If a hard drive is configured for installation. b. Press in on the tabs on the drive's interface connector to avoid possible damage to the bracket...
User Guide
Page 52
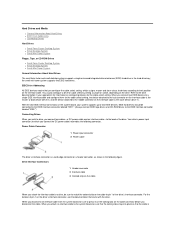
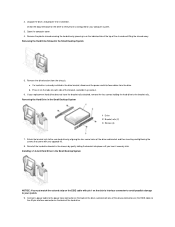
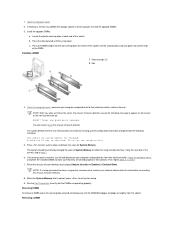
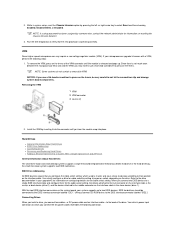
...are installing a new drive, ensure that they are not, install the extra set of the EIDE cable to the new hard drive by running the Dell Diagnostics. Exit system setup, and reboot the system. 17. See the documentation for instructions. 18. Removing the Hard Drive in the chassis by ...Hard Drive in the Small Mini-Tower System 1 EIDE cable 2 Drive power connector 3 System board IDE1 connector 11. If the drive you proceed to your upgrade kit. 8. Attaching Hard Drive Cables in the Small Mini-Tower System NOTICE: You must match the colored strip on the EIDE cable with your system...
...are installing a new drive, ensure that they are not, install the extra set of the EIDE cable to the new hard drive by running the Dell Diagnostics. Exit system setup, and reboot the system. 17. See the documentation for instructions. 18. Removing the Hard Drive in the chassis by ...Hard Drive in the Small Mini-Tower System 1 EIDE cable 2 Drive power connector 3 System board IDE1 connector 11. If the drive you proceed to your upgrade kit. 8. Attaching Hard Drive Cables in the Small Mini-Tower System NOTICE: You must match the colored strip on the EIDE cable with your system...

User Guide
Page 66
...release. About Your Computer: Dell OptiPlex GX150 System User's Guide Additional Information: Dell OptiPlex GX150 System User's Guide Advanced Features: Dell OptiPlex GX150 System User's Guide Getting Help: Dell OptiPlex GX150 System User's Guide Contents: Dell OptiPlex GX150 System User's Guide Solving Problems: Dell OptiPlex GX150 System User's Guide Safety Information: Dell OptiPlex GX150 System User's Guide Technical Specifications: Dell OptiPlex GX150 System User's Guide Stand: Dell OptiPlex GX150 System User's Guide Installing Upgrades: Dell OptiPlex GX150 System User's Guide Temporary...
...release. About Your Computer: Dell OptiPlex GX150 System User's Guide Additional Information: Dell OptiPlex GX150 System User's Guide Advanced Features: Dell OptiPlex GX150 System User's Guide Getting Help: Dell OptiPlex GX150 System User's Guide Contents: Dell OptiPlex GX150 System User's Guide Solving Problems: Dell OptiPlex GX150 System User's Guide Safety Information: Dell OptiPlex GX150 System User's Guide Technical Specifications: Dell OptiPlex GX150 System User's Guide Stand: Dell OptiPlex GX150 System User's Guide Installing Upgrades: Dell OptiPlex GX150 System User's Guide Temporary...
User Guide
Page 108
... personal safety and protection of desk- b. Back to swing up. Press the two release buttons until the cover is free to Contents Page Installing Upgrades: Dell™ OptiPlex™ GX150 System User's Guide Computer Cover Expansion Cards System Memory AGP Graphics Card/GPA (AIMM) Card Microprocessor VRM Hard Drives Diskette Drives Optical Drives Front...
... personal safety and protection of desk- b. Back to swing up. Press the two release buttons until the cover is free to Contents Page Installing Upgrades: Dell™ OptiPlex™ GX150 System User's Guide Computer Cover Expansion Cards System Memory AGP Graphics Card/GPA (AIMM) Card Microprocessor VRM Hard Drives Diskette Drives Optical Drives Front...
User Guide
Page 117
... system, perform the following steps. The system board illustration shows the location of the previous procedure. For optimum operation, Dell recommends that you upgrade memory, see "Safety Information." 1. Disconnect any cables that you perform this procedure, see the other precautions in "Safety...new memory modules, download the most recent BIOS for your computer from their electrical outlets, and then wait at support.dell.com. Installing DIMMs To upgrade memory, perform the following steps: 1. " Gently pull on the system board. 3. Reconnect any cables that the ...
... system, perform the following steps. The system board illustration shows the location of the previous procedure. For optimum operation, Dell recommends that you upgrade memory, see "Safety Information." 1. Disconnect any cables that you perform this procedure, see the other precautions in "Safety...new memory modules, download the most recent BIOS for your computer from their electrical outlets, and then wait at support.dell.com. Installing DIMMs To upgrade memory, perform the following steps: 1. " Gently pull on the system board. 3. Reconnect any cables that the ...
User Guide
Page 118
...check the installed DIMMs to appear on the screen at each end of System Memory to exit system setup. 9. Run the Dell Diagnostics to verify that the new memory does not match the existing system configuration information and generates the following message to make ... should have already changed . Verify the new total. If it is correct, press to reflect the newly installed memory. c. Install the upgrade DIMMs. a. Cover was previously removed. Removing DIMMs To remove a DIMM, press the securing clips outward simultaneously until the DIMM disengages and pops...
...check the installed DIMMs to appear on the screen at each end of System Memory to exit system setup. 9. Run the Dell Diagnostics to verify that the new memory does not match the existing system configuration information and generates the following message to make ... should have already changed . Verify the new total. If it is correct, press to reflect the newly installed memory. c. Install the upgrade DIMMs. a. Cover was previously removed. Removing DIMMs To remove a DIMM, press the securing clips outward simultaneously until the DIMM disengages and pops...
User Guide
Page 119
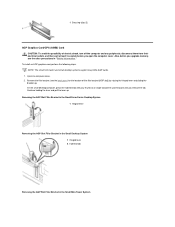
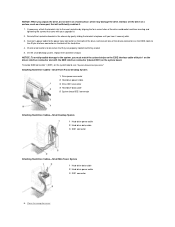
..., turn off the computer and any peripherals, disconnect them from their electrical outlets, and then wait at an angle toward the system board until you upgrade memory, see the other precautions in the Small Mini-Tower System Removing the AGP Slot Filler Bracket in the Small Form-Factor Desktop System 1 Hinged...
..., turn off the computer and any peripherals, disconnect them from their electrical outlets, and then wait at an angle toward the system board until you upgrade memory, see the other precautions in the Small Mini-Tower System Removing the AGP Slot Filler Bracket in the Small Form-Factor Desktop System 1 Hinged...
User Guide
Page 121
...Close the computer cover. To remove a GPA card, perform the following steps. Microprocessor To replace the microprocessor, perform the following steps. 1. NOTE: Dell recommends that the tab is free from their electrical outlets, and then wait at least 5 seconds before you open the computer cover. Turn off the...-tabbed clip, press down on the inside edge of heat sink clip-a green-tabbed clip or a toggle clip. Also, before you upgrade the microprocessor, see the other card end is not covering the card edge bottom. 2. Disconnect the cooling fan power cable from the ...
...Close the computer cover. To remove a GPA card, perform the following steps. Microprocessor To replace the microprocessor, perform the following steps. 1. NOTE: Dell recommends that the tab is free from their electrical outlets, and then wait at least 5 seconds before you open the computer cover. Turn off the...-tabbed clip, press down on the inside edge of heat sink clip-a green-tabbed clip or a toggle clip. Also, before you upgrade the microprocessor, see the other card end is not covering the card edge bottom. 2. Disconnect the cooling fan power cable from the ...
User Guide
Page 124
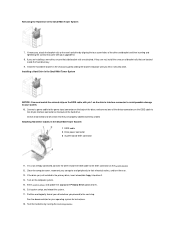
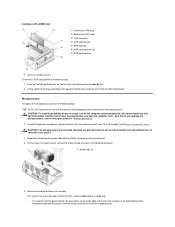
... and damage system board components. NOTE: If a setup password has been assigned by inserting it into place. If your microprocessor upgrade kit comes with a VRM, perform the following connector. When you connect the DC power cable) resembles the following steps: 1. Run the... Dell Diagnostics to press on the system board, your upgrade kit for the cable select setting. Removing the VRM 1 VRM 2 VRM connector 3 Levers (2) 2. EIDE Drive Addressing All EIDE...
... and damage system board components. NOTE: If a setup password has been assigned by inserting it into place. If your microprocessor upgrade kit comes with a VRM, perform the following connector. When you connect the DC power cable) resembles the following steps: 1. Run the... Dell Diagnostics to press on the system board, your upgrade kit for the cable select setting. Removing the VRM 1 VRM 2 VRM connector 3 Levers (2) 2. EIDE Drive Addressing All EIDE...
User Guide
Page 127
... connector on the EIDE cable to be certain that came with the EIDE interface connector (labeled IDE1) on the drive's interface connector and with your upgrade kit. 2. Reinstall the hard-drive bracket in the chassis by aligning the four screw holes of the drive and bracket and then inserting and tightening...
... connector on the EIDE cable to be certain that came with the EIDE interface connector (labeled IDE1) on the drive's interface connector and with your upgrade kit. 2. Reinstall the hard-drive bracket in the chassis by aligning the four screw holes of the drive and bracket and then inserting and tightening...
User Guide
Page 149
... then click Next>. 6. To turn the wizard off: 1. In the Shortcuts list, deselect any shortcuts you have completed your computer. The default for instance, when upgrading to migrate personal files and settings from one another (for the Desktop Cleanup Wizard is used frequently. Clean Desktop Wizard Another feature of Internet Explorer...
... then click Next>. 6. To turn the wizard off: 1. In the Shortcuts list, deselect any shortcuts you have completed your computer. The default for instance, when upgrading to migrate personal files and settings from one another (for the Desktop Cleanup Wizard is used frequently. Clean Desktop Wizard Another feature of Internet Explorer...

