
Quick Reference Guide
Page 3
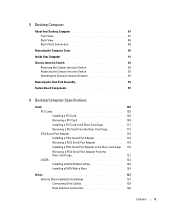
... Computer 14 Mini Tower Computer 16 System Views 16 Removing the Computer Cover 22 Inside Your Computer 24 System Board Components 25 Jumper Settings 26 Desktop Computer 27 System Views 27 Removing the Computer Cover 32 Inside Your Computer 33 System Board Components 35 Jumper Settings 36 Small Form Factor Computer...
... Computer 14 Mini Tower Computer 16 System Views 16 Removing the Computer Cover 22 Inside Your Computer 24 System Board Components 25 Jumper Settings 26 Desktop Computer 27 System Views 27 Removing the Computer Cover 32 Inside Your Computer 33 System Board Components 35 Jumper Settings 36 Small Form Factor Computer...
Quick Reference Guide
Page 5
... and documentation updates can use the media to reinstall drivers (see "Reinstalling Drivers and Utilities" on page 79), to run the Dell Diagnostics (see "Dell Diagnostics" on your media to provide last-minute updates about technical changes to your computer. Documentation and drivers are already installed on... countries. Some features or media may not ship with your computer or advanced technical-reference material for my computer • Desktop System Software (DSS) Drivers and Utilities Media NOTE: The Drivers and Utilities media may be optional and may not ship with your ...
... and documentation updates can use the media to reinstall drivers (see "Reinstalling Drivers and Utilities" on page 79), to run the Dell Diagnostics (see "Dell Diagnostics" on your media to provide last-minute updates about technical changes to your computer. Documentation and drivers are already installed on... countries. Some features or media may not ship with your computer or advanced technical-reference material for my computer • Desktop System Software (DSS) Drivers and Utilities Media NOTE: The Drivers and Utilities media may be optional and may not ship with your ...
Quick Reference Guide
Page 8
...click Go. 3 Scroll to view the appropriate support site. • Upgrades - To download Desktop System Software: 1 Go to support.dell.com and click Drivers & Downloads. 2 Enter your selections. 8 Quick Reference Guide Online discussion with technical support ...• Dell Technical Update Service - Certified drivers, patches, and software updates • Desktop System Software (DSS)- DSS is necessary for correct operation of software and hardware updates for your Dell computer. Proactive e-mail notification of your computer...
...click Go. 3 Scroll to view the appropriate support site. • Upgrades - To download Desktop System Software: 1 Go to support.dell.com and click Drivers & Downloads. 2 Enter your selections. 8 Quick Reference Guide Online discussion with technical support ...• Dell Technical Update Service - Certified drivers, patches, and software updates • Desktop System Software (DSS)- DSS is necessary for correct operation of software and hardware updates for your Dell computer. Proactive e-mail notification of your computer...
Quick Reference Guide
Page 9
... optional and may not ship with your operating system, use Windows XP • How to work with programs and files • How to personalize my desktop • How to use the Operating System media. Quick Reference Guide 9 See "Restoring Your Operating System" in your computer. The operating system is already installed...
... optional and may not ship with your operating system, use Windows XP • How to work with programs and files • How to personalize my desktop • How to use the Operating System media. Quick Reference Guide 9 See "Restoring Your Operating System" in your computer. The operating system is already installed...
Quick Reference Guide
Page 13
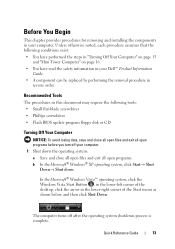
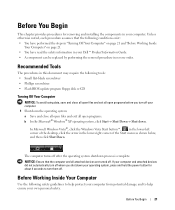
Before You Begin This chapter provides procedures for removing and installing the components in your Dell™ Product Information Guide. • A component can be replaced by performing the removal procedure in reverse order. Unless otherwise noted, each procedure assumes that ...process is complete. In the Microsoft® Windows Vista™ operating system, click the Windows Vista Start Button , in the lower-left corner of the desktop, click the arrow in this document may require the following conditions exist: • You have performed the steps in "Turning Off Your Computer" on ...
Before You Begin This chapter provides procedures for removing and installing the components in your Dell™ Product Information Guide. • A component can be replaced by performing the removal procedure in reverse order. Unless otherwise noted, each procedure assumes that ...process is complete. In the Microsoft® Windows Vista™ operating system, click the Windows Vista Start Button , in the lower-left corner of the desktop, click the arrow in this document may require the following conditions exist: • You have performed the steps in "Turning Off Your Computer" on ...
Quick Reference Guide
Page 15
... electrical outlet before removing the cover. 6 Remove the computer cover. • For a mini tower computer, see "Removing the Computer Cover" on page 22. • For a desktop computer, see "Removing the Computer Cover" on page 32. • For a small form factor computer, see "Removing the Computer Cover" on page 43. • For...
... electrical outlet before removing the cover. 6 Remove the computer cover. • For a mini tower computer, see "Removing the Computer Cover" on page 22. • For a desktop computer, see "Removing the Computer Cover" on page 32. • For a small form factor computer, see "Removing the Computer Cover" on page 43. • For...
Quick Reference Guide
Page 27
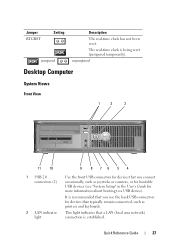
... as joysticks or cameras, or for bootable USB devices (see "System Setup" in the User's Guide for more information about booting to a USB device). unjumpered Desktop Computer System Views Front View 1 2 3 11 10 1 USB 2.0 connectors (2) 2 LAN indicator light 9 8 76 5 4 Use the front USB connectors for devices that you use the back...
... as joysticks or cameras, or for bootable USB devices (see "System Setup" in the User's Guide for more information about booting to a USB device). unjumpered Desktop Computer System Views Front View 1 2 3 11 10 1 USB 2.0 connectors (2) 2 LAN indicator light 9 8 76 5 4 Use the front USB connectors for devices that you use the back...
Quick Reference Guide
Page 62
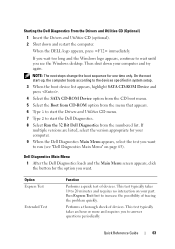
See the documentation that no diagnostics utility partition has been found, run (see the Microsoft® Windows® desktop. Then shut down the computer. The resulting menu displays: • Test Memory - NOTE: If you to the MPMemory Diagnostic • Test ...4 Turn on your docking device for more information about the optional Drivers and Utilities CD. NOTE: If your computer cannot display a screen image, contact Dell. 1 Shut down your computer and try again. 5 When the boot device list appears, highlight DiagnosticsBoot to Utility Partition and press . 6 Press any ...
See the documentation that no diagnostics utility partition has been found, run (see the Microsoft® Windows® desktop. Then shut down the computer. The resulting menu displays: • Test Memory - NOTE: If you to the MPMemory Diagnostic • Test ...4 Turn on your docking device for more information about the optional Drivers and Utilities CD. NOTE: If your computer cannot display a screen image, contact Dell. 1 Shut down your computer and try again. 5 When the boot device list appears, highlight DiagnosticsBoot to Utility Partition and press . 6 Press any ...
Quick Reference Guide
Page 63
...Dell Diagnostics Main Menu appears, select the test you see "Dell... Diagnostics Main Menu" on your part. This test typically takes an hour or more and requires you to wait until you want . If you want to 20 minutes and requires no interaction on page 63). Then shut down and restart the computer. Dell... Diagnostics Main Menu 1 After the Dell Diagnostics loads... first to start the Dell Diagnostics. 8 Select Run the 32 Bit Dell Diagnostics from the menu ...list. When the DELL logo appears, press immediately. Starting the Dell Diagnostics From the ...
...Dell Diagnostics Main Menu appears, select the test you see "Dell... Diagnostics Main Menu" on your part. This test typically takes an hour or more and requires you to wait until you want . If you want to 20 minutes and requires no interaction on page 63). Then shut down and restart the computer. Dell... Diagnostics Main Menu 1 After the Dell Diagnostics loads... first to start the Dell Diagnostics. 8 Select Run the 32 Bit Dell Diagnostics from the menu ...list. When the DELL logo appears, press immediately. Starting the Dell Diagnostics From the ...
Quick Reference Guide
Page 65
..., if you are complete, close the Main Menu screen. To exit the Dell Diagnostics and restart the computer, close Close the test screen to return to the Main Menu screen. On the desktop computer, a solid green light indicates a network connection. If the computer does... not boot, contact Dell for technical assistance (see "Diagnostic Lights" on the system running the Dell Diagnostics from the Drivers and Utilities CD, remove the...
..., if you are complete, close the Main Menu screen. To exit the Dell Diagnostics and restart the computer, close Close the test screen to return to the Main Menu screen. On the desktop computer, a solid green light indicates a network connection. If the computer does... not boot, contact Dell for technical assistance (see "Diagnostic Lights" on the system running the Dell Diagnostics from the Drivers and Utilities CD, remove the...
User's Guide
Page 5
5 Desktop Computer About Your Desktop Computer 87 Front View 87 Back View 88 Back Panel Connectors 89 Removing the Computer Cover 90 Inside Your Computer 91 Chassis Intrusion Switch 92 ... Intrusion Switch 92 Replacing the Chassis Intrusion Switch 93 Resetting the Chassis Intrusion Detector 93 Removing the Heat Sink Assembly 94 System Board Components 95 6 Desktop Computer Specifications Cards 103 PCI Cards 103 Installing a PCI Card 103 Removing a PCI Card 109 Installing a PCI Card in the Riser-Card Cage 111 Removing...
5 Desktop Computer About Your Desktop Computer 87 Front View 87 Back View 88 Back Panel Connectors 89 Removing the Computer Cover 90 Inside Your Computer 91 Chassis Intrusion Switch 92 ... Intrusion Switch 92 Replacing the Chassis Intrusion Switch 93 Resetting the Chassis Intrusion Detector 93 Removing the Heat Sink Assembly 94 System Board Components 95 6 Desktop Computer Specifications Cards 103 PCI Cards 103 Installing a PCI Card 103 Removing a PCI Card 109 Installing a PCI Card in the Riser-Card Cage 111 Removing...
User's Guide
Page 12
... the Battery 303 11 Replacing the System Board Removing the System Board: Mini Tower, Desktop, Small Form Factor, and Ultra Small Form Factor Computers 307 Mini Tower System Board Screws 308 Desktop System Board Screws 309 Small Form Factor System Board Screws 310 Ultra Small Form Factor ...System Board Screws 311 Replacing the System Board: Mini Tower, Desktop, Small Form Factor, and Ultra Small Form Factor Computers 311 12 Memory DDR2 Memory Overview 313 Addressing Memory Configurations 314 Installing Memory 314...
... the Battery 303 11 Replacing the System Board Removing the System Board: Mini Tower, Desktop, Small Form Factor, and Ultra Small Form Factor Computers 307 Mini Tower System Board Screws 308 Desktop System Board Screws 309 Small Form Factor System Board Screws 310 Ultra Small Form Factor ...System Board Screws 311 Replacing the System Board: Mini Tower, Desktop, Small Form Factor, and Ultra Small Form Factor Computers 311 12 Memory DDR2 Memory Overview 313 Addressing Memory Configurations 314 Installing Memory 314...

User's Guide
Page 17
...and documentation updates can use the media to reinstall drivers (see "Reinstalling Drivers and Utilities" on page 357), to run the Dell Diagnostics (see "Dell Diagnostics" on page 353), or to access your documentation. Quick Reference Guide NOTE: This document may be optional and may not...technical changes to your computer or advanced technicalreference material for my computer • My computer documentation • My device documentation • Desktop System Software (DSS) Find It Here Drivers and Utilities CD or DVD NOTE: The Drivers and Utilities media may be optional and may...
...and documentation updates can use the media to reinstall drivers (see "Reinstalling Drivers and Utilities" on page 357), to run the Dell Diagnostics (see "Dell Diagnostics" on page 353), or to access your documentation. Quick Reference Guide NOTE: This document may be optional and may not...technical changes to your computer or advanced technicalreference material for my computer • My computer documentation • My device documentation • Desktop System Software (DSS) Find It Here Drivers and Utilities CD or DVD NOTE: The Drivers and Utilities media may be optional and may...
User's Guide
Page 19
...processors, 3 Click your operating system and search for your computer • Reference - DSS is necessary Desktop System Software. The NOTE: The support.dell.com user interface may vary software automatically detects your selections. Finding Information 19 What Are You Looking ..., the hard drive, and the operating system • Customer Care - Certified drivers, patches, and software updates • Desktop System Software (DSS)- support.dell.com NOTE: Select your problem. 4 Follow the instructions on my computer configuration, product specifications, and white papers • ...
...processors, 3 Click your operating system and search for your computer • Reference - DSS is necessary Desktop System Software. The NOTE: The support.dell.com user interface may vary software automatically detects your selections. Finding Information 19 What Are You Looking ..., the hard drive, and the operating system • Customer Care - Certified drivers, patches, and software updates • Desktop System Software (DSS)- support.dell.com NOTE: Select your problem. 4 Follow the instructions on my computer configuration, product specifications, and white papers • ...
User's Guide
Page 21
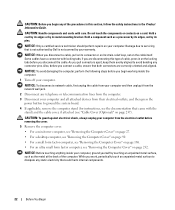
... Inside Your Computer" on page 21. • You have read the safety information in your Dell™ Product Information Guide. • A component can be replaced by performing the removal procedure in the lower-right corner of the desktop, click the arrow in reverse order. NOTICE: Ensure that the following tools: • Small...
... Inside Your Computer" on page 21. • You have read the safety information in your Dell™ Product Information Guide. • A component can be replaced by performing the removal procedure in the lower-right corner of the desktop, click the arrow in reverse order. NOTICE: Ensure that the following tools: • Small...
User's Guide
Page 22
...at the back of cable, press in the Product Information Guide. Damage due to dissipate any static electricity that is not authorized by Dell is not covered by its metal mounting bracket. As you work, periodically touch an unpainted metal surface to servicing that could harm internal ... removing the cover. 5 Remove the computer cover. • For a mini tower computer, see "Removing the Computer Cover" on page 27. • For a desktop computer, see "Removing the Computer Cover" on page 90. • For a small form factor computer, see "Removing the Computer Cover" on page 168. •...
...at the back of cable, press in the Product Information Guide. Damage due to dissipate any static electricity that is not authorized by Dell is not covered by its metal mounting bracket. As you work, periodically touch an unpainted metal surface to servicing that could harm internal ... removing the cover. 5 Remove the computer cover. • For a mini tower computer, see "Removing the Computer Cover" on page 27. • For a desktop computer, see "Removing the Computer Cover" on page 90. • For a small form factor computer, see "Removing the Computer Cover" on page 168. •...
User's Guide
Page 29
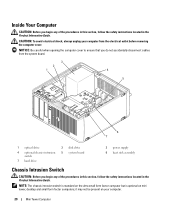
it may not be present on mini tower, desktop and small form factor computers; NOTICE: Be careful when opening the computer cover to ensure that you do not accidentally disconnect cables from the electrical ...
it may not be present on mini tower, desktop and small form factor computers; NOTICE: Be careful when opening the computer cover to ensure that you do not accidentally disconnect cables from the electrical ...
User's Guide
Page 31
Then shut down your BIOS settings and exit system setup. or right-arrow key to wait until you see the Microsoft® Windows® desktop. Mini Tower Computer 31 If you wait too long and the operating system logo appears, continue to select Reset. Change the setting to On, On-Silent, or Disabled. NOTE: The default setting is On-Silent. 4 Save your computer and try again. 3 Select the Chassis Intrusion option and then press the left- Resetting the Chassis Intrusion Detector 1 Turn on (or restart) your computer. 2 When the blue DELL™ logo appears, press immediately.
Then shut down your BIOS settings and exit system setup. or right-arrow key to wait until you see the Microsoft® Windows® desktop. Mini Tower Computer 31 If you wait too long and the operating system logo appears, continue to select Reset. Change the setting to On, On-Silent, or Disabled. NOTE: The default setting is On-Silent. 4 Save your computer and try again. 3 Select the Chassis Intrusion option and then press the left- Resetting the Chassis Intrusion Detector 1 Turn on (or restart) your computer. 2 When the blue DELL™ logo appears, press immediately.
User's Guide
Page 87
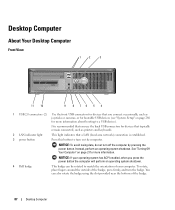
...system shutdown. To rotate, place fingers around the outside of the badge, press firmly, and turn off the computer by pressing the power button. Desktop Computer About Your Desktop Computer Front View 1 2 3 11 10 9 8 76 5 4 1 USB 2.0 connectors (2) Use the front USB connectors for devices that ... power button Press this button to match the orientation of the badge. 87 Desktop Computer It is recommended that you press the power button the computer will perform an operating system shutdown. 4 Dell badge This badge can also rotate the badge using the slot provided near the...
...system shutdown. To rotate, place fingers around the outside of the badge, press firmly, and turn off the computer by pressing the power button. Desktop Computer About Your Desktop Computer Front View 1 2 3 11 10 9 8 76 5 4 1 USB 2.0 connectors (2) Use the front USB connectors for devices that ... power button Press this button to match the orientation of the badge. 87 Desktop Computer It is recommended that you press the power button the computer will perform an operating system shutdown. 4 Dell badge This badge can also rotate the badge using the slot provided near the...
User's Guide
Page 88
.... • Steady green - Insert a CD or DVD (if supported) into the appropriate connectors (see "Diagnostic Lights" on the diagnostic code. Insert the power cable. 88 Desktop Computer Use the microphone connector to attach headphones and most kinds of the computer is different if a riser is in the Windows Device Manager. 5 power...
.... • Steady green - Insert a CD or DVD (if supported) into the appropriate connectors (see "Diagnostic Lights" on the diagnostic code. Insert the power cable. 88 Desktop Computer Use the microphone connector to attach headphones and most kinds of the computer is different if a riser is in the Windows Device Manager. 5 power...


