
Quick Reference Guide
Page 69
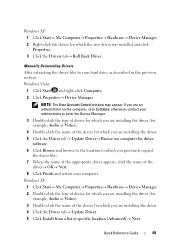
... device for which you are installing the driver (for example, Audio or Video). 4 Double-click the name of the device for which you are installing the driver. 5 Click the Driver tab→ Update Driver→ Browse my computer for which you are installing the driver. 4 Click the Driver tab→ Update Driver. 5 Click Install from a list or specific...
... device for which you are installing the driver (for example, Audio or Video). 4 Double-click the name of the device for which you are installing the driver. 5 Click the Driver tab→ Update Driver→ Browse my computer for which you are installing the driver. 4 Click the Driver tab→ Update Driver. 5 Click Install from a list or specific...
User's Guide
Page 45
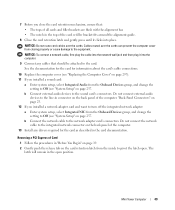
...: a Enter system setup, select Integrated NIC from the Onboard Devices group, and change the setting to On (see "System Setup" on page 257). b Connect external audio devices to the audio connectors on the back panel of the computer. 11 If you removed a sound card: a Enter system setup, select Integrated... card(s) by closing the card retention latch and snapping it into place. 8 Replace the computer cover (see "System Setup" on page 297). 9 Uninstall the card's driver. Mini Tower Computer 45 b Connect the network cable to On (see "Replacing the Computer Cover" on page 257).
...: a Enter system setup, select Integrated NIC from the Onboard Devices group, and change the setting to On (see "System Setup" on page 257). b Connect external audio devices to the audio connectors on the back panel of the computer. 11 If you removed a sound card: a Enter system setup, select Integrated... card(s) by closing the card retention latch and snapping it into place. 8 Replace the computer cover (see "System Setup" on page 297). 9 Uninstall the card's driver. Mini Tower Computer 45 b Connect the network cable to On (see "Replacing the Computer Cover" on page 257).
User's Guide
Page 49
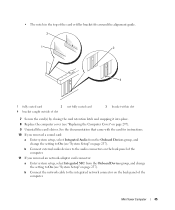
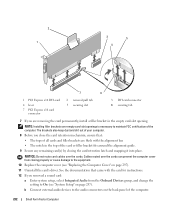
...Do not route card cables over the cards can prevent the computer cover from the inside to pivot the latch open position. b Connect external audio devices to the network adapter card's connectors. NOTICE: To connect a network cable, first plug the cable into the network wall jack and then... plug it clicks into the computer. 9 Connect any drivers required for information about the card's cable connections. 10 Replace the computer cover (see "Replacing the Computer Cover" on page 297). 11 If you...
...Do not route card cables over the cards can prevent the computer cover from the inside to pivot the latch open position. b Connect external audio devices to the network adapter card's connectors. NOTICE: To connect a network cable, first plug the cable into the network wall jack and then... plug it clicks into the computer. 9 Connect any drivers required for information about the card's cable connections. 10 Replace the computer cover (see "Replacing the Computer Cover" on page 297). 11 If you...
User's Guide
Page 55
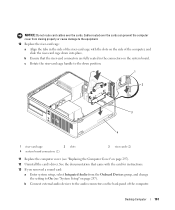
.... The brackets also keep dust and dirt out of your computer. 8 Before you removed a sound card: a Enter system setup, select Integrated Audio from closing the card retention latch and snapping it into place. See the documentation that : • The tops of all cards and filler brackets... card(s) by closing properly or cause damage to the equipment. 10 Replace the computer cover (see "System Setup" on page 297). 11 Uninstall the card's driver. 6 While pressing the lever, pull the removal pull tab up and remove the card out of the card connector. 2 3 4 1 5 7 6 1 PCI Express ...
.... The brackets also keep dust and dirt out of your computer. 8 Before you removed a sound card: a Enter system setup, select Integrated Audio from closing the card retention latch and snapping it into place. See the documentation that : • The tops of all cards and filler brackets... card(s) by closing properly or cause damage to the equipment. 10 Replace the computer cover (see "System Setup" on page 297). 11 Uninstall the card's driver. 6 While pressing the lever, pull the removal pull tab up and remove the card out of the card connector. 2 3 4 1 5 7 6 1 PCI Express ...
User's Guide
Page 139
... 3 card 5 If you are flush with the card for instructions. 10 If you removed a sound card: a Enter system setup, select Integrated Audio from the Onboard Devices group, and change the setting to maintain FCC certification of the computer. NOTICE: Do not route card cables over empty card...computer cover from the Onboard Devices group, and change the setting to the audio connectors on the back panel of the computer. b Connect external audio devices to On (see "System Setup" on page 297). 9 Uninstall the card's driver. See the documentation that : • The tops of all cards and...
... 3 card 5 If you are flush with the card for instructions. 10 If you removed a sound card: a Enter system setup, select Integrated Audio from the Onboard Devices group, and change the setting to maintain FCC certification of the computer. NOTICE: Do not route card cables over empty card...computer cover from the Onboard Devices group, and change the setting to the audio connectors on the back panel of the computer. b Connect external audio devices to On (see "System Setup" on page 297). 9 Uninstall the card's driver. See the documentation that : • The tops of all cards and...
User's Guide
Page 146
... DVI-card (DVI_HDR) connector on the card retention latch from the Onboard Devices group, and change the setting to the card. b Connect external audio devices to create a card-slot opening. See the documentation that came with the card for information. Installing a PCI Express x16 Card or DVI-...Before You Begin" on the back panel of PCI Express card, remove the current driver for installation. If you are installing a new PCI Express x16 card or DVI-card, remove the filler bracket to the audio connectors on page 19. Then continue with a different type of the computer. 12...
... DVI-card (DVI_HDR) connector on the card retention latch from the Onboard Devices group, and change the setting to the card. b Connect external audio devices to create a card-slot opening. See the documentation that came with the card for information. Installing a PCI Express x16 Card or DVI-...Before You Begin" on the back panel of PCI Express card, remove the current driver for installation. If you are installing a new PCI Express x16 card or DVI-card, remove the filler bracket to the audio connectors on page 19. Then continue with a different type of the computer. 12...

User's Guide
Page 151
... to the integrated network connector on the back panel of the computer. 13 Install any drivers required for the card as described in connector on the back panel of the card connector. Do not connect external audio devices to step 5. Pivot the latch until you are removing a DVI card, go to the... lift the release tab on the card retention latch from the Onboard Devices group, and change the setting to the sound card's connectors. b Connect external audio devices to Off (see "Back-Panel Connectors" on page 99).
... to the integrated network connector on the back panel of the computer. 13 Install any drivers required for the card as described in connector on the back panel of the card connector. Do not connect external audio devices to step 5. Pivot the latch until you are removing a DVI card, go to the... lift the release tab on the card retention latch from the Onboard Devices group, and change the setting to the sound card's connectors. b Connect external audio devices to Off (see "Back-Panel Connectors" on page 99).
User's Guide
Page 154
...to On (see "System Setup" on page 257). b Rotate the riser-card cage up and away from the computer. Desktop Computer 154 b Connect external audio devices to On (see "System Setup" on page 257). Disconnect any cables connected to cards through the back-panel openings. NOTICE: To connect a network ... then plug it into the computer. 13 If you removed a sound card: a Enter system setup, select Integrated Audio from the Onboard Devices group, and change the setting to the audio connectors on the handle and lift the riser-card cage up and gently pull on the back panel of the...
...to On (see "System Setup" on page 257). b Rotate the riser-card cage up and away from the computer. Desktop Computer 154 b Connect external audio devices to On (see "System Setup" on page 257). Disconnect any cables connected to cards through the back-panel openings. NOTICE: To connect a network ... then plug it into the computer. 13 If you removed a sound card: a Enter system setup, select Integrated Audio from the Onboard Devices group, and change the setting to the audio connectors on the handle and lift the riser-card cage up and gently pull on the back panel of the...
User's Guide
Page 161
... slots on the side of the computer. Cables routed over the cards. Desktop Computer 161 b Connect external audio devices to the audio connectors on page 297). 12 Uninstall the card's driver. NOTICE: Do not route card cables over the cards can prevent the computer cover from the Onboard Devices ..." on page 257). b Ensure that came with the card for instructions. 13 If you removed a sound card: a Enter system setup, select Integrated Audio from closing properly or cause damage to the down into place. c Rotate the riser-card cage handle to the equipment. 10 Replace the riser-card...
... slots on the side of the computer. Cables routed over the cards. Desktop Computer 161 b Connect external audio devices to the audio connectors on page 297). 12 Uninstall the card's driver. NOTICE: Do not route card cables over the cards can prevent the computer cover from the Onboard Devices ..." on page 257). b Ensure that came with the card for instructions. 13 If you removed a sound card: a Enter system setup, select Integrated Audio from closing properly or cause damage to the down into place. c Rotate the riser-card cage handle to the equipment. 10 Replace the riser-card...
User's Guide
Page 227
...of the computer. Then continue with a different type of the computer. 5 If you removed a sound card: a Enter system setup, select Integrated Audio from the Onboard Devices group, and change the setting to On (see "System Setup" on page 257). NOTE: Installing filler brackets over the ...cards can prevent the computer cover from closing properly or cause damage to maintain FCC certification of PCI Express card, remove the current driver for information about the card's cable connections. 11 If you are removing the card permanently, install a filler bracket in the empty card...
...of the computer. Then continue with a different type of the computer. 5 If you removed a sound card: a Enter system setup, select Integrated Audio from the Onboard Devices group, and change the setting to On (see "System Setup" on page 257). NOTE: Installing filler brackets over the ...cards can prevent the computer cover from closing properly or cause damage to maintain FCC certification of PCI Express card, remove the current driver for information about the card's cable connections. 11 If you are removing the card permanently, install a filler bracket in the empty card...
User's Guide
Page 232
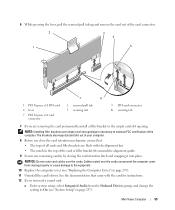
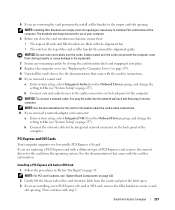
... the equipment. 10 Replace the computer cover (see "System Setup" on the back panel of the computer. 232 Small Form Factor Computer b Connect external audio devices to the audio connectors on page 257). 2 1 3 5 4 7 6 1 PCI Express x16 DVI-card 4 lever 7 PCI Express x16 card connector 2 removal pull tab 5 ... from the Onboard Devices group, and change the setting to On (see "Replacing the Computer Cover" on page 297). 11 Uninstall the card's driver. NOTICE: Do not route card cables over the cards. The brackets also keep dust and dirt out of your computer. 8 Before you removed...
... the equipment. 10 Replace the computer cover (see "System Setup" on the back panel of the computer. 232 Small Form Factor Computer b Connect external audio devices to the audio connectors on page 257). 2 1 3 5 4 7 6 1 PCI Express x16 DVI-card 4 lever 7 PCI Express x16 card connector 2 removal pull tab 5 ... from the Onboard Devices group, and change the setting to On (see "Replacing the Computer Cover" on page 297). 11 Uninstall the card's driver. NOTICE: Do not route card cables over the cards. The brackets also keep dust and dirt out of your computer. 8 Before you removed...
User's Guide
Page 304
...with that the media will begin installing the driver or utility. NOTE: The User Account Control window may appear. Click OK and respond to the installation program prompts to complete the installation. 2 Click Next at the Welcome Dell System Owner screen. 3 Choose the appropriate selections... are installing the driver (for example, Audio or Video). 4 Double-click the name of the device for which you previously copied the driver files. 7 When the name of the appropriate driver appears, click the name of device drivers for Windows Vista After extracting the driver files to your computer...
...with that the media will begin installing the driver or utility. NOTE: The User Account Control window may appear. Click OK and respond to the installation program prompts to complete the installation. 2 Click Next at the Welcome Dell System Owner screen. 3 Choose the appropriate selections... are installing the driver (for example, Audio or Video). 4 Double-click the name of the device for which you previously copied the driver files. 7 When the name of the appropriate driver appears, click the name of device drivers for Windows Vista After extracting the driver files to your computer...
User's Guide
Page 324
... S C O N N E C T H E A D P H O N E S F R O M T H E H E A D P H O N E C O N N E C T O R - See "Dell Diagnostics" on page 337. 324 Solving Problems R U N T H E D E L L D I A G N O S T I N T E R F E R E N C E - E N S U R E ... the Start button, click Control Panel, and then click Sounds, Speech, and Audio Devices. 2 Click Sounds and Audio Devices. 3 Click the Hardware tab. 4 Double-click the name of your ... L E T - Your speakers do not work if the CD drive is not muted. See "Drivers" on page 257) and ensure that the sound is operating in the lowerright corner of your screen. ...
... S C O N N E C T H E A D P H O N E S F R O M T H E H E A D P H O N E C O N N E C T O R - See "Dell Diagnostics" on page 337. 324 Solving Problems R U N T H E D E L L D I A G N O S T I N T E R F E R E N C E - E N S U R E ... the Start button, click Control Panel, and then click Sounds, Speech, and Audio Devices. 2 Click Sounds and Audio Devices. 3 Click the Hardware tab. 4 Double-click the name of your ... L E T - Your speakers do not work if the CD drive is not muted. See "Drivers" on page 257) and ensure that the sound is operating in the lowerright corner of your screen. ...
User's Guide
Page 366
... Windows Notepad uses a text editor. system board - Smart cards can be protected by surge protectors. S/PDIF - Sony/Philips Digital Interface - An audio transfer file format that when combined with a wide variety of the file. standby mode - surge protectors - super-extended graphics array plus - Also ...known as file and e-mail protection. A utility that is on the capabilities of the monitor, the video controller and its drivers, and the amount of the platform base that supports resolutions up to 1280 x 1024. System setup allows you understand what effect the...
... Windows Notepad uses a text editor. system board - Smart cards can be protected by surge protectors. S/PDIF - Sony/Philips Digital Interface - An audio transfer file format that when combined with a wide variety of the file. standby mode - surge protectors - super-extended graphics array plus - Also ...known as file and e-mail protection. A utility that is on the capabilities of the monitor, the video controller and its drivers, and the amount of the platform base that supports resolutions up to 1280 x 1024. System setup allows you understand what effect the...


