OptiPlex Micro Dust Filter User Guide
Page 4
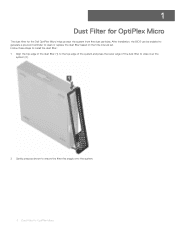
1 Dust Filter for OptiPlex Micro The dust filter for OptiPlex Micro Follow these steps to install the dust filter: 1 Align the top edge of the dust filter (1) to the top edge of the system and press the lower edge of the dust filter to close over the system (2). 2 Gently press as shown to clean or replace the dust filter based on the time interval set. After installation, the BIOS can be enabled to generate a pre-boot reminder to ensure the filter fits snugly onto the system. 4 Dust Filter for the Dell OptiPlex Micro helps protect the system from fine dust particles.
1 Dust Filter for OptiPlex Micro The dust filter for OptiPlex Micro Follow these steps to install the dust filter: 1 Align the top edge of the dust filter (1) to the top edge of the system and press the lower edge of the dust filter to close over the system (2). 2 Gently press as shown to clean or replace the dust filter based on the time interval set. After installation, the BIOS can be enabled to generate a pre-boot reminder to ensure the filter fits snugly onto the system. 4 Dust Filter for the Dell OptiPlex Micro helps protect the system from fine dust particles.
OptiPlex Micro Dust Filter User Guide
Page 5
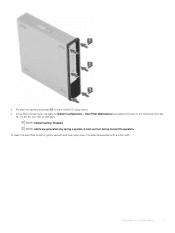
NOTE: Alerts are generated only during a system re-boot and not during normal OS operation. Dust Filter for OptiPlex Micro 5 To clean the dust filter, brush or gently vacuum and then wipe down the external surfaces with a moist cloth. NOTE: Default setting: Disabled. 3 Re-start the system and press F2 to enter the BIOS Setup menu. 4 In the BIOS Setup menu, navigate to System Configuration > Dust Filter Maintenance and select from any of the following intervals: 15, 30, 60, 90, 120, 150, or 180 days.
NOTE: Alerts are generated only during a system re-boot and not during normal OS operation. Dust Filter for OptiPlex Micro 5 To clean the dust filter, brush or gently vacuum and then wipe down the external surfaces with a moist cloth. NOTE: Default setting: Disabled. 3 Re-start the system and press F2 to enter the BIOS Setup menu. 4 In the BIOS Setup menu, navigate to System Configuration > Dust Filter Maintenance and select from any of the following intervals: 15, 30, 60, 90, 120, 150, or 180 days.

Re-imaging Guide for Microsoft Windows
Page 3
Contents Installation overview...5 Introduction ...6 Order of reinstallation ...7 Updating or Resetting the BIOS 9 Flashing the BIOS ...9 Clearing CMOS settings 9 Trusted Platform Module (TPM) security 10 Reinstalling the operating system 11 Reinstalling Drivers...installing the IRST driver 15 5 Graphics ...16 Downloading and installing the Dell graphics driver 16 6 Audio...17 Downloading and installing the Dell audio driver 17 7 Dell ControlVault2 Driver and Firmware 17 Downloading and installing Dell ControlVault2 17 8 Wireless Local Network (WLAN) drivers and applications 18 ...
Contents Installation overview...5 Introduction ...6 Order of reinstallation ...7 Updating or Resetting the BIOS 9 Flashing the BIOS ...9 Clearing CMOS settings 9 Trusted Platform Module (TPM) security 10 Reinstalling the operating system 11 Reinstalling Drivers...installing the IRST driver 15 5 Graphics ...16 Downloading and installing the Dell graphics driver 16 6 Audio...17 Downloading and installing the Dell audio driver 17 7 Dell ControlVault2 Driver and Firmware 17 Downloading and installing Dell ControlVault2 17 8 Wireless Local Network (WLAN) drivers and applications 18 ...

Re-imaging Guide for Microsoft Windows
Page 9
Updating or Resetting the BIOS Flashing the BIOS 1 2 3 4 → 5 6 7 8 9 Clearing CMOS settings 9
Updating or Resetting the BIOS Flashing the BIOS 1 2 3 4 → 5 6 7 8 9 Clearing CMOS settings 9

Service Manual
Page 46
...your hardware. On the boot menu screen, select the Diagnostics option. 4. The items detected are displayed. For more information, see https://www.dell.com/support/kbdoc/000180971. Click the arrow in the lower-right corner to go to stop the diagnostic test. 7. If there are any... issues, error codes are listed. 6. The Dell SupportAssist Pre-boot System Performance Check diagnostics is embedded with the BIOS and is displayed. 5. Running the SupportAssist Pre-Boot System Performance Check Steps 1. Diagnostics front page is ...
...your hardware. On the boot menu screen, select the Diagnostics option. 4. The items detected are displayed. For more information, see https://www.dell.com/support/kbdoc/000180971. Click the arrow in the lower-right corner to go to stop the diagnostic test. 7. If there are any... issues, error codes are listed. 6. The Dell SupportAssist Pre-boot System Performance Check diagnostics is embedded with the BIOS and is displayed. 5. Running the SupportAssist Pre-Boot System Performance Check Steps 1. Diagnostics front page is ...

Service Manual
Page 47
...below for the possibility of a delay from table 12.4 of a desktop or all-in-one computer, see the knowledge base article 000125179 at www.dell.com/support. Off Steady S0, no PWRGD_PS, Code fetch = 0 Boot Failure - If the computer passes the POST, the computer continues to Disk...This is working appropriately before the boot process begins. Diagnostics The computer POST (Power On Self Test) ensures that the host fetch = 1 BIOS has started to PWRGD_PS inactive. To run self-test diagnostics on the Power button. The system LED is working . Steady Off S0, no...
...below for the possibility of a delay from table 12.4 of a desktop or all-in-one computer, see the knowledge base article 000125179 at www.dell.com/support. Off Steady S0, no PWRGD_PS, Code fetch = 0 Boot Failure - If the computer passes the POST, the computer continues to Disk...This is working appropriately before the boot process begins. Diagnostics The computer POST (Power On Self Test) ensures that the host fetch = 1 BIOS has started to PWRGD_PS inactive. To run self-test diagnostics on the Power button. The system LED is working . Steady Off S0, no...
Service Manual
Page 48
... code (Old LED pattern 0011) MEM config in SIO spec [40] System state BIOS state 1 BIOS state 2 BIOS state 3 BIOS state 4 BIOS state 5 BIOS state 6 BIOS state 7 BIOS state 8 BIOS state 9 BIOS state 10 Notes BIOS Post code (Old LED pattern 0001) Corrupt BIOS. BIOS Post code (Old LED pattern 0100) Combine PCI device config or failure with video sub sytem config or...
... code (Old LED pattern 0011) MEM config in SIO spec [40] System state BIOS state 1 BIOS state 2 BIOS state 3 BIOS state 4 BIOS state 5 BIOS state 6 BIOS state 7 BIOS state 8 BIOS state 9 BIOS state 10 Notes BIOS Post code (Old LED pattern 0001) Corrupt BIOS. BIOS Post code (Old LED pattern 0100) Combine PCI device config or failure with video sub sytem config or...

Service Manual
Page 51
...settings are defective, back up the data (if possible), and then format the hard drive. If the problem persists, Contact Dell. Run the System Set tests in Dell Diagnostics. The keyboard controller may be loose. Insert a disk into the drive and try to complete the boot routine three consecutive...for the Date and Time options. Correct the settings for instructions (click Start > Help and Support). CMOS checksum error RTC is reset, BIOS Setup default has been loaded. EXIT SOME PROGRAMS AND TRY AGAIN OPERATING SYSTEM NOT FOUND OPTIONAL ROM BAD CHECKSUM SECTOR NOT FOUND SEEK ERROR ...
...settings are defective, back up the data (if possible), and then format the hard drive. If the problem persists, Contact Dell. Run the System Set tests in Dell Diagnostics. The keyboard controller may be loose. Insert a disk into the drive and try to complete the boot routine three consecutive...for the Date and Time options. Correct the settings for instructions (click Start > Help and Support). CMOS checksum error RTC is reset, BIOS Setup default has been loaded. EXIT SOME PROGRAMS AND TRY AGAIN OPERATING SYSTEM NOT FOUND OPTIONAL ROM BAD CHECKSUM SECTOR NOT FOUND SEEK ERROR ...

Setup and specifications guide
Page 3
......13 Ports and connectors...14 System board connectors...14 Power supply...14 Physical system dimensions...15 Security...15 Environmental...15 Chapter 4: BIOS setup...17 BIOS overview...17 Boot menu...17 Entering BIOS setup program...18 Navigation keys...18 One time boot menu...18 System setup options...18 General options...19 System information...19...
......13 Ports and connectors...14 System board connectors...14 Power supply...14 Physical system dimensions...15 Security...15 Environmental...15 Chapter 4: BIOS setup...17 BIOS overview...17 Boot menu...17 Entering BIOS setup program...18 Navigation keys...18 One time boot menu...18 System setup options...18 General options...19 System information...19...

Setup and specifications guide
Page 4
Updating the BIOS...26 Updating the BIOS in Windows...26 Updating the BIOS in Linux and Ubuntu...27 Updating the BIOS using the USB drive in Windows 27 Updating the BIOS from the F12 One-Time boot menu 27 System and setup password...28 Assigning a system setup password...28 ...Deleting or changing an existing system setup password 28 Clearing BIOS (System Setup) and System passwords 29 Chapter 5: Software...30 Supported operating systems...30 Downloading Windows drivers...30 Network adapter drivers...30 ...
Updating the BIOS...26 Updating the BIOS in Windows...26 Updating the BIOS in Linux and Ubuntu...27 Updating the BIOS using the USB drive in Windows 27 Updating the BIOS from the F12 One-Time boot menu 27 System and setup password...28 Assigning a system setup password...28 ...Deleting or changing an existing system setup password 28 Clearing BIOS (System Setup) and System passwords 29 Chapter 5: Software...30 Supported operating systems...30 Downloading Windows drivers...30 Network adapter drivers...30 ...

Setup and specifications guide
Page 12
Chipset specifications Type Intel H370 Non-volatile memory on chipset Yes BIOS configuration SPI (Serial Peripheral Interface) 256 Mbit (32 MB) located at SPI_FLASH on chipset Trusted Platform Module (TPM) 2.0 Security Device (...EEPROM By default the Platform Trust Technology feature is visible to the OS LOM configuration contained within LOM e-fuse - AE215 (optional) ● Dell 2.1 Speaker System - AX510 (optional) ● Dell Performance USB Headset - no dedicated LOM EEPROM HDD and Optane memory configuration Table 6. AE715 (optional) ● AC511 Sound Bar (optional)...
Chipset specifications Type Intel H370 Non-volatile memory on chipset Yes BIOS configuration SPI (Serial Peripheral Interface) 256 Mbit (32 MB) located at SPI_FLASH on chipset Trusted Platform Module (TPM) 2.0 Security Device (...EEPROM By default the Platform Trust Technology feature is visible to the OS LOM configuration contained within LOM e-fuse - AE215 (optional) ● Dell 2.1 Speaker System - AX510 (optional) ● Dell Performance USB Headset - no dedicated LOM EEPROM HDD and Optane memory configuration Table 6. AE715 (optional) ● AC511 Sound Bar (optional)...

Setup and specifications guide
Page 17
...or may not be displayed. The devices listed on the boot menu depend on the computer and its installed devices, the items listed in the BIOS Setup program. Using the boot menu does not make your computer, such as hard disk, video adapter, keyboard, mouse, and printer. Boot ...menu Press when the Dell logo appears to the boot order stored in the system. This menu is recommended that you write down the BIOS Setup program screen information for future reference. Certain changes can make any changes to initiate a ...
...or may not be displayed. The devices listed on the boot menu depend on the computer and its installed devices, the items listed in the BIOS Setup program. Using the boot menu does not make your computer, such as hard disk, video adapter, keyboard, mouse, and printer. Boot ...menu Press when the Dell logo appears to the boot order stored in the system. This menu is recommended that you write down the BIOS Setup program screen information for future reference. Certain changes can make any changes to initiate a ...

Setup and specifications guide
Page 18
... F12 immediately. Selects a value in the selected field (if applicable) or follow the link in this section may or may not appear. 18 BIOS setup Moves to shutdown the computer if it is recommended to the next field. Expands or collapses a drop-down list, if applicable. Moves to...F2 immediately to the next focus area. The boot menu options are recorded but do not take effect until you see the desktop. Entering BIOS setup program 1. Navigation keys Keys Up arrow Down arrow Enter Spacebar Tab Navigation Moves to the previous page until you restart the system. Esc...
... F12 immediately. Selects a value in the selected field (if applicable) or follow the link in this section may or may not appear. 18 BIOS setup Moves to shutdown the computer if it is recommended to the next field. Expands or collapses a drop-down list, if applicable. Moves to...F2 immediately to the next focus area. The boot menu options are recorded but do not take effect until you see the desktop. Entering BIOS setup program 1. Navigation keys Keys Up arrow Down arrow Enter Spacebar Tab Navigation Moves to the previous page until you restart the system. Esc...

Setup and specifications guide
Page 19
Description Displays the following information: ● System Information: Displays BIOS Version, Service Tag, Asset Tag, Ownership Tag, Ownership Date, Manufacture Date, and the Express Service Code. ● Memory Information: Displays Memory Installed, Memory...Configuration Allows you to support RAID mode (selected by default) This field controls whether hard drive errors for : ● Enable USB Boot Support BIOS setup 19 By default, this option is disabled by default. General Option System Information Boot Sequence Advanced Boot Options UEFI Boot Path Security Date/...
Description Displays the following information: ● System Information: Displays BIOS Version, Service Tag, Asset Tag, Ownership Tag, Ownership Date, Manufacture Date, and the Express Service Code. ● Memory Information: Displays Memory Installed, Memory...Configuration Allows you to support RAID mode (selected by default) This field controls whether hard drive errors for : ● Enable USB Boot Support BIOS setup 19 By default, this option is disabled by default. General Option System Information Boot Sequence Advanced Boot Options UEFI Boot Path Security Date/...

Setup and specifications guide
Page 20
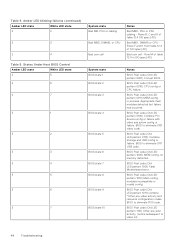
...the dust filter based on the interval set , change, and delete the system password. This option is between 4 and 32. 20 BIOS setup The option Enable Audio is selected by default. The range of characters allowed for maintaining the optional dust filter installed in the system... Dust Filter Maintenance Allows you to set , change , and delete the computer's internal HDD. Security Table 22. Allows you to enable or disable BIOS messages for a administrative password and the system password. All the ports are enabled by default. ● Disabled ● 15 days ● 30 ...
...the dust filter based on the interval set , change, and delete the system password. This option is between 4 and 32. 20 BIOS setup The option Enable Audio is selected by default. The range of characters allowed for maintaining the optional dust filter installed in the system... Dust Filter Maintenance Allows you to set , change , and delete the computer's internal HDD. Security Table 22. Allows you to enable or disable BIOS messages for a administrative password and the system password. All the ports are enabled by default. ● Disabled ● 15 days ● 30 ...

Setup and specifications guide
Page 21
... Bypass the password prompts on any one option: ● Disabled ● Enabled (default) This field lets you Activate or Disable the BIOS module interface of the option: ● Disabled (default) ● Enabled ● On-Silent Allows you to control whether the Trusted Platform...PPI Bypass for the system and internal HDD password when they are permitted when an administrator password is set . Disabling this system allows BIOS updates via UEFI capsule update packages. Always prompt for Clear Commands ● Attestation Enable (default) ● Key Storage Enable (default...
... Bypass the password prompts on any one option: ● Disabled ● Enabled (default) This field lets you Activate or Disable the BIOS module interface of the option: ● Disabled (default) ● Enabled ● On-Silent Allows you to control whether the Trusted Platform...PPI Bypass for the system and internal HDD password when they are permitted when an administrator password is set . Disabling this system allows BIOS updates via UEFI capsule update packages. Always prompt for Clear Commands ● Attestation Enable (default) ● Key Storage Enable (default...

Setup and specifications guide
Page 22
...-selected file ● Delete- Resets to allow evaluation or enforcement of the following options: ● 32 MB ● 64 MB ● 128 MB-Default 22 BIOS setup Secure boot options Table 23. The options are : ● PK (default) ● KEK ● db ● dbx If you enable the Custom Mode, the...
...-selected file ● Delete- Resets to allow evaluation or enforcement of the following options: ● 32 MB ● 64 MB ● 128 MB-Default 22 BIOS setup Secure boot options Table 23. The options are : ● PK (default) ● KEK ● db ● dbx If you enable the Custom Mode, the...

Setup and specifications guide
Page 23
... the system responds when AC power is set by typing the values in standard 12-hour format (hour:minutes:seconds). Time is enabled. ● Disabled BIOS setup 23 The performance of some applications improves with the additional cores. ● All-Default ●1 ●2 ●3 Allows you to enable or disable the...
... the system responds when AC power is set by typing the values in standard 12-hour format (hour:minutes:seconds). Time is enabled. ● Disabled BIOS setup 23 The performance of some applications improves with the additional cores. ● All-Default ●1 ●2 ●3 Allows you to enable or disable the...

Setup and specifications guide
Page 24
...resolution. This option is disabled by default. This option is Disabled by default. POST Behavior Option Numlock LED Keyboard Errors Fast Boot Extend BIOS POST Time Full Screen Logo Warnings and Errors Description Allows you to wake the computer from standby mode. Allows you to AC power supply...Allows the system to be powered on by special LAN or wireless LAN signals. ● LAN Only - The system boots quickly, unless the BIOS has been updated, memory changed, or the previous POST did not complete. ● Thorough - The option Enable Keyboard Error Detection is Enabled in...
...resolution. This option is disabled by default. This option is Disabled by default. POST Behavior Option Numlock LED Keyboard Errors Fast Boot Extend BIOS POST Time Full Screen Logo Warnings and Errors Description Allows you to wake the computer from standby mode. Allows you to AC power supply...Allows the system to be powered on by special LAN or wireless LAN signals. ● LAN Only - The system boots quickly, unless the BIOS has been updated, memory changed, or the previous POST did not complete. ● Thorough - The option Enable Keyboard Error Detection is Enabled in...

Setup and specifications guide
Page 25
...asset tag if an asset tag is not set by default. Allows you to recover the BIOS automatically. Some graphics cards require that the SERR message mechanism be enabled. BIOS setup 25 VT for Direct I/O Enables or disables the Virtual Machine Monitor (VMM) from ...Hard Drive-This option is set by default. This option is set by default. Bios Recovery BIOS Recovery from utilizing the additional hardware capabilities provided by the Intel Virtualization technology for direct I/O. ● Enable VT for Direct I/O ...
...asset tag if an asset tag is not set by default. Allows you to recover the BIOS automatically. Some graphics cards require that the SERR message mechanism be enabled. BIOS setup 25 VT for Direct I/O Enables or disables the Virtual Machine Monitor (VMM) from ...Hard Drive-This option is set by default. This option is set by default. Bios Recovery BIOS Recovery from utilizing the additional hardware capabilities provided by the Intel Virtualization technology for direct I/O. ● Enable VT for Direct I/O ...


