
Dell Latitude 10 - ST2 Owner's Manual
Page 3
... Removing the Speakers...18 Installing the Speakers...20 Removing the SmartCard Reader ...20 Installing the SmartCard Reader ...21 Removing the Wireless Wide Area Network (WWAN) Card 21 Installing the Wireless Wide Area Network (WWAN...
... Removing the Speakers...18 Installing the Speakers...20 Removing the SmartCard Reader ...20 Installing the SmartCard Reader ...21 Removing the Wireless Wide Area Network (WWAN) Card 21 Installing the Wireless Wide Area Network (WWAN...
Dell Latitude 10 - ST2 Owner's Manual
Page 5
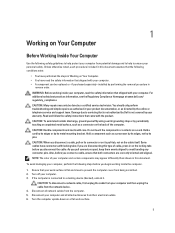
... Many repairs may appear differently than shown in this document. Some cables have read the safety information that is not authorized by Dell is not covered by your computer. • A component can be done by its pins. To avoid damaging your computer. ...their electrical outlets. 6. WARNING: Before working inside your computer, read the safety information that your work surface. 5 CAUTION: Handle components and cards with your warranty. CAUTION: When you begin working inside the computer. 1. Also, before you pull connectors apart, keep them evenly aligned to ...
... Many repairs may appear differently than shown in this document. Some cables have read the safety information that is not authorized by Dell is not covered by your computer. • A component can be done by its pins. To avoid damaging your computer. ...their electrical outlets. 6. WARNING: Before working inside your computer, read the safety information that your work surface. 5 CAUTION: Handle components and cards with your warranty. CAUTION: When you begin working inside the computer. 1. Also, before you pull connectors apart, keep them evenly aligned to ...
Dell Latitude 10 - ST2 Owner's Manual
Page 6
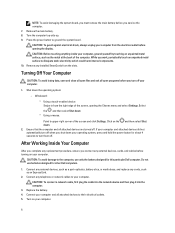
...the computer. Select the and then select Shut down your computer and all attached devices are turned off . Connect any external devices, cards, and cables before you service the computer. 7. After Working Inside Your Computer After you complete any replacement procedure, ensure you connect ...any telephone or network cables to the computer, use batteries designed for this particular Dell computer. Replace the battery. 4. NOTE: To avoid damaging the system board, you must remove the main battery before turning on your...
...the computer. Select the and then select Shut down your computer and all attached devices are turned off . Connect any external devices, cards, and cables before you service the computer. 7. After Working Inside Your Computer After you complete any replacement procedure, ensure you connect ...any telephone or network cables to the computer, use batteries designed for this particular Dell computer. Replace the battery. 4. NOTE: To avoid damaging the system board, you must remove the main battery before turning on your...

Dell Latitude 10 - ST2 Owner's Manual
Page 13
External View 1. battery 4. micro SIM card (located below the battery) 2. fingerprint reader (optional) 13 Secure Digital (SD) card slot 5. SmartCard reader slot 3. Recommended Tools The procedures in this document may require the following tools: • Small flat-blade screwdriver • #0 Phillips screwdriver • #1 Phillips screwdriver • Small plastic scribe Internal and External View Figure 1. 3 Removing and Installing Components This section provides detailed information on how to remove or install the components from your computer.
External View 1. battery 4. micro SIM card (located below the battery) 2. fingerprint reader (optional) 13 Secure Digital (SD) card slot 5. SmartCard reader slot 3. Recommended Tools The procedures in this document may require the following tools: • Small flat-blade screwdriver • #0 Phillips screwdriver • #1 Phillips screwdriver • Small plastic scribe Internal and External View Figure 1. 3 Removing and Installing Components This section provides detailed information on how to remove or install the components from your computer.

Dell Latitude 10 - ST2 Owner's Manual
Page 14
Figure 2. front camera 6. rear camera 7. Slide the battery release latch to the unlock position. coin-cell battery 3. system board 5. SmartCard reader/WWAN card (WWAN card is located below the SmartCard reader Removing the Battery 1. speaker 4. Follow the procedures in an outward direction and remove it from the computer. 14 Lift up the battery in Before Working Inside Your Computer. 2. Internal View 1. docking board 2.
Figure 2. front camera 6. rear camera 7. Slide the battery release latch to the unlock position. coin-cell battery 3. system board 5. SmartCard reader/WWAN card (WWAN card is located below the SmartCard reader Removing the Battery 1. speaker 4. Follow the procedures in an outward direction and remove it from the computer. 14 Lift up the battery in Before Working Inside Your Computer. 2. Internal View 1. docking board 2.
Dell Latitude 10 - ST2 Owner's Manual
Page 21
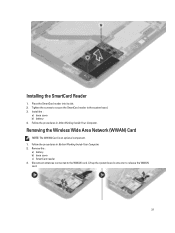
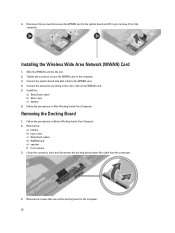
Tighten the screws to secure the SmartCard reader to release the WWAN card. 21 Install the : a) base cover b) battery 4. Lift up the system board connector to the system board. 3. Place the SmartCard reader into its slot. 2. ...Remove the : a) battery b) base cover c) SmartCard reader 3. Installing the SmartCard Reader 1. Removing the Wireless Wide Area Network (WWAN) Card NOTE: The WWAN Card is an optional component. 1. Follow the procedures in Before Working Inside Your Computer. 2. Follow the procedures in After Working Inside Your Computer. Disconnect antennae...
Tighten the screws to secure the SmartCard reader to release the WWAN card. 21 Install the : a) base cover b) battery 4. Lift up the system board connector to the system board. 3. Place the SmartCard reader into its slot. 2. ...Remove the : a) battery b) base cover c) SmartCard reader 3. Installing the SmartCard Reader 1. Removing the Wireless Wide Area Network (WWAN) Card NOTE: The WWAN Card is an optional component. 1. Follow the procedures in Before Working Inside Your Computer. 2. Follow the procedures in After Working Inside Your Computer. Disconnect antennae...
Dell Latitude 10 - ST2 Owner's Manual
Page 22
...board power flex cable from the computer. Installing the Wireless Wide Area Network (WWAN) Card 1. Connect the system board side data cable to the color code on the WWAN card. 5. Follow the procedures in Before Working Inside Your Computer. 2. Lift up to remove...4. Install the : a) SmartCard reader b) base cover c) battery 6. Slide the WWAN card into the slot. 2. Connect the antennae according to the WWAN card. 4. Remove the: a) battery b) base cover c) SmartCard reader d) WWAN Card e) speaker f) front camera 3. Follow the procedures in After Working Inside Your Computer....
...board power flex cable from the computer. Installing the Wireless Wide Area Network (WWAN) Card 1. Connect the system board side data cable to the color code on the WWAN card. 5. Follow the procedures in Before Working Inside Your Computer. 2. Lift up to remove...4. Install the : a) SmartCard reader b) base cover c) battery 6. Slide the WWAN card into the slot. 2. Connect the antennae according to the WWAN card. 4. Remove the: a) battery b) base cover c) SmartCard reader d) WWAN Card e) speaker f) front camera 3. Follow the procedures in After Working Inside Your Computer....
Dell Latitude 10 - ST2 Owner's Manual
Page 23
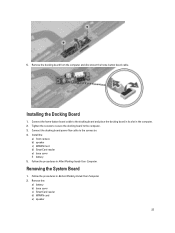
... reader e) base cover f) battery 5. Remove the: a) battery b) base cover c) SmartCard reader d) WWAN card e) speaker 23 Installing the Docking Board 1. Removing the System Board 1. Tighten the screws to secure the docking board to the connector. 4. Remove the docking board ...
... reader e) base cover f) battery 5. Remove the: a) battery b) base cover c) SmartCard reader d) WWAN card e) speaker 23 Installing the Docking Board 1. Removing the System Board 1. Tighten the screws to secure the docking board to the connector. 4. Remove the docking board ...
Dell Latitude 10 - ST2 Owner's Manual
Page 24
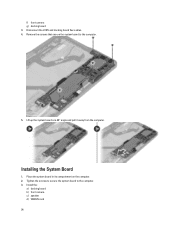
Disconnect the LVDS and docking board flex cables. 4. Place the system board in its compartment on the computer. 2. Install the: a) docking board b) front camera c) speaker d) WWAN card 24 Lift up the system board at a 45° angle and pull it away from the computer. Remove the screws that secure the system board to the computer. 3. Tighten the screws to secure the system board to the computer. 5. Installing the System Board 1. f) front camera g) docking board 3.
Disconnect the LVDS and docking board flex cables. 4. Place the system board in its compartment on the computer. 2. Install the: a) docking board b) front camera c) speaker d) WWAN card 24 Lift up the system board at a 45° angle and pull it away from the computer. Remove the screws that secure the system board to the computer. 3. Tighten the screws to secure the system board to the computer. 5. Installing the System Board 1. f) front camera g) docking board 3.
Dell Latitude 10 - ST2 Owner's Manual
Page 25
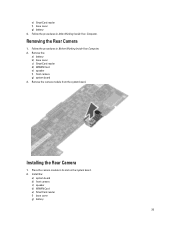
Installing the Rear Camera 1. Place the camera module in Before Working Inside Your Computer. 2. Follow the procedures in its slot on the system board. 2. Remove the: a) battery b) base cover c) SmartCard reader d) WWAN Card e) speaker f) front camera g) system board 3. Install the: a) system board b) front camera c) speaker d) WWAN Card e) SmartCard reader f) base cover g) battery 25 Remove the camera module from the system board. e) SmartCard reader f) base cover g) battery 4. Removing the Rear Camera 1. Follow the procedures in After Working Inside Your Computer.
Installing the Rear Camera 1. Place the camera module in Before Working Inside Your Computer. 2. Follow the procedures in its slot on the system board. 2. Remove the: a) battery b) base cover c) SmartCard reader d) WWAN Card e) speaker f) front camera g) system board 3. Install the: a) system board b) front camera c) speaker d) WWAN Card e) SmartCard reader f) base cover g) battery 25 Remove the camera module from the system board. e) SmartCard reader f) base cover g) battery 4. Removing the Rear Camera 1. Follow the procedures in After Working Inside Your Computer.

Dell Latitude 10 - ST2 Owner's Manual
Page 26
... f) front camera g) system board 3. Disconnect the coin-cell battery cable and remove it from the system board. Install the: a) system board b) front camera c) WWAN Card d) SmartCard reader e) speaker 3. Follow the procedures in Before Working Inside Your Computer. 2. Install the: a) battery b) base cover 26 Removing the Coin-Cell Battery 1. Follow the ...
... f) front camera g) system board 3. Disconnect the coin-cell battery cable and remove it from the system board. Install the: a) system board b) front camera c) WWAN Card d) SmartCard reader e) speaker 3. Follow the procedures in Before Working Inside Your Computer. 2. Install the: a) battery b) base cover 26 Removing the Coin-Cell Battery 1. Follow the ...
Dell Latitude 10 - ST2 Owner's Manual
Page 31
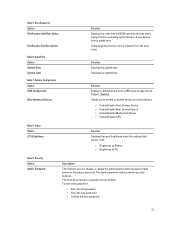
.... • Brightness on Battery • Brightness on -board devices. • Enable/Disable Front Camera Device • Enable/Disable Rear Camera Device • Enable/Disable Media Card Device • Enable/Disable GPS Table 8.
.... • Brightness on Battery • Brightness on -board devices. • Enable/Disable Front Camera Device • Enable/Disable Rear Camera Device • Enable/Disable Media Card Device • Enable/Disable GPS Table 8.
Dell Latitude 10 - ST2 Owner's Manual
Page 37
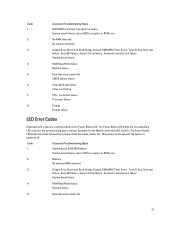
... controller test failure System board failure RAM Read/Write failure Memory failure Real-time clock power fail CMOS battery failure Video BIOS test failure Video card failure CPU - Example: For No Memory detected (LED code 2) , The Power Button LED blinks two times followed by a pause, blinks two times, pause, etc. cache...
... controller test failure System board failure RAM Read/Write failure Memory failure Real-time clock power fail CMOS battery failure Video BIOS test failure Video card failure CPU - Example: For No Memory detected (LED code 2) , The Power Button LED blinks two times followed by a pause, blinks two times, pause, etc. cache...
Dell Latitude 10 - ST2 Owner's Manual
Page 38
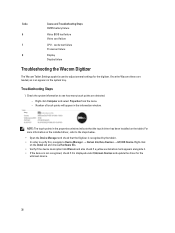
... the information window. Right click Computer and select Properties from the menu. - Code 6 7 8 Cause and Troubleshooting Steps CMOS battery failure Video BIOS test failure Video card failure CPU -
... the information window. Right click Computer and select Properties from the menu. - Code 6 7 8 Cause and Troubleshooting Steps CMOS battery failure Video BIOS test failure Video card failure CPU -
Dell Latitude 10 - ST2 Owner's Manual
Page 40
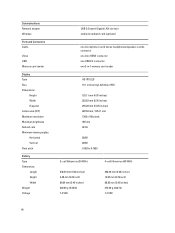
... Battery Type Dimensions Length Height Width Weight Voltage USB 2.0 based Gigabit LAN via dock mobile broadband card (optional) one microphone-in and stereo headphones/speakers combo connector one mini HDMI connector one USB 2.0 connector one 3-in-1 memory card reader HD IPS LED 10.1 inches high definition (HD) 125.11 mm (4.93 inches) 222...
... Battery Type Dimensions Length Height Width Weight Voltage USB 2.0 based Gigabit LAN via dock mobile broadband card (optional) one microphone-in and stereo headphones/speakers combo connector one mini HDMI connector one USB 2.0 connector one 3-in-1 memory card reader HD IPS LED 10.1 inches high definition (HD) 125.11 mm (4.93 inches) 222...
Setup and Features Information Tech Sheet
Page 1
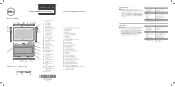
... 6 pembaca kartu memori 7 LED daya 8 tombol daya 9 tombol pengunci rotasi layar 10 layar sentuh 11 konektor audio 12 konektor USB 13 konektor mini HDMI 14 tombol mulai 15 kamera belakang 16 lampu kilat kamera 17 baterai yang dapat diganti 18 speaker 19 kait baterai 20 LED status baterai... (optional) 2 front camera 3 camera LED 4 microphones 5 Ambient Light Sensor 6 memory card reader 7 power LED 8 power button 9 screen rotation lock button 10 touch screen 11 audio connector 12 USB connector 13 mini HDMI connector 14 start button 15 rear camera 16 camera flash 17 swappable battery 18 speakers 19 ...
... 6 pembaca kartu memori 7 LED daya 8 tombol daya 9 tombol pengunci rotasi layar 10 layar sentuh 11 konektor audio 12 konektor USB 13 konektor mini HDMI 14 tombol mulai 15 kamera belakang 16 lampu kilat kamera 17 baterai yang dapat diganti 18 speaker 19 kait baterai 20 LED status baterai... (optional) 2 front camera 3 camera LED 4 microphones 5 Ambient Light Sensor 6 memory card reader 7 power LED 8 power button 9 screen rotation lock button 10 touch screen 11 audio connector 12 USB connector 13 mini HDMI connector 14 start button 15 rear camera 16 camera flash 17 swappable battery 18 speakers 19 ...

