
Owner's Manual
Page 3
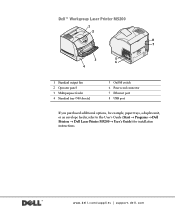
Dell™ Workgroup Laser Printer M5200 1 2 8 7 3 5 6 4 1 Standard output bin 2 Operator panel 3 Multipurpose feeder 4 Standard tray (500 sheets) 5 On/Off switch 6 Power cord connector 7 Ethernet port 8 USB port If you purchased additional options, for example, paper trays, a duplex unit, or an envelope feeder, refer to the User's Guide (Start → Programs → Dell Printers → Dell Laser Printer M5200 → User's Guide) for installation instructions. www.dell.com/supplies | support.dell.com
Dell™ Workgroup Laser Printer M5200 1 2 8 7 3 5 6 4 1 Standard output bin 2 Operator panel 3 Multipurpose feeder 4 Standard tray (500 sheets) 5 On/Off switch 6 Power cord connector 7 Ethernet port 8 USB port If you purchased additional options, for example, paper trays, a duplex unit, or an envelope feeder, refer to the User's Guide (Start → Programs → Dell Printers → Dell Laser Printer M5200 → User's Guide) for installation instructions. www.dell.com/supplies | support.dell.com
Owner's Manual
Page 6
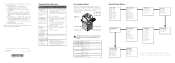
... and transparencies 46 In the standard tray 46 In the multipurpose feeder 49 Loading envelopes 53 In the multipurpose feeder 53 5 Use your printer Changing the language on the operator panel 56 Using the operator panel to change printer settings 56 Restore factory default settings ...menus 58 Printing a job 60 Canceling a job from the printer operator panel 60 Utilizing additional software tools 61 Status Monitor 61 Status Monitor Center 61 Printing Status window 62 Dell Toner Reorder Window 62 Dell Printer Software Uninstall 62 Driver Profiler 63 Replacing the toner cartridge ...
... and transparencies 46 In the standard tray 46 In the multipurpose feeder 49 Loading envelopes 53 In the multipurpose feeder 53 5 Use your printer Changing the language on the operator panel 56 Using the operator panel to change printer settings 56 Restore factory default settings ...menus 58 Printing a job 60 Canceling a job from the printer operator panel 60 Utilizing additional software tools 61 Status Monitor 61 Status Monitor Center 61 Printing Status window 62 Dell Toner Reorder Window 62 Dell Printer Software Uninstall 62 Driver Profiler 63 Replacing the toner cartridge ...

Owner's Manual
Page 59
... Multipage Border Utilities Menu Print Menus Print Net Setup Print Fonts Factory Defaults Hex Trace Job Menu Confidential Job** Held Jobs** Cancel Job** Reset Printer Print Buffer** PostScript Menu Print PS Error Network Menu Standard Network PCL SmartSwitch PS SmartSwitch NPA Mode Network Buffer MAC Binary PS STD Net Setup... PCL Emul Menu Font Source Font Name Point Size Pitch Symbol Set Orientation Lines per Page A4 Width Tray Renumber Auto CR after LF Auto LF after CR USB Menu Standard USB PCL SmartSwitch PS SmartSwitch NPA Mode USB Buffer MAC Binary PS ...
... Multipage Border Utilities Menu Print Menus Print Net Setup Print Fonts Factory Defaults Hex Trace Job Menu Confidential Job** Held Jobs** Cancel Job** Reset Printer Print Buffer** PostScript Menu Print PS Error Network Menu Standard Network PCL SmartSwitch PS SmartSwitch NPA Mode Network Buffer MAC Binary PS STD Net Setup... PCL Emul Menu Font Source Font Name Point Size Pitch Symbol Set Orientation Lines per Page A4 Width Tray Renumber Auto CR after LF Auto LF after CR USB Menu Standard USB PCL SmartSwitch PS SmartSwitch NPA Mode USB Buffer MAC Binary PS ...

Owner's Manual
Page 63
...Click Uninstall Now. a Select Dell Printer Software Uninstall. A driver profile can contain a group of saved printer driver settings and other data for things such as: • Print orientation and N-Up (document settings) • Installation status of an output tray (printer options) • User-...defined paper sizes (custom papers) • Simple text and watermarks • Overlay references • Font references • Form associations Use your printer 63 Driver Profiler Use the Driver Profiler to...
...Click Uninstall Now. a Select Dell Printer Software Uninstall. A driver profile can contain a group of saved printer driver settings and other data for things such as: • Print orientation and N-Up (document settings) • Installation status of an output tray (printer options) • User-...defined paper sizes (custom papers) • Simple text and watermarks • Overlay references • Font references • Form associations Use your printer 63 Driver Profiler Use the Driver Profiler to...
Owner's Manual
Page 97
...to the network (queue), 20 locally, 13 C canceling a job, 60 changing printer settings from the operator panel, 56 changing the language from the operator panel, 56 D Dell Printer Software Uninstall, 62 Dell Toner Re-Order Window, 62 disable menus from the operator panel, 58 driver ... 23 L Linux, drivers, 18 loading paper multipurpose feeder, 49 standard tray, 46 loading transparencies multipurpose feeder, 49 standard tray, 46 local printing, 36 locating the IP address, 20, 23 M maintaining the printer cleaning the printer, 65 toner cartridge installing, 66 memory cards, installing, 27 menus,...
...to the network (queue), 20 locally, 13 C canceling a job, 60 changing printer settings from the operator panel, 56 changing the language from the operator panel, 56 D Dell Printer Software Uninstall, 62 Dell Toner Re-Order Window, 62 disable menus from the operator panel, 58 driver ... 23 L Linux, drivers, 18 loading paper multipurpose feeder, 49 standard tray, 46 loading transparencies multipurpose feeder, 49 standard tray, 46 local printing, 36 locating the IP address, 20, 23 M maintaining the printer cleaning the printer, 65 toner cartridge installing, 66 memory cards, installing, 27 menus,...
Quick Reference Guide
Page 1
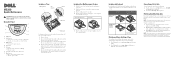
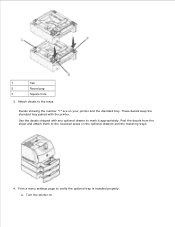
...print a menu settings page: 1 Press Menu until you see Utilities Menu, and then press Select. 2 Press Menu until you arrive at the printer. M5200 Quick Reference CAUTION: Before you set up for double-sided printing. NOTE: This only works with the recommended print side face down for the size... until it lightly touches the side of the tray. 3 Squeeze the length guide lever, and slide the length guide to the correct position for single-sided printing and face up and operate your Dell printer, read and follow the safety instructions in the multipurpose feeder and push it forward without...
...print a menu settings page: 1 Press Menu until you see Utilities Menu, and then press Select. 2 Press Menu until you arrive at the printer. M5200 Quick Reference CAUTION: Before you set up for double-sided printing. NOTE: This only works with the recommended print side face down for the size... until it lightly touches the side of the tray. 3 Squeeze the length guide lever, and slide the length guide to the correct position for single-sided printing and face up and operate your Dell printer, read and follow the safety instructions in the multipurpose feeder and push it forward without...
Quick Reference Guide
Page 2
... Duplex rear door Duplex front access cover (remove standard input tray) Standard input tray Paper trays Lower front door (down when envelope feeder is loaded. • Remove the currently loaded print media from printer memory and the printer returns to the Ready state. © 2003 Dell Computer Corporation. After the job prints, the job is displayed...
... Duplex rear door Duplex front access cover (remove standard input tray) Standard input tray Paper trays Lower front door (down when envelope feeder is loaded. • Remove the currently loaded print media from printer memory and the printer returns to the Ready state. © 2003 Dell Computer Corporation. After the job prints, the job is displayed...

Dell™ Workgroup Laser Printer M5200 User's Guide
Page 1
Dell™ Workgroup Laser Printer M5200 User's Guide Click the links to the left for information on the features, options, and operation of your desktop. Double-click the icon on other documentation included with your printer, see Finding information. 1 Printer 2 Multipurpose feeder 3 Standard 500-sheet tray 4 Optional envelope feeder 5 Optional duplex unit 6 Optional 250-sheet drawer with tray 7 Optional 500-sheet drawer with tray To order replacement toner cartridges or supplies from Dell: 1. For information on your printer.
Dell™ Workgroup Laser Printer M5200 User's Guide Click the links to the left for information on the features, options, and operation of your desktop. Double-click the icon on other documentation included with your printer, see Finding information. 1 Printer 2 Multipurpose feeder 3 Standard 500-sheet tray 4 Optional envelope feeder 5 Optional duplex unit 6 Optional 250-sheet drawer with tray 7 Optional 500-sheet drawer with tray To order replacement toner cartridges or supplies from Dell: 1. For information on your printer.
Dell™ Workgroup Laser Printer M5200 User's Guide
Page 8
...fonts: OCR-A OCR-B C39 Narrow (3 of 9) C39 Regular (3 of 9) C39 Wide (3 of resident printer fonts by Windows programs for any number of printer models and any number of an output tray (printer options) User-defined paper sizes (custom papers) Simple text and watermarks Overlay references Font references Form associations Profiles... file in the same DCF can point to the DCF that contains the profiles to match the output from your printer in Windows to an existing DCF by a short description. During installation, the user can have access to an existing configuration file.
...fonts: OCR-A OCR-B C39 Narrow (3 of 9) C39 Regular (3 of 9) C39 Wide (3 of resident printer fonts by Windows programs for any number of printer models and any number of an output tray (printer options) User-defined paper sizes (custom papers) Simple text and watermarks Overlay references Font references Form associations Profiles... file in the same DCF can point to the DCF that contains the profiles to match the output from your printer in Windows to an existing DCF by a short description. During installation, the user can have access to an existing configuration file.
Dell™ Workgroup Laser Printer M5200 User's Guide
Page 9
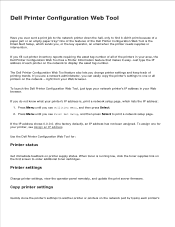
...the IP address of the printers in your area, the Dell Printer Configuration Web Tool has a Printer Information feature that makes it didn't print because of a paper jam or an empty paper tray? To launch the Dell Printer Configuration Web Tool, just type your network printer's IP address in your ...Web browser. Use the Dell Printer Configuration Web Tool for: Printer status Get immediate feedback on the first screen to one for...
...the IP address of the printers in your area, the Dell Printer Configuration Web Tool has a Printer Information feature that makes it didn't print because of a paper jam or an empty paper tray? To launch the Dell Printer Configuration Web Tool, just type your network printer's IP address in your ...Web browser. Use the Dell Printer Configuration Web Tool for: Printer status Get immediate feedback on the first screen to one for...

Dell™ Workgroup Laser Printer M5200 User's Guide
Page 11
Standard network Network printer with an envelope feeder, duplex unit option, and a tray 2 and tray 3 option (250- or 500-sheets) attached. The printer supports up to four optional trays. 4 Standard tray (500 sheets) About your printer The following illustrations show the standard Dell Workgroup Laser Printer M5200, and with options printer 1 Standard output 5 Optional envelope feeder bin 2 Operator panel 6 Optional duplex unit 3 Multipurpose feeder 7 Optional trays (250 or 500 sheets).
Standard network Network printer with an envelope feeder, duplex unit option, and a tray 2 and tray 3 option (250- or 500-sheets) attached. The printer supports up to four optional trays. 4 Standard tray (500 sheets) About your printer The following illustrations show the standard Dell Workgroup Laser Printer M5200, and with options printer 1 Standard output 5 Optional envelope feeder bin 2 Operator panel 6 Optional duplex unit 3 Multipurpose feeder 7 Optional trays (250 or 500 sheets).

Dell™ Workgroup Laser Printer M5200 User's Guide
Page 12
..., heaters, or ventilators Free of sunlight, humidity extremes, or temperature fluctuations Clean, dry, and free of dust NOTE: Leave the printer in the box until you have the following items: Leave enough room to install it safely. It is also important to lift it... . 2. CAUTION: The printer requires at least two people to allow space around the printer for your printer. Unpacking the printer 1. Provide the proper environment: A firm, level surface Away from the box except the printer. Make sure you are ready to open the printer trays, covers, doors, and options....
..., heaters, or ventilators Free of sunlight, humidity extremes, or temperature fluctuations Clean, dry, and free of dust NOTE: Leave the printer in the box until you have the following items: Leave enough room to install it safely. It is also important to lift it... . 2. CAUTION: The printer requires at least two people to allow space around the printer for your printer. Unpacking the printer 1. Provide the proper environment: A firm, level surface Away from the box except the printer. Make sure you are ready to open the printer trays, covers, doors, and options....

Dell™ Workgroup Laser Printer M5200 User's Guide
Page 13
2. 1 Printer 4 Drivers and with Utilities CD standard tray 2 Wire bail 5 Owner's Manual 3 Power cord 6 Setup diagram Save the carton and packing material in case you need to repack the printer.
2. 1 Printer 4 Drivers and with Utilities CD standard tray 2 Wire bail 5 Owner's Manual 3 Power cord 6 Setup diagram Save the carton and packing material in case you need to repack the printer.

Dell™ Workgroup Laser Printer M5200 User's Guide
Page 19
... Printing Menus appears on the computer and the printer. Verify that the options you purchased or installed. 1. Verify that any optional trays you installed are correctly listed under "Printer Information." 6. Turn on the display. 3.... Print and check the menu settings page The Menu Settings page lists all the options you installed are configured for the sizes and types of memory installed is correctly listed under "Installed Features." 4. Right-click the Dell Laser Printer M5200...
... Printing Menus appears on the computer and the printer. Verify that the options you purchased or installed. 1. Verify that any optional trays you installed are correctly listed under "Printer Information." 6. Turn on the display. 3.... Print and check the menu settings page The Menu Settings page lists all the options you installed are configured for the sizes and types of memory installed is correctly listed under "Installed Features." 4. Right-click the Dell Laser Printer M5200...

Dell™ Workgroup Laser Printer M5200 User's Guide
Page 25
... completing these tasks. Place the support unit on top of the table or printer cabinet where you can purchase optional 250-sheet and/or 500-sheet drawers. Remove the tray from the back of a tray and a support unit. The 250-sheet drawer and the 500-sheet drawer are aligned properly. Remove ...all cables from the support unit. To increase paper capacity, you plan to turn the printer off, unplug the power cord, and ...
... completing these tasks. Place the support unit on top of the table or printer cabinet where you can purchase optional 250-sheet and/or 500-sheet drawers. Remove the tray from the back of a tray and a support unit. The 250-sheet drawer and the 500-sheet drawer are aligned properly. Remove ...all cables from the support unit. To increase paper capacity, you plan to turn the printer off, unplug the power cord, and ...
Dell™ Workgroup Laser Printer M5200 User's Guide
Page 26
a. 1 Tab 2 Round peg 3 Square hole 3. Use the decals shipped with the printer. Decals showing the number "1" are on the optional drawers and the matching trays. 4. These decals keep the standard tray paired with any optional drawer to the recessed areas on your printer and the standard tray. b. Attach decals to verify the optional tray is installed properly. Peel the decals from the sheet and attach them to mark it appropriately. Print a menu settings page to the trays. Turn the printer on.
a. 1 Tab 2 Round peg 3 Square hole 3. Use the decals shipped with the printer. Decals showing the number "1" are on the optional drawers and the matching trays. 4. These decals keep the standard tray paired with any optional drawer to the recessed areas on your printer and the standard tray. b. Attach decals to verify the optional tray is installed properly. Peel the decals from the sheet and attach them to mark it appropriately. Print a menu settings page to the trays. Turn the printer on.

Dell™ Workgroup Laser Printer M5200 User's Guide
Page 27
... Menu, and then press Select. Click Start Settings Printers and Faxes. 2. c. In the Options list, find 250-sheet tray or 500-sheet tray. After loading paper in the table. e. Click Start Settings Printers. 2. Right-click the Dell Laser Printer M5200 icon. 3. a. Close the Printers folder. Press Menu until you see Tray Type, and then press Select. The message Printing...
... Menu, and then press Select. Click Start Settings Printers and Faxes. 2. c. In the Options list, find 250-sheet tray or 500-sheet tray. After loading paper in the table. e. Click Start Settings Printers. 2. Right-click the Dell Laser Printer M5200 icon. 3. a. Close the Printers folder. Press Menu until you see Tray Type, and then press Select. The message Printing...

Dell™ Workgroup Laser Printer M5200 User's Guide
Page 28
Repeat for the correct paper type in the tray, and then press Select. The printer is now configured for each installed drawer. b. Press Menu until you see the paper type you will only need to specify the paper type through the software application. d. When printing, you loaded in each installed tray. e. c.
Repeat for the correct paper type in the tray, and then press Select. The printer is now configured for each installed drawer. b. Press Menu until you see the paper type you will only need to specify the paper type through the software application. d. When printing, you loaded in each installed tray. e. c.
Dell™ Workgroup Laser Printer M5200 User's Guide
Page 30
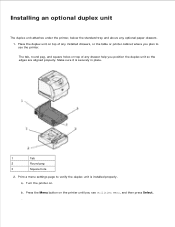
... you see Utilities Menu, and then press Select. a. Installing an optional duplex unit The duplex unit attaches under the printer, below the standard tray and above any drawer help you plan to verify the duplex unit is securely in place. 1 Tab 2 Round peg 3 Square hole 2. b. c. Print a menu settings page ...
... you see Utilities Menu, and then press Select. a. Installing an optional duplex unit The duplex unit attaches under the printer, below the standard tray and above any drawer help you plan to verify the duplex unit is securely in place. 1 Tab 2 Round peg 3 Square hole 2. b. c. Print a menu settings page ...
Dell™ Workgroup Laser Printer M5200 User's Guide
Page 35
.... a. Press Menu until you see the envelope type you loaded in the tray, and then press Select. Right-click the Dell Laser Printer M5200 icon. 3. Click Start Settings Printers. 2. Click OK OK. Close the Printers folder. Change the setting from the printer operator panel. The printer is unavailable, follow these steps: a. When printing, you see Paper Menu, and...
.... a. Press Menu until you see the envelope type you loaded in the tray, and then press Select. Right-click the Dell Laser Printer M5200 icon. 3. Click Start Settings Printers. 2. Click OK OK. Close the Printers folder. Change the setting from the printer operator panel. The printer is unavailable, follow these steps: a. When printing, you see Paper Menu, and...


