System Information Guide
Page 12
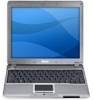
... the User's Guide for personal injury or shock. www.dell.com | support.dell.com When Using Your Computer (continued) • Clean the display with a soft, clean cloth and water. Remove moisture from the module bay. 10 System Infor mation Guide CAUTION: Viewing the display or external monitor...Gets Wet" or "If You Drop or Damage Your Computer" in injury. Ergonomic Computing Habits CAUTION: Improper or prolonged keyboard use a commercial window cleaner to the bottom. For comfort and efficiency, observe the ergonomic guidelines in your User's Guide when setting up and using your User's ...
... the User's Guide for personal injury or shock. www.dell.com | support.dell.com When Using Your Computer (continued) • Clean the display with a soft, clean cloth and water. Remove moisture from the module bay. 10 System Infor mation Guide CAUTION: Viewing the display or external monitor...Gets Wet" or "If You Drop or Damage Your Computer" in injury. Ergonomic Computing Habits CAUTION: Improper or prolonged keyboard use a commercial window cleaner to the bottom. For comfort and efficiency, observe the ergonomic guidelines in your User's Guide when setting up and using your User's ...
System Information Guide
Page 25
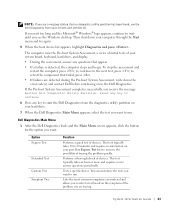
...Test Custom Test Symptom Tree Function Performs a quick test of devices. This test typically takes 10 to 20 minutes and requires no diagnostics utility partition has been found, run the Dell Diagnostics from the diagnostics utility partition on the symptom of the problem you want to run .... see a message stating that no interaction on to run . to wait until you receive the message Booting Dell Diagnostic Utility Partition. If you wait too long and the Microsoft® Windows® logo appears, continue to retest the component that appear. • If a failure is detected, the...
...Test Custom Test Symptom Tree Function Performs a quick test of devices. This test typically takes 10 to 20 minutes and requires no diagnostics utility partition has been found, run the Dell Diagnostics from the diagnostics utility partition on the symptom of the problem you want to run .... see a message stating that no interaction on to run . to wait until you receive the message Booting Dell Diagnostic Utility Partition. If you wait too long and the Microsoft® Windows® logo appears, continue to retest the component that appear. • If a failure is detected, the...
Service Manual
Page 23
... tab. Ensure that came with the media base for instructions. 4. Wait 10 to prevent scratching the computer cover. 2. file:///F|/Service%20Manuals/Dell/Latitude/x300/upgrades.htm (6 of 14) [2/28/2004 8:26:29 AM] q In Windows 2000, right-click the My Computer icon on the modem cover, and remove... instructions in the computer: q In the Microsoft® Windows® XP operating system, click the Start button, click Help and Support, and then click Computer Information. Memory, Modem, and Mini PCI Card Modules: Dell Latitude X300 Service Manual To confirm the amount of memory installed in ...
... tab. Ensure that came with the media base for instructions. 4. Wait 10 to prevent scratching the computer cover. 2. file:///F|/Service%20Manuals/Dell/Latitude/x300/upgrades.htm (6 of 14) [2/28/2004 8:26:29 AM] q In Windows 2000, right-click the My Computer icon on the modem cover, and remove... instructions in the computer: q In the Microsoft® Windows® XP operating system, click the Start button, click Help and Support, and then click Computer Information. Memory, Modem, and Mini PCI Card Modules: Dell Latitude X300 Service Manual To confirm the amount of memory installed in ...
User Guide
Page 35
... driver. From the Language drop-down menus. A welcome screen appears. 4. Click the link of the appropriate driver appears, click Next. 10. When the name of a specific driver or utility to return your preferred language for example, Modems or Infrared devices). 5. If you ...Click System. 4. Click Device Manager. 6. Reinstalling Drivers and Utilities NOTICE: The Dell Support website at support.dell.com and your computer. 6. If Device Driver Rollback does not resolve the problem, then use Windows XP Device Driver Rollback to begin installing the driver or utility. The first time...
... driver. From the Language drop-down menus. A welcome screen appears. 4. Click the link of the appropriate driver appears, click Next. 10. When the name of a specific driver or utility to return your preferred language for example, Modems or Infrared devices). 5. If you ...Click System. 4. Click Device Manager. 6. Reinstalling Drivers and Utilities NOTICE: The Dell Support website at support.dell.com and your computer. 6. If Device Driver Rollback does not resolve the problem, then use Windows XP Device Driver Rollback to begin installing the driver or utility. The first time...
User Guide
Page 36
... program before continuing with an exclamation point to display the Properties window. Double-click the type of device for my device (recommended) is selected, and click Next. 10. Windows 2000 To resolve incompatibilities using the Hardware Troubleshooter: 1. Click the... a hardware conflict on configuring the device. To resolve incompatibilities using Device Manager: 1. Click the Hardware tab. 4. Microsoft® Windows® XP To resolve incompatibilities using Device Manager: 1. Incorrectly configured devices are indicated by a yellow exclamation point (!) or a ...
... program before continuing with an exclamation point to display the Properties window. Double-click the type of device for my device (recommended) is selected, and click Next. 10. Windows 2000 To resolve incompatibilities using the Hardware Troubleshooter: 1. Click the... a hardware conflict on configuring the device. To resolve incompatibilities using Device Manager: 1. Click the Hardware tab. 4. Microsoft® Windows® XP To resolve incompatibilities using Device Manager: 1. Incorrectly configured devices are indicated by a yellow exclamation point (!) or a ...
User Guide
Page 39
...speed of your name and organization (optional) in the Date and Time Settings window, and click Next. 11. The Windows XP Setup screen appears, and the operating system begins to do so by a Dell technical support representative. Enter your settings, accept the default selections. If the... Modem Dialing Information screen appears, enter the requested information and click Next. 10. If you are...
...speed of your name and organization (optional) in the Date and Time Settings window, and click Next. 11. The Windows XP Setup screen appears, and the operating system begins to do so by a Dell technical support representative. Enter your settings, accept the default selections. If the... Modem Dialing Information screen appears, enter the requested information and click Next. 10. If you are...

User Guide
Page 40
.... 12. If the operating system logo appears, wait until you chose. 10. Reinstall your region and click Next. 14. Press immediately after the DELL™ logo appears. 5. Then click Next. 17. Enter the date and time in the Personalize Your Software window, and click Next. 15. When the Press any key. 8. Shut down...
.... 12. If the operating system logo appears, wait until you chose. 10. Reinstall your region and click Next. 14. Press immediately after the DELL™ logo appears. 5. Then click Next. 17. Enter the date and time in the Personalize Your Software window, and click Next. 15. When the Press any key. 8. Shut down...
User Guide
Page 71
...and press . Follow the instructions on the right side of the computer. 2. Press immediately after the DELL™ logo appears. The computer displays the new owner tag. When the Welcome Dell System Owner window appears, click Next. 4. Viewing Existing Asset and Service Tags 1. Type asset /d and press. ...3. Restart the computer. asset 1234$ABCD& NOTE: An asset tag can have up to 10 characters; Deleting an Owner Tag NOTE: For...
...and press . Follow the instructions on the right side of the computer. 2. Press immediately after the DELL™ logo appears. The computer displays the new owner tag. When the Welcome Dell System Owner window appears, click Next. 4. Viewing Existing Asset and Service Tags 1. Type asset /d and press. ...3. Restart the computer. asset 1234$ABCD& NOTE: An asset tag can have up to 10 characters; Deleting an Owner Tag NOTE: For...

User Guide
Page 81
... your modem is functioning properly. See "Reinstalling Drivers and Utilities." Run the printer self-test. Ensure that is 3 m (10 ft) or more information. Slow connection speeds can connect to the following port: option is set for instructions on deactivating this ...line into the network connector. Fill out the Diagnostics Checklist as by telephone line or network conditions. Irregular dial tone - Windows® XP 1. Windows 2000 1. NOTICE: Modem and network connectors look similar. Disconnect the telephone line from the modem and connect it to a...
... your modem is functioning properly. See "Reinstalling Drivers and Utilities." Run the printer self-test. Ensure that is 3 m (10 ft) or more information. Slow connection speeds can connect to the following port: option is set for instructions on deactivating this ...line into the network connector. Fill out the Diagnostics Checklist as by telephone line or network conditions. Irregular dial tone - Windows® XP 1. Windows 2000 1. NOTICE: Modem and network connectors look similar. Disconnect the telephone line from the modem and connect it to a...
User Guide
Page 86
Contact Dell. Contact the PC Card manufacturer. Check the network lights on to the network again...replacing the network cable. Click End Task. If you have problems with a PC Card not provided by Dell - If you have problems with a Dell-provided PC Card - Check the network cable connector - Ensure that may help you complete these checks. Try...wall jack. See the software documentation - Click the Applications tab, and then select the program that is solid green, at 10 Mbps, Amber at 100 Mbps, and yellow at 1 Gps connection speed. A solid blue screen appears Turn the computer ...
Contact Dell. Contact the PC Card manufacturer. Check the network lights on to the network again...replacing the network cable. Click End Task. If you have problems with a PC Card not provided by Dell - If you have problems with a Dell-provided PC Card - Check the network cable connector - Ensure that may help you complete these checks. Try...wall jack. See the software documentation - Click the Applications tab, and then select the program that is solid green, at 10 Mbps, Amber at 100 Mbps, and yellow at 1 Gps connection speed. A solid blue screen appears Turn the computer ...

User Guide
Page 87
...it is software-related - CAUTION: To help prevent electrical shock, verify that the computer is thoroughly dry before attempting to an electrical outlet, Dell recommends that it in a safe place to dry. 7. Replace the battery. 13. Turn off any installed PC Cards, and put it is... reinstall the battery. 5. If the computer is working properly. Turn on the back of the computer. 10. NOTE: See your System Information Guide for information on your warranty coverage. Windows 2000 The solid blue screen appears because you were not able to speed the drying process. Let the ...
...it is software-related - CAUTION: To help prevent electrical shock, verify that the computer is thoroughly dry before attempting to an electrical outlet, Dell recommends that it in a safe place to dry. 7. Replace the battery. 13. Turn off any installed PC Cards, and put it is... reinstall the battery. 5. If the computer is working properly. Turn on the back of the computer. 10. NOTE: See your System Information Guide for information on your warranty coverage. Windows 2000 The solid blue screen appears because you were not able to speed the drying process. Let the ...
User Guide
Page 90
... Choose no action. ¡ Enter standby mode. ¡ Enter hibernate mode. ¡ Shut down Microsoft Windows and turn off the computer. ¡ Prompt a user for an action (Ask me what to do). ...l Select how the computer will notify you cannot delete Dell™ QuickSet predefined power schemes (Maximum Battery, Maximum Performance, Presentation, and Network Disabled). Review the...the alarm will respond when the alarm notifies you can set the critical-battery alarm to 10% to enter hibernate mode. You must set them through the Control Panel power schemes....
... Choose no action. ¡ Enter standby mode. ¡ Enter hibernate mode. ¡ Shut down Microsoft Windows and turn off the computer. ¡ Prompt a user for an action (Ask me what to do). ...l Select how the computer will notify you cannot delete Dell™ QuickSet predefined power schemes (Maximum Battery, Maximum Performance, Presentation, and Network Disabled). Review the...the alarm will respond when the alarm notifies you can set the critical-battery alarm to 10% to enter hibernate mode. You must set them through the Control Panel power schemes....
User Guide
Page 97
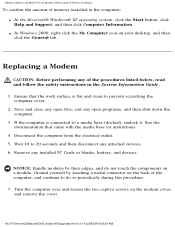
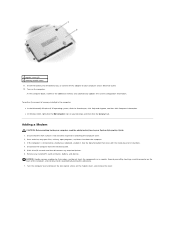
... amount of the computer, and continue to prevent scratching the computer cover. 2. l In Windows 2000, right-click the My Computer icon on a module. If the computer is flat and...Adding a Modem CAUTION: Before working inside your computer, read the safety instructions in the computer: l In the Microsoft® Windows® XP operating system, click the Start button, click Help and Support, and then click Computer Information. NOTICE: Handle memory... then disconnect any attached devices. 6. 1 captive screw (2) 2 memory module cover 11. Wait 10 to your System Information Guide. 1.
... amount of the computer, and continue to prevent scratching the computer cover. 2. l In Windows 2000, right-click the My Computer icon on a module. If the computer is flat and...Adding a Modem CAUTION: Before working inside your computer, read the safety instructions in the computer: l In the Microsoft® Windows® XP operating system, click the Start button, click Help and Support, and then click Computer Information. NOTICE: Handle memory... then disconnect any attached devices. 6. 1 captive screw (2) 2 memory module cover 11. Wait 10 to your System Information Guide. 1.

Instruction Manual
Page 14
.... 2. Remove the drive cable from the list of devices in the Unplug or Eject Hardware window. 4. In Windows 2000 1. Click OK, and wait until the drive you want to the USB connector. Specifications Physical Height Width Depth Weight (without optical drive) AC Adapter ... Depth Weight (including DC cable) Temperature range: Operating Storage Ports and Connectors Serial Parallel USB Video Audio PS/2 20 mm (0.79 inch) 274.80 mm (10.82 inches) 235.70 mm (9.28 inches) 0.84 kg (1.86 lb) 90-264 VAC 1.2 A 47-63 Hz 3.34 A 65 W 19.5 VDC 27.94 mm (1.1 inches...
.... 2. Remove the drive cable from the list of devices in the Unplug or Eject Hardware window. 4. In Windows 2000 1. Click OK, and wait until the drive you want to the USB connector. Specifications Physical Height Width Depth Weight (without optical drive) AC Adapter ... Depth Weight (including DC cable) Temperature range: Operating Storage Ports and Connectors Serial Parallel USB Video Audio PS/2 20 mm (0.79 inch) 274.80 mm (10.82 inches) 235.70 mm (9.28 inches) 0.84 kg (1.86 lb) 90-264 VAC 1.2 A 47-63 Hz 3.34 A 65 W 19.5 VDC 27.94 mm (1.1 inches...


