System Information Guide
Page 12
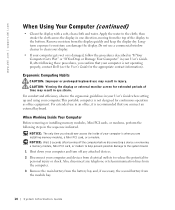
... may result in one direction, moving from the display quickly and keep the display dry. Ergonomic Computing Habits CAUTION: Improper or prolonged keyboard use in injury. then stroke the cloth across the display in eye strain. Also, disconnect any attached devices. 2 Disconnect your computer... PCI cards, or modems, perform the following these procedures, you are installing memory modules, a Mini PCI card, or a modem. www.dell.com | support.dell.com When Using Your Computer (continued) • Clean the display with a soft, clean cloth and water. Do not use a commercial ...
... may result in one direction, moving from the display quickly and keep the display dry. Ergonomic Computing Habits CAUTION: Improper or prolonged keyboard use in injury. then stroke the cloth across the display in eye strain. Also, disconnect any attached devices. 2 Disconnect your computer... PCI cards, or modems, perform the following these procedures, you are installing memory modules, a Mini PCI card, or a modem. www.dell.com | support.dell.com When Using Your Computer (continued) • Clean the display with a soft, clean cloth and water. Do not use a commercial ...

System Information Guide
Page 19
Front View display latch display power button touch pad speakers (2) touchpad buttons (2) keyboard device status lights keyboard status lights System Infor mation Guide 17
Front View display latch display power button touch pad speakers (2) touchpad buttons (2) keyboard device status lights keyboard status lights System Infor mation Guide 17
System Information Guide
Page 25
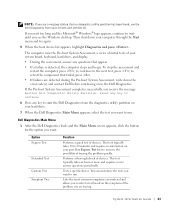
...you to select a test based on the symptom of the problem you are detected during the Pre-boot System Assessment, write down your system board, keyboard, hard drive, and display. • During the assessment, answer any key to run . The computer runs the Pre-boot System Assessment, a series... Test Symptom Tree Function Performs a quick test of devices. You can customize the tests you want . System Infor mation Guide 23 to the Dell Diagnostics. If you wait too long and the Microsoft® Windows® logo appears, continue to wait until you see a message stating that...
...you to select a test based on the symptom of the problem you are detected during the Pre-boot System Assessment, write down your system board, keyboard, hard drive, and display. • During the assessment, answer any key to run . The computer runs the Pre-boot System Assessment, a series... Test Symptom Tree Function Performs a quick test of devices. You can customize the tests you want . System Infor mation Guide 23 to the Dell Diagnostics. If you wait too long and the Microsoft® Windows® logo appears, continue to wait until you see a message stating that...
Service Manual
Page 1
... you make better use of 2) [2/28/2004 8:26:18 AM] Dell Latitude X300 Service Manual Dell™ Latitude™ X300 Service Manual Before You Begin Dell Diagnostics System Components Battery Memory, Modem, and Mini PCI Card Modules Keyboard Palm Rest Hard Drive Hinge Covers and Display Assembly Keyboard Tray Reserve Battery Speakers Bluetooth™ Module Cooling Fan Battery Latches...
... you make better use of 2) [2/28/2004 8:26:18 AM] Dell Latitude X300 Service Manual Dell™ Latitude™ X300 Service Manual Before You Begin Dell Diagnostics System Components Battery Memory, Modem, and Mini PCI Card Modules Keyboard Palm Rest Hard Drive Hinge Covers and Display Assembly Keyboard Tray Reserve Battery Speakers Bluetooth™ Module Cooling Fan Battery Latches...
Service Manual
Page 7
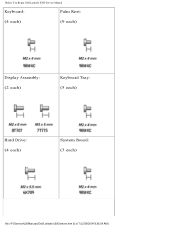
Before You Begin: Dell Latitude X300 Service Manual Keyboard: Palm Rest: (4 each) (9 each) Display Assembly: (2 each) Keyboard Tray: (5 each) Hard Drive: (4 each) System Board: (3 each) file:///F|/Service%20Manuals/Dell/Latitude/x300/before.htm (6 of 7) [2/28/2004 8:26:24 AM]
Before You Begin: Dell Latitude X300 Service Manual Keyboard: Palm Rest: (4 each) (9 each) Display Assembly: (2 each) Keyboard Tray: (5 each) Hard Drive: (4 each) System Board: (3 each) file:///F|/Service%20Manuals/Dell/Latitude/x300/before.htm (6 of 7) [2/28/2004 8:26:24 AM]
Service Manual
Page 10
...keyboard, hard drive, and display. Connect the computer to begin . When the DELL™ logo appears, press immediately. The computer runs the Pre-boot System Assessment, a series of initial tests of 4) [2/28/2004 8:26:25 AM] To stop the assessment and restart the computer, press ; Dell Diagnostics: Dell Latitude X300...® Windows® logo appears, continue to the next file:///F|/Service%20Manuals/Dell/Latitude/x300/diag.htm (2 of your computer cannot display a screen image, contact Dell. 1. If you see a message stating that came with other computers can result...
...keyboard, hard drive, and display. Connect the computer to begin . When the DELL™ logo appears, press immediately. The computer runs the Pre-boot System Assessment, a series of initial tests of 4) [2/28/2004 8:26:25 AM] To stop the assessment and restart the computer, press ; Dell Diagnostics: Dell Latitude X300...® Windows® logo appears, continue to the next file:///F|/Service%20Manuals/Dell/Latitude/x300/diag.htm (2 of your computer cannot display a screen image, contact Dell. 1. If you see a message stating that came with other computers can result...
Service Manual
Page 14
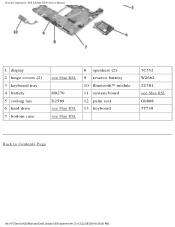
System Components: Dell Latitude X300 Service Manual 1 display 2 hinge covers (2) 3 keyboard tray 4 battery 5 cooling fan 6 hard drive 7 bottom case see Mini RSL M0270 D2589 see Mini RSL see Mini RSL 8 speakers (2) 9 reserve battery 10 Bluetooth™ module 11 system board 12 palm rest 13 keyboard 7C552 W2662 2U381 see Mini RSL G0808 5Y730 Back to Contents Page file:///F|/Service%20Manuals/Dell/Latitude/x300/system.htm (2 of 2) [2/28/2004 8:26:26 AM]
System Components: Dell Latitude X300 Service Manual 1 display 2 hinge covers (2) 3 keyboard tray 4 battery 5 cooling fan 6 hard drive 7 bottom case see Mini RSL M0270 D2589 see Mini RSL see Mini RSL 8 speakers (2) 9 reserve battery 10 Bluetooth™ module 11 system board 12 palm rest 13 keyboard 7C552 W2662 2U381 see Mini RSL G0808 5Y730 Back to Contents Page file:///F|/Service%20Manuals/Dell/Latitude/x300/system.htm (2 of 2) [2/28/2004 8:26:26 AM]
Service Manual
Page 32
...: Read "Before You Begin" before performing the following procedure. 1. Keyboard: Dell Latitude X300 Service Manual Back to Contents Page Keyboard Dell™ Latitude™ X300 Service Manual Removing the Keyboard Replacing the Keyboard Removing the Keyboard CAUTION: Before you begin any attached devices from the bottom of the computer. file:///F|/Service%20Manuals/Dell/Latitude/x300/keyboard.htm (1 of the procedures in this section, follow the...
...: Read "Before You Begin" before performing the following procedure. 1. Keyboard: Dell Latitude X300 Service Manual Back to Contents Page Keyboard Dell™ Latitude™ X300 Service Manual Removing the Keyboard Replacing the Keyboard Removing the Keyboard CAUTION: Before you begin any attached devices from the bottom of the computer. file:///F|/Service%20Manuals/Dell/Latitude/x300/keyboard.htm (1 of the procedures in this section, follow the...

Service Manual
Page 33
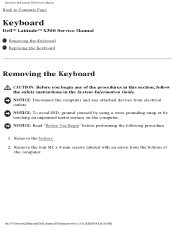
Keyboard: Dell Latitude X300 Service Manual 1 M2 x 4-mm screws (4) 98MKC NOTICE: The keycaps on the keyboard are fragile, easily dislodged, and timeconsuming to the right of 6) [2/28/2004 8:26:30 AM] Turn the computer over, and insert a ¼-inch flat-blade screwdriver into the slot to replace. Be careful when removing and handling the keyboard. 3. file:///F|/Service%20Manuals/Dell/Latitude/x300/keyboard.htm (2 of the keyboard locator tab.
Keyboard: Dell Latitude X300 Service Manual 1 M2 x 4-mm screws (4) 98MKC NOTICE: The keycaps on the keyboard are fragile, easily dislodged, and timeconsuming to the right of 6) [2/28/2004 8:26:30 AM] Turn the computer over, and insert a ¼-inch flat-blade screwdriver into the slot to replace. Be careful when removing and handling the keyboard. 3. file:///F|/Service%20Manuals/Dell/Latitude/x300/keyboard.htm (2 of the keyboard locator tab.

Service Manual
Page 34
... release the four securing tabs located across the back edge of the computer. file:///F|/Service%20Manuals/Dell/Latitude/x300/keyboard.htm (3 of the computer and place it face-down on the palm rest. Open the ZIF connector on the keyboard flex cable. 7. Pull the keyboard a small distance toward the back of the keyboard. 6. Keyboard: Dell Latitude X300 Service Manual 1 keyboard locator tab 4.
... release the four securing tabs located across the back edge of the computer. file:///F|/Service%20Manuals/Dell/Latitude/x300/keyboard.htm (3 of the computer and place it face-down on the palm rest. Open the ZIF connector on the keyboard flex cable. 7. Pull the keyboard a small distance toward the back of the keyboard. 6. Keyboard: Dell Latitude X300 Service Manual 1 keyboard locator tab 4.

Service Manual
Page 35
Remove the keyboard flex cable from the ZIF connector. 9. Keyboard: Dell Latitude X300 Service Manual 1 ZIF connector 2 keyboard flex cable 3 ZIF connector tabs (2) 8. Lift the keyboard up and out of 6) [2/28/2004 8:26:30 AM] Replacing the Keyboard file:///F|/Service%20Manuals/Dell/Latitude/x300/keyboard.htm (4 of the computer.
Remove the keyboard flex cable from the ZIF connector. 9. Keyboard: Dell Latitude X300 Service Manual 1 ZIF connector 2 keyboard flex cable 3 ZIF connector tabs (2) 8. Lift the keyboard up and out of 6) [2/28/2004 8:26:30 AM] Replacing the Keyboard file:///F|/Service%20Manuals/Dell/Latitude/x300/keyboard.htm (4 of the computer.

Service Manual
Page 36
Keyboard: Dell Latitude X300 Service Manual 1. Press down on the bottom of the palm rest before trying to help control tab/slot alignment. NOTICE: To avoid damage to Contents Page file:///F|/Service%20Manuals/Dell/Latitude/x300/keyboard.htm (5 of the flex cable. When the keyboard appears to be completely seated, confirm that the front edge of the computer. Press the...
Keyboard: Dell Latitude X300 Service Manual 1. Press down on the bottom of the palm rest before trying to help control tab/slot alignment. NOTICE: To avoid damage to Contents Page file:///F|/Service%20Manuals/Dell/Latitude/x300/keyboard.htm (5 of the flex cable. When the keyboard appears to be completely seated, confirm that the front edge of the computer. Press the...

Service Manual
Page 38
... (1 of the procedures in this section, follow the safety instructions in the System Information Guide. Remove the keyboard. 3. Remove the battery. 2. Palm Rest: Dell Latitude X300 Service Manual Back to Contents Page Palm Rest Dell™ Latitude™ X300 Service Manual Removing the Palm Rest Replacing the Palm Rest Removing the Palm Rest CAUTION: Before you begin...
... (1 of the procedures in this section, follow the safety instructions in the System Information Guide. Remove the keyboard. 3. Remove the battery. 2. Palm Rest: Dell Latitude X300 Service Manual Back to Contents Page Palm Rest Dell™ Latitude™ X300 Service Manual Removing the Palm Rest Replacing the Palm Rest Removing the Palm Rest CAUTION: Before you begin...
Service Manual
Page 43
...or by touching an unpainted metal surface on the computer. Remove the keyboard. 3. Loosen the four M2 x 5.5-mm screws that you begin any attached devices from electrical outlets. file:///F|/Service%20Manuals/Dell/Latitude/x300/hdd.htm (1 of the procedures in this section, follow the safety... instructions in the System Information Guide. Hard Drive: Dell Latitude X300 Service Manual Back to Contents Page Hard Drive Dell™ Latitude™ X300 Service Manual Removing the Hard Drive Replacing the Hard Drive Removing the Hard Drive CAUTION: ...
...or by touching an unpainted metal surface on the computer. Remove the keyboard. 3. Loosen the four M2 x 5.5-mm screws that you begin any attached devices from electrical outlets. file:///F|/Service%20Manuals/Dell/Latitude/x300/hdd.htm (1 of the procedures in this section, follow the safety... instructions in the System Information Guide. Hard Drive: Dell Latitude X300 Service Manual Back to Contents Page Hard Drive Dell™ Latitude™ X300 Service Manual Removing the Hard Drive Replacing the Hard Drive Removing the Hard Drive CAUTION: ...

Service Manual
Page 48
...from the bottom of each hinge cover to snap the hinge covers into the back of the computer. Remove the keyboard. 3. file:///F|/Service%20Manuals/Dell/Latitude/x300/display.htm (3 of the procedures in this section, follow the safety instructions in the System Information Guide. NOTICE:... outlets. Remove the battery. 2. NOTICE: Disconnect the computer and any of 7) [2/28/2004 8:26:33 AM] Hinge Covers and Display Assembly: Dell Latitude X300 Service Manual 3. Close the display. 5. NOTE: The back of each hinge cover into place. 4. Press down on the computer. NOTICE: Read ...
...from the bottom of each hinge cover to snap the hinge covers into the back of the computer. Remove the keyboard. 3. file:///F|/Service%20Manuals/Dell/Latitude/x300/display.htm (3 of the procedures in this section, follow the safety instructions in the System Information Guide. NOTICE:... outlets. Remove the battery. 2. NOTICE: Disconnect the computer and any of 7) [2/28/2004 8:26:33 AM] Hinge Covers and Display Assembly: Dell Latitude X300 Service Manual 3. Close the display. 5. NOTE: The back of each hinge cover into place. 4. Press down on the computer. NOTICE: Read ...

Service Manual
Page 52
Replace the two M3 x 5-mm screws from the bottom of 7) [2/28/2004 8:26:33 AM] Connect the signal cable to the system board. 6. Replace the battery. Hinge Covers and Display Assembly: Dell Latitude X300 Service Manual 3. Back to Contents Page file:///F|/Service%20Manuals/Dell/Latitude/x300/display.htm (7 of the computer. 8. If a tape secured the signal connector, replace it and connect the signal cable to the system board. 5. Close the display and turn the computer over. 7. Connect both the antenna connectors, matching the color codes. 4. Replace the keyboard. 9.
Replace the two M3 x 5-mm screws from the bottom of 7) [2/28/2004 8:26:33 AM] Connect the signal cable to the system board. 6. Replace the battery. Hinge Covers and Display Assembly: Dell Latitude X300 Service Manual 3. Back to Contents Page file:///F|/Service%20Manuals/Dell/Latitude/x300/display.htm (7 of the computer. 8. If a tape secured the signal connector, replace it and connect the signal cable to the system board. 5. Close the display and turn the computer over. 7. Connect both the antenna connectors, matching the color codes. 4. Replace the keyboard. 9.
Service Manual
Page 53
... x 4-mm screws that secure the keyboard tray to Contents Page Keyboard Tray Dell™ Latitude™ X300 Service Manual Removing the Keyboard Tray Replacing the Keyboard Tray Removing the Keyboard Tray CAUTION: Before you begin any attached devices from electrical outlets. NOTICE: Read "Before You Begin" before performing the following procedure. 1. Keyboard Tray: Dell Latitude X300 Service Manual Back to the system...
... x 4-mm screws that secure the keyboard tray to Contents Page Keyboard Tray Dell™ Latitude™ X300 Service Manual Removing the Keyboard Tray Replacing the Keyboard Tray Removing the Keyboard Tray CAUTION: Before you begin any attached devices from electrical outlets. NOTICE: Read "Before You Begin" before performing the following procedure. 1. Keyboard Tray: Dell Latitude X300 Service Manual Back to the system...

Service Manual
Page 54
Route the antenna cables through the oval opening on the keyboard tray. file:///F|/Service%20Manuals/Dell/Latitude/x300/keytray.htm (2 of the bottom case. Replace the keyboard tray. 2. Keyboard Tray: Dell Latitude X300 Service Manual 1 keyboard tray 2 M2 x 4-mm screws (5) 98MKC 7. Replacing the Keyboard Tray 1. Lift the keyboard tray up and slip out the antenna cables before lifting the tray out of 3) [2/28/2004 8:26:34 AM]
Route the antenna cables through the oval opening on the keyboard tray. file:///F|/Service%20Manuals/Dell/Latitude/x300/keytray.htm (2 of the bottom case. Replace the keyboard tray. 2. Keyboard Tray: Dell Latitude X300 Service Manual 1 keyboard tray 2 M2 x 4-mm screws (5) 98MKC 7. Replacing the Keyboard Tray 1. Lift the keyboard tray up and slip out the antenna cables before lifting the tray out of 3) [2/28/2004 8:26:34 AM]

Service Manual
Page 55
Back to the system board. Reinstall the five M2 x 4-mm screws that secure the keyboard tray to Contents Page file:///F|/Service%20Manuals/Dell/Latitude/x300/keytray.htm (3 of 3) [2/28/2004 8:26:34 AM] Keyboard Tray: Dell Latitude X300 Service Manual 1 antenna cable connectors 2 oval opening on keyboard tray 3.
Back to the system board. Reinstall the five M2 x 4-mm screws that secure the keyboard tray to Contents Page file:///F|/Service%20Manuals/Dell/Latitude/x300/keytray.htm (3 of 3) [2/28/2004 8:26:34 AM] Keyboard Tray: Dell Latitude X300 Service Manual 1 antenna cable connectors 2 oval opening on keyboard tray 3.
Service Manual
Page 56
... Replacing the Reserve Battery Removing the Reserve Battery CAUTION: Before you begin any attached devices from electrical outlets. Remove the keyboard. 3. Reserve Battery: Dell Latitude X300 Service Manual Back to disconnect the cable. 4. Remove the battery. 2. NOTICE: To avoid ESD, ground yourself by ... touching an unpainted metal surface on the reserve battery cable. NOTICE: Do not pull on the computer. file:///F|/Service%20Manuals/Dell/Latitude/x300/rsrvbatt.htm (1 of the procedures in this section, follow the safety instructions in the System Information Guide. Remove the palm...
... Replacing the Reserve Battery Removing the Reserve Battery CAUTION: Before you begin any attached devices from electrical outlets. Remove the keyboard. 3. Reserve Battery: Dell Latitude X300 Service Manual Back to disconnect the cable. 4. Remove the battery. 2. NOTICE: To avoid ESD, ground yourself by ... touching an unpainted metal surface on the reserve battery cable. NOTICE: Do not pull on the computer. file:///F|/Service%20Manuals/Dell/Latitude/x300/rsrvbatt.htm (1 of the procedures in this section, follow the safety instructions in the System Information Guide. Remove the palm...


