Owner's Manual
Page 8
... unpainted metal surface, such as an ExpressCard. 2. Connect any external devices, such as a port replicator, battery slice, or media base, and replace any installed ExpressCards or Smart Cards from the electrical outlet before turning on a flat work , periodically touch an unpainted metal surface to your computer from the appropriate slots. Connect any external devices, cards, and cables before opening the display. Turn the computer top-side up. 9. CAUTION: To guard against...
... unpainted metal surface, such as an ExpressCard. 2. Connect any external devices, such as a port replicator, battery slice, or media base, and replace any installed ExpressCards or Smart Cards from the electrical outlet before turning on a flat work , periodically touch an unpainted metal surface to your computer from the appropriate slots. Connect any external devices, cards, and cables before opening the display. Turn the computer top-side up. 9. CAUTION: To guard against...
Owner's Manual
Page 64
...Enable Boot Support • Enable External USB Port Default Setting: both the options are enabled The option is disabled by default. • Enable USB PowerShare Allows you to configure the behavior of the keyboard illumination feature. The option is disabled by default. The options are: • Enable Internal Modem • Enable Microphone • Enable eSATA Ports • Enable Hard Drive Free Fall Protection • Enable Module Bay • Enable ExpressCard • Enable Camera • Enable Media Card • Disable Media Card Default Setting: All devices are enabled...
...Enable Boot Support • Enable External USB Port Default Setting: both the options are enabled The option is disabled by default. • Enable USB PowerShare Allows you to configure the behavior of the keyboard illumination feature. The option is disabled by default. The options are: • Enable Internal Modem • Enable Microphone • Enable eSATA Ports • Enable Hard Drive Free Fall Protection • Enable Module Bay • Enable ExpressCard • Enable Camera • Enable Media Card • Disable Media Card Default Setting: All devices are enabled...
Owner's Manual
Page 68
... displays the keystroke sequence required to define how the computer handles the mouse and touchpad input. This option is enabled by default. • Enable Fn Key Emulation Specifies whether keyboard related errors are : • Minimal • Thorough (Default Setting) • Auto 68 This option is enabled by default. • Enable Adapter Warnings Allows you to charge the battery. Allows you to enter the BIOS Boot Option Menu. • Enable F12 Boot Option menu - Option Battery Slice Configuration Table 8. Allows you to activate...
... displays the keystroke sequence required to define how the computer handles the mouse and touchpad input. This option is enabled by default. • Enable Fn Key Emulation Specifies whether keyboard related errors are : • Minimal • Thorough (Default Setting) • Auto 68 This option is enabled by default. • Enable Adapter Warnings Allows you to charge the battery. Allows you to enter the BIOS Boot Option Menu. • Enable F12 Boot Option menu - Option Battery Slice Configuration Table 8. Allows you to activate...

Owner's Manual
Page 69
... 1. Maintenance Option Service Tag Asset Tag Table 12. System Logs Option BIOS events Description Allows you to create a system asset tag if an asset tag is not set . Go to enable or disable the wireless devices. Table 9. For notebooks, ensure that your computer battery is available. Virtualization Support Option Virtualization VT for Direct I /O Description This option specifies whether a Virtual Machine Monitor (VMM) can be controlled by the wireless switch. Description Displays...
... 1. Maintenance Option Service Tag Asset Tag Table 12. System Logs Option BIOS events Description Allows you to create a system asset tag if an asset tag is not set . Go to enable or disable the wireless devices. Table 9. For notebooks, ensure that your computer battery is available. Virtualization Support Option Virtualization VT for Direct I /O Description This option specifies whether a Virtual Machine Monitor (VMM) can be controlled by the wireless switch. Description Displays...
Owner's Manual
Page 70
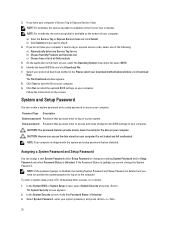
... BIOS file and click Download File. 7. a) Enter the Service Tag or Express Service Code and click Submit. Follow the instructions on or reboot. 1. In the System BIOS or System Setup screen, select System Security and press . If you must enter to log on to install the updated BIOS settings on to the BIOS settings of the following: a) Automatically detect my Service Tag for the data on your computer. Setup password Password that Password...
... BIOS file and click Download File. 7. a) Enter the Service Tag or Express Service Code and click Submit. Follow the instructions on or reboot. 1. In the System BIOS or System Setup screen, select System Security and press . If you must enter to log on to install the updated BIOS settings on to the BIOS settings of the following: a) Automatically detect my Service Tag for the data on your computer. Setup password Password that Password...
Owner's Manual
Page 75
... Blinking The USB controller encountered a problem during initialization. Turns on hard drive initialization OR System failed in a power management mode. Solid Blinking Solid The memory modules are installed/detected. Turns on the computer and blinks when the computer is in Option ROM initialization. The device status LEDs are used to indicate battery charge status. Off Blinking Blinking The modem is preventing the system from that they can troubleshoot your computer using indicators like Diagnostic Lights, Beep Codes, and Error Messages during the operation...
... Blinking The USB controller encountered a problem during initialization. Turns on hard drive initialization OR System failed in a power management mode. Solid Blinking Solid The memory modules are installed/detected. Turns on the computer and blinks when the computer is in Option ROM initialization. The device status LEDs are used to indicate battery charge status. Off Blinking Blinking The modem is preventing the system from that they can troubleshoot your computer using indicators like Diagnostic Lights, Beep Codes, and Error Messages during the operation...
Owner's Manual
Page 78
...Internal speaker amplifier Volume controls Video Type Controller Communications Network adapter Wireless Ports and Connectors Audio Video Network adapter USB 2.0 USB 3.0 Memory card reader Docking port Subscriber Identity Module (SIM) card Contactless Smart Card Supported Smart Cards/Technologies Display Type Size 78 two 1 W (RMS) per channel keyboard function keys, program menus integrated on system board • Intel HD Graphics • NVidia Discrete Graphics 10/100/1000 Mb/s Ethernet (RJ-45) internal wireless local area network (WLAN) and wireless wide area network (WWAN) one microphone...
...Internal speaker amplifier Volume controls Video Type Controller Communications Network adapter Wireless Ports and Connectors Audio Video Network adapter USB 2.0 USB 3.0 Memory card reader Docking port Subscriber Identity Module (SIM) card Contactless Smart Card Supported Smart Cards/Technologies Display Type Size 78 two 1 W (RMS) per channel keyboard function keys, program menus integrated on system board • Intel HD Graphics • NVidia Discrete Graphics 10/100/1000 Mb/s Ethernet (RJ-45) internal wireless local area network (WLAN) and wireless wide area network (WWAN) one microphone...
Intel Responsiveness Technologies Guide
Page 31
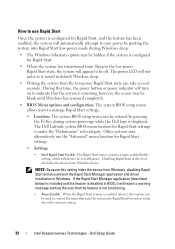
... exit BIOS Setup. Rapid Start System Configuration 31 The system should proceed to boot to the "Performance" menu or "Advanced" BIOS menu, depending on support.dell.com for each supported platform. As the system resets... 10 BIOS: ....press F2, when the Dell splash screen appears, to enter the BIOS setup menu: a Navigate to Windows. 11 Windows: Driver/application installation. a The driver and application package can be allowed. b If Rapid Start Timer or Critical Battery settings are available, enable...
... exit BIOS Setup. Rapid Start System Configuration 31 The system should proceed to boot to the "Performance" menu or "Advanced" BIOS menu, depending on support.dell.com for each supported platform. As the system resets... 10 BIOS: ....press F2, when the Dell splash screen appears, to enter the BIOS setup menu: a Navigate to Windows. 11 Windows: Driver/application installation. a The driver and application package can be allowed. b If Rapid Start Timer or Critical Battery settings are available, enable...
Intel Responsiveness Technologies Guide
Page 32
... turn on to manage Rapid Start settings. • Location: The system BIOS setup menu can take several seconds. Other systems may be entered by putting the system into Rapid Start low-power mode when the system is under the "Performance" sub-category. The Dell Latitude system BIOS menu location for Rapid Start settings. • Settings • Intel Rapid Start Enable: The Rapid Start menu contains a main enable/disable setting, which will also prevent the Rapid Start Manager application and driver installation...
... turn on to manage Rapid Start settings. • Location: The system BIOS setup menu can take several seconds. Other systems may be entered by putting the system into Rapid Start low-power mode when the system is under the "Performance" sub-category. The Dell Latitude system BIOS menu location for Rapid Start settings. • Settings • Intel Rapid Start Enable: The Rapid Start menu contains a main enable/disable setting, which will also prevent the Rapid Start Manager application and driver installation...
Statement of Volatility
Page 1
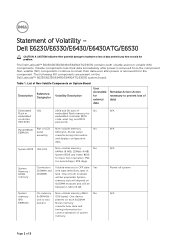
...), 32Mbit (4 MB) System BIOS and Video BIOS for correct operation of 3 Dell E6230/E6330/E6430/E6430ATG/E6530 CAUTION: A CAUTION indicates either potential damage to hardware or loss of Non-Volatile Components on System Board Reference Description Volatility Description Designator User Accessible for embedded controller BIOS code, asset tag, and BIOS passwords. Volatile components lose their data even after power is removed from the component. System Memory - One or both...
...), 32Mbit (4 MB) System BIOS and Video BIOS for correct operation of 3 Dell E6230/E6330/E6430/E6430ATG/E6530 CAUTION: A CAUTION indicates either potential damage to hardware or loss of Non-Volatile Components on System Board Reference Description Volatility Description Designator User Accessible for embedded controller BIOS code, asset tag, and BIOS passwords. Volatile components lose their data even after power is removed from the component. System Memory - One or both...
Statement of Volatility
Page 2
... is no power. Win 2K and Win XP support S4 state. Serial Flash Memory Security Controller U2 (up latency sleeping state. Stores CMOS information. User Accessible for external data Remedial Action (Action necessary to clarify memory volatility and data retention in situations where the system is put in the system supports S3 state. User Non-volatile Yes ROM/RW/ replaceable optical/magnetic media. DVD/ DVD+RW/ Diskette Drives Enter S3-S5...
... is no power. Win 2K and Win XP support S4 state. Serial Flash Memory Security Controller U2 (up latency sleeping state. Stores CMOS information. User Accessible for external data Remedial Action (Action necessary to clarify memory volatility and data retention in situations where the system is put in the system supports S3 state. User Non-volatile Yes ROM/RW/ replaceable optical/magnetic media. DVD/ DVD+RW/ Diskette Drives Enter S3-S5...

Latitude E-Family Re-Imaging Guide
Page 7
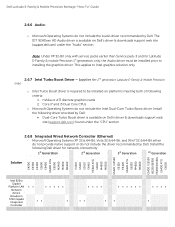
Dell Latitude E-Family & Mobile Precision Reimage "How-To" Guide 2.3 Latest Drivers / Applications and Utilities Dell recommends always obtaining the latest and most updated BIOS, drivers, firmware, and applications. Dell validated and tested drivers and applications are located on Dell's support web site http://support.dell.com/ o Enter the Service Tag or select the product model and the model number o Select Operating System (32-Bit or 64-Bit version must be selected) o Choose drivers and downloads
Dell Latitude E-Family & Mobile Precision Reimage "How-To" Guide 2.3 Latest Drivers / Applications and Utilities Dell recommends always obtaining the latest and most updated BIOS, drivers, firmware, and applications. Dell validated and tested drivers and applications are located on Dell's support web site http://support.dell.com/ o Enter the Service Tag or select the product model and the model number o Select Operating System (32-Bit or 64-Bit version must be selected) o Choose drivers and downloads
Latitude E-Family Re-Imaging Guide
Page 13
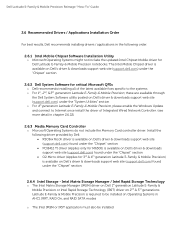
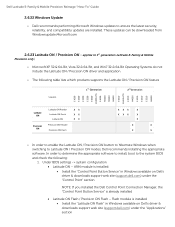
...following order: 2.6.1 Intel Mobile Chipset Software Installation Utility o Microsoft Operating Systems might not include the updated Intel Chipset Mobile driver for critical Microsoft QFEs o Dell recommends installing all of Integrated Wired Network Controller. (see more detail in chapter 2.6.22) 2.6.3 Media Memory Card Controller o Microsoft Operating Systems do not include the Memory Card controller driver. The Intel Mobile Chipset driver is available on Dell's driver & downloads support web site (support.dell.com) under the "Chipset" section 2.6.2 Dell System Software for Dell Latitude...
...following order: 2.6.1 Intel Mobile Chipset Software Installation Utility o Microsoft Operating Systems might not include the updated Intel Chipset Mobile driver for critical Microsoft QFEs o Dell recommends installing all of Integrated Wired Network Controller. (see more detail in chapter 2.6.22) 2.6.3 Media Memory Card Controller o Microsoft Operating Systems do not include the Memory Card controller driver. The Intel Mobile Chipset driver is available on Dell's driver & downloads support web site (support.dell.com) under the "Chipset" section 2.6.2 Dell System Software for Dell Latitude...
Latitude E-Family Re-Imaging Guide
Page 19
... Dell. Install the following Dell driver for Latitude E-Family & mobile Precision 1st generation only, the Audio driver must be installed on Dell's driver & downloads support web site (support.dell.com) under the "CPU" section 2.6.8 Integrated Wired Network Controller (Ethernet) - This applies to installing the graphics driver. Install the following criteria: 1. Core i7 and i5 Dual Core CPUs o Microsoft Operating Systems do not include the driver recommended by Dell. nVidia or ATI discrete graphics cards...
... Dell. Install the following Dell driver for Latitude E-Family & mobile Precision 1st generation only, the Audio driver must be installed on Dell's driver & downloads support web site (support.dell.com) under the "CPU" section 2.6.8 Integrated Wired Network Controller (Ethernet) - This applies to installing the graphics driver. Install the following criteria: 1. Core i7 and i5 Dual Core CPUs o Microsoft Operating Systems do not include the driver recommended by Dell. nVidia or ATI discrete graphics cards...

Latitude E-Family Re-Imaging Guide
Page 26
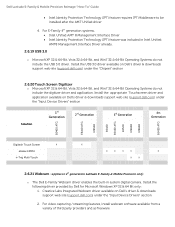
... & downloads support web site (support.dell.com) Dell strongly recommends only installing the appropriate driver for the system. 3rd generation Latitude Touchpad driver is backword compatible on 2nd generation Latitude systems o Dell Touchpad drivers are NOT compatible. Touch Touchpad Dell Jog Shuttle Touchpad Dell Jog Shuttle Touchpad (Multi-Touch) X X X X X X X X X X X X X X X X X X X X X o Dell Touchpad drivers are different between Dell Touchpad devices and drivers: 1st Generation 2nd Generation 3rd Generation 4th Generation E4200 E4300 E5400 E5500 E6400 E6400 ATG...
... & downloads support web site (support.dell.com) Dell strongly recommends only installing the appropriate driver for the system. 3rd generation Latitude Touchpad driver is backword compatible on 2nd generation Latitude systems o Dell Touchpad drivers are NOT compatible. Touch Touchpad Dell Jog Shuttle Touchpad Dell Jog Shuttle Touchpad (Multi-Touch) X X X X X X X X X X X X X X X X X X X X X o Dell Touchpad drivers are different between Dell Touchpad devices and drivers: 1st Generation 2nd Generation 3rd Generation 4th Generation E4200 E4300 E5400 E5500 E6400 E6400 ATG...

Latitude E-Family Re-Imaging Guide
Page 27
...-Bit Operating Systems do not include the Free Fall Sensor driver. Install the following driver provided by Dell are available on Dell's driver & downloads support web site (support.dell.com) under the "Communication" section o If Dell Control Point Connection Manager module is installed, the Conexant modem driver does not need to be installed 2.6.18 Intel vPro or AMT (Applicable ONLY to vPro Configurations) o Intel Active Management Technology (Intel AMT) allows users to easily manage networked computers to...
...-Bit Operating Systems do not include the Free Fall Sensor driver. Install the following driver provided by Dell are available on Dell's driver & downloads support web site (support.dell.com) under the "Communication" section o If Dell Control Point Connection Manager module is installed, the Conexant modem driver does not need to be installed 2.6.18 Intel vPro or AMT (Applicable ONLY to vPro Configurations) o Intel Active Management Technology (Intel AMT) allows users to easily manage networked computers to...
Latitude E-Family Re-Imaging Guide
Page 28
... E6420 ATG E6520 M4600 M6600 E6430 ATG Digitech Touch Screen X X eGalax EMPIA X X X X X n-Trig Multi Touch X X 2.6.21 Webcam -applies to be installed after the AMT Unified driver 4. Creative Labs Integrated Webcam driver available on Dell's driver & downloads support web site (support.dell.com) under the "Chipset" section 2.6.20 Touch Screen Digitizer o Microsoft XP 32 & 64-Bit, Vista 32 & 64-Bit, and Win7 32 & 64-Bit Operating Systems do not include the USB 3.0 driver. For...
... E6420 ATG E6520 M4600 M6600 E6430 ATG Digitech Touch Screen X X eGalax EMPIA X X X X X n-Trig Multi Touch X X 2.6.21 Webcam -applies to be installed after the AMT Unified driver 4. Creative Labs Integrated Webcam driver available on Dell's driver & downloads support web site (support.dell.com) under the "Chipset" section 2.6.20 Touch Screen Digitizer o Microsoft XP 32 & 64-Bit, Vista 32 & 64-Bit, and Win7 32 & 64-Bit Operating Systems do not include the USB 3.0 driver. For...
Latitude E-Family Re-Imaging Guide
Page 29
... X o In order to enable the Latitude ON / Precision ON button to hibernate Windows when switching to the system BIOS and check the following: 1. ARM module is installed: Install the "Control Point Button Service" in Windows available on Dell's driver & downloads support web site (support.dell.com) under the "Control Point" section NOTE: If you installed the Dell Control Point Connection Manager, the "Control Point Button Service" is installed Install the "Latitude ON Flash" in Windows available on Dell's driver & downloads support web site (support.dell.com) under the...
... X o In order to enable the Latitude ON / Precision ON button to hibernate Windows when switching to the system BIOS and check the following: 1. ARM module is installed: Install the "Control Point Button Service" in Windows available on Dell's driver & downloads support web site (support.dell.com) under the "Control Point" section NOTE: If you installed the Dell Control Point Connection Manager, the "Control Point Button Service" is installed Install the "Latitude ON Flash" in Windows available on Dell's driver & downloads support web site (support.dell.com) under the...
Latitude E-Family Re-Imaging Guide
Page 39
... install the Control Point Security Device Driver Pack 3. The driver pack has the drivers for ATAPI.SYS) 5. No, the wireless adapter only supports one of them being active at the same time? After installing the drivers and you have this PCI yellow bang in the Chipset folder: b. What drivers are in device manager, you need to install one time 6. Atmel Trusted Platform Module 3. STMicroelectronics Trusted Platform Module 4. Dell Smart Card Keyboard 7. a. After installing...
... install the Control Point Security Device Driver Pack 3. The driver pack has the drivers for ATAPI.SYS) 5. No, the wireless adapter only supports one of them being active at the same time? After installing the drivers and you have this PCI yellow bang in the Chipset folder: b. What drivers are in device manager, you need to install one time 6. Atmel Trusted Platform Module 3. STMicroelectronics Trusted Platform Module 4. Dell Smart Card Keyboard 7. a. After installing...
Latitude E-Family Re-Imaging Guide
Page 41
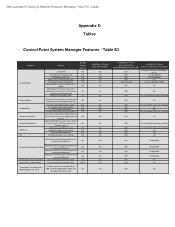
... enable/disable Privacy screen Privacy Screen - Dell Latitude E-Family & Mobile Precision Reimage "How-To" Guide Appendix D Tables - Fn+F2 to enable Battery Charge disable Fn+F3 launch DCP w/ Battery Status Fn+F7 to enable/disable DCP Fn+F8 to switch between display settings User hot key customization ability (also Fn+D functionality which is set the intensity, inactivity timeout values and input triggers.) Ability to toggle display by default). Table B1 Category Power Manager Display settings Function Keys Hot Key customizaton Keyboard backlighting Brightness ALS...
... enable/disable Privacy screen Privacy Screen - Dell Latitude E-Family & Mobile Precision Reimage "How-To" Guide Appendix D Tables - Fn+F2 to enable Battery Charge disable Fn+F3 launch DCP w/ Battery Status Fn+F7 to enable/disable DCP Fn+F8 to switch between display settings User hot key customization ability (also Fn+D functionality which is set the intensity, inactivity timeout values and input triggers.) Ability to toggle display by default). Table B1 Category Power Manager Display settings Function Keys Hot Key customizaton Keyboard backlighting Brightness ALS...


