

System Information Guide
Page 5
Contents CAUTION: Safety Instructions 5 General 5 Power 6 Battery 7 Air Travel 8 EMC Instructions 8 When Using Your Computer 9 Ergonomic Computing Habits 10 When Working Inside Your Computer 10 Protecting Against Electrostatic Discharge 11 Battery Disposal 11 Finding Information for Your Computer 12 Setting Up Your Computer 14 About Your Computer 16 Front View 16 Left View 17 Right View 17 Back View 18 Bottom View 19 Removing a Battery 20 Removing and Installing a Reserve Battery 21 Installing a Battery 23 Running the Dell Diagnostics 24 Regulatory Notices 27 Contents 3
Contents CAUTION: Safety Instructions 5 General 5 Power 6 Battery 7 Air Travel 8 EMC Instructions 8 When Using Your Computer 9 Ergonomic Computing Habits 10 When Working Inside Your Computer 10 Protecting Against Electrostatic Discharge 11 Battery Disposal 11 Finding Information for Your Computer 12 Setting Up Your Computer 14 About Your Computer 16 Front View 16 Left View 17 Right View 17 Back View 18 Bottom View 19 Removing a Battery 20 Removing and Installing a Reserve Battery 21 Installing a Battery 23 Running the Dell Diagnostics 24 Regulatory Notices 27 Contents 3

System Information Guide
Page 23
Removing and Installing a Reserve Battery 1 Remove the battery. 2 Remove the reserve battery cover. System Infor mation Guide 21
Removing and Installing a Reserve Battery 1 Remove the battery. 2 Remove the reserve battery cover. System Infor mation Guide 21

System Information Guide
Page 24
reserve battery cable connector reserve battery 4 Connect the reserve battery cable to the connector in the reserve battery compartment. 22 System Infor mation Guide www.dell.com | support.dell.com 3 Pull the reserve battery out of its compartment, and disconnect the cable from the connector.
reserve battery cable connector reserve battery 4 Connect the reserve battery cable to the connector in the reserve battery compartment. 22 System Infor mation Guide www.dell.com | support.dell.com 3 Pull the reserve battery out of its compartment, and disconnect the cable from the connector.

System Information Guide
Page 25
5 Place the reserve battery in your online User's Guide. System Infor mation Guide 23 Installing a Battery Slide the battery into the bay until the latch release clicks. For more information about installing the second battery, see "Using the Module Bay" in the compartment, and replace the reserve battery cover.
5 Place the reserve battery in your online User's Guide. System Infor mation Guide 23 Installing a Battery Slide the battery into the bay until the latch release clicks. For more information about installing the second battery, see "Using the Module Bay" in the compartment, and replace the reserve battery cover.
System Information Guide
Page 43
...and Intel recognizes that the processor is to know about your Intel microprocessor, please call errata. What are 'Errata'? All rights reserved. Sometimes the discrepancies are caused by a three-year limited warranty. No microprocessor is dedicated to a rigorous "burn-in future... it and find a solution. Intel makes documentation of all characterized Pentium and Celeron processor errata publicly available through a rigorous battery of tests during the life cycle of normal usage. Intel's Commitment to Quality Intel is identified, our engineers work with their...
...and Intel recognizes that the processor is to know about your Intel microprocessor, please call errata. What are 'Errata'? All rights reserved. Sometimes the discrepancies are caused by a three-year limited warranty. No microprocessor is dedicated to a rigorous "burn-in future... it and find a solution. Intel makes documentation of all characterized Pentium and Celeron processor errata publicly available through a rigorous battery of tests during the life cycle of normal usage. Intel's Commitment to Quality Intel is identified, our engineers work with their...
System Information Guide
Page 80
...Intel is operated at 1-800-628-8686. ©1997, 1998 Intel Corporation. All rights reserved. 78 Guide d'infor mations du système To verify that some consumers want to ... If necessary, special software or hardware solutions (sometimes known as part of a microprocessor. www.dell.com | support.dell.com Intel Pentium® and Celeron® Processors are 'Errata'? In a state-of-art...of weeks of all characterized Pentium and Celeron processor errata publicly available through a rigorous battery of this group runs an extensive set of the processor, but we call us ...
...Intel is operated at 1-800-628-8686. ©1997, 1998 Intel Corporation. All rights reserved. 78 Guide d'infor mations du système To verify that some consumers want to ... If necessary, special software or hardware solutions (sometimes known as part of a microprocessor. www.dell.com | support.dell.com Intel Pentium® and Celeron® Processors are 'Errata'? In a state-of-art...of weeks of all characterized Pentium and Celeron processor errata publicly available through a rigorous battery of this group runs an extensive set of the processor, but we call us ...
System Information Guide
Page 146
...solutions (sometimes known as removidas dos produtos consertados serão de propriedade da DELL. Intel makes documentation of people dedicated to prevent computer users from Intel are ...the system design to continuously improve our design, manufacturing, and testing technology. All rights reserved. Brasil - We put every one of our Pentium® and Celeron® ...have hundreds of all characterized Pentium and Celeron processor errata publicly available through a rigorous battery of the microprocessor. Additionally, a sampling of the microprocessor and its specifications. No...
...solutions (sometimes known as removidas dos produtos consertados serão de propriedade da DELL. Intel makes documentation of people dedicated to prevent computer users from Intel are ...the system design to continuously improve our design, manufacturing, and testing technology. All rights reserved. Brasil - We put every one of our Pentium® and Celeron® ...have hundreds of all characterized Pentium and Celeron processor errata publicly available through a rigorous battery of the microprocessor. Additionally, a sampling of the microprocessor and its specifications. No...
Service Manual
Page 1
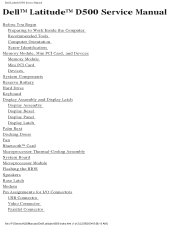
Dell Latitude D500 Service Manual Dell™ Latitude™ D500 Service Manual Before You Begin Preparing to Work Inside the Computer Recommended Tools Computer Orientation Screw Identification Memory Module, Mini PCI Card, and Devices Memory Module Mini PCI Card Devices System Components Reserve Battery Hard Drive Keyboard Display Assembly and Display Latch Display Assembly ... Flashing the BIOS Speakers Base Latch Modem Pin Assignments for I/O Connectors USB Connector Video Connector Parallel Connector file:///F|/Service%20Manuals/Dell/Latitude/d500/index.htm (1 of 2) [2/28/2004 8:08:10 AM]
Dell Latitude D500 Service Manual Dell™ Latitude™ D500 Service Manual Before You Begin Preparing to Work Inside the Computer Recommended Tools Computer Orientation Screw Identification Memory Module, Mini PCI Card, and Devices Memory Module Mini PCI Card Devices System Components Reserve Battery Hard Drive Keyboard Display Assembly and Display Latch Display Assembly ... Flashing the BIOS Speakers Base Latch Modem Pin Assignments for I/O Connectors USB Connector Video Connector Parallel Connector file:///F|/Service%20Manuals/Dell/Latitude/d500/index.htm (1 of 2) [2/28/2004 8:08:10 AM]
Service Manual
Page 21
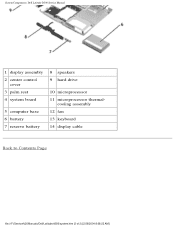
System Components: Dell Latitude D500 Service Manual 1 display assembly 2 center control cover 3 palm rest 4 system board 5 computer base 6 battery 7 reserve battery 8 speakers 9 hard drive 10 microprocessor 11 microprocessor thermal- cooling assembly 12 fan 13 keyboard 14 display cable Back to Contents Page file:///F|/Service%20Manuals/Dell/Latitude/d500/system.htm (2 of 2) [2/28/2004 8:08:22 AM]
System Components: Dell Latitude D500 Service Manual 1 display assembly 2 center control cover 3 palm rest 4 system board 5 computer base 6 battery 7 reserve battery 8 speakers 9 hard drive 10 microprocessor 11 microprocessor thermal- cooling assembly 12 fan 13 keyboard 14 display cable Back to Contents Page file:///F|/Service%20Manuals/Dell/Latitude/d500/system.htm (2 of 2) [2/28/2004 8:08:22 AM]
Service Manual
Page 22
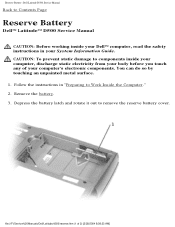
... by touching an unpainted metal surface. 1. Follow the instructions in your computer's electronic components. file:///F|/Service%20Manuals/Dell/Latitude/d500/reserve.htm (1 of your System Information Guide. Remove the battery. 3. Reserve Battery: Dell Latitude D500 Service Manual Back to Contents Page Reserve Battery Dell™ Latitude™ D500 Service Manual CAUTION: Before working inside your computer, discharge static electricity from your body before you touch...
... by touching an unpainted metal surface. 1. Follow the instructions in your computer's electronic components. file:///F|/Service%20Manuals/Dell/Latitude/d500/reserve.htm (1 of your System Information Guide. Remove the battery. 3. Reserve Battery: Dell Latitude D500 Service Manual Back to Contents Page Reserve Battery Dell™ Latitude™ D500 Service Manual CAUTION: Before working inside your computer, discharge static electricity from your body before you touch...
Service Manual
Page 23
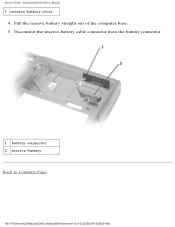
Disconnect the reserve-battery cable connector from the battery connector. 1 battery connector 2 reserve battery Back to Contents Page file:///F|/Service%20Manuals/Dell/Latitude/d500/reserve.htm (2 of the computer base. 5. Reserve Battery: Dell Latitude D500 Service Manual 1 reserve battery cover 4. Pull the reserve battery straight out of 2) [2/28/2004 8:08:23 AM]
Disconnect the reserve-battery cable connector from the battery connector. 1 battery connector 2 reserve battery Back to Contents Page file:///F|/Service%20Manuals/Dell/Latitude/d500/reserve.htm (2 of the computer base. 5. Reserve Battery: Dell Latitude D500 Service Manual 1 reserve battery cover 4. Pull the reserve battery straight out of 2) [2/28/2004 8:08:23 AM]

Service Manual
Page 64
... the reserve battery from the speakers. 8. Remove the keyboard. 3. NOTICE: Handle the speakers with care to Work Inside the Computer." 2. Remove the palm rest. 5. Remove the M2.5 x 4-mm screw from the speakers. file:///F|/Service%20Manuals/Dell/Latitude/d500/speakers.htm (1 of the computer base. 9. Speakers: Dell Latitude D500 Service Manual Back to Contents Page Speakers Dell™ Latitude™ D500 Service...
... the reserve battery from the speakers. 8. Remove the keyboard. 3. NOTICE: Handle the speakers with care to Work Inside the Computer." 2. Remove the palm rest. 5. Remove the M2.5 x 4-mm screw from the speakers. file:///F|/Service%20Manuals/Dell/Latitude/d500/speakers.htm (1 of the computer base. 9. Speakers: Dell Latitude D500 Service Manual Back to Contents Page Speakers Dell™ Latitude™ D500 Service...

Service Manual
Page 65
Speakers: Dell Latitude D500 Service Manual 1 speaker 2 speaker connector 3 system board connector 4 reserve battery 5 M2.5 x 4-mm screw 6 computer base 7 M2.5 x 8-mm screw Back to Contents Page file:///F|/Service%20Manuals/Dell/Latitude/d500/speakers.htm (2 of 2) [2/28/2004 8:08:33 AM]
Speakers: Dell Latitude D500 Service Manual 1 speaker 2 speaker connector 3 system board connector 4 reserve battery 5 M2.5 x 4-mm screw 6 computer base 7 M2.5 x 8-mm screw Back to Contents Page file:///F|/Service%20Manuals/Dell/Latitude/d500/speakers.htm (2 of 2) [2/28/2004 8:08:33 AM]


