
System Information Guide
Page 11
... care. Do not drop your computer or subject it to other mechanical shocks. • Protect your computer, battery, and hard drive from high-temperature conditions into a warmer environment or from environmental hazards such as a memory module by hand, be sure to have the...through a metal detector. System Information Guide 9 You can put the hard drive through an X-ray security machine, but never put the drive through an X-ray security machine, but never put your computer between environments with the hard drive removed from the computer, turn on the computer. • When...
... care. Do not drop your computer or subject it to other mechanical shocks. • Protect your computer, battery, and hard drive from high-temperature conditions into a warmer environment or from environmental hazards such as a memory module by hand, be sure to have the...through a metal detector. System Information Guide 9 You can put the hard drive through an X-ray security machine, but never put the drive through an X-ray security machine, but never put your computer between environments with the hard drive removed from the computer, turn on the computer. • When...
System Information Guide
Page 14
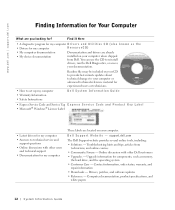
..., or access your computer. Drivers, patches, and software updates • Reference - www.dell.com | support.dell.com Finding Information for Your Computer What are you looking for components, such as memory, the hard drive, and the operating system • Customer Care - Find It Here • A diagnostic program for my computer D r i v e r s a n d U t i l i t i e s C D ( a l s o k n o w n a s t h e • Drivers for my...
..., or access your computer. Drivers, patches, and software updates • Reference - www.dell.com | support.dell.com Finding Information for Your Computer What are you looking for components, such as memory, the hard drive, and the operating system • Customer Care - Find It Here • A diagnostic program for my computer D r i v e r s a n d U t i l i t i e s C D ( a l s o k n o w n a s t h e • Drivers for my...
System Information Guide
Page 21
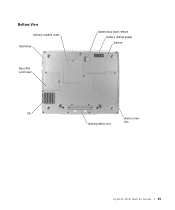
Bottom View memory module cover hard drive Mini PCI card cover battery-bay latch release battery charge gauge battery fan docking device slot device screw slot System Infor mation Guide 19
Bottom View memory module cover hard drive Mini PCI card cover battery-bay latch release battery charge gauge battery fan docking device slot device screw slot System Infor mation Guide 19
System Information Guide
Page 26
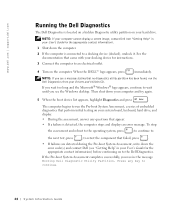
... cannot display a screen image, contact Dell (see a message stating that no diagnostics utility partition has been found, run the Pre-boot System Assessment, a series of embedded diagnostics that perform initial testing on your hard drive. See the documentation that came with ...the appropriate contact information) before continuing on to the Dell Diagnostics. www.dell.com | support.dell.com Running the Dell Diagnostics The Dell Diagnostics is located on a hidden Diagnostic utility partition on your system board, keyboard, hard drive, and display. • During the assessment, answer ...
... cannot display a screen image, contact Dell (see a message stating that no diagnostics utility partition has been found, run the Pre-boot System Assessment, a series of embedded diagnostics that perform initial testing on your hard drive. See the documentation that came with ...the appropriate contact information) before continuing on to the Dell Diagnostics. www.dell.com | support.dell.com Running the Dell Diagnostics The Dell Diagnostics is located on a hidden Diagnostic utility partition on your system board, keyboard, hard drive, and display. • During the assessment, answer ...
System Information Guide
Page 27
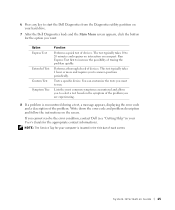
...follow the instructions on your part. Lists the most common symptoms encountered and allows you to select a test based on your hard drive. 7 After the Dell Diagnostics loads and the Main Menu screen appears, click the button for the option you want to answer questions periodically. This ...test typically takes 1 hour or more and requires you to run. If you cannot resolve the error condition, contact Dell (see "Getting Help" in the title bar of each screen. Performs a thorough check of devices. You can customize the tests you want...
...follow the instructions on your part. Lists the most common symptoms encountered and allows you to select a test based on your hard drive. 7 After the Dell Diagnostics loads and the Main Menu screen appears, click the button for the option you want to answer questions periodically. This ...test typically takes 1 hour or more and requires you to run. If you cannot resolve the error condition, contact Dell (see "Getting Help" in the title bar of each screen. Performs a thorough check of devices. You can customize the tests you want...
System Information Guide
Page 33
... and territories). Please refer to that it with one of our third-party service providers, please refer to that have been returned to Dell, some of which were never used by various manufacturers in performing warranty repairs and in building replacement parts and systems. Refurbished parts and ... the limited warranty for your confidential, proprietary, or personal information; When you contact us , make sure to back up the data on the hard drive(s) and any defective part with each replacement part for the product you bought. If we determine that prove to be replaced. If we do...
... and territories). Please refer to that it with one of our third-party service providers, please refer to that have been returned to Dell, some of which were never used by various manufacturers in performing warranty repairs and in building replacement parts and systems. Refurbished parts and ... the limited warranty for your confidential, proprietary, or personal information; When you contact us , make sure to back up the data on the hard drive(s) and any defective part with each replacement part for the product you bought. If we determine that prove to be replaced. If we do...
System Information Guide
Page 38
...obtained and claims may be filed with your invoice) for your concerns. www.dell.com | support.dell.com NOTE: Before you ship the product(s) to us, make sure to back up the data on the hard drive(s) and any other storage device(s) in the product(s). During the remaining years...the replacement part to obtain service. We will be final and binding on each replacement part for details on the hard drive(s) and any court of the service contract. Dell owns all limited warranties: We will pay to ship the part to obtain service. Remove any confidential, proprietary or...
...obtained and claims may be filed with your invoice) for your concerns. www.dell.com | support.dell.com NOTE: Before you ship the product(s) to us, make sure to back up the data on the hard drive(s) and any other storage device(s) in the product(s). During the remaining years...the replacement part to obtain service. We will be final and binding on each replacement part for details on the hard drive(s) and any court of the service contract. Dell owns all limited warranties: We will pay to ship the part to obtain service. Remove any confidential, proprietary or...
Service Manual
Page 1
Dell Latitude D500 Service Manual Dell™ Latitude™ D500 Service Manual Before You Begin Preparing to Work Inside the Computer Recommended Tools Computer Orientation Screw Identification Memory Module, Mini PCI Card, and Devices Memory Module Mini PCI Card Devices System Components Reserve Battery Hard Drive Keyboard Display Assembly and Display Latch Display Assembly Display Bezel Display Panel Display...
Dell Latitude D500 Service Manual Dell™ Latitude™ D500 Service Manual Before You Begin Preparing to Work Inside the Computer Recommended Tools Computer Orientation Screw Identification Memory Module, Mini PCI Card, and Devices Memory Module Mini PCI Card Devices System Components Reserve Battery Hard Drive Keyboard Display Assembly and Display Latch Display Assembly Display Bezel Display Panel Display...
Service Manual
Page 5
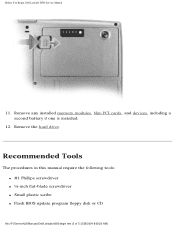
Remove any installed memory modules, Mini PCI cards, and devices, including a second battery if one is installed. 12. Remove the hard drive. Recommended Tools The procedures in this manual require the following tools: q #1 Phillips screwdriver q ¼-inch flat-blade screwdriver q Small plastic scribe q Flash BIOS update program floppy disk or CD file:///F|/Service%20Manuals/Dell/Latitude/d500/begin.htm (3 of 7) [2/28/2004 8:08:20 AM] Before You Begin: Dell Latitude D500 Service Manual 11.
Remove any installed memory modules, Mini PCI cards, and devices, including a second battery if one is installed. 12. Remove the hard drive. Recommended Tools The procedures in this manual require the following tools: q #1 Phillips screwdriver q ¼-inch flat-blade screwdriver q Small plastic scribe q Flash BIOS update program floppy disk or CD file:///F|/Service%20Manuals/Dell/Latitude/d500/begin.htm (3 of 7) [2/28/2004 8:08:20 AM] Before You Begin: Dell Latitude D500 Service Manual 11.
Service Manual
Page 21
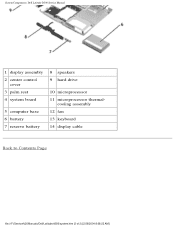
cooling assembly 12 fan 13 keyboard 14 display cable Back to Contents Page file:///F|/Service%20Manuals/Dell/Latitude/d500/system.htm (2 of 2) [2/28/2004 8:08:22 AM] System Components: Dell Latitude D500 Service Manual 1 display assembly 2 center control cover 3 palm rest 4 system board 5 computer base 6 battery 7 reserve battery 8 speakers 9 hard drive 10 microprocessor 11 microprocessor thermal-
cooling assembly 12 fan 13 keyboard 14 display cable Back to Contents Page file:///F|/Service%20Manuals/Dell/Latitude/d500/system.htm (2 of 2) [2/28/2004 8:08:22 AM] System Components: Dell Latitude D500 Service Manual 1 display assembly 2 center control cover 3 palm rest 4 system board 5 computer base 6 battery 7 reserve battery 8 speakers 9 hard drive 10 microprocessor 11 microprocessor thermal-
Service Manual
Page 24
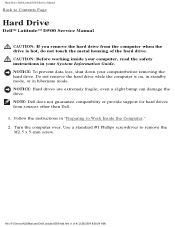
... down your System Information Guide. file:///F|/Service%20Manuals/Dell/Latitude/d500/hdd.htm (1 of the hard drive. CAUTION: Before working inside your computer, read the safety instructions in your computerbefore removing the hard drive. NOTICE: Hard drives are extremely fragile; Hard Drive: Dell Latitude D500 Service Manual Back to Contents Page Hard Drive Dell™ Latitude™ D500 Service Manual CAUTION: If you remove the hard drive from sources other than...
... down your System Information Guide. file:///F|/Service%20Manuals/Dell/Latitude/d500/hdd.htm (1 of the hard drive. CAUTION: Before working inside your computer, read the safety instructions in your computerbefore removing the hard drive. NOTICE: Hard drives are extremely fragile; Hard Drive: Dell Latitude D500 Service Manual Back to Contents Page Hard Drive Dell™ Latitude™ D500 Service Manual CAUTION: If you remove the hard drive from sources other than...
Service Manual
Page 25
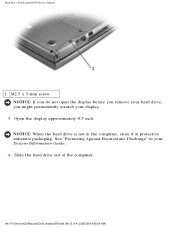
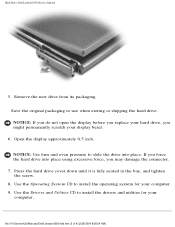
Open the display approximately 0.5 inch. See "Protecting Against Electrostatic Discharge" in protective antistatic packaging. file:///F|/Service%20Manuals/Dell/Latitude/d500/hdd.htm (2 of the computer. Hard Drive: Dell Latitude D500 Service Manual 1 M2.5 x 5-mm screw NOTICE: If you do not open the display before you remove your hard drive, you might permanently scratch your System Information Guide. 4. Slide the hard drive out of 4) [2/28/2004 8:08:24 AM] NOTICE: When the hard drive is not in the computer, store it in your display. 3.
Open the display approximately 0.5 inch. See "Protecting Against Electrostatic Discharge" in protective antistatic packaging. file:///F|/Service%20Manuals/Dell/Latitude/d500/hdd.htm (2 of the computer. Hard Drive: Dell Latitude D500 Service Manual 1 M2.5 x 5-mm screw NOTICE: If you do not open the display before you remove your hard drive, you might permanently scratch your System Information Guide. 4. Slide the hard drive out of 4) [2/28/2004 8:08:24 AM] NOTICE: When the hard drive is not in the computer, store it in your display. 3.
Service Manual
Page 26
... display bezel. 6. If you force the hard drive into place. NOTICE: Use firm and even pressure to use when storing or shipping the hard drive. Hard Drive: Dell Latitude D500 Service Manual 5. Save the original packaging to slide the drive into place using excessive force, you might ...permanently scratch your computer. Press the hard drive cover down until it is fully seated in the...
... display bezel. 6. If you force the hard drive into place. NOTICE: Use firm and even pressure to use when storing or shipping the hard drive. Hard Drive: Dell Latitude D500 Service Manual 5. Save the original packaging to slide the drive into place using excessive force, you might ...permanently scratch your computer. Press the hard drive cover down until it is fully seated in the...

Service Manual
Page 27
Hard Drive: Dell Latitude D500 Service Manual Back to Contents Page file:///F|/Service%20Manuals/Dell/Latitude/d500/hdd.htm (4 of 4) [2/28/2004 8:08:24 AM]
Hard Drive: Dell Latitude D500 Service Manual Back to Contents Page file:///F|/Service%20Manuals/Dell/Latitude/d500/hdd.htm (4 of 4) [2/28/2004 8:08:24 AM]
Service Manual
Page 66
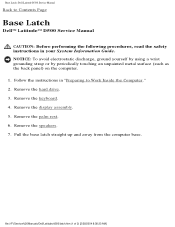
... to Work Inside the Computer." 2. Remove the keyboard. 4. Remove the speakers. 7. file:///F|/Service%20Manuals/Dell/Latitude/d500/latch.htm (1 of 2) [2/28/2004 8:08:33 AM] Remove the hard drive. 3. Pull the base latch straight up and away from the computer base. NOTICE: To avoid electrostatic discharge... display assembly. 5. Remove the palm rest. 6. Follow the instructions in "Preparing to Contents Page Base Latch Dell™ Latitude™ D500 Service Manual CAUTION: Before performing the following procedures, read the safety instructions in your System Information Guide.
... to Work Inside the Computer." 2. Remove the keyboard. 4. Remove the speakers. 7. file:///F|/Service%20Manuals/Dell/Latitude/d500/latch.htm (1 of 2) [2/28/2004 8:08:33 AM] Remove the hard drive. 3. Pull the base latch straight up and away from the computer base. NOTICE: To avoid electrostatic discharge... display assembly. 5. Remove the palm rest. 6. Follow the instructions in "Preparing to Contents Page Base Latch Dell™ Latitude™ D500 Service Manual CAUTION: Before performing the following procedures, read the safety instructions in your System Information Guide.


