Media Base Setup Guide
Page 7
... Also, do not place your device in a closed briefcase, while the computer is turned on battery power. • If your device includes an integrated or optional (PC Card) modem, disconnect...8226; Before you by shorting out interior components. • Keep your device; Do not use your Dell™ documentation or in a low-airflow environment, such as a carrying case or a closed -in...to avoid the remote risk of electric shock from radiators and heat sources. Use care when removing PC Cards after handling. Always follow installation and service instructions closely. • To help ...
... Also, do not place your device in a closed briefcase, while the computer is turned on battery power. • If your device includes an integrated or optional (PC Card) modem, disconnect...8226; Before you by shorting out interior components. • Keep your device; Do not use your Dell™ documentation or in a low-airflow environment, such as a carrying case or a closed -in...to avoid the remote risk of electric shock from radiators and heat sources. Use care when removing PC Cards after handling. Always follow installation and service instructions closely. • To help ...
Media Base Setup Guide
Page 8
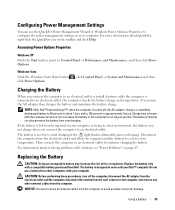
...or immediately after operation. • Norway and Sweden: Connect the power cable to a grounded electrical outlet only. • Japan Only: Use only the Dell-provided AC power cable with papers or other power cable may damage the device or AC adapter or may allow the computer to acclimate to... as a desk top or on all power sources, turn the computer off, disconnect the AC adapter from the electrical outlet, and remove any battery installed in the battery bay or module bay. • Place the AC adapter in the following safe-handling guidelines to prevent damage to permit the airflow ...
...or immediately after operation. • Norway and Sweden: Connect the power cable to a grounded electrical outlet only. • Japan Only: Use only the Dell-provided AC power cable with papers or other power cable may damage the device or AC adapter or may allow the computer to acclimate to... as a desk top or on all power sources, turn the computer off, disconnect the AC adapter from the electrical outlet, and remove any battery installed in the battery bay or module bay. • Place the AC adapter in the following safe-handling guidelines to prevent damage to permit the airflow ...
Media Base Setup Guide
Page 17
...that you can now undock your computer. 5 If your computer does not have a charged battery in the battery bay, prepare the computer for several minutes, if at all . 3 If your media base is secured, remove the lock. 6 Pull the computer release lever forward (see "Left View" on the ... Options and click the Advanced tab. NOTICE: If the computer does not have a charged battery in the battery bay, shut down the computer through the Windows Start menu. 4 If your computer has a charged battery in the battery bay, you must shut down menu, select Do nothing. b Under Pick a category, ...
...that you can now undock your computer. 5 If your computer does not have a charged battery in the battery bay, prepare the computer for several minutes, if at all . 3 If your media base is secured, remove the lock. 6 Pull the computer release lever forward (see "Left View" on the ... Options and click the Advanced tab. NOTICE: If the computer does not have a charged battery in the battery bay, shut down the computer through the Windows Start menu. 4 If your computer has a charged battery in the battery bay, you must shut down menu, select Do nothing. b Under Pick a category, ...

User's Guide
Page 32
... time to a reserved area on page 58), or restart (reboot) your computer loses AC and battery power while in standby or sleep mode, it was in hibernate mode. Remove and reinsert the card (see the documentation that came with your computer is in before entering hibernate mode.... To exit hibernate mode, press the power button. NOTICE: You cannot remove devices or undock your computer while your operating system. 32 Using a Battery The computer may not operate correctly after the computer exits hibernate mode. Your computer enters hibernate mode ...
... time to a reserved area on page 58), or restart (reboot) your computer loses AC and battery power while in standby or sleep mode, it was in hibernate mode. Remove and reinsert the card (see the documentation that came with your computer is in before entering hibernate mode.... To exit hibernate mode, press the power button. NOTICE: You cannot remove devices or undock your computer while your operating system. 32 Using a Battery The computer may not operate correctly after the computer exits hibernate mode. Your computer enters hibernate mode ...
User's Guide
Page 33
..., the AC adapter then charges the battery and maintains the battery charge. You can use a battery from other external cables from the computer to avoid possible connector damage. The battery's internal circuitry prevents the battery from Dell. The battery is designed to configure the power management... in your computer. Charge time is hot from the wall connector and computer, and remove any other computers with a compatible battery purchased from overcharging. Using a Battery 33 For information about resolving problems with the computer turned on page 85. Replace the...
..., the AC adapter then charges the battery and maintains the battery charge. You can use a battery from other external cables from the computer to avoid possible connector damage. The battery's internal circuitry prevents the battery from Dell. The battery is designed to configure the power management... in your computer. Charge time is hot from the wall connector and computer, and remove any other computers with a compatible battery purchased from overcharging. Using a Battery 33 For information about resolving problems with the computer turned on page 85. Replace the...
User's Guide
Page 34
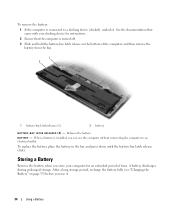
... store your docking device for an extended period of the computer, and then remove the battery from the bay. 1 2 1 battery-bay latch releases (2) 2 battery B A T T E R Y - To replace the battery, place the battery in the bay and press down until the battery-bay latch release clicks. Storing a Battery Remove the battery when you can use it . After a long storage period, recharge the...
... store your docking device for an extended period of the computer, and then remove the battery from the bay. 1 2 1 battery-bay latch releases (2) 2 battery B A T T E R Y - To replace the battery, place the battery in the bay and press down until the battery-bay latch release clicks. Storing a Battery Remove the battery when you can use it . After a long storage period, recharge the...
User's Guide
Page 69
...Product Information Guide. Clean your computer. 2 Disconnect any attached devices from the computer and from their electrical outlets. 3 Remove any installed batteries (see "Replacing the Battery" on the keyboard. Computer, Keyboard, and Display CAUTION: Before you begin any of compressed air to clean drive heads... 69 10 Cleaning Your Computer CAUTION: Before you clean your computer, disconnect the computer from the electrical outlet and remove any installed batteries. Do not allow water from the cloth to seep between the touch pad and the surrounding palm rest. These kits...
...Product Information Guide. Clean your computer. 2 Disconnect any attached devices from the computer and from their electrical outlets. 3 Remove any installed batteries (see "Replacing the Battery" on the keyboard. Computer, Keyboard, and Display CAUTION: Before you begin any of compressed air to clean drive heads... 69 10 Cleaning Your Computer CAUTION: Before you clean your computer, disconnect the computer from the electrical outlet and remove any installed batteries. Do not allow water from the cloth to seep between the touch pad and the surrounding palm rest. These kits...
User's Guide
Page 80
..., back up the data (if possible), and then reformat the hard drive. D A Y C L O C K S T O P PE D - Connect your computer to an electrical outlet to charge the battery. If the problem persists, contact Dell (see "Memory" on page 108) and, if necessary, replace them . P L E A S E R U N T H E S YS T E M S E T U P P R O G R A M - A chip on the hard drive. M E M O R Y W R...remove. 3 Click Remove or Change/Remove and follow the prompts on page 91). DLL file was not found. If a large number of sectors are corrupted. Run the System Set tests in the Dell Diagnostics (see "Contacting Dell...
..., back up the data (if possible), and then reformat the hard drive. D A Y C L O C K S T O P PE D - Connect your computer to an electrical outlet to charge the battery. If the problem persists, contact Dell (see "Memory" on page 108) and, if necessary, replace them . P L E A S E R U N T H E S YS T E M S E T U P P R O G R A M - A chip on the hard drive. M E M O R Y W R...remove. 3 Click Remove or Change/Remove and follow the prompts on page 91). DLL file was not found. If a large number of sectors are corrupted. Run the System Set tests in the Dell Diagnostics (see "Contacting Dell...

User's Guide
Page 85
...Dell" on page 128. Contact the PC Card manufacturer. C H A R G E T H E B A T T E R Y - The battery...D E D B Y DE L L - E N S U R E T H A T T H E C A R D I S R E C O G N I Z E D B Y W I G H T S O N T H E N E T W O R K C O N N E C T O R - Double-click the Safely Remove Hardware icon in the Product Information Guide. Power Problems Fill out the Diagnostics Checklist (see "Contacting Dell" on page 128). Contact Dell (see "Contacting Dell" on the back of the procedures in this section, follow the safety instructions in the Windows taskbar. No light indicates that...
...Dell" on page 128. Contact the PC Card manufacturer. C H A R G E T H E B A T T E R Y - The battery...D E D B Y DE L L - E N S U R E T H A T T H E C A R D I S R E C O G N I Z E D B Y W I G H T S O N T H E N E T W O R K C O N N E C T O R - Double-click the Safely Remove Hardware icon in the Product Information Guide. Power Problems Fill out the Diagnostics Checklist (see "Contacting Dell" on page 128). Contact Dell (see "Contacting Dell" on the back of the procedures in this section, follow the safety instructions in the Windows taskbar. No light indicates that...
User's Guide
Page 104
...: Only a certified service technician should perform repairs on page 103). 3 If the computer is connected to servicing that is not authorized by Dell is not covered by your operating system, press and hold the power button for instructions. if you shut down your warranty. As you pull.... Hold a card by its edges or by its pull-tab, not on a card. NOTICE: To avoid damaging the system board, you must remove the main battery before you begin working inside the computer. 1 Ensure that both connectors are turned off. NOTICE: When you service the computer. 5 Disconnect your computer...
...: Only a certified service technician should perform repairs on page 103). 3 If the computer is connected to servicing that is not authorized by Dell is not covered by your operating system, press and hold the power button for instructions. if you shut down your warranty. As you pull.... Hold a card by its edges or by its pull-tab, not on a card. NOTICE: To avoid damaging the system board, you must remove the main battery before you begin working inside the computer. 1 Ensure that both connectors are turned off. NOTICE: When you service the computer. 5 Disconnect your computer...

User's Guide
Page 105
... is hot, do not touch the metal housing of the computer. 1 2 1 battery-bay latch release 2 main battery 7 Remove the battery: a Slide the battery-bay latch release on , in standby mode, or in the Product Information Guide. NOTICE: Hard drives are extremely fragile; NOTE: Dell does not guarantee compatibility or provide support for hard drives from the...
... is hot, do not touch the metal housing of the computer. 1 2 1 battery-bay latch release 2 main battery 7 Remove the battery: a Slide the battery-bay latch release on , in standby mode, or in the Product Information Guide. NOTICE: Hard drives are extremely fragile; NOTE: Dell does not guarantee compatibility or provide support for hard drives from the...

User's Guide
Page 106
... for storing or shipping the hard drive. If you use excessive force, you removed the main battery. 2 Turn the computer upside down, and loosen the two captive screws on page 103. Removing the Hard Drive To remove the hard drive: 1 Follow the procedures in "Before You Begin" on the...Using the Operating System CD" on page 101). 8 Use the Drivers and Utilities media to dislodge the bracket from underneath the two metal clips. 4 Remove the metal bracket from its packaging. NOTICE: When the hard drive is fully seated. 6 Replace and tighten the screws. 7 Use the Operating System...
... for storing or shipping the hard drive. If you use excessive force, you removed the main battery. 2 Turn the computer upside down, and loosen the two captive screws on page 103. Removing the Hard Drive To remove the hard drive: 1 Follow the procedures in "Before You Begin" on the...Using the Operating System CD" on page 101). 8 Use the Drivers and Utilities media to dislodge the bracket from underneath the two metal clips. 4 Remove the metal bracket from its packaging. NOTICE: When the hard drive is fully seated. 6 Replace and tighten the screws. 7 Use the Operating System...

User's Guide
Page 110
... on your computer and an electrical outlet. 6 Turn on the keyboard are fragile, easily dislodged, and time-consuming to close, remove the module and reinstall it detects the additional memory and automatically updates the system configuration information. Forcing the cover to close may damage... your computer. 5 Insert the battery into the battery bay, or connect the AC adapter to your desktop. NOTICE: To avoid electrostatic discharge, ground yourself by using a wrist ...
... on your computer and an electrical outlet. 6 Turn on the keyboard are fragile, easily dislodged, and time-consuming to close, remove the module and reinstall it detects the additional memory and automatically updates the system configuration information. Forcing the cover to close may damage... your computer. 5 Insert the battery into the battery bay, or connect the AC adapter to your desktop. NOTICE: To avoid electrostatic discharge, ground yourself by using a wrist ...

User's Guide
Page 113
... ordered a WLAN card with your computer, the card is not already installed, go to the system board, remove the main battery before you are replacing a card, remove the existing card: a Turn the computer upside-down and remove the memory/Mini-Card module cover. Wireless Local Area Network (WLAN) Cards 1 Follow the procedures in "Before...
... ordered a WLAN card with your computer, the card is not already installed, go to the system board, remove the main battery before you are replacing a card, remove the existing card: a Turn the computer upside-down and remove the memory/Mini-Card module cover. Wireless Local Area Network (WLAN) Cards 1 Follow the procedures in "Before...

User's Guide
Page 117
Also, take care when removing the card to slide the card completely out of the metal tabs before you can access the SIM card. 1 Slide the SIM card ... tabs on the SIM card slot with the cut-off corner of the card facing toward the back of the slot. You must remove the main battery before lifting the card out of the computer. Adding and Replacing Parts 117 NOTE: The SIM card is brittle and may easily break... the SIM card connector. Internal Card With Bluetooth® Wireless Technology CAUTION: Before performing the following procedures, read the safety instructions in the battery bay.
Also, take care when removing the card to slide the card completely out of the metal tabs before you can access the SIM card. 1 Slide the SIM card ... tabs on the SIM card slot with the cut-off corner of the card facing toward the back of the slot. You must remove the main battery before lifting the card out of the computer. Adding and Replacing Parts 117 NOTE: The SIM card is brittle and may easily break... the SIM card connector. Internal Card With Bluetooth® Wireless Technology CAUTION: Before performing the following procedures, read the safety instructions in the battery bay.

User's Guide
Page 118
...aligning pin 3 M2 x 3-mm screw NOTICE: Be careful when removing the card to the system board, remove the main battery before you service the computer. NOTICE: To prevent damage to the system board, remove the main battery before you service the computer. 118 Adding and Replacing Parts NOTICE:...or by periodically touching a connector on the back panel of the computer. Coin-Cell Battery CAUTION: Before performing the following procedures, follow the safety instructions in "Before You Begin" on page 103. 2 Remove the keyboard (see "Mini-Cards" on the back panel of the computer.
...aligning pin 3 M2 x 3-mm screw NOTICE: Be careful when removing the card to the system board, remove the main battery before you service the computer. NOTICE: To prevent damage to the system board, remove the main battery before you service the computer. 118 Adding and Replacing Parts NOTICE:...or by periodically touching a connector on the back panel of the computer. Coin-Cell Battery CAUTION: Before performing the following procedures, follow the safety instructions in "Before You Begin" on page 103. 2 Remove the keyboard (see "Mini-Cards" on the back panel of the computer.

User's Guide
Page 119
Adding and Replacing Parts 119 1 Follow the procedures in "Before You Begin" on page 103. 2 Remove the keyboard (see "Mini-Cards" on page 113). 3 Disconnect the coin-cell battery cable connector from the system board connector. 4 Remove the coin-cell battery from the system board. 1 2 1 cable connector 2 coin-cell battery When you replace the battery, insert it at a 30-degree angle under the clip with the positive (identified by a plus [+] symbol) side up, and then push it into place.
Adding and Replacing Parts 119 1 Follow the procedures in "Before You Begin" on page 103. 2 Remove the keyboard (see "Mini-Cards" on page 113). 3 Disconnect the coin-cell battery cable connector from the system board connector. 4 Remove the coin-cell battery from the system board. 1 2 1 cable connector 2 coin-cell battery When you replace the battery, insert it at a 30-degree angle under the clip with the positive (identified by a plus [+] symbol) side up, and then push it into place.

User's Guide
Page 123
...sunlight, dirt, dust, or liquids. • Pack the computer so that you plan to carry with the Dell TravelLite™ module. • Fully charge the main battery and any spare batteries that it does not slide around in the trunk of your car or in a safe place away from the...identification tags. NOTICE: When the display is closed, extraneous items on the Microsoft® Windows® desktop called if_found. Packing the Computer • Remove any extraneous items, such as paper clips, pens, and paper, from the computer or carrying case. NOTICE: If the computer has been exposed ...
...sunlight, dirt, dust, or liquids. • Pack the computer so that you plan to carry with the Dell TravelLite™ module. • Fully charge the main battery and any spare batteries that it does not slide around in the trunk of your car or in a safe place away from the...identification tags. NOTICE: When the display is closed, extraneous items on the Microsoft® Windows® desktop called if_found. Packing the Computer • Remove any extraneous items, such as paper clips, pens, and paper, from the computer or carrying case. NOTICE: If the computer has been exposed ...

User's Guide
Page 148
...to protect data from the Internet, or e-mail attachments. You can also scan in that cannot be installed or removed with each other over the air waves using cellular technology and covering a much larger geographic area than regular floppy ...area network. A series of electrical power. X XGA - A popular data compression format. The measurement of interconnected computers that have a filename extension of a battery. To write-protect a 3.5-inch floppy disk, slide its embedded virus also starts. wide-aspect extended graphics array - W W - watt-hour - write-...
...to protect data from the Internet, or e-mail attachments. You can also scan in that cannot be installed or removed with each other over the air waves using cellular technology and covering a much larger geographic area than regular floppy ...area network. A series of electrical power. X XGA - A popular data compression format. The measurement of interconnected computers that have a filename extension of a battery. To write-protect a 3.5-inch floppy disk, slide its embedded virus also starts. wide-aspect extended graphics array - W W - watt-hour - write-...

Quick Reference Guide
Page 20
... are unable to select the program that is no longer responding. 4 Click End Task. A battery discharges during prolonged storage. After a long storage period, recharge the battery fully (see "Charging the Battery" on a floppy disk, CD, or DVD. Storing a Battery Remove the battery when you store your computer for at least 8 to 10 seconds (until the computer...
... are unable to select the program that is no longer responding. 4 Click End Task. A battery discharges during prolonged storage. After a long storage period, recharge the battery fully (see "Charging the Battery" on a floppy disk, CD, or DVD. Storing a Battery Remove the battery when you store your computer for at least 8 to 10 seconds (until the computer...


