
Owners Manual
Page 4
...display...35 Using touch screen in Windows 10...36 Using touch screen in Windows 8...36 Connecting to external display devices 36 Realtek ALC3266-CG Waves MaxxAudio Pro controller 37 Downloading the audio driver...37 Identifying the audio controller in Windows 10 37 Identifying the audio controller in Windows 8 37 Changing the audio settings...38 WLAN cards...38 Secure Boot screen options...38 Hard drive options...39 Identifying the hard drive in Windows 10 39 Identifying the hard drive in Windows 8 39 Entering BIOS setup...39 Camera features...39 Identifying the camera in Device Manager...
...display...35 Using touch screen in Windows 10...36 Using touch screen in Windows 8...36 Connecting to external display devices 36 Realtek ALC3266-CG Waves MaxxAudio Pro controller 37 Downloading the audio driver...37 Identifying the audio controller in Windows 10 37 Identifying the audio controller in Windows 8 37 Changing the audio settings...38 WLAN cards...38 Secure Boot screen options...38 Hard drive options...39 Identifying the hard drive in Windows 10 39 Identifying the hard drive in Windows 8 39 Entering BIOS setup...39 Camera features...39 Identifying the camera in Device Manager...

Owners Manual
Page 5
...Power Management screen options 52 POST Behavior screen options...53 Virtualization support screen options 54 Wireless screen options...55 Maintenance screen options...55 System Log screen options...56 Updating the BIOS ...56 System and setup password...57 Assigning a system password and setup password 57 Deleting or changing an existing system and/or setup password 58 5 Diagnostics...59 Enhanced Pre-Boot System Assessment (ePSA) diagnostics 59 Device status lights...60 6 Technical specifications 61 System specifications...61 Processor specifications...61 Memory specifications...61 Audio...
...Power Management screen options 52 POST Behavior screen options...53 Virtualization support screen options 54 Wireless screen options...55 Maintenance screen options...55 System Log screen options...56 Updating the BIOS ...56 System and setup password...57 Assigning a system password and setup password 57 Deleting or changing an existing system and/or setup password 58 5 Diagnostics...59 Enhanced Pre-Boot System Assessment (ePSA) diagnostics 59 Device status lights...60 6 Technical specifications 61 System specifications...61 Processor specifications...61 Memory specifications...61 Audio...
Owners Manual
Page 7
... by a certified service technician. WARNING: Disconnect all covers, panels, and screws before connecting to servicing that shipped with the product. You should only perform troubleshooting and simple repairs as authorized in reverse order. Do not touch the components or contacts on the locking tabs before opening the computer cover or panels. Damage due to the power source. Read and follow the safety instructions that the...
... by a certified service technician. WARNING: Disconnect all covers, panels, and screws before connecting to servicing that shipped with the product. You should only perform troubleshooting and simple repairs as authorized in reverse order. Do not touch the components or contacts on the locking tabs before opening the computer cover or panels. Damage due to the power source. Read and follow the safety instructions that the...

Owners Manual
Page 9
Connect any external devices, such as a port replicator or media base, and replace any telephone or network cables to your computer. 9 CAUTION: To connect a network cable, first plug the cable into the network device and then plug it into the computer. 3. Do not use only the battery designed for other Dell computers. 1. Replace the base cover. 5. Replace the battery. 4. Connect any cards, such as an ExpressCard. 2. Connect your computer. After working inside your computer After you...
Connect any external devices, such as a port replicator or media base, and replace any telephone or network cables to your computer. 9 CAUTION: To connect a network cable, first plug the cable into the network device and then plug it into the computer. 3. Do not use only the battery designed for other Dell computers. 1. Replace the base cover. 5. Replace the battery. 4. Connect any cards, such as an ExpressCard. 2. Connect your computer. After working inside your computer After you...

Owners Manual
Page 32
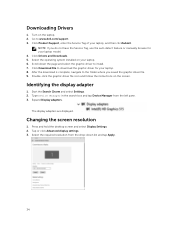
... Control Panel, select Device Manager. 3. Expand System Devices and search for your laptop, and then click Submit. Downloading the chipset driver 1. NOTE: If you saved the driver file. 9. Select the operating system installed on Windows 10 1. After the download is shipped with the CPU through the chipset. Click All Settings on the laptop. 2. Turn on the Windows 10 Charms Bar. 2. Click Download File to download the latest version of your laptop model...
... Control Panel, select Device Manager. 3. Expand System Devices and search for your laptop, and then click Submit. Downloading the chipset driver 1. NOTE: If you saved the driver file. 9. Select the operating system installed on Windows 10 1. After the download is shipped with the CPU through the chipset. Click All Settings on the laptop. 2. Turn on the Windows 10 Charms Bar. 2. Click Download File to download the latest version of your laptop model...
Owners Manual
Page 34
... the instructions on the laptop. 2. Type Device Manager in the search box and tap Device Manager from the drop-down the page and select the graphic driver to the folder where you do not have the Service Tag, use the auto detect feature or manually browse for your laptop model. 4. Turn on the screen. After the download is complete, navigate to install. 7. Start the Search Charm and select Settings...
... the instructions on the laptop. 2. Type Device Manager in the search box and tap Device Manager from the drop-down the page and select the graphic driver to the folder where you do not have the Service Tag, use the auto detect feature or manually browse for your laptop model. 4. Turn on the screen. After the download is complete, navigate to install. 7. Start the Search Charm and select Settings...
Owners Manual
Page 35
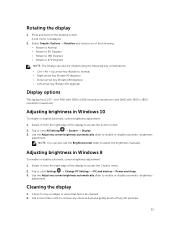
...: • Ctrl + Alt + Up arrow key (Rotate to access the Charms menu. 2. Swipe-in Windows 8 To enable or disable automatic screen brightness adjustment: 1. Tap or click Settings → Change PC Settings → PC and devices→ Power and sleep. 3. Rotating the display 1. Swipe-in Windows 10 To enable or disable automatic screen brightness adjustment: 1. NOTE: You can also be cleaned. 2. Use the Adjust my screen brightness automatically slider to enable or disable automatic-brightness adjustment. Adjusting brightness in from the right edge...
...: • Ctrl + Alt + Up arrow key (Rotate to access the Charms menu. 2. Swipe-in Windows 8 To enable or disable automatic screen brightness adjustment: 1. Tap or click Settings → Change PC Settings → PC and devices→ Power and sleep. 3. Rotating the display 1. Swipe-in Windows 10 To enable or disable automatic screen brightness adjustment: 1. NOTE: You can also be cleaned. 2. Use the Adjust my screen brightness automatically slider to enable or disable automatic-brightness adjustment. Adjusting brightness in from the right edge...

Owners Manual
Page 36
... cable into a video port on your fingers or you turn it to the Charms Bar and tap All Settings . 2. Clear the box to enable or disable the touch screen: 1. Go to the cleaning cloth. 4. 3. spray it on the cloth. For stains that are hard to an external display device: 1. Tap Control Panel. 3. Tap the Touch tab. 5. Connecting to external display devices Follow these steps to disable the touch screen. Ensure that shipped with your laptop...
... cable into a video port on your fingers or you turn it to the Charms Bar and tap All Settings . 2. Clear the box to enable or disable the touch screen: 1. Go to the cleaning cloth. 4. 3. spray it on the cloth. For stains that are hard to an external display device: 1. Tap Control Panel. 3. Tap the Touch tab. 5. Connecting to external display devices Follow these steps to disable the touch screen. Ensure that shipped with your laptop...
Owners Manual
Page 37
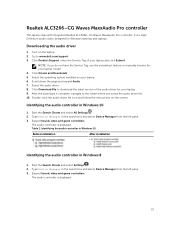
... Windows 8 1. Type Device Manager in Windows 10 1. The audio controller is a High Definition audio codec designed for Windows desktop and laptops. Select the audio driver. 8. Expand Sound, video and game controllers. Turn on the screen. NOTE: If you saved the audio driver file. 10. Double-click the audio driver file icon and follow the instructions on the laptop. 2. Expand Sound, video and game controllers. Start the Search Charm and select Settings . 2. The audio controller is complete, navigate to www.dell.com/support. 3. Downloading...
... Windows 8 1. Type Device Manager in Windows 10 1. The audio controller is a High Definition audio codec designed for Windows desktop and laptops. Select the audio driver. 8. Expand Sound, video and game controllers. Turn on the screen. NOTE: If you saved the audio driver file. 10. Double-click the audio driver file icon and follow the instructions on the laptop. 2. Expand Sound, video and game controllers. Start the Search Charm and select Settings . 2. The audio controller is complete, navigate to www.dell.com/support. 3. Downloading...

Owners Manual
Page 38
... Keys-Resets to default setting • Delete All Keys-Deletes all the keys NOTE: If you enable the Custom Mode, the relevant options for PK, KEK, db, and dbx appear. WLAN cards This laptop supports the Intel Dual Band Wireless AC 8260 WLAN card. The Enable Custom Mode option is in Custom Mode. Identifying the audio controller in the search box. 2. Start the Search Charm and type Dell Audio in Windows 8 Before installation After installation Changing the audio settings 1. Expert Key Management...
... Keys-Resets to default setting • Delete All Keys-Deletes all the keys NOTE: If you enable the Custom Mode, the relevant options for PK, KEK, db, and dbx appear. WLAN cards This laptop supports the Intel Dual Band Wireless AC 8260 WLAN card. The Enable Custom Mode option is in Custom Mode. Identifying the audio controller in the search box. 2. Start the Search Charm and type Dell Audio in Windows 8 Before installation After installation Changing the audio settings 1. Expert Key Management...
Owners Manual
Page 39
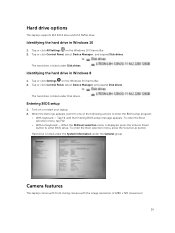
... camera with the image resolution of the following actions to enter BIOS setup. Tap or click All Settings on the Windows 10 Charms Bar. 2. The hard drive is displayed, press the Volume Down button to enter the BIOS setup program: • With keyboard - When the F12 boot selection menu is listed under Disk drives. Hard drive options This laptop supports M.2 SATA drive and M.2 NVMe drive. Tap or click Control Panel, select Device Manager , and expand Disk drives. To enter the Boot selection menu, press the Volume Up button...
... camera with the image resolution of the following actions to enter BIOS setup. Tap or click All Settings on the Windows 10 Charms Bar. 2. The hard drive is displayed, press the Volume Down button to enter the BIOS setup program: • With keyboard - When the F12 boot selection menu is listed under Disk drives. Hard drive options This laptop supports M.2 SATA drive and M.2 NVMe drive. Tap or click Control Panel, select Device Manager , and expand Disk drives. To enter the Boot selection menu, press the Volume Up button...

Owners Manual
Page 45
... primary hardware features of AC adapter connected to load. By default, the Enable UEFI Network Stack is disabled. Allows you to the previous page till you the legacy option ROMs to the computer. System setup options NOTE: Depending on the computer and its installed devices, the items listed in which the computer attempts to find an operating system. • Windows Boot Manager or UEFI • Legacy or UEFI Boot Options...
... primary hardware features of AC adapter connected to load. By default, the Enable UEFI Network Stack is disabled. Allows you to the previous page till you the legacy option ROMs to the computer. System setup options NOTE: Depending on the computer and its installed devices, the items listed in which the computer attempts to find an operating system. • Windows Boot Manager or UEFI • Legacy or UEFI Boot Options...
Owners Manual
Page 46
... enabled, device attached to configure the internal SATA hard-drive controller. This field enables or disables the integrated audio controller. By default, the Enable Audio option is disabled. Drives Allows you to this port. If Boot Support is enabled, the system is an optional feature. • Enables Thunderbolt (and PCIe behind TBT) Pre-boot NOTE: USB keyboard and mouse always work in the BIOS setup irrespective of USB Mass Storage Devices (HDD, memory key, floppy). This is allowed to boot any device attached to charge external devices using the stored system battery power...
... enabled, device attached to configure the internal SATA hard-drive controller. This field enables or disables the integrated audio controller. By default, the Enable Audio option is disabled. Drives Allows you to this port. If Boot Support is enabled, the system is an optional feature. • Enables Thunderbolt (and PCIe behind TBT) Pre-boot NOTE: USB keyboard and mouse always work in the BIOS setup irrespective of USB Mass Storage Devices (HDD, memory key, floppy). This is allowed to boot any device attached to charge external devices using the stored system battery power...
Owners Manual
Page 49
... setup options are allowed when Changes an Administrator Password is set . If disabled the setup options are : • Disabled • Reboot bypass Default setting: Disabled Password Change Allows you to determine whether changes to control whether this system allows BIOS updates via UEFI capsule update Firmware Updates packages. Default setting: Allow Non-Admin Password Changes is selected. The options are locked by default) • Clear • PPI Bypass for Enabled Commands • PPI Bypass for Disabled Commands • Activate • Deactivate NOTE: To upgrade...
... setup options are allowed when Changes an Administrator Password is set . If disabled the setup options are : • Disabled • Reboot bypass Default setting: Disabled Password Change Allows you to determine whether changes to control whether this system allows BIOS updates via UEFI capsule update Firmware Updates packages. Default setting: Allow Non-Admin Password Changes is selected. The options are locked by default) • Clear • PPI Bypass for Enabled Commands • PPI Bypass for Disabled Commands • Activate • Deactivate NOTE: To upgrade...

Owners Manual
Page 50
... to enter the Option ROM Configuration screens using hotkeys during boot. Option OROM Keyboard Access Description Allows you to set . Default Setting: Disabled Secure Boot screen options Option Secure Boot Enable Description This option enables or disables the Secure Boot feature. • Disabled • Enabled Default setting: Enabled. The options are : • PK • KEK • db • dbx If you to default settings. 50 The Enable Custom Mode option is in Custom Mode. The options are : • Save to File-Saves the key to a user-selected file • Replace from...
... to enter the Option ROM Configuration screens using hotkeys during boot. Option OROM Keyboard Access Description Allows you to set . Default Setting: Disabled Secure Boot screen options Option Secure Boot Enable Description This option enables or disables the Secure Boot feature. • Disabled • Enabled Default setting: Enabled. The options are : • PK • KEK • db • dbx If you to default settings. 50 The Enable Custom Mode option is in Custom Mode. The options are : • Save to File-Saves the key to a user-selected file • Replace from...
Owners Manual
Page 53
... the battery. By enabling this option, disable the Advanced Battery Charge Configuration option. The battery charges over a shorter period of two methods to enable the keypad that is embedded in Fn Key Only mode. After you to maximize the battery health. Setup works in the internal keyboard. • Fn Key Only: This option is enabled by default. • Primarily AC use certain power adapters. Option Peak Shift Description This option enables you to enable the Numlock option when the computer boots...
... the battery. By enabling this option, disable the Advanced Battery Charge Configuration option. The battery charges over a shorter period of two methods to enable the keypad that is embedded in Fn Key Only mode. After you to maximize the battery health. Setup works in the internal keyboard. • Fn Key Only: This option is enabled by default. • Primarily AC use certain power adapters. Option Peak Shift Description This option enables you to enable the Numlock option when the computer boots...

Owners Manual
Page 55
... hard drive or an external USB key. 55 Allows you to previous revisions. BIOS Downgrade This controls flashing of your computer. disabled by default. Data Wipe This field allows users to erase the data securely from a recover file on WWAN Module) • WLAN/WiGig • Bluetooth All the options are enabled by default. Trusted Execution - NOTE: For WLAN and WiGig enable or disable controls are enabled by default. Maintenance screen options Option Service Tag Asset Tag Description Displays...
... hard drive or an external USB key. 55 Allows you to previous revisions. BIOS Downgrade This controls flashing of your computer. disabled by default. Data Wipe This field allows users to erase the data securely from a recover file on WWAN Module) • WLAN/WiGig • Bluetooth All the options are enabled by default. Trusted Execution - NOTE: For WLAN and WiGig enable or disable controls are enabled by default. Maintenance screen options Option Service Tag Asset Tag Description Displays...
Owners Manual
Page 56
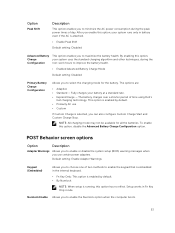
... Service Tag? Option Description • BIOS Recovery from Hard Drive (enabled by default) System Log screen options Option BIOS Events Thermal Events Power Events Description Allows you to view and clear the System Setup (Power) events. Allows you to view and clear the System Setup (BIOS) POST events. Click Run to locate or find your computer. 5. Enter the Service Tag or Express Service Code and click Submit. NOTE: If you are unable to install the updated BIOS settings...
... Service Tag? Option Description • BIOS Recovery from Hard Drive (enabled by default) System Log screen options Option BIOS Events Thermal Events Power Events Description Allows you to view and clear the System Setup (Power) events. Allows you to view and clear the System Setup (BIOS) POST events. Click Run to locate or find your computer. 5. Enter the Service Tag or Express Service Code and click Submit. NOTE: If you are unable to install the updated BIOS settings...

Owners Manual
Page 57
...-boot. 1. The System Security screen appears. 2. In the System Security screen, verify that Password Status is shipped with the system and setup password feature disabled. Select System Password , enter your system password and press Enter or Tab. The computer reboots. 57 Assigning a system password and setup password You can assign a new System Password and/or Setup Password or change an existing System Password and/or Setup Password only when Password Status is Locked, you must enter...
...-boot. 1. The System Security screen appears. 2. In the System Security screen, verify that Password Status is shipped with the system and setup password feature disabled. Select System Password , enter your system password and press Enter or Tab. The computer reboots. 57 Assigning a system password and setup password You can assign a new System Password and/or Setup Password or change an existing System Password and/or Setup Password only when Password Status is Locked, you must enter...
Owners Manual
Page 59
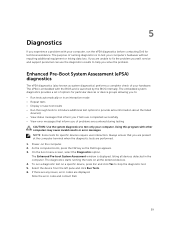
... the problem. Using this program with your computer. Power-on all devices detected in an interactive mode • Repeat tests • Display or save test results • Run thorough tests to introduce additional test options to test your hardware. The diagnostics starts running diagnostics is launched by the BIOS internally. If there are any issues, error codes are unable to fix the problem yourself, service and support...
... the problem. Using this program with your computer. Power-on all devices detected in an interactive mode • Repeat tests • Display or save test results • Run thorough tests to introduce additional test options to test your hardware. The diagnostics starts running diagnostics is launched by the BIOS internally. If there are any issues, error codes are unable to fix the problem yourself, service and support...


