
Owners Manual
Page 3
... Board...31 Removing the Display Assembly...31 Installing the Display Assembly...33 Removing the Power Connector...33 Installing the Power Connector...34 Removing the System Board...34 Installing the System Board...36 Removing the Thermal Module...36 Installing the Thermal Module...37 3 System Setup...39 System Setup Overview...39 Boot Sequence...39 Navigation Keys...39 Updating the BIOS ...40 System Setup Option...40 4 Troubleshooting...49 Enhanced Pre-Boot System Assessment (ePSA) Diagnostics 49 Diagnostics...49 Beep Codes...50 LED Error Codes...
... Board...31 Removing the Display Assembly...31 Installing the Display Assembly...33 Removing the Power Connector...33 Installing the Power Connector...34 Removing the System Board...34 Installing the System Board...36 Removing the Thermal Module...36 Installing the Thermal Module...37 3 System Setup...39 System Setup Overview...39 Boot Sequence...39 Navigation Keys...39 Updating the BIOS ...40 System Setup Option...40 4 Troubleshooting...49 Enhanced Pre-Boot System Assessment (ePSA) Diagnostics 49 Diagnostics...49 Beep Codes...50 LED Error Codes...
Owners Manual
Page 5
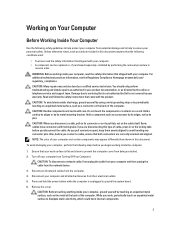
... service and support team. if you disconnect a cable, pull on its connector or on a card. To avoid damaging your computer, perform the following conditions exist: • You have connectors with care. CAUTION: Handle components and cards with locking tabs; CAUTION: When you are correctly oriented and aligned. Remove the cover. Damage due to servicing that came with your work , periodically touch...
... service and support team. if you disconnect a cable, pull on its connector or on a card. To avoid damaging your computer, perform the following conditions exist: • You have connectors with care. CAUTION: Handle components and cards with locking tabs; CAUTION: When you are correctly oriented and aligned. Remove the cover. Damage due to servicing that came with your work , periodically touch...
Owners Manual
Page 6
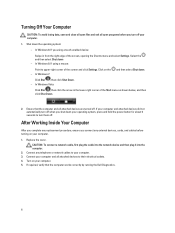
... Start , then click Shut Down. - After Working Inside Your Computer After you complete any replacement procedure, ensure you shut down the operating system: - Connect any external devices, cards, and cables before you using a mouse: Point to your computer. 3. In Windows Vista: Click Start , then click the arrow in from the right edge of the screen and click Settings. If your computer and all attached devices to turn off...
... Start , then click Shut Down. - After Working Inside Your Computer After you complete any replacement procedure, ensure you shut down the operating system: - Connect any external devices, cards, and cables before you using a mouse: Point to your computer. 3. In Windows Vista: Click Start , then click the arrow in from the right edge of the screen and click Settings. If your computer and all attached devices to turn off...
Owners Manual
Page 12
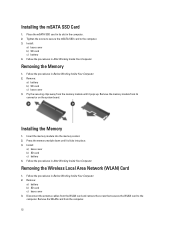
.... Installing the Memory 1. Remove: a) battery b) SD card c) base cover 3. Installing the mSATA SSD Card 1. Pry the securing clips away from its slot in After Working Inside Your Computer. Follow the procedures in the computer. 2. Place the mSATA SSD card in its connector on the system board. Insert the memory module into place. 3. Disconnect the antenna cables from the computer. 12 Removing the Wireless Local Area Network (WLAN) Card 1. Removing the Memory...
.... Installing the Memory 1. Remove: a) battery b) SD card c) base cover 3. Installing the mSATA SSD Card 1. Pry the securing clips away from its slot in After Working Inside Your Computer. Follow the procedures in the computer. 2. Place the mSATA SSD card in its connector on the system board. Insert the memory module into place. 3. Disconnect the antenna cables from the computer. 12 Removing the Wireless Local Area Network (WLAN) Card 1. Removing the Memory...
Owners Manual
Page 39
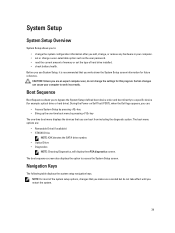
... the user password. • read the current amount of memory or set the type of the system setup options, changes that you write down the System Setup screen information for this program. System Setup System Setup Overview System Setup allows you to work incorrectly. During the Power-on Self Test (POST), when the Dell logo appears, you can boot from including the diagnostic option. NOTE: For most of hard drive installed...
... the user password. • read the current amount of memory or set the type of the system setup options, changes that you write down the System Setup screen information for this program. System Setup System Setup Overview System Setup allows you to work incorrectly. During the Power-on Self Test (POST), when the Dell logo appears, you can boot from including the diagnostic option. NOTE: For most of hard drive installed...
Owners Manual
Page 40
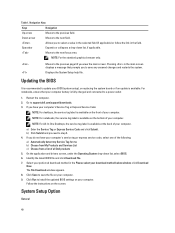
... and drivers screen, under the Operating System drop-down list, if applicable. click Download Now. The File Download window appears. 8. Click Save to save the file on replacing the system board or if an update is fully charged and connected to a power outlet 1. Follow the instructions on your computer. 9. Spacebar Expands or collapses a drop‐down list, select BIOS. 6. Moves to support.dell.com/support/downloads. 3. Pressing in the main screen displays...
... and drivers screen, under the Operating System drop-down list, if applicable. click Download Now. The File Download window appears. 8. Click Save to save the file on replacing the system board or if an update is fully charged and connected to a power outlet 1. Follow the instructions on your computer. 9. Spacebar Expands or collapses a drop‐down list, select BIOS. 6. Moves to support.dell.com/support/downloads. 3. Pressing in the main screen displays...
Owners Manual
Page 41
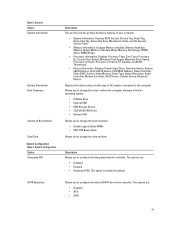
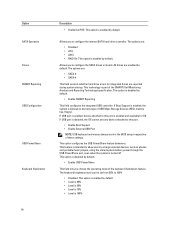
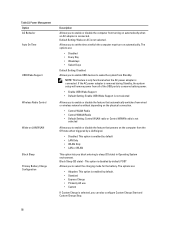
... • AHCI 41 SATA Operation Allows you to configure the internal SATA hard-drive controller. The options are : • Disabled • Enabled • Enabled w/PXE: This option is enabled by default. Table 2. Displays the battery status and the type of your computer. • System Information: Displays BIOS Version, Service Tag, Asset Tag, Ownership Tag, Ownership Date, Manufacture Date, and the Express Service Code. • Memory Information: Displays Memory Installed, Memory Available, Memory Speed, Memory Channels Mode, Memory Technology, DIMM ASize...
... • AHCI 41 SATA Operation Allows you to configure the internal SATA hard-drive controller. The options are : • Disabled • Enabled • Enabled w/PXE: This option is enabled by default. Table 2. Displays the battery status and the type of your computer. • System Information: Displays BIOS Version, Service Tag, Asset Tag, Ownership Tag, Ownership Date, Manufacture Date, and the Express Service Code. • Memory Information: Displays Memory Installed, Memory Available, Memory Speed, Memory Channels Mode, Memory Technology, DIMM ASize...
Owners Manual
Page 42
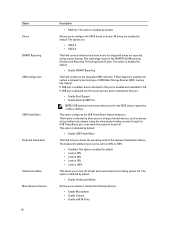
... type of these settings. If USB port is disabled by default. The keyboard brightness level can be set from 25% to 100% • Disabled: This option is enabled by default: • Enable USB PowerShare This field lets you to this port. • Enable Boot Support • Enable External USB Port NOTE: USB keyboard and mouse always work in the BIOS setup irrespective of USB Mass Storage Devices (HDD, memory key, floppy). The options are: • SATA-0 • SATA-4 This field controls whether hard drive errors for OS. This option configures the USB...
... type of these settings. If USB port is disabled by default. The keyboard brightness level can be set from 25% to 100% • Disabled: This option is enabled by default: • Enable USB PowerShare This field lets you to this port. • Enable Boot Support • Enable External USB Port NOTE: USB keyboard and mouse always work in the BIOS setup irrespective of USB Mass Storage Devices (HDD, memory key, floppy). The options are: • SATA-0 • SATA-4 This field controls whether hard drive errors for OS. This option configures the USB...
Owners Manual
Page 44
... boot mode and the Enable Legacy Option ROMs Option needs to the System and Hard Drive passwords when the admin password is set an option to enable the Trusted Platform Module (TPM) during boot. Allows you to manipulate the databases. Description Allows you to enable the Expert Key Management to enable or disable the Secure Boot Feature. Allows you to set . Default Setting: The option is disabled by default. 44 Default Setting: Enable CPU XD Support Allows you to enter the Option ROM Configuration screens using hotkeys during POST. The option...
... boot mode and the Enable Legacy Option ROMs Option needs to the System and Hard Drive passwords when the admin password is set an option to enable the Trusted Platform Module (TPM) during boot. Allows you to manipulate the databases. Description Allows you to enable the Expert Key Management to enable or disable the Secure Boot Feature. Allows you to set . Default Setting: The option is disabled by default. 44 Default Setting: Enable CPU XD Support Allows you to enter the Option ROM Configuration screens using hotkeys during POST. The option...

Owners Manual
Page 46
...; Disabled: This option is enabled by default • LAN Only • WLAN Only • LAN or WLAN Block Sleep Primary Battery Charge Configuration This option lets you block entering to sleep (S3 state) in Operating System environment. Block Sleep (S3 state) - POST Behaviour 46 NOTE: All charging mode may not be available for all of the USB ports to conserve battery power. • Enable USB Wake Support • Default Setting: Enable USB Wake Support is not selected Wireless Radio Control Allows...
...; Disabled: This option is enabled by default • LAN Only • WLAN Only • LAN or WLAN Block Sleep Primary Battery Charge Configuration This option lets you block entering to sleep (S3 state) in Operating System environment. Block Sleep (S3 state) - POST Behaviour 46 NOTE: All charging mode may not be available for all of the USB ports to conserve battery power. • Enable USB Wake Support • Default Setting: Enable USB Wake Support is not selected Wireless Radio Control Allows...
Owners Manual
Page 47
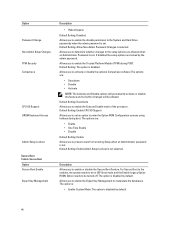
... be controlled by default. • By Numlock Allows you use this feature. Default Setting: Enable Fn Key Emulation Allows you to enable or disable the Intel Virtualization Technology. This option is used to enable the Numlock option when the computer boots. Wireless Option Wireless Switch Description Allows you to enable or disable the system setup (BIOS) warning messages when you to simulate the key feature. Default Setting: Enable Network Allows you enable the sign-on screen message display indicating the keystroke...
... be controlled by default. • By Numlock Allows you use this feature. Default Setting: Enable Fn Key Emulation Allows you to enable or disable the Intel Virtualization Technology. This option is used to enable the Numlock option when the computer boots. Wireless Option Wireless Switch Description Allows you to enable or disable the system setup (BIOS) warning messages when you to simulate the key feature. Default Setting: Enable Network Allows you enable the sign-on screen message display indicating the keystroke...
Owners Manual
Page 48
... view and clear the System Setup (BIOS) POST events. Allows you to view and clear the Thermal events. This option is not already set by default. Description Displays the Service Tag of your computer. Description Allows you to enable or disable the internal wireless devices. • WWAN • WLAN • Bluetooth All the options are enabled by default. Allows you to view and clear the Power events. 48 Maintenance Option Service Tag Asset...
... view and clear the System Setup (BIOS) POST events. Allows you to view and clear the Thermal events. This option is not already set by default. Description Displays the Service Tag of your computer. Description Allows you to enable or disable the internal wireless devices. • WWAN • WLAN • Bluetooth All the options are enabled by default. Allows you to view and clear the Power events. 48 Maintenance Option Service Tag Asset...
Owners Manual
Page 49
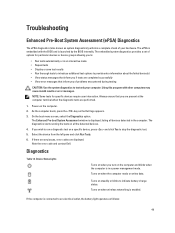
... the BIOS and is enabled. The Enhanced Pre-boot System Assessment window is in a power management mode. If you wish to run a diagnostic test on a specific device, press and click Yes to an electrical outlet, the battery light operates as follows: 49 Select the device from the left pane and click Run Tests. 6. Device Status Lights Turns on when you of problems encountered during testing CAUTION: Use the...
... the BIOS and is enabled. The Enhanced Pre-boot System Assessment window is in a power management mode. If you wish to run a diagnostic test on a specific device, press and click Yes to an electrical outlet, the battery light operates as follows: 49 Select the device from the left pane and click Run Tests. 6. Device Status Lights Turns on when you of problems encountered during testing CAUTION: Use the...
Owners Manual
Page 50
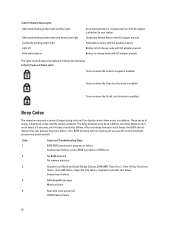
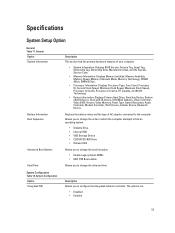
... power button. Temporary battery failure with AC adapter present. The lights located above the keyboard indicate the following: Table 16. Turns on when the numeric keypad is 3 seconds, and the beep sound lasts 300 ms. After each beep and each set of beeps is enabled. Fatal battery failure with AC adapter present. Code 1 Cause and Troubleshooting Steps BIOS ROM checksum in full charge mode with AC adapter present. Battery Status Lights Alternately blinking amber light...
... power button. Temporary battery failure with AC adapter present. The lights located above the keyboard indicate the following: Table 16. Turns on when the numeric keypad is 3 seconds, and the beep sound lasts 300 ms. After each beep and each set of beeps is enabled. Fatal battery failure with AC adapter present. Code 1 Cause and Troubleshooting Steps BIOS ROM checksum in full charge mode with AC adapter present. Battery Status Lights Alternately blinking amber light...
Owners Manual
Page 53
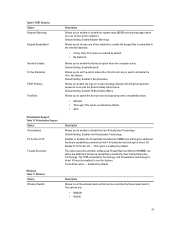
... Device Information: Displays Primary Hard Drive, Fixed bay Device, System eSATA Device, Dock eSATA Device, LOM MAC Address, Video Controller, Video BIOS Version, Video Memory, Panel Type, Native Resolution, Audio Controller, Modem Controller, Wi-Fi Device, Cellular Device, Bluetooth Device. Specifications System Setup Option General Table 17. System Configuration Option Integrated NIC Description Allows you to configure the integrated network controller. The options are: • Disabled • Enabled 53 General Option System Information Battery Information Boot Sequence Advanced Boot...
... Device Information: Displays Primary Hard Drive, Fixed bay Device, System eSATA Device, Dock eSATA Device, LOM MAC Address, Video Controller, Video BIOS Version, Video Memory, Panel Type, Native Resolution, Audio Controller, Modem Controller, Wi-Fi Device, Cellular Device, Bluetooth Device. Specifications System Setup Option General Table 17. System Configuration Option Integrated NIC Description Allows you to configure the integrated network controller. The options are: • Disabled • Enabled 53 General Option System Information Battery Information Boot Sequence Advanced Boot...
Owners Manual
Page 54
...: USB keyboard and mouse always work in the BIOS setup irrespective of these settings. If Boot Support is enabled, the system is turned off. This option configures the USB PowerShare feature behaviour. Allows you to configure the internal SATA hard-drive controller. All drives are reported during system startup. If USB port is enabled by default. Option SATA Operation Drives SMART Reporting USB Configuration USB PowerShare Keyboard Illumination 54 Description • Enabled w/PXE: This option is disabled, the OS cannot see any type of USB Mass Storage Devices (HDD, memory key...
...: USB keyboard and mouse always work in the BIOS setup irrespective of these settings. If Boot Support is enabled, the system is turned off. This option configures the USB PowerShare feature behaviour. Allows you to configure the internal SATA hard-drive controller. All drives are reported during system startup. If USB port is enabled by default. Option SATA Operation Drives SMART Reporting USB Configuration USB PowerShare Keyboard Illumination 54 Description • Enabled w/PXE: This option is disabled, the OS cannot see any type of USB Mass Storage Devices (HDD, memory key...

Owners Manual
Page 56
... Option ROM Configuration screens using hotkeys during POST. Default Setting: Enable CPU XD Support Allows you to set . Allows you to enable or disable the permission to bypass the System and the Internal HDD password, when they are : • Enable • One Time Enable • Disable Default Setting: Enable Allows you to prevent users from entering Setup when an Administrator password is set . Allows you to determine the minimum and maximum length of the processor. Option Password Configuration Password Bypass Password Change Non-Admin Setup Changes...
... Option ROM Configuration screens using hotkeys during POST. Default Setting: Enable CPU XD Support Allows you to set . Allows you to enable or disable the permission to bypass the System and the Internal HDD password, when they are : • Enable • One Time Enable • Disable Default Setting: Enable Allows you to prevent users from entering Setup when an Administrator password is set . Allows you to determine the minimum and maximum length of the processor. Option Password Configuration Password Bypass Password Change Non-Admin Setup Changes...
Owners Manual
Page 58
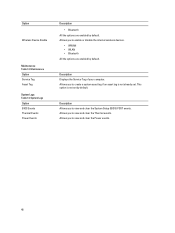
... charging mode for the battery. Allows you block entering to wake the system from Standby. If the AC power adapter is removed during Standby, the system setup will remove power from all of the USB ports to conserve battery power. • Enable USB Wake Support • Default Setting: Enable USB Wake Support is enabled by a LAN signal. • Disabled: This option is not selected Allows you can also configure Custom Charge Start and Custom Charge Stop. 58 This option is connected. The options...
... charging mode for the battery. Allows you block entering to wake the system from Standby. If the AC power adapter is removed during Standby, the system setup will remove power from all of the USB ports to conserve battery power. • Enable USB Wake Support • Default Setting: Enable USB Wake Support is enabled by a LAN signal. • Disabled: This option is not selected Allows you can also configure Custom Charge Start and Custom Charge Stop. 58 This option is connected. The options...
Owners Manual
Page 59
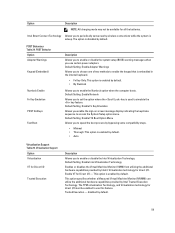
...) Numlock Enable Fn Key Emulation POST HotKeys Fast Boot Description Allows you to enable or disable the system setup (BIOS) warning messages when you to use certain power adapters. The option is disabled by default. POST Behaviour Table 24. Virtualization Support Option Virtualization VT for Direct I /O Trusted Execution Description Allows you to access the System Setup option menu. Default Setting: Enable Intel Virtualization Technology Enables or disables the Virtual Machine Monitor (VMM) from utilizing the additional hardware capabilities...
...) Numlock Enable Fn Key Emulation POST HotKeys Fast Boot Description Allows you to enable or disable the system setup (BIOS) warning messages when you to use certain power adapters. The option is disabled by default. POST Behaviour Table 24. Virtualization Support Option Virtualization VT for Direct I /O Trusted Execution Description Allows you to access the System Setup option menu. Default Setting: Enable Intel Virtualization Technology Enables or disables the Virtual Machine Monitor (VMM) from utilizing the additional hardware capabilities...
Owners Manual
Page 60
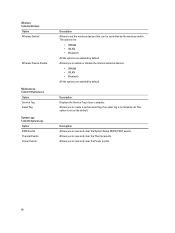
... default. Wireless Option Wireless Switch Wireless Device Enable Maintenance Table 27. Allows you to view and clear the Power events. 60 System Logs Option BIOS Events Thermal Events Power Events Description Allows to view and clear the Thermal events. Maintenance Option Service Tag Asset Tag System Logs Table 28. The options are: • WWAN • WLAN • Bluetooth All the options are enabled by default. Allows you to set . Wireless Table 26. Allows you to create...
... default. Wireless Option Wireless Switch Wireless Device Enable Maintenance Table 27. Allows you to view and clear the Power events. 60 System Logs Option BIOS Events Thermal Events Power Events Description Allows to view and clear the Thermal events. Maintenance Option Service Tag Asset Tag System Logs Table 28. The options are: • WWAN • WLAN • Bluetooth All the options are enabled by default. Allows you to set . Wireless Table 26. Allows you to create...


