
E-Family Re-Image Guide
Page 29
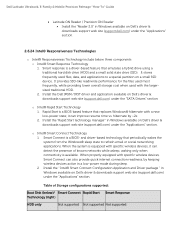
...special partition on a small SSD device. and driver-based technology that replaces Windows® hibernate with the largersized traditional HDD. 2. Dell Latitude Ultrabook, E-Family & Mobile Precision Reimage "How-To" Guide Latitude ON Reader / Precision ON Reader Install the "Reader 2.0" ... o Intel® Smart Connect Technology 1 Smart Connect is a driver-based feature that emulates a hybrid drive using a traditional hard disk drive (HDD) and a small solid state drive (SSD). it can also provide quick internet connection readiness, by ~2x. 2. It stores frequently used...
...special partition on a small SSD device. and driver-based technology that replaces Windows® hibernate with the largersized traditional HDD. 2. Dell Latitude Ultrabook, E-Family & Mobile Precision Reimage "How-To" Guide Latitude ON Reader / Precision ON Reader Install the "Reader 2.0" ... o Intel® Smart Connect Technology 1 Smart Connect is a driver-based feature that emulates a hybrid drive using a traditional hard disk drive (HDD) and a small solid state drive (SSD). it can also provide quick internet connection readiness, by ~2x. 2. It stores frequently used...
Owner's Manual
Page 7
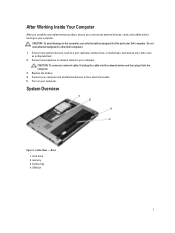
... electrical outlets. 5. memory 3. Do not use only the battery designed for other Dell computers. 1. SIM slot 7 Connect any external devices, such as an ExpressCard. 2. hard drive 2. battery bay 4. Connect any cards, such as a port replicator, battery slice, or media base, and replace any telephone or network cables to your computer and all attached devices...
... electrical outlets. 5. memory 3. Do not use only the battery designed for other Dell computers. 1. SIM slot 7 Connect any external devices, such as an ExpressCard. 2. hard drive 2. battery bay 4. Connect any cards, such as a port replicator, battery slice, or media base, and replace any telephone or network cables to your computer and all attached devices...
Owner's Manual
Page 12
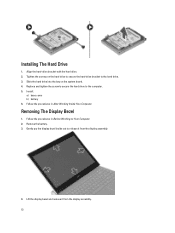
Installing The Hard Drive 1. Slide the hard drive into the bay on the hard drive to secure the hard-drive bracket to the hard drive. 3. Removing The Display Bezel 1. Tighten the screws on the system board. 4. Replace and tighten the screw to secure the hard drive to release it from the display assembly. 4. Follow the procedures in After Working Inside Your Computer. Gently pry...
Installing The Hard Drive 1. Slide the hard drive into the bay on the hard drive to secure the hard-drive bracket to the hard drive. 3. Removing The Display Bezel 1. Tighten the screws on the system board. 4. Replace and tighten the screw to secure the hard drive to release it from the display assembly. 4. Follow the procedures in After Working Inside Your Computer. Gently pry...
Owner's Manual
Page 24
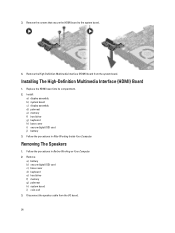
Replace the HDMI board into its compartment. 2. Removing The Speakers 1. Installing The High-Definition Multimedia Interface (HDMI) Board 1. 3. Install: a) display assembly b) system board c) display assembly d) palmrest e) memory f) hard drive g) keyboard h) base cover i) secure digital (SD) card j) battery 3. Follow ... in Before Working on Your Computer. 2. Remove: a) battery b) secure digital (SD) card c) base cover d) keyboard e) hard drive f) memory g) palmrest h) system board i) coin-cell 3. Disconnect the speaker cable from the system board. Remove the screws that...
Replace the HDMI board into its compartment. 2. Removing The Speakers 1. Installing The High-Definition Multimedia Interface (HDMI) Board 1. 3. Install: a) display assembly b) system board c) display assembly d) palmrest e) memory f) hard drive g) keyboard h) base cover i) secure digital (SD) card j) battery 3. Follow ... in Before Working on Your Computer. 2. Remove: a) battery b) secure digital (SD) card c) base cover d) keyboard e) hard drive f) memory g) palmrest h) system board i) coin-cell 3. Disconnect the speaker cable from the system board. Remove the screws that...
Owner's Manual
Page 27
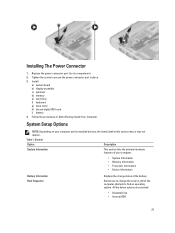
Installing The Power Connector 1. Replace the power connector port into its installed devices, the items listed in which the computer attempts to change the order in this section may ... in place. 3. Allows you to find an operating system. Install: a) system board b) display assembly c) palmrest d) memory e) hard drive f) keyboard g) base cover h) decure digital (SD) card i) battery 4. All the below options are selected. • Diskette Drive • Internal HDD 27 Table 1. System Setup Options NOTE: Depending on your computer. • System Information •...
Installing The Power Connector 1. Replace the power connector port into its installed devices, the items listed in which the computer attempts to change the order in this section may ... in place. 3. Allows you to find an operating system. Install: a) system board b) display assembly c) palmrest d) memory e) hard drive f) keyboard g) base cover h) decure digital (SD) card i) battery 4. All the below options are selected. • Diskette Drive • Internal HDD 27 Table 1. System Setup Options NOTE: Depending on your computer. • System Information •...
Statement of Volatility
Page 2
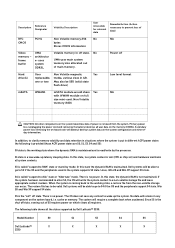
...Dell Latitude™ 3330: Model Number S0 S1 S3 S4 S5 Dell Latitude™ X X X X X 3330 The OS does not save any component on which clears all system contexts. cache or memory. There is the working state, a restore file from the system. S1 state is the "soft" off Hard drive(s) User Non Volatile magnetic Yes replaceable... memory 256 No NA CMOS bytes Stores CMOS information Video memory - Dell systems will write the system context to be SSD (solid state flash drive) Low level format mSATA WWAN1 mSATA module would share Yes NA with...
...Dell Latitude™ 3330: Model Number S0 S1 S3 S4 S5 Dell Latitude™ X X X X X 3330 The OS does not save any component on which clears all system contexts. cache or memory. There is the working state, a restore file from the system. S1 state is the "soft" off Hard drive(s) User Non Volatile magnetic Yes replaceable... memory 256 No NA CMOS bytes Stores CMOS information Video memory - Dell systems will write the system context to be SSD (solid state flash drive) Low level format mSATA WWAN1 mSATA module would share Yes NA with...


