
E-Family Re-Image Guide
Page 7
... & Mobile Precision 4th generation Ten fingers touch support on Latitude E-Family & Mobile Precision 3rdgeneration. Dell Latitude Ultrabook, E-Family & Mobile Precision Reimage "How-To" Guide o Dell Data Protection | Encryption(DDPE) - Latitude E-Family & Mobile Precision 3rd & 4th generation o Privacy Panel o Touch Screen Digitizer- Latitude E-Family & Mobile Precision 4th generation o Dell Battery Management - Four Fingers touch with Stylus support on Mobile...
... & Mobile Precision 4th generation Ten fingers touch support on Latitude E-Family & Mobile Precision 3rdgeneration. Dell Latitude Ultrabook, E-Family & Mobile Precision Reimage "How-To" Guide o Dell Data Protection | Encryption(DDPE) - Latitude E-Family & Mobile Precision 3rd & 4th generation o Privacy Panel o Touch Screen Digitizer- Latitude E-Family & Mobile Precision 4th generation o Dell Battery Management - Four Fingers touch with Stylus support on Mobile...
E-Family Re-Image Guide
Page 11
... only 2. Intel® Rapid Start Technology 3. Reader, Flash, and ARM - 1st & 2nd generations Latitude EFamily & Mobile Precision 1. Dell Latitude Ultrabook, E-Family & Mobile Precision Reimage "How-To" Guide HW based solution using out-of the system state) o USB 3.0 o Touch Screen Digitizer o Control Vault Driver Update (FingerPrint Reader, Contactless Smart Card reader tied in case...
... only 2. Intel® Rapid Start Technology 3. Reader, Flash, and ARM - 1st & 2nd generations Latitude EFamily & Mobile Precision 1. Dell Latitude Ultrabook, E-Family & Mobile Precision Reimage "How-To" Guide HW based solution using out-of the system state) o USB 3.0 o Touch Screen Digitizer o Control Vault Driver Update (FingerPrint Reader, Contactless Smart Card reader tied in case...
E-Family Re-Image Guide
Page 27
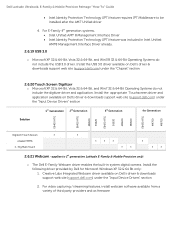
...(IPT) feature was included in system digital camera. Install the USB 3.0 driver available on Dell's driver & downloads support web site (support.dell.com) under the "Input Device Drivers" section 2. Dell Latitude Ultrabook, E-Family & Mobile Precision Reimage "How-To" Guide Intel Identity Protection ... the digitizer driver and application. Install the appropriate Touchscreen driver and application available on Dell's driver & downloads support web site (support.dell.com) under the "Chipset" section 2.6.20 Touch Screen Digitizer o Microsoft XP 32 & 64-Bit, Vista 32 & 64-Bit, and...
...(IPT) feature was included in system digital camera. Install the USB 3.0 driver available on Dell's driver & downloads support web site (support.dell.com) under the "Input Device Drivers" section 2. Dell Latitude Ultrabook, E-Family & Mobile Precision Reimage "How-To" Guide Intel Identity Protection ... the digitizer driver and application. Install the appropriate Touchscreen driver and application available on Dell's driver & downloads support web site (support.dell.com) under the "Chipset" section 2.6.20 Touch Screen Digitizer o Microsoft XP 32 & 64-Bit, Vista 32 & 64-Bit, and...
E-Family Re-Image Guide
Page 40
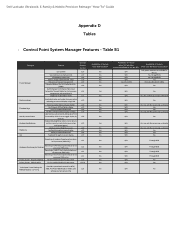
Dell Latitude Ultrabook, E-Family & Mobile Precision Reimage "How-To" Guide Appendix D Tables - Keyboard backlighting options (to be able to set to toggle display by default). Yes Yes ... Yes Yes Yes Yes Yes Yes Yes Availablity of ECC Alerts log information at OS presence (PWS only) Reporting of Feature when Dell provides drivers/middleware, but with No screen pop-up display Yes N/A No Yes N/A Yes Yes N/A No Yes N/A Through BIOS Yes N/A Through BIOS Yes N/A Through BIOS Yes N/A Through BIOS Yes...
Dell Latitude Ultrabook, E-Family & Mobile Precision Reimage "How-To" Guide Appendix D Tables - Keyboard backlighting options (to be able to set to toggle display by default). Yes Yes ... Yes Yes Yes Yes Yes Yes Yes Availablity of ECC Alerts log information at OS presence (PWS only) Reporting of Feature when Dell provides drivers/middleware, but with No screen pop-up display Yes N/A No Yes N/A Yes Yes N/A No Yes N/A Through BIOS Yes N/A Through BIOS Yes N/A Through BIOS Yes N/A Through BIOS Yes...
Owner's Manual
Page 6
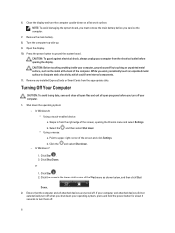
... system board. Remove any installed ExpressCards or Smart Cards from the right edge of the Start menu as the metal at the back of the screen and click Settings. b. If your computer and attached devices did not automatically turn off when you turn them off . Press the power button to upper... you service the computer. 7. Click Shut Down. CAUTION: To guard against electrical shock, always unplug your computer. 1. Swipe in the lower-right corner of the screen, opening the display.
... system board. Remove any installed ExpressCards or Smart Cards from the right edge of the Start menu as the metal at the back of the screen and click Settings. b. If your computer and attached devices did not automatically turn off when you turn them off . Press the power button to upper... you service the computer. 7. Click Shut Down. CAUTION: To guard against electrical shock, always unplug your computer. 1. Swipe in the lower-right corner of the screen, opening the display.

Owner's Manual
Page 30
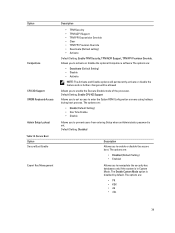
... to activate or disable the optional Computrace software The options are permitted when an administrator password is set access to enter the Option ROM Configuration screens using hotkeys during POST. The options are: • Enable (Default Setting) • One Time Enable • Disable Allows you to determine whether changes to setup...
... to activate or disable the optional Computrace software The options are permitted when an administrator password is set access to enter the Option ROM Configuration screens using hotkeys during POST. The options are: • Enable (Default Setting) • One Time Enable • Disable Allows you to determine whether changes to setup...

Owner's Manual
Page 35
3 System Setup System Setup enables you to access the System Setup screen. The boot sequence screen also displays the option to manage your computer security Boot Sequence Boot Sequence allows you to ...level options. Down arrow Moves to the next field. 35 Table 13. During the Power-on Self Test (POST), when the Dell logo appears, you can: • Access System Setup by pressing key • Bring up the one-time boot menu by ...XXX denotes the SATA drive number. • Optical Drive • Diagnostics NOTE: Choosing Diagnostics, will display the ePSA diagnostics screen.
3 System Setup System Setup enables you to access the System Setup screen. The boot sequence screen also displays the option to manage your computer security Boot Sequence Boot Sequence allows you to ...level options. Down arrow Moves to the next field. 35 Table 13. During the Power-on Self Test (POST), when the Dell logo appears, you can: • Access System Setup by pressing key • Bring up the one-time boot menu by ...XXX denotes the SATA drive number. • Optical Drive • Diagnostics NOTE: Choosing Diagnostics, will display the ePSA diagnostics screen.

Owner's Manual
Page 36
Pressing in the main screen displays a message that prompts you to select a value in the selected field (if applicable) or follow the link in the field. Displays the System Setup ... battery. Moves to the previous page till you to change the order in this section may or may not appear. Allows you view the main screen. Allows you to the next focus area. Moves to enable the Legacy Option ROMs during the UEFI boot mode.
Pressing in the main screen displays a message that prompts you to select a value in the selected field (if applicable) or follow the link in the field. Displays the System Setup ... battery. Moves to the previous page till you to change the order in this section may or may not appear. Allows you view the main screen. Allows you to the next focus area. Moves to enable the Legacy Option ROMs during the UEFI boot mode.
Owner's Manual
Page 39
... and Disable options will permanently activate or disable the feature and no further changes will be allowed Allows you to enter the Option ROM Configuration screens using hotkeys during boot process. Option Computrace CPU XD Support OROM Keyboard Access Admin Setup Lockout Table 18. Secure Boot Option Secure Boot Enable Expert...
... and Disable options will permanently activate or disable the feature and no further changes will be allowed Allows you to enter the Option ROM Configuration screens using hotkeys during boot process. Option Computrace CPU XD Support OROM Keyboard Access Admin Setup Lockout Table 18. Secure Boot Option Secure Boot Enable Expert...

Owner's Manual
Page 43
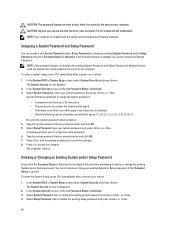
... Log Updating the BIOS It is recommended to update your BIOS (system setup), on the bottom of your computer. On the application and drivers screen, under the Operating System drop-down list, select BIOS. 6. click Download Now. The File Download window appears. 8. System and Setup Password ... your computer battery is available on replacing the system board or if an update is available. b) Click Submit and proceed to support.dell.com/support/downloads. 3. Click Run to install the updated BIOS settings on to your system. Password Type System password Setup password Description...
... Log Updating the BIOS It is recommended to update your BIOS (system setup), on the bottom of your computer. On the application and drivers screen, under the Operating System drop-down list, select BIOS. 6. click Download Now. The File Download window appears. 8. System and Setup Password ... your computer battery is available on replacing the system board or if an update is available. b) Click Submit and proceed to support.dell.com/support/downloads. 3. Click Run to install the updated BIOS settings on to your system. Password Type System password Setup password Description...
Owner's Manual
Page 44
... an existing System Password and/or Setup Password only when Password Status is deleted and you to save the changes. In the System Security screen, verify that you entered earlier and click OK. 7. Select Setup Password, type your system password, and press or . Type the setup... on to the computer. NOTE: If the password jumper is disabled, the existing System Password and Setup Password is Unlocked. In the System Security screen, verify that you entered earlier and click OK. 5. Use the following special characters are not allowed. - To enter the System Setup, press ...
... an existing System Password and/or Setup Password only when Password Status is deleted and you to save the changes. In the System Security screen, verify that you entered earlier and click OK. 7. Select Setup Password, type your system password, and press or . Type the setup... on to the computer. NOTE: If the password jumper is disabled, the existing System Password and Setup Password is Unlocked. In the System Security screen, verify that you entered earlier and click OK. 5. Use the following special characters are not allowed. - To enter the System Setup, press ...

