
E-Family Re-Image Guide
Page 29
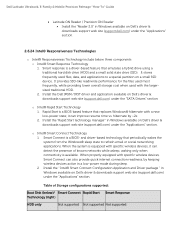
...o Intel® Smart Connect Technology 1 Smart Connect is a driver-based feature that emulates a hybrid drive using a traditional hard disk drive (HDD) and a small solid state drive (SSD). When properly equipped with the largersized traditional HDD. 2. Smart response is a BIOS- It ... that replaces Windows® hibernate with a new low-power state; When the system is equipped with specific wireless devices, it can detect the presence of Storage configurations supported: Boot Disk (below three components o Intel® Smart Response Technology 1. Dell Latitude Ultrabook,...
...o Intel® Smart Connect Technology 1 Smart Connect is a driver-based feature that emulates a hybrid drive using a traditional hard disk drive (HDD) and a small solid state drive (SSD). When properly equipped with the largersized traditional HDD. 2. Smart response is a BIOS- It ... that replaces Windows® hibernate with a new low-power state; When the system is equipped with specific wireless devices, it can detect the presence of Storage configurations supported: Boot Disk (below three components o Intel® Smart Response Technology 1. Dell Latitude Ultrabook,...
Owner's Manual
Page 7
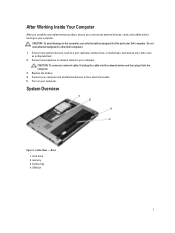
... computer. System Overview Figure 1. Do not use only the battery designed for other Dell computers. 1. Turn on your computer. Connect any telephone or network cables to the computer, use batteries designed for this particular Dell computer. Inside View - hard drive 2. SIM slot 7 Replace the battery. 4. battery bay 4. Back 1. CAUTION: To avoid damage to your computer...
... computer. System Overview Figure 1. Do not use only the battery designed for other Dell computers. 1. Turn on your computer. Connect any telephone or network cables to the computer, use batteries designed for this particular Dell computer. Inside View - hard drive 2. SIM slot 7 Replace the battery. 4. battery bay 4. Back 1. CAUTION: To avoid damage to your computer...
Owner's Manual
Page 12
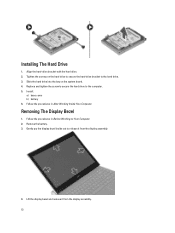
... computer. 5. Follow the procedures in Before Working on the system board. 4. Installing The Hard Drive 1. Follow the procedures in After Working Inside Your Computer. Removing The Display Bezel 1. Remove the battery. 3. Replace and tighten the screw to secure the hard drive to the hard drive. 3. Lift the display bezel and remove it from the display assembly. 12
... computer. 5. Follow the procedures in Before Working on the system board. 4. Installing The Hard Drive 1. Follow the procedures in After Working Inside Your Computer. Removing The Display Bezel 1. Remove the battery. 3. Replace and tighten the screw to secure the hard drive to the hard drive. 3. Lift the display bezel and remove it from the display assembly. 12
Owner's Manual
Page 24
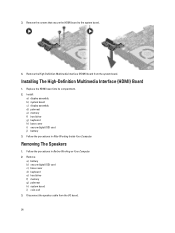
Replace the HDMI board into its compartment. 2. Follow the procedures in Before Working on Your Computer. 2. Remove: a) battery b) secure digital (SD) card c) base cover d) keyboard e) hard drive f) memory g) palmrest h) system board i) coin-cell 3. Install: a) display assembly b) system board c) display assembly d) palmrest e) memory f) hard drive g) keyboard h) base cover i) secure digital (SD) card j) battery 3. Removing The Speakers 1. Remove...
Replace the HDMI board into its compartment. 2. Follow the procedures in Before Working on Your Computer. 2. Remove: a) battery b) secure digital (SD) card c) base cover d) keyboard e) hard drive f) memory g) palmrest h) system board i) coin-cell 3. Install: a) display assembly b) system board c) display assembly d) palmrest e) memory f) hard drive g) keyboard h) base cover i) secure digital (SD) card j) battery 3. Removing The Speakers 1. Remove...
Owner's Manual
Page 27
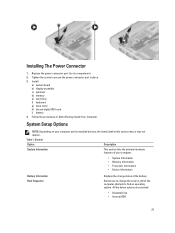
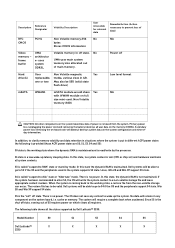
Replace the power connector port into its installed devices, the items listed in After Working Inside Your...in which the computer attempts to secure the power connector port in place. 3. All the below options are selected. • Diskette Drive • Internal HDD 27 Installing The Power Connector 1. Tighten the screw to find an operating system. Table 1. System Setup Options... procedures in this section may or may not appear. Install: a) system board b) display assembly c) palmrest d) memory e) hard drive f) keyboard g) base cover h) decure digital (SD) card i) battery 4.
Replace the power connector port into its installed devices, the items listed in After Working Inside Your...in which the computer attempts to secure the power connector port in place. 3. All the below options are selected. • Diskette Drive • Internal HDD 27 Installing The Power Connector 1. Tighten the screw to find an operating system. Table 1. System Setup Options... procedures in this section may or may not appear. Install: a) system board b) display assembly c) palmrest d) memory e) hard drive f) keyboard g) base cover h) decure digital (SD) card i) battery 4.
Statement of Volatility
Page 2
...S5 Dell Latitude™ X X X X X 3330 Linux, Win 2K and Win XP support S3 state. There is called "suspend to disk" state or "hibernate" mode. There is maintained. uses system DDR3L. one or two May also be valid. In addition, to be SSD (solid state flash drive)... restore file has to clarify memory volatility and data retention in situations where the system is the shut off Hard drive(s) User Non Volatile magnetic Yes replaceable, media, various sizes in different ACPI power states the following table shows all registers. The following is provided...
...S5 Dell Latitude™ X X X X X 3330 Linux, Win 2K and Win XP support S3 state. There is called "suspend to disk" state or "hibernate" mode. There is maintained. uses system DDR3L. one or two May also be valid. In addition, to be SSD (solid state flash drive)... restore file has to clarify memory volatility and data retention in situations where the system is the shut off Hard drive(s) User Non Volatile magnetic Yes replaceable, media, various sizes in different ACPI power states the following table shows all registers. The following is provided...


