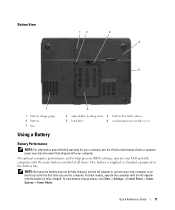
Service Manual View
Page 8
3 Connect the AC adapter to the AC adapter connector on the computer and to the electrical outlet. 4 Open the computer display and press the power button to a docking device or other external device, such as a printer. 8 Quick Reference Guide NOTE: It is recommended that you turn on the computer (see "Front View" on and shut down your computer at least once before you install any cards or connect the computer to turn on page 9).
Service Manual View
Page 9
About Your Computer Front View 10 9 8 1 2 3 4 5 6 1 display latch release 4 power button 7 speakers (2) 10 keyboard and wireless status lights 7 2 display latches (2) 5 device status lights 8 touch pad buttons 3 display 6 touch pad 9 keyboard Quick Reference Guide 9
Service Manual View
Page 11
...; Power Meter. NOTE: Because the battery may not be fully charged, use the AC adapter to an electrical outlet the first time you use the computer. For optimal computer performance and to help preserve BIOS settings, operate your new computer to connect your Dell portable...6 2 optical-drive locking screw 3 battery-bay latch release 5 hard drive 6 modem/memory module cover Battery Performance NOTE: For information about the Dell warranty for your computer, see the Product Information Guide or separate paper warranty document that shipped with the AC adapter until the battery is supplied...
Service Manual View
Page 12
... in the Product Information Guide. Damaged batteries may increase the risk of batteries with extreme care. Microsoft Windows Power Meter The Windows Power Meter indicates the remaining battery charge. Keep the battery away from Dell. CAUTION: Using an incompatible battery may leak and cause personal injury or equipment damage. Replace the battery only...
Service Manual View
Page 13
...release the status button on the battery charge gauge for as long as you connect the computer to 80 percent in about accessing the Power Options Properties window. Check the Battery Health To check the battery health using the charge gauge, press and hold the status button on...turned off, the AC adapter charges a completely discharged battery to an electrical outlet. That is in good condition, and more than 60 percent of power, hibernate mode begins automatically. If no charge. For example, if the battery has 80 percent of its original charge capacity remains. When you ...
Service Manual View
Page 15
After a long storage period, recharge the battery fully (see "Charging the Battery" on your keyboard or moving your mouse, press and hold the power button for at least 8 to perform an operating system shutdown. TURN THE COMPUTER OFF - If you are unable to 10 seconds until the computer turns ...
Service Manual View
Page 16
... and Utilities CD. 16 Quick Reference Guide Use an anti-virus program that your mouse, press and hold the power button for the keyword spyware. NOTE: The Drivers and Utilities CD is optional and may require an upgrade) to Use the...the safety instructions in "Lockups and Software Problems" on your computer. • Ensure that includes anti-spyware protection (your computer. Start the Dell Diagnostics from either your computer. Other software problems CHECK THE SOFTWARE DOCUMENTATION OR CONTACT THE SOFTWARE MANUFACTURER FOR TROUBLESHOOTING INFORMATION - • Ensure that ...
Service Manual View
Page 17
... computer to continue. 5 Press any questions that came with your hard drive. b Press and hold the key while powering the computer on the computer. Press any key to an electrical outlet. 4 Run the Dell Diagnostics: a Turn on . NOTE: The next steps change the boot sequence for technical assistance. 1 Turn on your computer...
Service Manual View
Page 21
...charge, 12 performance, 11 power meter, 12 removing, 14 storing, 15 C CDs operating system, 7 computer crashes, 15-16 slow performance, 16 stops responding, 15 D Dell premier support website, 7 support site, 6 Dell Diagnostics, 16 Dell Premier Support website, 5, 7 diagnostics Dell, 16 documentation End User ...7 reinstalling, 7 P problems blue screen, 16 computer crashes, 15-16 computer does not start up, 15 computer stops responding, 15 Dell Diagnostics, 16 lockups, 15 program crashes, 15 program stops responding, 15 programs and Windows compatibility, 15 slow computer performance, 16 software...
Quick Reference Guide (Multilanguage: English, Dutch, French, German, Italian, Spanish)
Page 8
3 Connect the AC adapter to the AC adapter connector on page 9). NOTE: It is recommended that you turn on and shut down your computer at least once before you install any cards or connect the computer to turn on the computer (see "Front View" on the computer and to the electrical outlet. 4 Open the computer display and press the power button to a docking device or other external device, such as a printer. 8 Quick Reference Guide
Quick Reference Guide (Multilanguage: English, Dutch, French, German, Italian, Spanish)
Page 9
About Your Computer Front View 10 9 8 1 2 3 4 5 6 1 display latch release 4 power button 7 speakers (2) 10 keyboard and wireless status lights 7 2 display latches (2) 5 device status lights 8 touch pad buttons 3 display 6 touch pad 9 keyboard Quick Reference Guide 9
Quick Reference Guide (Multilanguage: English, Dutch, French, German, Italian, Spanish)
Page 11
..., use the computer. To view battery charge status, click Start→ Settings→ Control Panel→ Power Options→ Power Meter. Quick Reference Guide 11 For best results, operate the computer with your computer. Bottom View 12 3... 4 5 7 1 battery charge gauge 4 battery 7 fan Using a Battery 6 2 optical-drive locking screw 3 battery-bay latch release 5 hard drive 6 modem/memory module cover Battery Performance NOTE: For information about the Dell...
Quick Reference Guide (Multilanguage: English, Dutch, French, German, Italian, Spanish)
Page 12
...to temperatures above 65°C (149°F). Keep the battery away from Dell. CAUTION: Using an incompatible battery may increase the risk of fire or explosion. Checking the Battery Charge The Microsoft Windows Power Meter window and icon, the battery charge gauge and health gauge, and...new battery during the life of your computer. Battery operating time varies depending on the battery charge. Replace the battery only with your Dell computer. When your battery no longer holds a charge, call your local waste disposal or environmental agency for advice on disposing of ...
Quick Reference Guide (Multilanguage: English, Dutch, French, German, Italian, Spanish)
Page 13
...NOTE: When the computer is hot from overcharging. When you when the battery charge is charged. See the specifications in about accessing the Power Options Properties window. Low-Battery Warning NOTICE: To avoid losing or corrupting data, save your computer or being used in the computer ...for at least 3 seconds. Quick Reference Guide 13 After hundreds of power, hibernate mode begins automatically. That is, a battery can leave the battery in your work immediately after a low-battery warning, and then ...
Quick Reference Guide (Multilanguage: English, Dutch, French, German, Italian, Spanish)
Page 15
... ELECTRICAL OUTLET. After a long storage period, recharge the battery fully (see "Charging the Battery" on your keyboard or moving your mouse, press and hold the power button for an earlier Microsoft Windows operating system R U N T H E P R O G R A M C O M P A T I B I L I O N - Storing a Battery Remove the battery when you use it runs in its documentation or on the screen...
Quick Reference Guide (Multilanguage: English, Dutch, French, German, Italian, Spanish)
Page 16
...you experience a problem with the program. • If necessary, uninstall and then reinstall the program. For more information, go to support.dell.com and search for information. • Ensure that the program is installed and configured properly. • Verify that your computer meets ...MANUFACTURER FOR TROUBLESHOOTING INFORMATION - • Ensure that the program is recommended that includes anti-spyware protection (your mouse, press and hold the power button for technical assistance. USE A VIRUS-SCANNING PROGRAM TO CHECK THE HARD DRIVE, FLOPPY DISKS, OR CDS. A solid blue screen ...
Quick Reference Guide (Multilanguage: English, Dutch, French, German, Italian, Spanish)
Page 17
... operating system logo appears, continue to wait until you receive the message Booting Dell Diagnostic Utility Partition. b Press and hold the key while powering the computer on. On the next start the Dell Diagnostics from the diagnostics utility partition on your hard drive. NOTE: If your... computer cannot display a screen image, contact Dell for technical assistance. 1 Turn on (or restart) your system ...
Quick Reference Guide (Multilanguage: English, Dutch, French, German, Italian, Spanish)
Page 21
...charge, 12 performance, 11 power meter, 12 removing, 14 storing, 15 C CDs operating system, 7 computer crashes, 15-16 slow performance, 16 stops responding, 15 D Dell premier support website, 7 support site, 6 Dell Diagnostics, 16 Dell Premier Support website, 5, 7 diagnostics Dell, 16 documentation End User ...7 reinstalling, 7 P problems blue screen, 16 computer crashes, 15-16 computer does not start up, 15 computer stops responding, 15 Dell Diagnostics, 16 lockups, 15 program crashes, 15 program stops responding, 15 programs and Windows compatibility, 15 slow computer performance, 16 software...
Quick Reference Guide (Multilanguage: English, Danish, Finnish, Greek, Norwegian, Swedish, Hebrew)
Page 8
NOTE: It is recommended that you turn on and shut down your computer at least once before you install any cards or connect the computer to turn on the computer (see "Front View" on the computer and to the electrical outlet. 4 Open the computer display and press the power button to a docking device or other external device, such as a printer. 8 Quick Reference Guide 3 Connect the AC adapter to the AC adapter connector on page 9).
Quick Reference Guide (Multilanguage: English, Danish, Finnish, Greek, Norwegian, Swedish, Hebrew)
Page 9
About Your Computer Front View 10 9 8 1 2 3 4 5 6 1 display latch release 4 power button 7 speakers (2) 10 keyboard and wireless status lights 7 2 display latches (2) 5 device status lights 8 touch pad buttons 3 display 6 touch pad 9 keyboard Quick Reference Guide 9