Dell Latitude C500 Support and Manuals
Get Help and Manuals for this Dell item
View All Support Options Below
Free Dell Latitude C500 manuals!
Problems with Dell Latitude C500?
Ask a Question
Free Dell Latitude C500 manuals!
Problems with Dell Latitude C500?
Ask a Question
Dell Latitude C500 Videos

Dell Latitude C500 C510 C540 C600 C610 C640 C800 C810 C840 Laptop Battery
Duration: :43
Total Views: 2,350
Duration: :43
Total Views: 2,350
Dell Latitude C500
Duration: 1:17:19
Total Views: 184
Duration: 1:17:19
Total Views: 184
Dell Latitude C500 Update from 2012.09
Duration: 30:22
Total Views: 136
Duration: 30:22
Total Views: 136
Upgrading the CPU on the Dell Latitude C500
Duration: 46:30
Total Views: 793
Duration: 46:30
Total Views: 793
Popular Dell Latitude C500 Manual Pages
Service Manual - Page 12
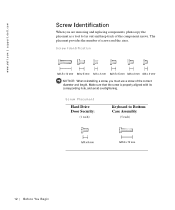
... corresponding hole, and avoid overtightening. Screw Identification
NOTICE: When reinstalling a screw, you are removing and replacing components, photocopy the placemat as a tool to Bottom Case Assembly:
(5 each)
12 Be fo r e Yo u Be g in
www.dell.com | support.dell.com
Screw Identification
When you must use a screw of the correct diameter and length. The placemat...
Service Manual - Page 15
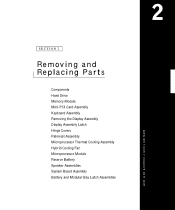
... and Replacing Parts
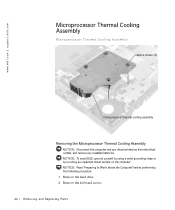
Components Hard Drive Memory Module Mini-PCI Card Assembly Keyboard Assembly Removing the Display Assembly Display Assembly Latch Hinge Covers Palmrest Assembly Microprocessor Thermal Cooling Assembly Hybrid Cooling Fan Microprocessor Module Reserve Battery Speaker Assemblies System Board Assembly Battery and Modular Bay Latch Assemblies
www.dell.com | support.dell.com
Service Manual - Page 16
Damage due to servicing that a part can be replaced by your system. www.dell.com | support.dell.com
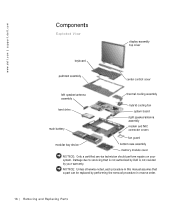
Components
Exploded View
display-assembly top cover
keyboard
palmrest assembly
center control cover
left speaker/antenna assembly hard drive
main battery
thermal cooling assembly
hybrid cooling fan system board
right speaker/antenna assembly modem and NIC connector covers
fan guard
...
Service Manual - Page 18
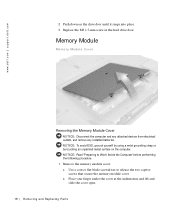
... an unpainted metal surface on the drive door until it snaps into place. 3 Replace the M3 x 5-mm screw in the hard drive door. Memory Module
Memory Module Cover
Removing the Memory Module Cover
NOTICE: Disconnect the computer and any attached devices from electrical outlets, and remove any installed batteries. www.dell.com | support.dell.com
2 Push down on the...
Service Manual - Page 30
... of the display panel.
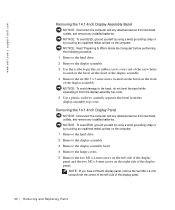
30 Removi ng and Replacing Parts Removing the 14.1-Inch Display Panel
NOTICE: Disconnect the computer and any attached devices from electrical outlets, and remove any installed batteries. NOTICE: Read "Preparing to Work Inside the Computer" before performing the following procedure. 1 Remove the hard drive. 2 Remove the display assembly. 3 Use the scribe...
Service Manual - Page 32
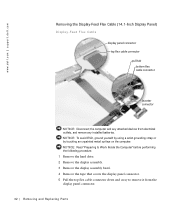
... the hard drive. 2 Remove the display assembly. 3 Remove the display assembly bezel. 4 Remove the tape that covers the display panel connector. 5 Pull the top flex cable connector down and away to remove it from electrical outlets, and remove any attached devices from the display panel connector.
32 Removi ng and Replacing Parts NOTICE: To...
Service Manual - Page 34
...installed batteries. www.dell.com | support.dell.com
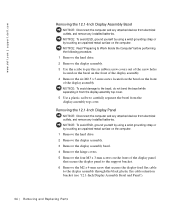
Removing the 12.1-Inch Display Assembly Bezel
NOTICE: Disconnect the computer and any attached devices from electrical outlets, and remove any installed batteries...ng and Replacing Parts NOTICE: To avoid ESD, ground yourself by using a wrist grounding strap or by touching an unpainted metal surface on the computer. 1 Remove the hard drive. 2 ...
Service Manual - Page 36

... the hard drive.
2 Remove the display assembly.
3 Remove the display assembly bezel.
4 Remove the four M3 x 3-mm screws that secure the display panel to the support bracket (see "12.1-Inch Display Assembly Bezel and Panel").
5 Lift the bottom of the display panel out of the display-assembly top cover.
36 Removi ng and Replacing Parts...
Service Manual - Page 44
... from electrical outlets, and remove any installed batteries. NOTICE: To avoid ESD, ground yourself by using a wrist grounding strap or by touching an unpainted metal surface on the computer. NOTICE: Read "Preparing to Work Inside the Computer" before performing the following procedure. 1 Remove the hard drive. 2 Remove the keyboard screws.
44 Removi ng and Replacing Parts
Service Manual - Page 46
www.dell.com | support.dell.com
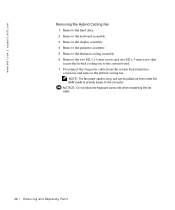
Removing the Hybrid Cooling Fan 1 Remove the hard drive. 2 Remove the keyboard assembly. 3 Remove the display assembly. 4 Remove the palmrest assembly. 5 Remove....
NOTICE: Do not block the keyboard screw hole when reinserting the fan cable.
46 Removi ng and Replacing Parts NOTE: The fan power cable is long, and can be pulled out from under the EMI shield to...
Service Manual - Page 50

... routing in "Reserve Battery," contact Dell technical support.
4 Remove the reserve battery from the EMI shield: a Pry the reserve battery free from the foam pad. Replacing the Reserve Battery 1 Connect the reserve battery cable to the connector on the system board. 2 Position the reserve battery on the front left label.
www.dell.com | support.dell.com
1 Remove the hard drive. 2 Remove the...
Service Manual - Page 54
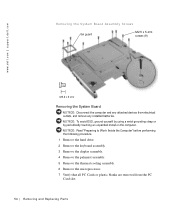
... the hard drive. 2 Remove the keyboard assembly. 3 Remove the display assembly. 4 Remove the palmrest assembly. 5 Remove the thermal cooling assembly. 6 Remove the microprocessor. 7 Verify that all PC Cards or plastic blanks are removed from electrical outlets, and remove any attached devices from the PC Card slot.
54 Removi ng and Replacing Parts www.dell.com | support.dell...
Service Manual - Page 56
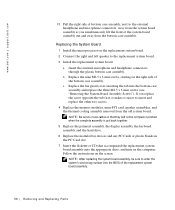
... tab into the bottom case assembly and replace the three M2.5 x 5-mm screws (see "Removing the System Board Assembly Screws"). www.dell.com | support.dell.com
13 Pull the right side of bottom case assembly, next to enter the system's service tag number into the BIOS of the replacement system board assembly.
56 Removi ng and Replacing Parts
Service Manual - Page 58

www.dell.com | support.dell.com
NOTICE: Read "Preparing to prevent the latch ...installed latch moves smoothly and freely when pushed and released. 9 Repeat steps 5 through 7 for the modular bay latch.
58 Removi ng and Replacing Parts Apply pressure to the latch and spring while unsnapping the snap tabs to Work Inside the Computer" before performing the following procedure. 1 Remove the hard drive...
System Information Guide - Page 4
... updates, which provides step-by-step instructions for attaching devices to obtain them. The User's Guide is an HTML document that includes descriptions of
computer features, instructions on installing and configuring drivers and utilities, information on the System Setup program, and instructions for con-
ing system software from your
computer.
support.dell.com
Dell Latitude...
Dell Latitude C500 Reviews
We have not received any reviews for Dell yet.