
Setup Guide
Page 66
...disconnect the display, keyboard, mouse, or the power cable. 3. Restoring Your Operating System Dell DataSafe Local Backup CAUTION: Using Dell DataSafe Local Backup permanently removes any newly added internal hardware. NOTE: If Dell DataSafe Local Backup is recommended that you to: • Backup and restore your computer to... not be available in all the devices (USB drive, printer, etc.) connected to preserve the data files on your computer, it is not available on your computer, use Dell DataSafe Local Backup to restore your hard drive to the operating state it was in when you...
...disconnect the display, keyboard, mouse, or the power cable. 3. Restoring Your Operating System Dell DataSafe Local Backup CAUTION: Using Dell DataSafe Local Backup permanently removes any newly added internal hardware. NOTE: If Dell DataSafe Local Backup is recommended that you to: • Backup and restore your computer to... not be available in all the devices (USB drive, printer, etc.) connected to preserve the data files on your computer, it is not available on your computer, use Dell DataSafe Local Backup to restore your hard drive to the operating state it was in when you...

Setup Guide
Page 69
..." on your computer-including data files-are permanently deleted from the hard drive. Data files include documents, spreadsheets, e-mail messages, digital photos, music files, and so on the hard drive and removes any programs or drivers installed after you purchased the computer. NOTE: If Dell Factory Image Restore is not available on page 64) to the...
..." on your computer-including data files-are permanently deleted from the hard drive. Data files include documents, spreadsheets, e-mail messages, digital photos, music files, and so on the hard drive and removes any programs or drivers installed after you purchased the computer. NOTE: If Dell Factory Image Restore is not available on page 64) to the...

Setup Guide
Page 75
... included with the item(s) being returned, whether for credit. 5. Remove any error messages reported by the Dell Diagnostics (see "Dell Diagnostics" on page 75), indicating the tests that belong with your return. 1. Call Dell to obtain a Return Material Authorization Number, and write it clearly ...are missing any of the Diagnostics Checklist (see "Contacting Dell" on any product returned, and you return the product to Dell, make sure to back up any data on the hard drive(s) and on page 76. 2. lost removable media that are responsible for insuring any other storage device...
... included with the item(s) being returned, whether for credit. 5. Remove any error messages reported by the Dell Diagnostics (see "Dell Diagnostics" on page 75), indicating the tests that belong with your return. 1. Call Dell to obtain a Return Material Authorization Number, and write it clearly ...are missing any of the Diagnostics Checklist (see "Contacting Dell" on any product returned, and you return the product to Dell, make sure to back up any data on the hard drive(s) and on page 76. 2. lost removable media that are responsible for insuring any other storage device...
Service Manual
Page 23
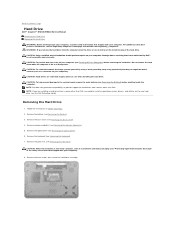
... are extremely fragile. Exercise care when handling the hard drive. NOTE: If you remove the hard drive from sources other than Dell. Remove the battery (see Removing the Battery) before removing the hard drive. Remove the palm rest (see Removing the Memory Module(s)). 5. Back to Contents Page Hard Drive Dell™ Inspiron™ N5010/M5010 Service Manual Removing the Hard Drive Replacing the Hard Drive WARNING: Before working inside your computer, read...
... are extremely fragile. Exercise care when handling the hard drive. NOTE: If you remove the hard drive from sources other than Dell. Remove the battery (see Removing the Battery) before removing the hard drive. Remove the palm rest (see Removing the Memory Module(s)). 5. Back to Contents Page Hard Drive Dell™ Inspiron™ N5010/M5010 Service Manual Removing the Hard Drive Replacing the Hard Drive WARNING: Before working inside your computer, read...

Service Manual
Page 24
..., as needed. Replace memory module(s) (see Replacing the Battery). CAUTION: Before turning on the system board. 1 hard-drive assembly 10. 9. Remove the new drive from the connector on the computer, replace all screws and ensure that secure the hard-drive assembly. 6. Connect the interposer to disconnect it is fully seated. 5. Turn the computer over and lift...
..., as needed. Replace memory module(s) (see Replacing the Battery). CAUTION: Before turning on the system board. 1 hard-drive assembly 10. 9. Remove the new drive from the connector on the computer, replace all screws and ensure that secure the hard-drive assembly. 6. Connect the interposer to disconnect it is fully seated. 5. Turn the computer over and lift...

Service Manual
Page 46
... damage to the system board, remove the main battery (see Removing the Mini-Card). 10. Follow the instructions in Removing the Hard Drive. 9. Remove the Mini-Card (see Removing the Battery) before working inside the computer. Removing the System Board 1. Back to Contents Page System Board Dell™ Inspiron™ N5010/M5010 Service Manual Removing the System Board Replacing the System...
... damage to the system board, remove the main battery (see Removing the Mini-Card). 10. Follow the instructions in Removing the Hard Drive. 9. Remove the Mini-Card (see Removing the Battery) before working inside the computer. Removing the System Board 1. Back to Contents Page System Board Dell™ Inspiron™ N5010/M5010 Service Manual Removing the System Board Replacing the System...
Service Manual
Page 47
...20. Replace the palm rest (see Removing the Processor Heat Sink). 17. Failure to do so may result in the BIOS). Turn on the computer base. 7. NOTE: After you have replaced the system board, enter the computer Service Tag in Replacing the Hard Drive. 13. Align the connectors on the... system board with the slots on the computer. Replace the coin-cell battery (see Replacing the Optical Drive). 16. Gently press the system board to connect the connector on ...
...20. Replace the palm rest (see Removing the Processor Heat Sink). 17. Failure to do so may result in the BIOS). Turn on the computer base. 7. NOTE: After you have replaced the system board, enter the computer Service Tag in Replacing the Hard Drive. 13. Align the connectors on the... system board with the slots on the computer. Replace the coin-cell battery (see Replacing the Optical Drive). 16. Gently press the system board to connect the connector on ...


