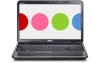
Setup Guide
Page 5
... 5 Connect the AC Adapter 6 Connect the Network Cable (Optional 7 Press the Power Button 8 Set Up the Operating System 9 Create System Recovery Media (Recommended 10 Install the SIM Card (Optional 12 Enable or Disable Wireless (Optional 14 Set Up Wireless Display (Optional 16 Connect to the Internet (Optional 18 Install Software Using Dell Digital Delivery 22 Using Your Inspiron Laptop 24 Right View Features 24 Left View Features 26 Back View Features 28 Front View Features 29 Status Lights and Indicators 30 Computer Base and Keyboard Features 32 Touch Pad...
... 5 Connect the AC Adapter 6 Connect the Network Cable (Optional 7 Press the Power Button 8 Set Up the Operating System 9 Create System Recovery Media (Recommended 10 Install the SIM Card (Optional 12 Enable or Disable Wireless (Optional 14 Set Up Wireless Display (Optional 16 Connect to the Internet (Optional 18 Install Software Using Dell Digital Delivery 22 Using Your Inspiron Laptop 24 Right View Features 24 Left View Features 26 Back View Features 28 Front View Features 29 Status Lights and Indicators 30 Computer Base and Keyboard Features 32 Touch Pad...
Setup Guide
Page 6
... Network Problems 48 Power Problems 49 Memory Problems 50 Lockups and Software Problems 50 Using Support Tools 53 Dell Support Center 53 My Dell Downloads 54 System Messages 55 Hardware Troubleshooter 57 Dell Diagnostics 58 Restoring Your Operating System 62 System Restore 63 Dell DataSafe Local Backup 64 System Recovery Media 66 Dell Factory Image Restore 67 Getting Help 69 Technical Support and Customer Service 70 DellConnect 70 Online Services 71 Automated Order-Status Service 72 Product Information 72 Returning Items for Repair...
... Network Problems 48 Power Problems 49 Memory Problems 50 Lockups and Software Problems 50 Using Support Tools 53 Dell Support Center 53 My Dell Downloads 54 System Messages 55 Hardware Troubleshooter 57 Dell Diagnostics 58 Restoring Your Operating System 62 System Restore 63 Dell DataSafe Local Backup 64 System Recovery Media 66 Dell Factory Image Restore 67 Getting Help 69 Technical Support and Customer Service 70 DellConnect 70 Online Services 71 Automated Order-Status Service 72 Product Information 72 Returning Items for Repair...
Setup Guide
Page 14
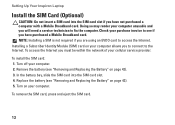
... SIM card. 12 Setting Up Your Inspiron Laptop Install the SIM Card (Optional) CAUTION: Do not insert a SIM card into the SIM card slot. 4. Installing a Subscriber Identity Module (SIM) card on page 42). 3. Replace the battery (see "Removing and Replacing the Battery" on your computer allows you will need a service technician to the Internet. Doing so may render your cellular service provider. To access the Internet you have not purchased a computer with a Mobile Broadband card. Turn...
... SIM card. 12 Setting Up Your Inspiron Laptop Install the SIM Card (Optional) CAUTION: Do not insert a SIM card into the SIM card slot. 4. Installing a Subscriber Identity Module (SIM) card on page 42). 3. Replace the battery (see "Removing and Replacing the Battery" on your computer allows you will need a service technician to the Internet. Doing so may render your cellular service provider. To access the Internet you have not purchased a computer with a Mobile Broadband card. Turn...
Setup Guide
Page 19
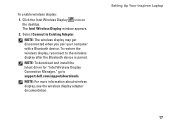
... wireless display, see the wireless display adapter documentation. Select Connect to support.dell.com/support/downloads. Setting Up Your Inspiron Laptop 17 NOTE: To download and install the latest driver for "Intel Wireless Display Connection Manager," go to Existing Adapter. To enable wireless display: 1. NOTE: The wireless display may get disconnected when you pair your computer with a Bluetooth device. The Intel Wireless Display window appears. 2. To restore the wireless display, reconnect to the wireless display after the Bluetooth device is paired. Click the Intel Wireless...
... wireless display, see the wireless display adapter documentation. Select Connect to support.dell.com/support/downloads. Setting Up Your Inspiron Laptop 17 NOTE: To download and install the latest driver for "Intel Wireless Display Connection Manager," go to Existing Adapter. To enable wireless display: 1. NOTE: The wireless display may get disconnected when you pair your computer with a Bluetooth device. The Intel Wireless Display window appears. 2. To restore the wireless display, reconnect to the wireless display after the Bluetooth device is paired. Click the Intel Wireless...
Setup Guide
Page 24
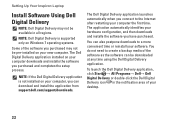
... software. The Dell Digital Delivery application installed on your computer downloads and installs the software you can download and install the application from support.dell.com/support/downloads. NOTE: Dell Digital Delivery is not installed on your computer, you purchased and completes the setup process. You do not need to create a backup media of your desktop. 22 You can be downloaded at any time using the Dell Digital Delivery application. Setting Up Your Inspiron Laptop Install Software Using Dell...
... software. The Dell Digital Delivery application installed on your computer downloads and installs the software you can download and install the application from support.dell.com/support/downloads. NOTE: Dell Digital Delivery is not installed on your computer, you purchased and completes the setup process. You do not need to create a backup media of your desktop. 22 You can be downloaded at any time using the Dell Digital Delivery application. Setting Up Your Inspiron Laptop Install Software Using Dell...
Setup Guide
Page 35
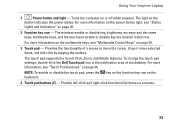
... light on the keyboard. 4 Touch pad buttons (2) - The wireless enable or disable key, brightness increase and decrease keys, multimedia keys, and the touch pad enable or disable key are located in the notification area of a mouse to move the cursor, drag or move selected items, and left -click and right-click functions like those on page 34. The touch pad supports the Scroll, Flick, Zoom, and Rotate features. To change the touch pad settings, double-click the Dell Touch pad icon...
... light on the keyboard. 4 Touch pad buttons (2) - The wireless enable or disable key, brightness increase and decrease keys, multimedia keys, and the touch pad enable or disable key are located in the notification area of a mouse to move the cursor, drag or move selected items, and left -click and right-click functions like those on page 34. The touch pad supports the Scroll, Flick, Zoom, and Rotate features. To change the touch pad settings, double-click the Dell Touch pad icon...
Setup Guide
Page 49
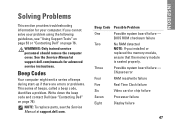
.../manuals for your problem using the following guidelines, see "Contacting Dell" on page 76. Chipset error Four RAM read/write failure Five Real Time Clock failure Six Video card or chip failure Seven Processor failure Eight Display failure 47 INSPIRON If you installed or replaced the memory module, ensure that the memory module is seated properly. See the Service Manual at support.dell.com. Beep Code Possible Problem One Possible system board failure - BIOS ROM...
.../manuals for your problem using the following guidelines, see "Contacting Dell" on page 76. Chipset error Four RAM read/write failure Five Real Time Clock failure Six Video card or chip failure Seven Processor failure Eight Display failure 47 INSPIRON If you installed or replaced the memory module, ensure that the memory module is seated properly. See the Service Manual at support.dell.com. Beep Code Possible Problem One Possible system board failure - BIOS ROM...
Setup Guide
Page 52
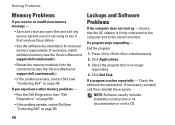
... using to the electrical outlet. Solving Problems Memory Problems If you receive an insufficient memory message - • Save and close any open files and exit any open programs you experience other memory problems - • Run the Dell Diagnostics (see "Dell Diagnostics" on page 76). If necessary, install additional memory (see the Service Manual at support.dell.com/manuals). • Reseat the memory module(s) into the connector(s) (see the Service Manual at support.dell.com/manuals...
... using to the electrical outlet. Solving Problems Memory Problems If you receive an insufficient memory message - • Save and close any open files and exit any open programs you experience other memory problems - • Run the Dell Diagnostics (see "Dell Diagnostics" on page 76). If necessary, install additional memory (see the Service Manual at support.dell.com/manuals). • Reseat the memory module(s) into the connector(s) (see the Service Manual at support.dell.com/manuals...
Setup Guide
Page 60
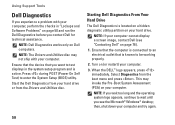
...: Dell Diagnostics works only on your hard drive or from the boot menu and press . NOTE: If you wait too long and the operating system logo appears, continue to enter the System Setup (BIOS) utility. Using Support Tools Dell Diagnostics If you experience a problem with your computer. Select Diagnostics from the Drivers and Utilities disc. When the DELL™ logo appears, press immediately. Starting Dell Diagnostics From Your Hard Drive The Dell Diagnostics is active.
...: Dell Diagnostics works only on your hard drive or from the boot menu and press . NOTE: If you wait too long and the operating system logo appears, continue to enter the System Setup (BIOS) utility. Using Support Tools Dell Diagnostics If you experience a problem with your computer. Select Diagnostics from the Drivers and Utilities disc. When the DELL™ logo appears, press immediately. Starting Dell Diagnostics From Your Hard Drive The Dell Diagnostics is active.
Setup Guide
Page 82
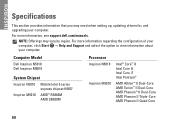
... vary by region. NOTE: Offerings may need when setting up, updating drivers for, and upgrading your computer. For more information regarding the configuration of your computer, click Start → Help and Support and select the option to view information about your computer. Computer Model Dell Inspiron N5010 Dell Inspiron M5010 System Chipset Inspiron N5010 Mobile Intel 5 series express chipset HM57 Inspiron M5010 AMD™ RS880M AMD SB820M...
... vary by region. NOTE: Offerings may need when setting up, updating drivers for, and upgrading your computer. For more information regarding the configuration of your computer, click Start → Help and Support and select the option to view information about your computer. Computer Model Dell Inspiron N5010 Dell Inspiron M5010 System Chipset Inspiron N5010 Mobile Intel 5 series express chipset HM57 Inspiron M5010 AMD™ RS880M AMD SB820M...
Setup Guide
Page 91
Index A airflow, allowing 5 B backup and recovery 45 battery status light 29 C calling Dell 74 CDs, playing and creating 45 computer capabilities 44 computer, setting up 5 connect(ing) to the Internet 18 Contacting Dell online 76 customer service 70 D DataSafe Local Backup 64 DellConnect 70 Dell Diagnostics 58 Dell Digital Delivery install software 22 Dell Factory Image Restore 67 Dell Support Center 53 Diagnostic Checklist 75 drivers and downloads 79 DVDs, playing and creating 45 E email addresses for technical support 71 89 INSPIRON
Index A airflow, allowing 5 B backup and recovery 45 battery status light 29 C calling Dell 74 CDs, playing and creating 45 computer capabilities 44 computer, setting up 5 connect(ing) to the Internet 18 Contacting Dell online 76 customer service 70 D DataSafe Local Backup 64 DellConnect 70 Dell Diagnostics 58 Dell Digital Delivery install software 22 Dell Factory Image Restore 67 Dell Support Center 53 Diagnostic Checklist 75 drivers and downloads 79 DVDs, playing and creating 45 E email addresses for technical support 71 89 INSPIRON
Service Manual
Page 4
... covered by Dell™ is turned off when you disconnect a cable, pull on its connector or on a card. Ensure that shipped with locking tabs; Hold a component such as a connector on the cable itself. CAUTION: When you shut down the operating system: Microsoft® Windows Vista®: Click Start Windows® 7: , click the arrow , and then click Shut Down. Before Working Inside Your Computer Use...
... covered by Dell™ is turned off when you disconnect a cable, pull on its connector or on a card. Ensure that shipped with locking tabs; Hold a component such as a connector on the cable itself. CAUTION: When you shut down the operating system: Microsoft® Windows Vista®: Click Start Windows® 7: , click the arrow , and then click Shut Down. Before Working Inside Your Computer Use...
Service Manual
Page 7
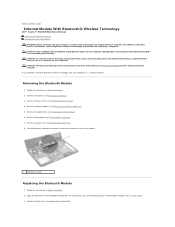
.... 3. Remove memory module(s) (see Removing the Battery). 3. CAUTION: To avoid electrostatic discharge, ground yourself by using a wrist grounding strap or by your warranty. If you ordered a card with Bluetooth wireless technology with the connector on the system board and press the Bluetooth module until it from the connector on your computer. Back to Contents Page Internal Module With Bluetooth® Wireless Technology Dell™ Inspiron™ N5010/M5010 Service Manual Removing the Bluetooth Module Replacing...
.... 3. Remove memory module(s) (see Removing the Battery). 3. CAUTION: To avoid electrostatic discharge, ground yourself by using a wrist grounding strap or by your warranty. If you ordered a card with Bluetooth wireless technology with the connector on the system board and press the Bluetooth module until it from the connector on your computer. Back to Contents Page Internal Module With Bluetooth® Wireless Technology Dell™ Inspiron™ N5010/M5010 Service Manual Removing the Bluetooth Module Replacing...
Service Manual
Page 9
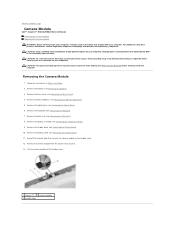
... service technician should perform repairs on your computer. Remove memory module(s) (see Removing the Display Panel). 11. Lift the camera module off the metallic tape that secures the camera module to the system board, remove the main battery (see the Regulatory Compliance Homepage at www.dell.com/regulatory_compliance. Peel off the display cover. 1 latches (2) 2 camera module 3 metallic tape Back to Contents Page Camera Module Dell™ Inspiron™ N5010/M5010 Service Manual Removing the Camera Module Replacing the Camera Module WARNING: Before working...
... service technician should perform repairs on your computer. Remove memory module(s) (see Removing the Display Panel). 11. Lift the camera module off the metallic tape that secures the camera module to the system board, remove the main battery (see the Regulatory Compliance Homepage at www.dell.com/regulatory_compliance. Peel off the display cover. 1 latches (2) 2 camera module 3 metallic tape Back to Contents Page Camera Module Dell™ Inspiron™ N5010/M5010 Service Manual Removing the Camera Module Replacing the Camera Module WARNING: Before working...
Service Manual
Page 11
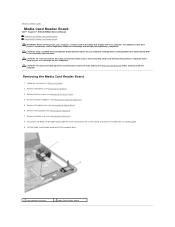
... base cover (see Removing the Battery) before working inside the computer. Disconnect the Media Card Reader board cable from its routing guide. 9. Remove the optical drive (see Removing the Memory Module(s)). 5. Damage due to servicing that shipped with your warranty. Remove memory module(s) (see Removing the Optical Drive). 6. Remove the keyboard (see Removing the Palm Rest). 8. Remove the palm rest (see Removing the Keyboard). 7. Back to Contents Page Media Card Reader Board Dell™ Inspiron™ N5010/M5010 Service Manual Removing the Media Card Reader Board Replacing...
... base cover (see Removing the Battery) before working inside the computer. Disconnect the Media Card Reader board cable from its routing guide. 9. Remove the optical drive (see Removing the Memory Module(s)). 5. Damage due to servicing that shipped with your warranty. Remove memory module(s) (see Removing the Optical Drive). 6. Remove the keyboard (see Removing the Palm Rest). 8. Remove the palm rest (see Removing the Keyboard). 7. Back to Contents Page Media Card Reader Board Dell™ Inspiron™ N5010/M5010 Service Manual Removing the Media Card Reader Board Replacing...
Service Manual
Page 23
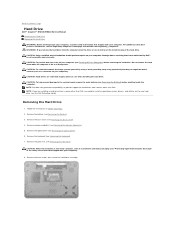
... Regulatory Compliance Homepage at www.dell.com/regulatory_compliance. CAUTION: When the hard drive is hot, do not touch the metal housing of the hard drive. CAUTION: Hard drives are installing a hard drive from sources other than Dell. Follow the instructions in the safety instructions that shipped with your computer). Back to Contents Page Hard Drive Dell™ Inspiron™ N5010/M5010 Service Manual Removing the Hard Drive Replacing the Hard Drive WARNING: Before working inside your computer, read...
... Regulatory Compliance Homepage at www.dell.com/regulatory_compliance. CAUTION: When the hard drive is hot, do not touch the metal housing of the hard drive. CAUTION: Hard drives are installing a hard drive from sources other than Dell. Follow the instructions in the safety instructions that shipped with your computer). Back to Contents Page Hard Drive Dell™ Inspiron™ N5010/M5010 Service Manual Removing the Hard Drive Replacing the Hard Drive WARNING: Before working inside your computer, read...
Service Manual
Page 31
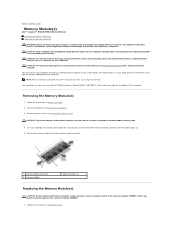
... covered by installing memory modules on the system board. Removing the Memory Module(s) 1. Use your fingertips to Contents Page Memory Module(s) Dell™ Inspiron™ N5010/M5010 Service Manual Removing the Memory Module(s) Replacing the Memory Module(s) WARNING: Before working inside your computer. Damage due to the system board, remove the main battery (see Removing the Battery). 3. Back to carefully spread apart the securing clips on each end of the memory-module connector until the module pops up. 5. You can be accessed...
... covered by installing memory modules on the system board. Removing the Memory Module(s) 1. Use your fingertips to Contents Page Memory Module(s) Dell™ Inspiron™ N5010/M5010 Service Manual Removing the Memory Module(s) Replacing the Memory Module(s) WARNING: Before working inside your computer. Damage due to the system board, remove the main battery (see Removing the Battery). 3. Back to carefully spread apart the securing clips on each end of the memory-module connector until the module pops up. 5. You can be accessed...
Service Manual
Page 32
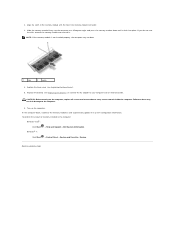
.... NOTE: If the memory module is not installed properly, the computer may result in damage to the computer. 6. Replace the base cover (see Replacing the Battery), or connect the AC adapter to Contents Page Align the notch in the memory module with the tab in the computer: Windows Vista®: Click Start Windows® 7: ® Help and Support® Dell System Information. CAUTION: Before turning on the computer...
.... NOTE: If the memory module is not installed properly, the computer may result in damage to the computer. 6. Replace the base cover (see Replacing the Battery), or connect the AC adapter to Contents Page Align the notch in the memory module with the tab in the computer: Windows Vista®: Click Start Windows® 7: ® Help and Support® Dell System Information. CAUTION: Before turning on the computer...
Service Manual
Page 33
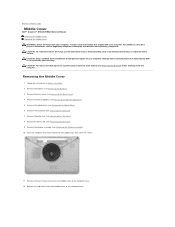
... Mini-Card (see Removing the Battery) before working inside the computer. Back to Contents Page Middle Cover Dell™ Inspiron™ N5010/M5010 Service Manual Removing the Middle Cover Replacing the Middle Cover WARNING: Before working inside your computer, read the safety information that secure the middle cover to the computer base. CAUTION: To help prevent damage to the system board, remove the main battery (see Removing the Mini-Card). 9.
... Mini-Card (see Removing the Battery) before working inside the computer. Back to Contents Page Middle Cover Dell™ Inspiron™ N5010/M5010 Service Manual Removing the Middle Cover Replacing the Middle Cover WARNING: Before working inside your computer, read the safety information that secure the middle cover to the computer base. CAUTION: To help prevent damage to the system board, remove the main battery (see Removing the Mini-Card). 9.
Service Manual
Page 35
... on the locking tabs before you pull connectors apart, keep them evenly aligned to the system board, remove the main battery (see Removing the Battery) before working inside the computer. Remove the optical drive (see Removing the Base Cover). 4. Your computer supports one half Mini-Card slot: l One half Mini-Card slot - Remove the base cover (see Removing the Optical Drive). 6. Remove the keyboard (see the Regulatory Compliance Homepage at www.dell.com/regulatory_compliance...
... on the locking tabs before you pull connectors apart, keep them evenly aligned to the system board, remove the main battery (see Removing the Battery) before working inside the computer. Remove the optical drive (see Removing the Base Cover). 4. Your computer supports one half Mini-Card slot: l One half Mini-Card slot - Remove the base cover (see Removing the Optical Drive). 6. Remove the keyboard (see the Regulatory Compliance Homepage at www.dell.com/regulatory_compliance...


