
Owner's Manual
Page 3
Contents Before You Begin 9 Turn Off Your Computer and Connected Devices . . . . . 9 Safety Instructions 10 Recommended Tools 10 After Working Inside Your Computer 11 Removing the Battery 12 Procedure 12 Replacing the Battery 13 Procedure 13 Removing the Optical Drive 14 Prerequisites 14 Procedure 14 Replacing the Optical Drive 16 Procedure 16 Postrequisites 16 Removing the Keyboard 17 Prerequisites 17 Procedure 17 Replacing the Keyboard 20 Procedure 20 Postrequisites 20 Removing the Base Cover 21 Prerequisites 21 Procedure 21 Contents | 3
Contents Before You Begin 9 Turn Off Your Computer and Connected Devices . . . . . 9 Safety Instructions 10 Recommended Tools 10 After Working Inside Your Computer 11 Removing the Battery 12 Procedure 12 Replacing the Battery 13 Procedure 13 Removing the Optical Drive 14 Prerequisites 14 Procedure 14 Replacing the Optical Drive 16 Procedure 16 Postrequisites 16 Removing the Keyboard 17 Prerequisites 17 Procedure 17 Replacing the Keyboard 20 Procedure 20 Postrequisites 20 Removing the Base Cover 21 Prerequisites 21 Procedure 21 Contents | 3

Owner's Manual
Page 4
Replacing the Base Cover 22 Procedure 22 Postrequisites 22 Removing the Memory Module(s 23 Prerequisites 23 Procedure 23 Replacing the Memory Module(s 24 Procedure 24 Postrequisites 24 Removing the Hard Drive 25 Prerequisites 25 Procedure 25 Replacing the Hard Drive 27 Procedure 27 Postrequisites 27 Removing the Wireless Mini-Card 28 Prerequisites 28 Procedure 28 Replacing the Wireless Mini-Card 30 Procedure 30 Postrequisites 30 Removing the Palm-Rest 31 Prerequisites 31 Procedure 31 Replacing the Palm-Rest 35 Procedure 35 Postrequisites 35 4 | Contents
Replacing the Base Cover 22 Procedure 22 Postrequisites 22 Removing the Memory Module(s 23 Prerequisites 23 Procedure 23 Replacing the Memory Module(s 24 Procedure 24 Postrequisites 24 Removing the Hard Drive 25 Prerequisites 25 Procedure 25 Replacing the Hard Drive 27 Procedure 27 Postrequisites 27 Removing the Wireless Mini-Card 28 Prerequisites 28 Procedure 28 Replacing the Wireless Mini-Card 30 Procedure 30 Postrequisites 30 Removing the Palm-Rest 31 Prerequisites 31 Procedure 31 Replacing the Palm-Rest 35 Procedure 35 Postrequisites 35 4 | Contents
Owner's Manual
Page 5
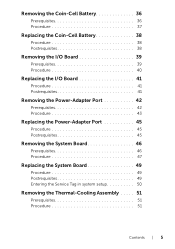
...-Cell Battery 38 Procedure 38 Postrequisites 38 Removing the I/O Board 39 Prerequisites 39 Procedure 40 Replacing the I/O Board 41 Procedure 41 Postrequisites 41 Removing the Power-Adapter Port 42 Prerequisites 42 Procedure 43 Replacing the Power-Adapter Port 45 Procedure 45 Postrequisites 45 Removing the System Board 46 Prerequisites 46 Procedure 47 Replacing the System Board 49 Procedure 49 Postrequisites 49 Entering the Service Tag in system setup 50 Removing the...
...-Cell Battery 38 Procedure 38 Postrequisites 38 Removing the I/O Board 39 Prerequisites 39 Procedure 40 Replacing the I/O Board 41 Procedure 41 Postrequisites 41 Removing the Power-Adapter Port 42 Prerequisites 42 Procedure 43 Replacing the Power-Adapter Port 45 Procedure 45 Postrequisites 45 Removing the System Board 46 Prerequisites 46 Procedure 47 Replacing the System Board 49 Procedure 49 Postrequisites 49 Entering the Service Tag in system setup 50 Removing the...

Owner's Manual
Page 7
Removing the Display Panel 66 Prerequisites 66 Procedure 67 Replacing the Display Panel 68 Procedure 68 Postrequisites 68 Removing the Camera Module 69 Prerequisites 69 Procedure 70 Replacing the Camera Module 71 Procedure 71 Postrequisites 71 Flashing the BIOS 72 Contents | 7
Removing the Display Panel 66 Prerequisites 66 Procedure 67 Replacing the Display Panel 68 Procedure 68 Postrequisites 68 Removing the Camera Module 69 Prerequisites 69 Procedure 70 Replacing the Camera Module 71 Procedure 71 Postrequisites 71 Flashing the BIOS 72 Contents | 7
Owner's Manual
Page 9
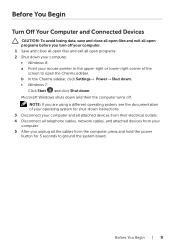
... telephone cables, network cables, and attached devices from their electrical outlets. 4 Disconnect all open the Charms sidebar. b In the Charms sidebar, click Settings→ Power→ Shut down. • Windows 7: Click Start and click Shut down instructions. 3 Disconnect your computer and all attached devices from your mouse pointer to the upper-right or lower-right corner of the screen to ground the system board.
... telephone cables, network cables, and attached devices from their electrical outlets. 4 Disconnect all open the Charms sidebar. b In the Charms sidebar, click Settings→ Power→ Shut down. • Windows 7: Click Start and click Shut down instructions. 3 Disconnect your computer and all attached devices from your mouse pointer to the upper-right or lower-right corner of the screen to ground the system board.
Owner's Manual
Page 10
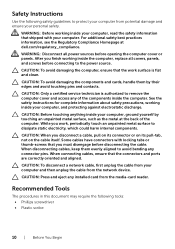
... the cable from the network device. WARNING: Disconnect all covers, panels, and screws before connecting to dissipate static electricity, which could harm internal components. While you finish working inside the computer. CAUTION: To disconnect a network cable, first unplug the cable from the media-card reader. See the safety instructions for complete information about safety precautions, working inside your computer, read the safety information that the work , periodically touch...
... the cable from the network device. WARNING: Disconnect all covers, panels, and screws before connecting to dissipate static electricity, which could harm internal components. While you finish working inside the computer. CAUTION: To disconnect a network cable, first unplug the cable from the media-card reader. See the safety instructions for complete information about safety precautions, working inside your computer, read the safety information that the work , periodically touch...

Owner's Manual
Page 11
... your computer. • Connect any external devices, cables, cards, and any other part(s) you removed before working on your computer, replace all attached devices to do so may damage your computer and all screws and ensure that no stray screws remain inside the computer. Failure to their electrical outlets. After Working Inside Your Computer | 11 CAUTION: Before turning on your computer. •...
... your computer. • Connect any external devices, cables, cards, and any other part(s) you removed before working on your computer, replace all attached devices to do so may damage your computer and all screws and ensure that no stray screws remain inside the computer. Failure to their electrical outlets. After Working Inside Your Computer | 11 CAUTION: Before turning on your computer. •...
Owner's Manual
Page 23
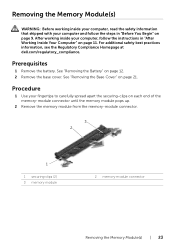
... Cover" on page 12. 2 Remove the base cover. Prerequisites 1 Remove the battery. Removing the Memory Module(s) WARNING: Before working inside your computer, read the safety information that shipped with your fingertips to carefully spread apart the securing-clips on page 9. For additional safety best practices information, see the Regulatory Compliance Homepage at dell.com/regulatory_compliance. Procedure 1 Use your computer and follow the instructions...
... Cover" on page 12. 2 Remove the base cover. Prerequisites 1 Remove the battery. Removing the Memory Module(s) WARNING: Before working inside your computer, read the safety information that shipped with your fingertips to carefully spread apart the securing-clips on page 9. For additional safety best practices information, see the Regulatory Compliance Homepage at dell.com/regulatory_compliance. Procedure 1 Use your computer and follow the instructions...
Owner's Manual
Page 24
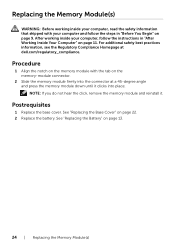
... the instructions in "Before You Begin" on page 9. Postrequisites 1 Replace the base cover. NOTE: If you do not hear the click, remove the memory module and reinstall it clicks into the connector at dell.com/regulatory_compliance. Replacing the Memory Module(s) WARNING: Before working inside your computer, read the safety information that shipped with the tab on the memory-module connector. 2 Slide the memory module firmly...
... the instructions in "Before You Begin" on page 9. Postrequisites 1 Replace the base cover. NOTE: If you do not hear the click, remove the memory module and reinstall it clicks into the connector at dell.com/regulatory_compliance. Replacing the Memory Module(s) WARNING: Before working inside your computer, read the safety information that shipped with the tab on the memory-module connector. 2 Slide the memory module firmly...

Owner's Manual
Page 26
3 Lift and slide the hard-drive assembly out of tabs on the computer base. 1 3 2 1 screw 3 hard-drive assembly 2 pull-tab 4 Remove the screws that secure the hard-drive bracket to the hard drive. 5 Using the pull-tab, lift the hard-drive bracket off the hard drive. 1 1 hard-drive bracket 3 hard drive 26 | Removing the Hard Drive 3 2 2 screws (2)
3 Lift and slide the hard-drive assembly out of tabs on the computer base. 1 3 2 1 screw 3 hard-drive assembly 2 pull-tab 4 Remove the screws that secure the hard-drive bracket to the hard drive. 5 Using the pull-tab, lift the hard-drive bracket off the hard drive. 1 1 hard-drive bracket 3 hard drive 26 | Removing the Hard Drive 3 2 2 screws (2)
Owner's Manual
Page 30
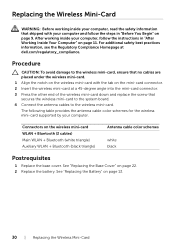
... instructions in "Before You Begin" on page 9. The following table provides the antenna cable color schemes for the wireless mini-card supported by your computer, follow the steps in "After Working Inside Your Computer" on page 11. See "Replacing the Base Cover" on the wireless mini-card WLAN + Bluetooth (2 cables) Main WLAN + Bluetooth (white triangle) Auxiliary WLAN + Bluetooth (black triangle) Antenna cable color schemes white black Postrequisites 1 Replace...
... instructions in "Before You Begin" on page 9. The following table provides the antenna cable color schemes for the wireless mini-card supported by your computer, follow the steps in "After Working Inside Your Computer" on page 11. See "Replacing the Base Cover" on the wireless mini-card WLAN + Bluetooth (2 cables) Main WLAN + Bluetooth (white triangle) Auxiliary WLAN + Bluetooth (black triangle) Antenna cable color schemes white black Postrequisites 1 Replace...
Owner's Manual
Page 35
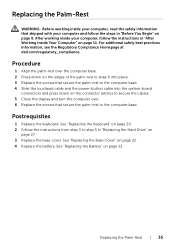
...-Rest WARNING: Before working inside your computer, read the safety information that shipped with your computer, follow the steps in "Replacing the Hard Drive" on page 11. Postrequisites 1 Replace the keyboard. See "Replacing the Battery" on page 9. See "Replacing the Base Cover" on the connector latches to secure the cables. 5 Close the display and turn the computer over the computer base. 2 Press down...
...-Rest WARNING: Before working inside your computer, read the safety information that shipped with your computer, follow the steps in "Replacing the Hard Drive" on page 11. Postrequisites 1 Replace the keyboard. See "Replacing the Battery" on page 9. See "Replacing the Base Cover" on the connector latches to secure the cables. 5 Close the display and turn the computer over the computer base. 2 Press down...

Owner's Manual
Page 36
...-cell battery resets the BIOS settings to step 3 in "Removing the Hard Drive" on page 25. 4 Remove the keyboard. See "Removing the Base Cover" on page 21. 3 Follow the instructions from step 1 to default. It is recommended that shipped with your computer and follow the instructions in "Before You Begin" on page 9. For additional safety best practices information, see the Regulatory Compliance Homepage at dell...
...-cell battery resets the BIOS settings to step 3 in "Removing the Hard Drive" on page 25. 4 Remove the keyboard. See "Removing the Base Cover" on page 21. 3 Follow the instructions from step 1 to default. It is recommended that shipped with your computer and follow the instructions in "Before You Begin" on page 9. For additional safety best practices information, see the Regulatory Compliance Homepage at dell...
Owner's Manual
Page 46
... cover. See "Removing the Memory Module(s)" on page 23. 5 Follow the instructions from the system board, note the location of the connectors so that shipped with your computer and follow the instructions in the system board. See "Removing the Coin-Cell Battery" on page 17. 8 Remove the palm-rest. You must enter the Service Tag in "Removing the Hard Drive" on page 28. 7 Remove the keyboard. See "Removing the Wireless Mini-Card...
... cover. See "Removing the Memory Module(s)" on page 23. 5 Follow the instructions from the system board, note the location of the connectors so that shipped with your computer and follow the instructions in the system board. See "Removing the Coin-Cell Battery" on page 17. 8 Remove the palm-rest. You must enter the Service Tag in "Removing the Hard Drive" on page 28. 7 Remove the keyboard. See "Removing the Wireless Mini-Card...

Owner's Manual
Page 49
... base. 5 Connect the power-adapter-port cable and speaker cable to the system-board connectors. 6 Slide the I/O-board cable into the system-board connector and press down on the connector latch to secure the cable. 7 Adhere the display cable to the fan. 8 Slide the display cable into the slots on the computer base and align the screw hole on page 27. 6 Replace the memory module(s). NOTE: Your computer's Service Tag is...
... base. 5 Connect the power-adapter-port cable and speaker cable to the system-board connectors. 6 Slide the I/O-board cable into the system-board connector and press down on the connector latch to secure the cable. 7 Adhere the display cable to the fan. 8 Slide the display cable into the slots on the computer base and align the screw hole on page 27. 6 Replace the memory module(s). NOTE: Your computer's Service Tag is...
Owner's Manual
Page 50
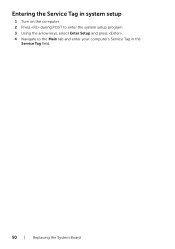
Entering the Service Tag in system setup 1 Turn on the computer. 2 Press during POST to enter the system setup program. 3 Using the arrow keys, select Enter Setup and press . 4 Navigate to the Main tab and enter your computer's Service Tag in the Service Tag field. 50 | Replacing the System Board
Entering the Service Tag in system setup 1 Turn on the computer. 2 Press during POST to enter the system setup program. 3 Using the arrow keys, select Enter Setup and press . 4 Navigate to the Main tab and enter your computer's Service Tag in the Service Tag field. 50 | Replacing the System Board
Owner's Manual
Page 66
... step 1 to step 2 in "Removing the Optical Drive" on page 63. 66 | Removing the Display Panel See "Removing the Base Cover" on page 25. 6 Remove the wireless Mini-Card. Prerequisites 1 Remove the battery. See "Removing the Memory Module(s)" on page 23. 5 Follow the instructions from step 1 to step 3 in "Removing the Hard Drive" on page 21. 4 Remove the memory module(s). See "Removing the Display Bezel" on page 9. Removing the Display Panel WARNING: Before working inside your computer, read...
... step 1 to step 2 in "Removing the Optical Drive" on page 63. 66 | Removing the Display Panel See "Removing the Base Cover" on page 25. 6 Remove the wireless Mini-Card. Prerequisites 1 Remove the battery. See "Removing the Memory Module(s)" on page 23. 5 Follow the instructions from step 1 to step 3 in "Removing the Hard Drive" on page 21. 4 Remove the memory module(s). See "Removing the Display Bezel" on page 9. Removing the Display Panel WARNING: Before working inside your computer, read...
Owner's Manual
Page 69
... 1 to step 3 in "Removing the Hard Drive" on page 17. 8 Remove the palm-rest. See "Removing the Memory Module(s)" on page 23. 5 Follow the instructions from step 1 to step 8 in "Removing the System Board" on page 46. 10 Remove the display assembly. See "Removing the Wireless Mini-Card" on page 57. 11 Remove the display bezel. See "Removing the Display Assembly" on page 28. 7 Remove the keyboard. After working inside your computer...
... 1 to step 3 in "Removing the Hard Drive" on page 17. 8 Remove the palm-rest. See "Removing the Memory Module(s)" on page 23. 5 Follow the instructions from step 1 to step 8 in "Removing the System Board" on page 46. 10 Remove the display assembly. See "Removing the Wireless Mini-Card" on page 57. 11 Remove the display bezel. See "Removing the Display Assembly" on page 28. 7 Remove the keyboard. After working inside your computer...
Owner's Manual
Page 70
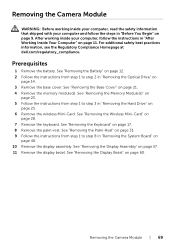
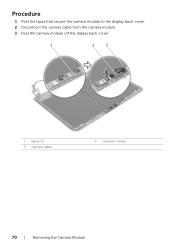
Procedure 1 Peel the tapes that secure the camera module to the display back-cover. 2 Disconnect the camera cable from the camera module. 3 Peel the camera module off the display back-cover. 1 2 3 1 tapes (2) 3 camera cable 2 camera module 70 | Removing the Camera Module
Procedure 1 Peel the tapes that secure the camera module to the display back-cover. 2 Disconnect the camera cable from the camera module. 3 Peel the camera module off the display back-cover. 1 2 3 1 tapes (2) 3 camera cable 2 camera module 70 | Removing the Camera Module
Quick Start Guide
Page 2
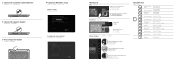
...(optional) 2 Connect the power adapter 3 Press the power button 4 Complete Windows setup 完成 Windows Windows 設定 Enable security Configure wireless (optional) Windows 8 Tiles Resources Swipe or scroll to lower- or upper-right corner Function Keys Switch to external display Turn off/on touch-screen displays Getting started My Dell Support Center 我的 Dell My Dell Charms sidebar Charms Charms 側邊列 Swipe from right edge of the display Swipe from right edge of the touchpad Point mouse to access...
...(optional) 2 Connect the power adapter 3 Press the power button 4 Complete Windows setup 完成 Windows Windows 設定 Enable security Configure wireless (optional) Windows 8 Tiles Resources Swipe or scroll to lower- or upper-right corner Function Keys Switch to external display Turn off/on touch-screen displays Getting started My Dell Support Center 我的 Dell My Dell Charms sidebar Charms Charms 側邊列 Swipe from right edge of the display Swipe from right edge of the touchpad Point mouse to access...


