Owners Manual
Page 3
Contents Finding Information 9 1 A Tour of Your Computer Front View 11 Left View 15 Right View 16 Back View 17 Bottom View 20 2 Setting Up Your Computer Connecting to the Internet 21 Setting Up Your Internet Connection 21 Modem and Internet Connection Problems 22 Setting Up a Printer 23 Printer Cable 23 Connecting a USB Printer 23 Printer Problems 24 Setting Up the Docking Device to Connect to a Network 25 Power Protection Devices 25 Surge Protectors 25 Line Conditioners 25 Uninterruptible Power Supplies 26 Turning Off Your Computer 26 Contents 3
Contents Finding Information 9 1 A Tour of Your Computer Front View 11 Left View 15 Right View 16 Back View 17 Bottom View 20 2 Setting Up Your Computer Connecting to the Internet 21 Setting Up Your Internet Connection 21 Modem and Internet Connection Problems 22 Setting Up a Printer 23 Printer Cable 23 Connecting a USB Printer 23 Printer Problems 24 Setting Up the Docking Device to Connect to a Network 25 Power Protection Devices 25 Surge Protectors 25 Line Conditioners 25 Uninterruptible Power Supplies 26 Turning Off Your Computer 26 Contents 3

Owners Manual
Page 4
... 31 Power Problems 31 About the Module Bay 31 Checking the Charge on the Second Battery 32 Removing and Installing Devices While the Computer Is Turned Off. . . . . . 32 If the Device Screw Is Not Installed 33 If the Device Screw Is Installed 34 Removing and Installing Devices While the Computer Is...
... 31 Power Problems 31 About the Module Bay 31 Checking the Charge on the Second Battery 32 Removing and Installing Devices While the Computer Is Turned Off. . . . . . 32 If the Device Screw Is Not Installed 33 If the Device Screw Is Installed 34 Removing and Installing Devices While the Computer Is...

Owners Manual
Page 11
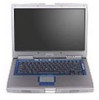
... buttons touch pad display latch button speakers D I S P L A Y - To access the help file, see the Dell Inspiron help file. Press the power button to enter or exit a power management mode. NOTICE: To avoid losing data, turn on the computer or to turn off completely (which may take several seconds). D I S P L A Y L A T C H - A Tour of Your Computer 11 Keeps...
... buttons touch pad display latch button speakers D I S P L A Y - To access the help file, see the Dell Inspiron help file. Press the power button to enter or exit a power management mode. NOTICE: To avoid losing data, turn on the computer or to turn off completely (which may take several seconds). D I S P L A Y L A T C H - A Tour of Your Computer 11 Keeps...

Owners Manual
Page 12
...To avoid loss of Your Computer Turns on the computer and blinks when the computer is in a power management mode. To turn off the computer while the light is flashing. www.dell.com | support.dell.com DEVICE STATUS LIGHTS Turns on when you turn on when Bluetooth® wireless ...technology is enabled. If it is an optional feature, so the light turns on when the computer...
...To avoid loss of Your Computer Turns on the computer and blinks when the computer is in a power management mode. To turn off the computer while the light is flashing. www.dell.com | support.dell.com DEVICE STATUS LIGHTS Turns on when you turn on when Bluetooth® wireless ...technology is enabled. If it is an optional feature, so the light turns on when the computer...

Owners Manual
Page 13
... outlet, the - Solid orange: The battery charge is charging. - For more information, see page 40. See the Dell Inspiron help file, see page 61. Press these buttons to turn off ). - Flashing orange: The battery charge is turned off the volume. M E D I S P L A Y L A T C H B U T T O N - Touch pad and touch pad buttons provide the functionality of the integrated speakers, press...
... outlet, the - Solid orange: The battery charge is charging. - For more information, see page 40. See the Dell Inspiron help file, see page 61. Press these buttons to turn off ). - Flashing orange: The battery charge is turned off the volume. M E D I S P L A Y L A T C H B U T T O N - Touch pad and touch pad buttons provide the functionality of the integrated speakers, press...

Owners Manual
Page 14
Turns on when the numeric keypad is enabled. www.dell.com | support.dell.com KEYBOARD STATUS LIGHTS The green lights located above the keyboard indicate the following: 9 Turns on when the scroll lock function is enabled. 14 A Tour of Your Computer A Turns on when the uppercase letter function is enabled.
Turns on when the numeric keypad is enabled. www.dell.com | support.dell.com KEYBOARD STATUS LIGHTS The green lights located above the keyboard indicate the following: 9 Turns on when the scroll lock function is enabled. 14 A Tour of Your Computer A Turns on when the uppercase letter function is enabled.

Owners Manual
Page 19
.... NOTICE: When you disconnect the AC adapter cable from overheating. You can damage the computer or cause a fire. To access the help file, see the Dell Inspiron help file. A C A D A P T E R C O N N E C T O R - Attaches an AC adapter to the DC power required by the computer. Fan noise is ..., such as a closed briefcase, while it is normal and does not indicate a problem with electrical outlets worldwide. NOTE: The computer turns on or off. Restricting the airflow can connect the AC adapter with your computer in the air vents. CAUTION: The AC adapter works...
.... NOTICE: When you disconnect the AC adapter cable from overheating. You can damage the computer or cause a fire. To access the help file, see the Dell Inspiron help file. A C A D A P T E R C O N N E C T O R - Attaches an AC adapter to the DC power required by the computer. Fan noise is ..., such as a closed briefcase, while it is normal and does not indicate a problem with electrical outlets worldwide. NOTE: The computer turns on or off. Restricting the airflow can connect the AC adapter with your computer in the air vents. CAUTION: The AC adapter works...

Owners Manual
Page 20
... computer gets hot. Lets you can damage the computer or cause a fire. See the documentation that came with the fan or the computer. www.dell.com | support.dell.com Bottom View battery-bay latch release hard drive Mini PCI card/modem cover battery battery charge gauge docking device slot fan memory module... a battery is running. The computer uses an internal fan to an electrical outlet. Do not store your computer in the air vents. NOTE: The computer turns on the battery charge.
... computer gets hot. Lets you can damage the computer or cause a fire. See the documentation that came with the fan or the computer. www.dell.com | support.dell.com Bottom View battery-bay latch release hard drive Mini PCI card/modem cover battery battery charge gauge docking device slot fan memory module... a battery is running. The computer uses an internal fan to an electrical outlet. Do not store your computer in the air vents. NOTE: The computer turns on the battery charge.

Owners Manual
Page 23
... Other Hardware, click Phone and Modem Options, click the Dialing Rules tab, and then click Edit. 3 In the Edit Location window, ensure that it is turned on deactivating this feature. If you are sure that your telephone directory. 4 Click Apply and click OK. 5 Close the Phone and Modems Options window. 6 Close...
... Other Hardware, click Phone and Modem Options, click the Dialing Rules tab, and then click Edit. 3 In the Edit Location window, ensure that it is turned on deactivating this feature. If you are sure that your telephone directory. 4 Click Apply and click OK. 5 Close the Phone and Modems Options window. 6 Close...

Owners Manual
Page 26
... connected devices when AC power is available. The computer turns off your computer by pressing the power button. www.dell.com | support.dell.com Uninterruptible Power Supplies NOTICE: Loss of power while data is approved by Underwriters Laboratories (UL). NOTE: As an alternative to turning off . A UPS protects against power fluctuations and interruptions. Connect...
... connected devices when AC power is available. The computer turns off your computer by pressing the power button. www.dell.com | support.dell.com Uninterruptible Power Supplies NOTICE: Loss of power while data is approved by Underwriters Laboratories (UL). NOTE: As an alternative to turning off . A UPS protects against power fluctuations and interruptions. Connect...

Owners Manual
Page 29
...battery operating time. If necessary, the AC adapter then charges the battery and maintains the battery charge. To access the help file, see the Dell Inspiron help file. To access the help file, see the Tell Me How help file. Each light represents incremental degradation. If five lights appear, ...four of the charge capacity remains, and you like. If the battery runs completely out of both batteries is in approximately 1 hour with the computer turned on . If two batteries are on . When you insert a battery, press the status button on the Power Meter tab, see page 61. ...
...battery operating time. If necessary, the AC adapter then charges the battery and maintains the battery charge. To access the help file, see the Dell Inspiron help file. To access the help file, see the Tell Me How help file. Each light represents incremental degradation. If five lights appear, ...four of the charge capacity remains, and you like. If the battery runs completely out of both batteries is in approximately 1 hour with the computer turned on . If two batteries are on . When you insert a battery, press the status button on the Power Meter tab, see page 61. ...

Owners Manual
Page 30
...computer to an electrical outlet. For more information about removing the second battery, see page 31. See the documentation that the computer is turned off the computer, disconnect it . The battery is too hot to continue charging the battery. For more information on the bottom of...the light flashes alternately green and orange. Removing a Battery For more information about installing the second battery, see page 31. www.dell.com | support.dell.com If the battery is hot from the electrical outlet and allow the computer and the battery to cool to room temperature. Installing...
...computer to an electrical outlet. For more information about removing the second battery, see page 31. See the documentation that the computer is turned off the computer, disconnect it . The battery is too hot to continue charging the battery. For more information on the bottom of...the light flashes alternately green and orange. Removing a Battery For more information about installing the second battery, see page 31. www.dell.com | support.dell.com If the battery is hot from the electrical outlet and allow the computer and the battery to cool to room temperature. Installing...

Owners Manual
Page 31
... when you use D-Family modules in the module bay. If the light is on . Contact Dell (see page 77). If the AC adapter has a light, ensure that the computer turns on . Turn off , press the power button to turn on the computer. R E S E A T T H E M E M O R Y M O D U L E S - You can ...Reinstall the battery. 2 Use the AC adapter to connect the computer to charge. Turn off the computer (see page 61. Check the AC adapter cable connections. C H E C K T H E A C A D A P T E R - See the Dell Inspiron help file, see page 26), disconnect the computer from the electrical outlet, and then...
... when you use D-Family modules in the module bay. If the light is on . Contact Dell (see page 77). If the AC adapter has a light, ensure that the computer turns on . Turn off , press the power button to turn on the computer. R E S E A T T H E M E M O R Y M O D U L E S - You can ...Reinstall the battery. 2 Use the AC adapter to connect the computer to charge. Turn off the computer (see page 61. Check the AC adapter cable connections. C H E C K T H E A C A D A P T E R - See the Dell Inspiron help file, see page 26), disconnect the computer from the electrical outlet, and then...

Owners Manual
Page 32
... install a second battery, press the status button on the charge gauge second battery (top) Removing and Installing Devices While the Computer Is Turned Off Your computer ships with an optical drive installed in the module bay. When you install your device in the optical drive but packaged ...separately. www.dell.com | support.dell.com NOTE: All devices that you install in the module bay, except a second battery, can install the device screw. 32 Using ...
... install a second battery, press the status button on the charge gauge second battery (top) Removing and Installing Devices While the Computer Is Turned Off Your computer ships with an optical drive installed in the module bay. When you install your device in the optical drive but packaged ...separately. www.dell.com | support.dell.com NOTE: All devices that you install in the module bay, except a second battery, can install the device screw. 32 Using ...

Owners Manual
Page 34
See the documentation that came with your docking device for instructions. NOTICE: To prevent damage to devices, place them . 3 Close the display and turn the computer over. 4 Use a #1 Phillips screwdriver to a docking device (docked), undock it. Avoid pressing down the computer (see page 26). 2 If the ...in a safe, dry place when they are not installed in the computer. device latch release 34 Using Batteries and Module Bay Devices www.dell.com | support.dell.com If the Device Screw Is Installed 1 Save and close any open files, exit any open programs, and shut down on them or...
See the documentation that came with your docking device for instructions. NOTICE: To prevent damage to devices, place them . 3 Close the display and turn the computer over. 4 Use a #1 Phillips screwdriver to a docking device (docked), undock it. Avoid pressing down the computer (see page 26). 2 If the ...in a safe, dry place when they are not installed in the computer. device latch release 34 Using Batteries and Module Bay Devices www.dell.com | support.dell.com If the Device Screw Is Installed 1 Save and close any open files, exit any open programs, and shut down on them or...

Owners Manual
Page 35
... (docked). When you install your device in the module bay, you feel a click. 8 Replace the device screw. 9 Turn on the computer. 7 Insert the new device into the module bay before you dock and turn on the computer. However, the device screw is running and connected to secure the module inside the computer...
... (docked). When you install your device in the module bay, you feel a click. 8 Replace the device screw. 9 Turn on the computer. 7 Insert the new device into the module bay before you dock and turn on the computer. However, the device screw is running and connected to secure the module inside the computer...

Owners Manual
Page 43
... THE PROBLEM IS WITH THE MOUSE, CHECK THE TOUCH PAD - 1 Shut down the computer (see page 26). 2 Disconnect the mouse. 3 Turn on the computer. 4 At the Windows desktop, use the touch pad to save the settings and close the window. Click Mouse. 2 On .... If you may be defective. If the touch pad operates correctly, the mouse may have a defective external keyboard. CHECK THE EXTERNAL KEYBOARD - 1 Turn off the computer, wait 1 minute, and turn it for damage. Using the Keyboard and Touch Pad 43 R E I N S T A L L T H E T O U C H P A D D R I V E R - Disconnect the keyboard cable and...
... THE PROBLEM IS WITH THE MOUSE, CHECK THE TOUCH PAD - 1 Shut down the computer (see page 26). 2 Disconnect the mouse. 3 Turn on the computer. 4 At the Windows desktop, use the touch pad to save the settings and close the window. Click Mouse. 2 On .... If you may be defective. If the touch pad operates correctly, the mouse may have a defective external keyboard. CHECK THE EXTERNAL KEYBOARD - 1 Turn off the computer, wait 1 minute, and turn it for damage. Using the Keyboard and Touch Pad 43 R E I N S T A L L T H E T O U C H P A D D R I V E R - Disconnect the keyboard cable and...

Owners Manual
Page 44
...not lit. 44 Using the Keyboard and Touch Pad www.dell.com | support.dell.com TO VERIFY THAT THE PROBLEM IS WITH THE EXTERNAL KEYBOARD, CHECK THE INTEGRATED KEYBOARD - 1 Turn off the computer. 2 Disconnect the external keyboard. 3 Turn on the computer. 4 From the Windows desktop, click the... Start button, point to All Programs, point to disable the numeric keypad if numbers are displayed instead of letters. Contact Dell (see page 100).
...not lit. 44 Using the Keyboard and Touch Pad www.dell.com | support.dell.com TO VERIFY THAT THE PROBLEM IS WITH THE EXTERNAL KEYBOARD, CHECK THE INTEGRATED KEYBOARD - 1 Turn off the computer. 2 Disconnect the external keyboard. 3 Turn on the computer. 4 From the Windows desktop, click the... Start button, point to All Programs, point to disable the numeric keypad if numbers are displayed instead of letters. Contact Dell (see page 100).

Owners Manual
Page 47
...video input connector on the computer. 3 Plug the other audio device are not included with the TV. S-Video Connection S-video cable audio cable 1 Turn off the computer and the TV and/or audio device that the computer recognizes and works properly with only a composite video-input connector, you determine... to help you must enable your computer to your TV. For a TV with the TV. The composite TV-out adapter cable is available from Dell. Your TV has either an S-video input connector or a composite video-input connector. Connecting Your Computer to a TV or Audio Device NOTE: ...
...video input connector on the computer. 3 Plug the other audio device are not included with the TV. S-Video Connection S-video cable audio cable 1 Turn off the computer and the TV and/or audio device that the computer recognizes and works properly with only a composite video-input connector, you determine... to help you must enable your computer to your TV. For a TV with the TV. The composite TV-out adapter cable is available from Dell. Your TV has either an S-video input connector or a composite video-input connector. Connecting Your Computer to a TV or Audio Device NOTE: ...

Owners Manual
Page 48
Composite Video Connection 48 Using CDs, DVDs, and Other Multimedia www.dell.com | support.dell.com 4 Plug the single-connector end of the audio cable in to the headphone connector on your computer. 5 Plug the two RCA connectors on the other end of the audio cable in to the audio input connectors on your TV or other audio device. 6 Turn on the TV, turn on any audio device that you connected (if applicable), and then turn on the computer. 7 See "Enabling the Display Settings for a TV" to ensure that the computer recognizes and works properly with the TV.
Composite Video Connection 48 Using CDs, DVDs, and Other Multimedia www.dell.com | support.dell.com 4 Plug the single-connector end of the audio cable in to the headphone connector on your computer. 5 Plug the two RCA connectors on the other end of the audio cable in to the audio input connectors on your TV or other audio device. 6 Turn on the TV, turn on any audio device that you connected (if applicable), and then turn on the computer. 7 See "Enabling the Display Settings for a TV" to ensure that the computer recognizes and works properly with the TV.


