Owner's Manual
Page 7
Resolving Software and Hardware Incompatibilities 91 Restoring Your Operating System 92 Using Microsoft Windows System Restore . . . . 93 Using Dell PC Restore 95 Using the Operating System CD 98 4 Removing and Installing Parts 101 Before You Begin 101 Recommended Tools 101 ...Turning Off Your Computer 102 Before Working Inside Your Computer 102 Removing the Computer Cover 103 Removing the Support Bracket 104 Inside View of Your Computer 106 System Board Components 107 Power Supply DC Connector Pin Assignments . . . . . 109 Memory 112 ...
Resolving Software and Hardware Incompatibilities 91 Restoring Your Operating System 92 Using Microsoft Windows System Restore . . . . 93 Using Dell PC Restore 95 Using the Operating System CD 98 4 Removing and Installing Parts 101 Before You Begin 101 Recommended Tools 101 ...Turning Off Your Computer 102 Before Working Inside Your Computer 102 Removing the Computer Cover 103 Removing the Support Bracket 104 Inside View of Your Computer 106 System Board Components 107 Power Supply DC Connector Pin Assignments . . . . . 109 Memory 112 ...
Owner's Manual
Page 9
Replacing the Support Bracket 164 Replacing the Computer Cover 165 Specifications 167 System Setup 172 Overview 172 Entering System Setup 172 System Setup Options 173 Boot Sequence 175 ... 177 Flashing the BIOS 178 Cleaning Your Computer 179 Computer, Keyboard, and Monitor 179 Mouse 179 Floppy Drive 180 CDs and DVDs 180 Dell Technical Support Policy (U.S. Only 180 Definition of "Dell-Installed" Software and Peripherals 181 Definition of "Third-Party" Software and Peripherals 181 FCC Notice (U.S. Only 181 FCC Class B 181 Contents...
Replacing the Support Bracket 164 Replacing the Computer Cover 165 Specifications 167 System Setup 172 Overview 172 Entering System Setup 172 System Setup Options 173 Boot Sequence 175 ... 177 Flashing the BIOS 178 Cleaning Your Computer 179 Computer, Keyboard, and Monitor 179 Mouse 179 Floppy Drive 180 CDs and DVDs 180 Dell Technical Support Policy (U.S. Only 180 Definition of "Dell-Installed" Software and Peripherals 181 Definition of "Third-Party" Software and Peripherals 181 FCC Notice (U.S. Only 181 FCC Class B 181 Contents...
Owner's Manual
Page 10
Getting Help 183 Obtaining Assistance 183 Technical Support and Customer Service . . . . . 183 DellConnect 184 Online Services 184 AutoTech Service 185 Automated Order-Status Service 185 Problems With Your Order 185 Product Information 185 Returning Items for Warranty Repair or Credit . . . . . 186 Before You Call 186 Contacting Dell 188 Glossary 189 Index 205 10 Contents
Getting Help 183 Obtaining Assistance 183 Technical Support and Customer Service . . . . . 183 DellConnect 184 Online Services 184 AutoTech Service 185 Automated Order-Status Service 185 Problems With Your Order 185 Product Information 185 Returning Items for Warranty Repair or Credit . . . . . 186 Before You Call 186 Contacting Dell 188 Glossary 189 Index 205 10 Contents
Owner's Manual
Page 12
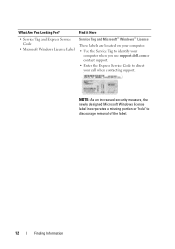
... Microsoft® Windows® License These labels are located on your computer. • Use the Service Tag to identify your computer when you use support.dell.com or contact support. • Enter the Express Service Code to discourage removal of the label. 12 Finding Information NOTE: As an increased security measure, the newly...
... Microsoft® Windows® License These labels are located on your computer. • Use the Service Tag to identify your computer when you use support.dell.com or contact support. • Enter the Express Service Code to discourage removal of the label. 12 Finding Information NOTE: As an increased security measure, the newly...
Owner's Manual
Page 13
... and click Download Now. DSS is necessary for correct 3 Scroll to support.dell.com and click Drivers for your Service Tag or Product Type and provides critical updates for Dell™ 3.5-inch USB floppy drives, optical drives, and USB devices. NOTE: The support.dell.com user interface may The software automatically detects vary depending on...
... and click Download Now. DSS is necessary for correct 3 Scroll to support.dell.com and click Drivers for your Service Tag or Product Type and provides critical updates for Dell™ 3.5-inch USB floppy drives, optical drives, and USB devices. NOTE: The support.dell.com user interface may The software automatically detects vary depending on...
Owner's Manual
Page 14
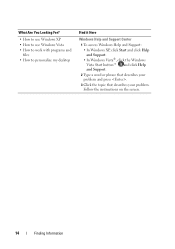
What Are You Looking For? • How to use Windows XP • How to use Windows Vista • How to work with programs and files • How to personalize my desktop Find it Here Windows Help and Support Center 1 To access Windows Help and Support: • In Windows XP, click Start and click Help and Support. • In Windows Vista®, click the Windows Vista Start button™ and click Help and Support. 2 Type a word or phrase that describes your problem and press . 3 Click the topic that describes your problem. Follow the instructions on the screen. 14 Finding Information
What Are You Looking For? • How to use Windows XP • How to use Windows Vista • How to work with programs and files • How to personalize my desktop Find it Here Windows Help and Support Center 1 To access Windows Help and Support: • In Windows XP, click Start and click Help and Support. • In Windows Vista®, click the Windows Vista Start button™ and click Help and Support. 2 Type a word or phrase that describes your problem and press . 3 Click the topic that describes your problem. Follow the instructions on the screen. 14 Finding Information
Owner's Manual
Page 16
..., such as joysticks or cameras, or for bootable USB devices (see "System Setup Options" on page 173 for devices that you access the Dell Support website or call technical support. 2 FlexBay open/close Press here to open or close the floppy/media card reader panel. 3 CD or DVD eject button Press to eject...
..., such as joysticks or cameras, or for bootable USB devices (see "System Setup Options" on page 173 for devices that you access the Dell Support website or call technical support. 2 FlexBay open/close Press here to open or close the floppy/media card reader panel. 3 CD or DVD eject button Press to eject...
Owner's Manual
Page 28
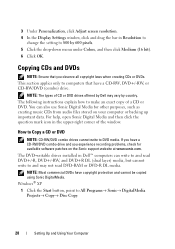
...All Programs→ Sonic→ DigitalMedia Projects→ Copy→ Disc Copy. 28 Setting Up and Using Your Computer The DVD-writable drives installed in Dell™ computers can also use Sonic Digital Media for available software patches on your computer or backing up important data. Windows® XP 1 Click ... write to computers that you experience recording problems, check for other purposes, such as creating music CDs from audio files stored on the Sonic support website at www.sonic.com. NOTE: Most commercial DVDs have a CD-RW, DVD+/-RW, or CD-RW/DVD (combo) drive.
...All Programs→ Sonic→ DigitalMedia Projects→ Copy→ Disc Copy. 28 Setting Up and Using Your Computer The DVD-writable drives installed in Dell™ computers can also use Sonic Digital Media for available software patches on your computer or backing up important data. Windows® XP 1 Click ... write to computers that you experience recording problems, check for other purposes, such as creating music CDs from audio files stored on the Sonic support website at www.sonic.com. NOTE: Most commercial DVDs have a CD-RW, DVD+/-RW, or CD-RW/DVD (combo) drive.
Owner's Manual
Page 31
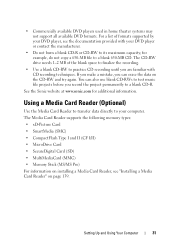
... example, do not copy a 650-MB file to your computer. Setting Up and Using Your Computer 31 The CD-RW drive needs 1-2 MB of formats supported by your DVD player or contact the manufacturer. • Do not burn a blank CD-R or CD-RW to a blank CD-R. You can erase the data... on page 139. • Commercially available DVD players used in home theater systems may not support all available DVD formats. Using a Media Card Reader (Optional) Use the Media Card Reader to transfer data directly to a blank 650-MB CD. For a list...
... example, do not copy a 650-MB file to your computer. Setting Up and Using Your Computer 31 The CD-RW drive needs 1-2 MB of formats supported by your DVD player or contact the manufacturer. • Do not burn a blank CD-R or CD-RW to a blank CD-R. You can erase the data... on page 139. • Commercially available DVD players used in home theater systems may not support all available DVD formats. Using a Media Card Reader (Optional) Use the Media Card Reader to transfer data directly to a blank 650-MB CD. For a list...

Owner's Manual
Page 33
If you are connecting two monitors that supports dual monitors, follow the safety instructions in addition to the TV. NOTICE: If you must have the optional DVI adapter to connect the cable. Setting ...
If you are connecting two monitors that supports dual monitors, follow the safety instructions in addition to the TV. NOTICE: If you must have the optional DVI adapter to connect the cable. Setting ...
Owner's Manual
Page 35
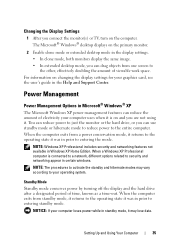
... power by turning off the display and the hard drive after a designated period of electricity your computer uses when it was in the Help and Support Center. The Microsoft® Windows® desktop displays on the computer. For information on and you can drag objects from a power conservation mode, it returns...
... power by turning off the display and the hard drive after a designated period of electricity your computer uses when it was in the Help and Support Center. The Microsoft® Windows® desktop displays on the computer. For information on and you can drag objects from a power conservation mode, it returns...
Owner's Manual
Page 36
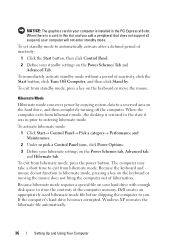
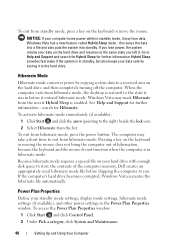
To set standby mode to you add a peripheral that does not support s3 suspend, your computer will not enter standby mode. To immediately activate standby mode without a period of the computer memory, Dell creates an appropriately sized hibernate mode file before shipping the computer to automatically activate after a defined period of hibernation. Hibernate...
To set standby mode to you add a peripheral that does not support s3 suspend, your computer will not enter standby mode. To immediately activate standby mode without a period of the computer memory, Dell creates an appropriately sized hibernate mode file before shipping the computer to automatically activate after a defined period of hibernation. Hibernate...

Owner's Manual
Page 38
... that scheme, unless you to use the hibernate settings as defined on the Power Schemes tab, click the Enable hibernate support check box on power management options: 1 Click Start→ Help and Support→ Performance and maintenance. In the Performance and maintenance window, click Conserving power on your computer. Changing the time...
... that scheme, unless you to use the hibernate settings as defined on the Power Schemes tab, click the Enable hibernate support check box on power management options: 1 Click Start→ Help and Support→ Performance and maintenance. In the Performance and maintenance window, click Conserving power on your computer. Changing the time...
Owner's Manual
Page 40
...hard drive becomes corrupted, Windows Vista recreates the hibernate file automatically. Hybrid Sleep provides fast wake if the system is enabled. See Help and Support for Hibernate. Pressing a key on the keyboard or move the mouse. NOTICE: If your data safe by copying system data to you left ...To exit from standby mode, press a key on the keyboard or moving the mouse does not bring the computer out of the computer memory, Dell creates an appropriately sized hibernate mode file before it . this saves the data into a file and also puts the system into standby. Hibernate ...
...hard drive becomes corrupted, Windows Vista recreates the hibernate file automatically. Hybrid Sleep provides fast wake if the system is enabled. See Help and Support for Hibernate. Pressing a key on the keyboard or move the mouse. NOTICE: If your data safe by copying system data to you left ...To exit from standby mode, press a key on the keyboard or moving the mouse does not bring the computer out of the computer memory, Dell creates an appropriately sized hibernate mode file before it . this saves the data into a file and also puts the system into standby. Hibernate ...
Owner's Manual
Page 42
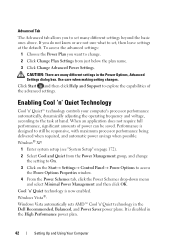
... 2 Click Change Plan Settings from just below the plan name. 3 Click Change Advanced Power Settings. Click Start and then click Help and Support to access the Power Options Properties window. 4 From the Power Schemes tab, click the Power Schemes drop-down menu and select Minimal Power Management...Plan you want to the task at the default. Windows Vista®: Windows Vista automatically sets AMD™ Cool 'n' Quiet technology in the Dell Recommended, Balanced, and Power Saver power plans. Advanced Tab The Advanced tab allows you to set , then leave settings at hand. Enabling ...
... 2 Click Change Plan Settings from just below the plan name. 3 Click Change Advanced Power Settings. Click Start and then click Help and Support to access the Power Options Properties window. 4 From the Power Schemes tab, click the Power Schemes drop-down menu and select Minimal Power Management...Plan you want to the task at the default. Windows Vista®: Windows Vista automatically sets AMD™ Cool 'n' Quiet technology in the Dell Recommended, Balanced, and Power Saver power plans. Advanced Tab The Advanced tab allows you to set , then leave settings at hand. Enabling ...
Owner's Manual
Page 43
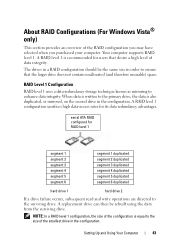
... the surviving drive. NOTE: In a RAID level 1 configuration, the size of the RAID configuration you may have selected when you purchased your computer. Your computer supports RAID level 1. The drives in the configuration. A RAID level 1 configuration sacrifices high data-access rates for RAID level 1 segment 1 segment 2 segment 3 segment 4 segment 5 segment 6 segment...
... the surviving drive. NOTE: In a RAID level 1 configuration, the size of the RAID configuration you may have selected when you purchased your computer. Your computer supports RAID level 1. The drives in the configuration. A RAID level 1 configuration sacrifices high data-access rates for RAID level 1 segment 1 segment 2 segment 3 segment 4 segment 5 segment 6 segment...
Owner's Manual
Page 45
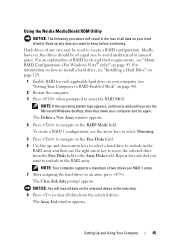
... Array Disks field. To create a RAID 1 configuration, use the right-arrow key to keep before continuing. The Clear disk data prompt appears. NOTE: Your computer supports a maximum of any data you want to move the selected drive from the selected drives. The Define a New Array window appears. 4 Press to navigate to...
... Array Disks field. To create a RAID 1 configuration, use the right-arrow key to keep before continuing. The Clear disk data prompt appears. NOTE: Your computer supports a maximum of any data you want to move the selected drive from the selected drives. The Define a New Array window appears. 4 Press to navigate to...
Owner's Manual
Page 50
... XP SP1. 4 Complete the checklist and required preparations. 5 Return to the Internet, Set Up a wireless router or access point and more information, access Help and Support -
... XP SP1. 4 Complete the checklist and required preparations. 5 Return to the Internet, Set Up a wireless router or access point and more information, access Help and Support -
Owner's Manual
Page 55
...battery still does not work , ensure that the part is correctly installed. • If a peripheral device does not work properly, contact Dell (see "Getting Help" on the screen, write down the exact message. Solving Problems 55 Troubleshooting Tips Follow these tips when you troubleshoot your...after turning on page 144). R E P L A C E T H E B A T T E R Y - If you begin any of the procedures in this chapter may help technical support personnel diagnose and fix the problem. • If an error message occurs in a program, see "Replacing the Battery" on the computer, or if an incorrect...
...battery still does not work , ensure that the part is correctly installed. • If a peripheral device does not work properly, contact Dell (see "Getting Help" on the screen, write down the exact message. Solving Problems 55 Troubleshooting Tips Follow these tips when you troubleshoot your...after turning on page 144). R E P L A C E T H E B A T T E R Y - If you begin any of the procedures in this chapter may help technical support personnel diagnose and fix the problem. • If an error message occurs in a program, see "Replacing the Battery" on the computer, or if an incorrect...
Owner's Manual
Page 67
...is a FlexBay disable option in the Product Information Guide. Memory Problems CAUTION: Before you begin any open files and exit any of memory supported by your computer is enabled in the BIOS setup. IF YOU RECEIVE AN INSUFFICIENT MEMORY MESSAGE - • Save and close any open ...programs you are not using to see "Starting the Dell Diagnostics From Your Hard Drive" on page 112). • Your computer supports DDR2 memory. For more information about the type of the procedures in this section, follow the safety instructions in...
...is a FlexBay disable option in the Product Information Guide. Memory Problems CAUTION: Before you begin any open files and exit any of memory supported by your computer is enabled in the BIOS setup. IF YOU RECEIVE AN INSUFFICIENT MEMORY MESSAGE - • Save and close any open ...programs you are not using to see "Starting the Dell Diagnostics From Your Hard Drive" on page 112). • Your computer supports DDR2 memory. For more information about the type of the procedures in this section, follow the safety instructions in...


