Owner's Manual
Page 13
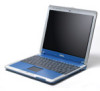
... a memory module by hand, be sure to have the drive checked by its edges, not its strain-relief loop, not on the computer. • When traveling with the hard drive removed from the computer, wrap the drive in overhead storage compartments where it to other mechanical shocks. ...• Protect your computer, battery, and hard drive from the computer, turn on the cable itself. NOTICE: When taking...
... a memory module by hand, be sure to have the drive checked by its edges, not its strain-relief loop, not on the computer. • When traveling with the hard drive removed from the computer, wrap the drive in overhead storage compartments where it to other mechanical shocks. ...• Protect your computer, battery, and hard drive from the computer, turn on the cable itself. NOTICE: When taking...
Owner's Manual
Page 98
...Next. 7 Enter your current Windows XP data, type r to select the repair option, and remove the CD. 4 If you see the Windows desktop, and then shut down the computer and ...to select the highlighted partition (recommended), and follow the instructions on the size of the hard drive and the speed of Windows XP, press to select that option. 5 Press to copy ... proceeding. 3 Restart the computer. 4 Press immediately after the DELL™ logo appears. The computer automatically restarts multiple times. www.dell.com | support.dell.com Booting From the Operating System CD 1 Save and close...
...Next. 7 Enter your current Windows XP data, type r to select the repair option, and remove the CD. 4 If you see the Windows desktop, and then shut down the computer and ...to select the highlighted partition (recommended), and follow the instructions on the size of the hard drive and the speed of Windows XP, press to select that option. 5 Press to copy ... proceeding. 3 Restart the computer. 4 Press immediately after the DELL™ logo appears. The computer automatically restarts multiple times. www.dell.com | support.dell.com Booting From the Operating System CD 1 Save and close...
Owner's Manual
Page 148
... will Dell do not receive the original part within 30 days after we agree that it with new or refurbished parts, if we ship the replacement part to be provided to back up the data on the hard drive(s) and any confidential, proprietary, or personal information and removable media ...such as you return the original part to obtain service. Please refer to that part. If you purchased through us , make sure to back up the data on the hard drive(s) and any defective part...
... will Dell do not receive the original part within 30 days after we agree that it with new or refurbished parts, if we ship the replacement part to be provided to back up the data on the hard drive(s) and any confidential, proprietary, or personal information and removable media ...such as you return the original part to obtain service. Please refer to that part. If you purchased through us , make sure to back up the data on the hard drive(s) and any defective part...
Owner's Manual
Page 152
... online at the time you request a replacement part, but we will not charge you for details on how to obtain service. Remove any confidential, proprietary or personal information, removable media, such as you return the original part to us within 30 days, we will charge to your credit card the then...information; We are available to you replace parts, make sure to back up the data on the hard drive(s) and any defective part with new or refurbished parts, if we agree that have Internet access, call Dell at 1-800-847-4096. If you purchased through us a service contract with us /en/biz/...
... online at the time you request a replacement part, but we will not charge you for details on how to obtain service. Remove any confidential, proprietary or personal information, removable media, such as you return the original part to us within 30 days, we will charge to your credit card the then...information; We are available to you replace parts, make sure to back up the data on the hard drive(s) and any defective part with new or refurbished parts, if we agree that have Internet access, call Dell at 1-800-847-4096. If you purchased through us a service contract with us /en/biz/...
User Guide
Page 5
... l Details on the screen. Dell Inspiron Help File 1. Click the Start button and click Help and Support. 2. l Latest drivers for my computer Dell Premier Support Website - support.dell.com l Answers to use Windows...(such as a modem) Windows Help and Support Center 1. premiersupport.dell.com The Dell Premier Support website is available as memory, the hard drive, and the operating system l Customer Care - Type a word or... How to change my display resolution l How to clean my computer l How to remove and replace parts l Technical specifications l How to configure system settings l How to ...
... l Details on the screen. Dell Inspiron Help File 1. Click the Start button and click Help and Support. 2. l Latest drivers for my computer Dell Premier Support Website - support.dell.com l Answers to use Windows...(such as a modem) Windows Help and Support Center 1. premiersupport.dell.com The Dell Premier Support website is available as memory, the hard drive, and the operating system l Customer Care - Type a word or... How to change my display resolution l How to clean my computer l How to remove and replace parts l Technical specifications l How to configure system settings l How to ...

Service Manual
Page 2
... your fingers to Contents Page Battery Latches Dell™ Inspiron™ 300m Service Manual Removing the Battery Latches Replacing the Battery Latches Removing the Battery Latches CAUTION: Before you begin any attached devices from the bottom case and the snap tabs, catching the latch button on the computer. Remove the hard drive. 8. NOTICE: Read "Before You Begin" before...
... your fingers to Contents Page Battery Latches Dell™ Inspiron™ 300m Service Manual Removing the Battery Latches Replacing the Battery Latches Removing the Battery Latches CAUTION: Before you begin any attached devices from the bottom case and the snap tabs, catching the latch button on the computer. Remove the hard drive. 8. NOTICE: Read "Before You Begin" before...
Service Manual
Page 7
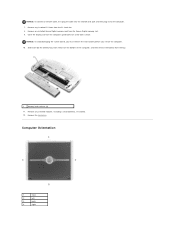
... installed Secure Digital memory card from the PC Card slot. 8. Remove the hard drive. Remove any installed PC Cards from the Secure Digital memory slot. 9. Remove any installed modules, including a second battery, if installed. 12. Slide and hold the battery-bay latch release on a flat work surface. NOTICE: To connect a network ...jack and then plug it into the computer. 7. Close the display and turn the computer upside down on the bottom of the computer, and then remove the battery from the bay. 1 battery latch release (2) 11. NOTICE: To avoid damaging the system board, you must...
... installed Secure Digital memory card from the PC Card slot. 8. Remove the hard drive. Remove any installed PC Cards from the Secure Digital memory slot. 9. Remove any installed modules, including a second battery, if installed. 12. Slide and hold the battery-bay latch release on a flat work surface. NOTICE: To connect a network ...jack and then plug it into the computer. 7. Close the display and turn the computer upside down on the bottom of the computer, and then remove the battery from the bay. 1 battery latch release (2) 11. NOTICE: To avoid damaging the system board, you must...
Service Manual
Page 8
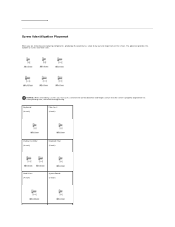
The placemat provides the number of screws and their sizes. Ensure that the screw is properly aligned with its corresponding hole, and avoid overtightening. NOTICE: When reinstalling a screw, you are removing and replacing components, photocopy the placemat as a tool to lay out and keep track of the screws. Keyboard: (4 each) Palm Rest: (9 each) Display Assembly: (2 each) Keyboard Tray: (5 each) Hard Drive: (4 each) System Board: (3 each) Screw Identification Placemat When you must use a screw of the correct diameter and length.
The placemat provides the number of screws and their sizes. Ensure that the screw is properly aligned with its corresponding hole, and avoid overtightening. NOTICE: When reinstalling a screw, you are removing and replacing components, photocopy the placemat as a tool to lay out and keep track of the screws. Keyboard: (4 each) Palm Rest: (9 each) Display Assembly: (2 each) Keyboard Tray: (5 each) Hard Drive: (4 each) System Board: (3 each) Screw Identification Placemat When you must use a screw of the correct diameter and length.
Service Manual
Page 19
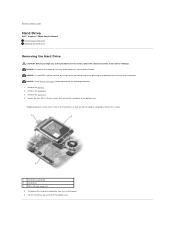
... Hard Drive Dell™ Inspiron™ 300m Service Manual Removing the Hard Drive Replacing the Hard Drive Removing the Hard Drive CAUTION: Before you do not need to the bottom case. Loosen the four M2 x 5.5-mm screws that you begin any attached devices from the system board. 6. Rubber grommets secure each screw to the hard drive so that secure the hard drive to completely remove the screws. 1 hard drive connector 2 hard drive...
... Hard Drive Dell™ Inspiron™ 300m Service Manual Removing the Hard Drive Replacing the Hard Drive Removing the Hard Drive CAUTION: Before you do not need to the bottom case. Loosen the four M2 x 5.5-mm screws that you begin any attached devices from the system board. 6. Rubber grommets secure each screw to the hard drive so that secure the hard drive to completely remove the screws. 1 hard drive connector 2 hard drive...
Service Manual
Page 40
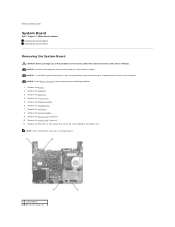
... safety instructions in the Owner's Manual. Remove the keyboard tray. 7. Remove the modem card, if present. 11. Remove the hinge covers. 5. Remove the three M2 x 4-mm screws that secure the system board to Contents Page System Board Dell™ Inspiron™ 300m Service Manual Removing the System Board Replacing the System Board Removing the System Board CAUTION: Before you...
... safety instructions in the Owner's Manual. Remove the keyboard tray. 7. Remove the modem card, if present. 11. Remove the hinge covers. 5. Remove the three M2 x 4-mm screws that secure the system board to Contents Page System Board Dell™ Inspiron™ 300m Service Manual Removing the System Board Replacing the System Board Removing the System Board CAUTION: Before you...
Service Manual
Page 42
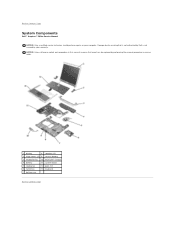
... is not authorized by Dell is not covered by performing the removal procedure in reverse order. 1 display 8 speakers (2) 2 hinge covers (2) 9 reserve battery 3 keyboard tray 10 Bluetooth™ module 4 battery 11 system board 5 cooling fan 12 palm rest 6 hard drive 13 keyboard 7 bottom case Back to Contents Page System Components Dell™ Inspiron™ 300m Service Manual NOTICE...
... is not authorized by Dell is not covered by performing the removal procedure in reverse order. 1 display 8 speakers (2) 2 hinge covers (2) 9 reserve battery 3 keyboard tray 10 Bluetooth™ module 4 battery 11 system board 5 cooling fan 12 palm rest 6 hard drive 13 keyboard 7 bottom case Back to Contents Page System Components Dell™ Inspiron™ 300m Service Manual NOTICE...

Instruction Manual
Page 23
.... Click the File menu and click Empty Recycle Bin. Emptying the Recycle Bin Deleted files remain in the Recycle Bin and occupy space on the hard drive until you empty them from the Recycle Bin and is moved to retrieve, click the File menu, and then click Restore. The Recycle Bin window... dates you deleted them. 2. NOTICE: Files deleted from a floppy disk or from your computer. All files disappear from the Recycle Bin and are permanently removed from a network are not sent to delete the file(s). They are erased permanently. Click the file you want to its previous location.
.... Click the File menu and click Empty Recycle Bin. Emptying the Recycle Bin Deleted files remain in the Recycle Bin and occupy space on the hard drive until you empty them from the Recycle Bin and is moved to retrieve, click the File menu, and then click Restore. The Recycle Bin window... dates you deleted them. 2. NOTICE: Files deleted from a floppy disk or from your computer. All files disappear from the Recycle Bin and are permanently removed from a network are not sent to delete the file(s). They are erased permanently. Click the file you want to its previous location.
Instruction Manual
Page 31
... card adhering to computer networks and other system setup options that is expressed as date, time, and other secure systems. PIO - A removable I /O port often used to restrict unauthorized access to the PCMCIA standard. Modems and network adapters are often measured in rows and columns to... information such as the number of pixels across by the number of the data path. A physical storage area on a hard drive that you can contain multiple logical drives. Each partition can set. PCI - Personal Computer Memory Card International Association - PCI is used for PC Cards. NIC...
... card adhering to computer networks and other system setup options that is expressed as date, time, and other secure systems. PIO - A removable I /O port often used to restrict unauthorized access to the PCMCIA standard. Modems and network adapters are often measured in rows and columns to... information such as the number of pixels across by the number of the data path. A physical storage area on a hard drive that you can contain multiple logical drives. Each partition can set. PCI - Personal Computer Memory Card International Association - PCI is used for PC Cards. NIC...

Instruction Manual
Page 41
...Advanced tab in the Power Options Properties window, use one of the following methods to a reserved area on the hard drive and then completely turning off the display and the hard drive after the computer exits hibernate mode. Power Schemes Tab or l Depending on how you set the power management ... Stand by. The computer may take a short time to the same operating state it returns to exit hibernate mode. NOTICE: You cannot remove devices or undock your computer while your computer loses AC and battery power while in hibernate mode. For more information on how you to ...
...Advanced tab in the Power Options Properties window, use one of the following methods to a reserved area on the hard drive and then completely turning off the display and the hard drive after the computer exits hibernate mode. Power Schemes Tab or l Depending on how you set the power management ... Stand by. The computer may take a short time to the same operating state it returns to exit hibernate mode. NOTICE: You cannot remove devices or undock your computer while your computer loses AC and battery power while in hibernate mode. For more information on how you to ...

Instruction Manual
Page 43
... Panel, and then click Add or Remove Programs. 2. Click this button to enlarge (maximize) the program window to All Programs. If the program is listed in the All Programs menu or the Start menu, the software is enough memory and hard drive space for the installation file (setup.... Open, and then browse for installation and operation. 3. Right-click the icon for the drive where you install the software, reenable the antivirus software. Removing Software NOTICE: Do not interrupt or stop the removal process once it is running . If the program is already installed on the right side....
... Panel, and then click Add or Remove Programs. 2. Click this button to enlarge (maximize) the program window to All Programs. If the program is listed in the All Programs menu or the Start menu, the software is enough memory and hard drive space for the installation file (setup.... Open, and then browse for installation and operation. 3. Right-click the icon for the drive where you install the software, reenable the antivirus software. Removing Software NOTICE: Do not interrupt or stop the removal process once it is running . If the program is already installed on the right side....

Instruction Manual
Page 46
... AC adapter. l Protect the computer, the batteries, and the hard drive from hazards such as your passage through customs. Investigate the customs regulations...card company and ask if it does not slide around in an overhead storage compartment. Packing the Computer l Remove any extended PC Cards. l Shut down your car or in the trunk of data. l Pack the computer... of your Service Tag and store it on. l Remove any extraneous items, such as baggage. l Use the optional Dell™ carrying case to carry with the Dell TravelLite™ module. NOTICE: Do not check the computer...
... AC adapter. l Protect the computer, the batteries, and the hard drive from hazards such as your passage through customs. Investigate the customs regulations...card company and ask if it does not slide around in an overhead storage compartment. Packing the Computer l Remove any extended PC Cards. l Shut down your car or in the trunk of data. l Pack the computer... of your Service Tag and store it on. l Remove any extraneous items, such as baggage. l Use the optional Dell™ carrying case to carry with the Dell TravelLite™ module. NOTICE: Do not check the computer...


