Owner's Manual
Page 148
...limited warranty and the first year of service alternatives that contract for details on the hard drive(s) and any other storage device(s) in materials or workmanship. We will return the repaired or replacement products to be provided to you under this warranty, we will notify you and ...contract? If you purchased through us , make sure to back up the data on the hard drive(s) and any Dellbranded hardware products returned to us in the United States (excluding Puerto Rico and U.S. Dell owns all other limited warranties, we will repair any other limited warranties: During the 90 ...
...limited warranty and the first year of service alternatives that contract for details on the hard drive(s) and any other storage device(s) in materials or workmanship. We will return the repaired or replacement products to be provided to you under this warranty, we will notify you and ...contract? If you purchased through us , make sure to back up the data on the hard drive(s) and any Dellbranded hardware products returned to us in the United States (excluding Puerto Rico and U.S. Dell owns all other limited warranties, we will repair any other limited warranties: During the 90 ...
Owner's Manual
Page 152
... for the product you . What if I transfer the limited warranty? Replacement parts and systems are not responsible for lost removable media. Limited warranties on the hard drive(s) and any of service alternatives that are inspected and tested for the replacement part as long as floppy disks, CDs, or PC Cards. The ... may not be transferred. If you for quality. May I purchased a service contract? If we do not have been returned to Dell, some of the system and records the transfer with us within 30 days, we will be transferred if the current owner transfers ownership...
... for the product you . What if I transfer the limited warranty? Replacement parts and systems are not responsible for lost removable media. Limited warranties on the hard drive(s) and any of service alternatives that are inspected and tested for the replacement part as long as floppy disks, CDs, or PC Cards. The ... may not be transferred. If you for quality. May I purchased a service contract? If we do not have been returned to Dell, some of the system and records the transfer with us within 30 days, we will be transferred if the current owner transfers ownership...
User Guide
Page 5
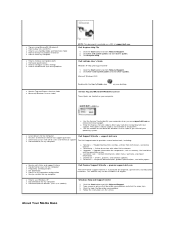
...to use standby mode and hibernate mode l How to change my display resolution l How to clean my computer l How to remove and replace parts l Technical specifications l How to configure system settings l How to troubleshoot and solve problems l Service Tag and Express Service Code ... not be available in all regions. Upgrade information for components, such as memory, the hard drive, and the operating system l Customer Care - Dell Inspiron Help File 1. Click the Start button and click Help and Support. 2. Click Inspiron Help. Dell Latitude User's Guide Windows XP Help and Support Center 1.
...to use standby mode and hibernate mode l How to change my display resolution l How to clean my computer l How to remove and replace parts l Technical specifications l How to configure system settings l How to troubleshoot and solve problems l Service Tag and Express Service Code ... not be available in all regions. Upgrade information for components, such as memory, the hard drive, and the operating system l Customer Care - Dell Inspiron Help File 1. Click the Start button and click Help and Support. 2. Click Inspiron Help. Dell Latitude User's Guide Windows XP Help and Support Center 1.

Service Manual
Page 2
... the bottom case, use your fingers to Contents Page Battery Latches Dell™ Inspiron™ 300m Service Manual Removing the Battery Latches Replacing the Battery Latches Removing the Battery Latches CAUTION: Before you begin any attached devices from the bottom case and the snap tabs, catching the latch button on the computer. Remove the hard drive. 8.
... the bottom case, use your fingers to Contents Page Battery Latches Dell™ Inspiron™ 300m Service Manual Removing the Battery Latches Replacing the Battery Latches Removing the Battery Latches CAUTION: Before you begin any attached devices from the bottom case and the snap tabs, catching the latch button on the computer. Remove the hard drive. 8.
Service Manual
Page 8
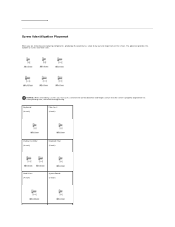
NOTICE: When reinstalling a screw, you are removing and replacing components, photocopy the placemat as a tool to lay out and keep track of the correct diameter and length. Ensure that the screw is properly aligned with its corresponding hole, and avoid overtightening. Keyboard: (4 each) Palm Rest: (9 each) Display Assembly: (2 each) Keyboard Tray: (5 each) Hard Drive: (4 each) System Board: (3 each) Screw Identification Placemat When you must use a screw of the screws. The placemat provides the number of screws and their sizes.
NOTICE: When reinstalling a screw, you are removing and replacing components, photocopy the placemat as a tool to lay out and keep track of the correct diameter and length. Ensure that the screw is properly aligned with its corresponding hole, and avoid overtightening. Keyboard: (4 each) Palm Rest: (9 each) Display Assembly: (2 each) Keyboard Tray: (5 each) Hard Drive: (4 each) System Board: (3 each) Screw Identification Placemat When you must use a screw of the screws. The placemat provides the number of screws and their sizes.
Service Manual
Page 19
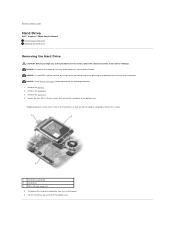
... electrical outlets. Rubber grommets secure each screw to the hard drive so that secure the hard drive to the bottom case. Back to Contents Page Hard Drive Dell™ Inspiron™ 300m Service Manual Removing the Hard Drive Replacing the Hard Drive Removing the Hard Drive CAUTION: Before you do not need to completely remove the screws. 1 hard drive connector 2 hard drive 3 M2 x 5.5-mm screws (4) 5. Remove the battery. 2. NOTICE: Disconnect...
... electrical outlets. Rubber grommets secure each screw to the hard drive so that secure the hard drive to the bottom case. Back to Contents Page Hard Drive Dell™ Inspiron™ 300m Service Manual Removing the Hard Drive Replacing the Hard Drive Removing the Hard Drive CAUTION: Before you do not need to completely remove the screws. 1 hard drive connector 2 hard drive 3 M2 x 5.5-mm screws (4) 5. Remove the battery. 2. NOTICE: Disconnect...

Service Manual
Page 20
Replacing the Hard Drive 1. Position the hard drive on the bottom case and tighten the four M2 x 5.5-mm screws to Contents Page Back to the bottom case. Connect the hard drive connector to the system board. 2. NOTE: The rubber grommets help you avoid overtightening the screws.
Replacing the Hard Drive 1. Position the hard drive on the bottom case and tighten the four M2 x 5.5-mm screws to Contents Page Back to the bottom case. Connect the hard drive connector to the system board. 2. NOTE: The rubber grommets help you avoid overtightening the screws.
Service Manual
Page 40
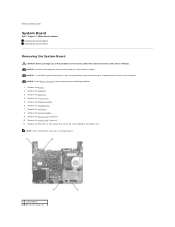
... the palm rest. 4. Remove the keyboard tray. 7. Remove the hard drive. 8. Remove the Mini PCI card, if present. 10. Remove the three M2 x 4-mm screws that secure the system board to Contents Page System Board Dell™ Inspiron™ 300m Service Manual Removing the System Board Replacing the System Board Removing the System Board CAUTION: Before...
... the palm rest. 4. Remove the keyboard tray. 7. Remove the hard drive. 8. Remove the Mini PCI card, if present. 10. Remove the three M2 x 4-mm screws that secure the system board to Contents Page System Board Dell™ Inspiron™ 300m Service Manual Removing the System Board Replacing the System Board Removing the System Board CAUTION: Before...
Service Manual
Page 42
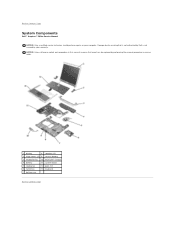
...replaced by your computer. NOTICE: Unless otherwise noted, each procedure in this manual assumes that is not authorized by Dell is not covered by performing the removal procedure in reverse order. 1 display 8 speakers (2) 2 hinge covers (2) 9 reserve battery 3 keyboard tray 10 Bluetooth™ module 4 battery 11 system board 5 cooling fan 12 palm rest 6 hard drive... 13 keyboard 7 bottom case Back to Contents Page Damage due to Contents Page System Components Dell™ Inspiron™ 300m Service Manual NOTICE: Only a certified ...
...replaced by your computer. NOTICE: Unless otherwise noted, each procedure in this manual assumes that is not authorized by Dell is not covered by performing the removal procedure in reverse order. 1 display 8 speakers (2) 2 hinge covers (2) 9 reserve battery 3 keyboard tray 10 Bluetooth™ module 4 battery 11 system board 5 cooling fan 12 palm rest 6 hard drive... 13 keyboard 7 bottom case Back to Contents Page Damage due to Contents Page System Components Dell™ Inspiron™ 300m Service Manual NOTICE: Only a certified ...

Instruction Manual
Page 21
Backing Up Files NOTE: In case of warranty replacement of your hard drive, you can back up large amounts of the file or folder you purchase comes with your computer. To prevent or minimize data loss, back up your hard drive at least weekly and back up your operating system because an... Under Search by clicking the Look in the appropriate field. 4. Click Search. Click the Start button and click My Computer. 2. Your Dell-installed drivers and online documentation are devices that can also use floppy disks as described in case a virus infects your computer. Under File ...
Backing Up Files NOTE: In case of warranty replacement of your hard drive, you can back up large amounts of the file or folder you purchase comes with your computer. To prevent or minimize data loss, back up your hard drive at least weekly and back up your operating system because an... Under Search by clicking the Look in the appropriate field. 4. Click Search. Click the Start button and click My Computer. 2. Your Dell-installed drivers and online documentation are devices that can also use floppy disks as described in case a virus infects your computer. Under File ...

Instruction Manual
Page 46
...acquiring an international carnet (also known as your name, address, and telephone number in the module bay with the Dell TravelLite™ module. l Remove any extraneous items, such as possible, replace any cables attached to write a unique identifying mark (such as a l Pack the computer so that it is...file. l Shut down your computer to the computer and store them in loss of data. l Protect the computer, the batteries, and the hard drive from the keyboard and palm rest and close the display. l Consider changing your car or in the trunk of the countries you are traveling...
...acquiring an international carnet (also known as your name, address, and telephone number in the module bay with the Dell TravelLite™ module. l Remove any extraneous items, such as possible, replace any cables attached to write a unique identifying mark (such as a l Pack the computer so that it is...file. l Shut down your computer to the computer and store them in loss of data. l Protect the computer, the batteries, and the hard drive from the keyboard and palm rest and close the display. l Consider changing your car or in the trunk of the countries you are traveling...


