3048 Owners Manual
Page 9
... Instructions Use the following safety guidelines to ground the system board. Before Working Inside Your Computer CAUTION: To avoid damaging the components and cards, handle them by their electrical outlets. 4 Disconnect all cables such as keyboard, mouse, monitor, and so on a flat, soft and clean surface to open applications. 2 Shut down . - CAUTION: Place the computer on , from your computer. 6 Remove any media card and optical disc...
... Instructions Use the following safety guidelines to ground the system board. Before Working Inside Your Computer CAUTION: To avoid damaging the components and cards, handle them by their electrical outlets. 4 Disconnect all cables such as keyboard, mouse, monitor, and so on a flat, soft and clean surface to open applications. 2 Shut down . - CAUTION: Place the computer on , from your computer. 6 Remove any media card and optical disc...
3048 Owners Manual
Page 10
... connector pins. CAUTION: To avoid damaging the components and cards, handle them evenly aligned to the power source. CAUTION: Only a certified service technician is flat and clean. WARNING: Disconnect all covers, panels, and screws before opening the computer cover or panels. CAUTION: To avoid damaging the computer, make sure that the ports and connectors are correctly oriented and aligned. When connecting cables, make sure that the work...
... connector pins. CAUTION: To avoid damaging the components and cards, handle them evenly aligned to the power source. CAUTION: Only a certified service technician is flat and clean. WARNING: Disconnect all covers, panels, and screws before opening the computer cover or panels. CAUTION: To avoid damaging the computer, make sure that the ports and connectors are correctly oriented and aligned. When connecting cables, make sure that the work...

3048 Owners Manual
Page 12
After Working Inside Your Computer CAUTION: Leaving stray or loose screws inside your computer may severely damage your computer. 1 Replace all screws and make sure that no stray screws remain inside your computer. 2 Connect any external devices, peripherals, and cables you removed before working on your computer. 3 Replace any media cards, discs, and any other part(s) that you removed before working on your computer. 4 Connect your computer and all attached devices to their electrical outlets. 5 Turn on your computer. 12
After Working Inside Your Computer CAUTION: Leaving stray or loose screws inside your computer may severely damage your computer. 1 Replace all screws and make sure that no stray screws remain inside your computer. 2 Connect any external devices, peripherals, and cables you removed before working on your computer. 3 Replace any media cards, discs, and any other part(s) that you removed before working on your computer. 4 Connect your computer and all attached devices to their electrical outlets. 5 Turn on your computer. 12
3048 Owners Manual
Page 14
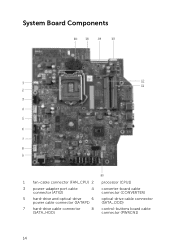
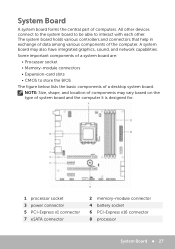
System Board Components 1 fan-cable connector (FAN_CPU) 2 processor (CPU1) 3 power-adapter port cable connector (ATX2) 4 converter-board cable connector (CONVERTER) 5 hard-drive and optical-drive 6 optical-drive cable connector power cable connector (SATAP1) (SATA_ODD) 7 hard-drive cable connector (SATA_HDD) 8 control-buttons board cable connector (PWRCN1) 14
System Board Components 1 fan-cable connector (FAN_CPU) 2 processor (CPU1) 3 power-adapter port cable connector (ATX2) 4 converter-board cable connector (CONVERTER) 5 hard-drive and optical-drive 6 optical-drive cable connector power cable connector (SATAP1) (SATA_ODD) 7 hard-drive cable connector (SATA_HDD) 8 control-buttons board cable connector (PWRCN1) 14
3048 Owners Manual
Page 25
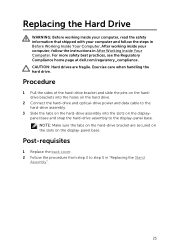
... After Working Inside Your Computer. Replacing the Hard Drive WARNING: Before working inside your computer, read the safety information that shipped with your computer, follow the steps in Before Working Inside Your Computer. Procedure 1 Pull the sides of the hard-drive bracket and slide the pins on the harddrive brackets into the holes on the hard drive. 2 Connect the hard-drive and optical-drive power and data cable to the display-panel base. Exercise...
... After Working Inside Your Computer. Replacing the Hard Drive WARNING: Before working inside your computer, read the safety information that shipped with your computer, follow the steps in Before Working Inside Your Computer. Procedure 1 Pull the sides of the hard-drive bracket and slide the pins on the harddrive brackets into the holes on the hard drive. 2 Connect the hard-drive and optical-drive power and data cable to the display-panel base. Exercise...
3048 Owners Manual
Page 72
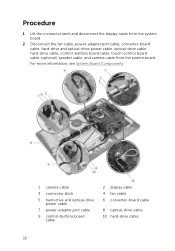
... cable 3 connector latch 5 hard-drive and optical-drive power cable 7 power-adapter port cable 9 control-buttons board cable 2 display cable 4 fan cable 6 converter-board cable 8 optical-drive cable 10 hard-drive cable 72 Procedure 1 Lift the connector latch and disconnect the display cable from the system board. 2 Disconnect the fan cable, power-adapter port cable, converter-board cable, hard-drive and optical-drive power cable, optical-drive cable, hard-drive cable, control-buttons board cable, touch-control board cable (optional), speaker cable, and camera cable from the system board...
... cable 3 connector latch 5 hard-drive and optical-drive power cable 7 power-adapter port cable 9 control-buttons board cable 2 display cable 4 fan cable 6 converter-board cable 8 optical-drive cable 10 hard-drive cable 72 Procedure 1 Lift the connector latch and disconnect the display cable from the system board. 2 Disconnect the fan cable, power-adapter port cable, converter-board cable, hard-drive and optical-drive power cable, optical-drive cable, hard-drive cable, control-buttons board cable, touch-control board cable (optional), speaker cable, and camera cable from the system board...
3048 Owners Manual
Page 74
..., follow the steps in Before Working Inside Your Computer. After working inside your computer and follow the instructions in After Working Inside Your Computer. Replacing the System Board WARNING: Before working inside your computer, read the safety information that secure the system board to the display-panel base. 3 Connect the fan cable, power-adapter port cable, converter-board cable, hard-drive and optical-drive power cable, optical-drive cable, hard-drive cable, control-buttons board cable, touch-control board cable (optional), speaker cable, and camera cable to the system...
..., follow the steps in Before Working Inside Your Computer. After working inside your computer and follow the instructions in After Working Inside Your Computer. Replacing the System Board WARNING: Before working inside your computer, read the safety information that secure the system board to the display-panel base. 3 Connect the fan cable, power-adapter port cable, converter-board cable, hard-drive and optical-drive power cable, optical-drive cable, hard-drive cable, control-buttons board cable, touch-control board cable (optional), speaker cable, and camera cable to the system...
3048 Specifications
Page 14
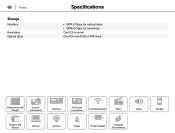
Views Storage Interface Hard drive Optical drive Specifications • SATA 3 Gbps for optical drive • SATA 6 Gbps for hard drive One 2.5-in drive One 9.5-mm DVD+/-RW drive Dimensions and Weight System Information Memory Ports and Connectors Communications Video Audio Media-Card Reader Display Camera Stand Power Adapter Computer Environment Storage
Views Storage Interface Hard drive Optical drive Specifications • SATA 3 Gbps for optical drive • SATA 6 Gbps for hard drive One 2.5-in drive One 9.5-mm DVD+/-RW drive Dimensions and Weight System Information Memory Ports and Connectors Communications Video Audio Media-Card Reader Display Camera Stand Power Adapter Computer Environment Storage
3048 Me and My Dell
Page 23
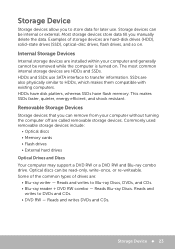
... Discs, DVDs, and CDs. • Blu-ray reader + DVD RW combo - This makes SSDs faster, quieter, energy efficient, and shock resistant. Reads and writes to DVDs and CDs. • DVD RW - HDDs have disk platters, whereas SSDs have flash memory. Commonly used removable storage devices include: • Optical discs • Memory cards • Flash drives • External hard drives Optical Drives and Discs Your computer may support a DVD RW or a DVD RW and Blu-ray combo drive. The most common internal...
... Discs, DVDs, and CDs. • Blu-ray reader + DVD RW combo - This makes SSDs faster, quieter, energy efficient, and shock resistant. Reads and writes to DVDs and CDs. • DVD RW - HDDs have disk platters, whereas SSDs have flash memory. Commonly used removable storage devices include: • Optical discs • Memory cards • Flash drives • External hard drives Optical Drives and Discs Your computer may support a DVD RW or a DVD RW and Blu-ray combo drive. The most common internal...
3048 Me and My Dell
Page 27
... may also have integrated graphics, sound, and network capabilities. Some important components of a system board are: • Processor socket • Memory-module connectors • Expansion‑card slots • CMOS to interact with each other. System Board A system board forms the central part of a desktop system board. All other devices connect to the system board to be able to store the BIOS The figure below lists the basic components of...
... may also have integrated graphics, sound, and network capabilities. Some important components of a system board are: • Processor socket • Memory-module connectors • Expansion‑card slots • CMOS to interact with each other. System Board A system board forms the central part of a desktop system board. All other devices connect to the system board to be able to store the BIOS The figure below lists the basic components of...
3048 Me and My Dell
Page 32
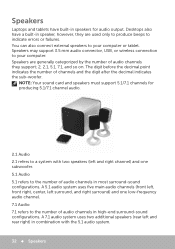
... surround-sound configurations. Speakers may support 3.5 mm audio connector, USB, or wireless connection to indicate errors or failures. The digit before the decimal point indicates the number of audio channels they are generally categorized by the number of channels and the digit after the decimal indicates the sub-woofer. A 7.1 audio system uses two additional speakers (rear left and rear right) in speakers for producing 5.1/7.1 channel audio. 2.1 Audio 2.1 refers to the number of audio channels...
... surround-sound configurations. Speakers may support 3.5 mm audio connector, USB, or wireless connection to indicate errors or failures. The digit before the decimal point indicates the number of audio channels they are generally categorized by the number of channels and the digit after the decimal indicates the sub-woofer. A 7.1 audio system uses two additional speakers (rear left and rear right) in speakers for producing 5.1/7.1 channel audio. 2.1 Audio 2.1 refers to the number of audio channels...
3048 Me and My Dell
Page 37
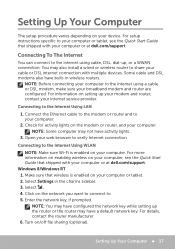
... setup instructions specific to the internet using a cable or DSL modem, make sure your broadband modem and router are configured. Connecting To The Internet You can connect to your computer or tablet, see the Quick Start Guide that shipped with your computer or at dell.com/support. NOTE: Some computer may also install a wired or wireless router to verify Internet connection. Setting Up Your Computer 37 You may not have a default network key. Open...
... setup instructions specific to the internet using a cable or DSL modem, make sure your broadband modem and router are configured. Connecting To The Internet You can connect to your computer or tablet, see the Quick Start Guide that shipped with your computer or at dell.com/support. NOTE: Some computer may also install a wired or wireless router to verify Internet connection. Setting Up Your Computer 37 You may not have a default network key. Open...
3048 Me and My Dell
Page 39
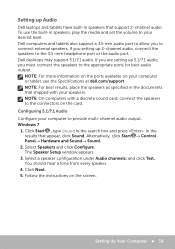
.... Alternatively, click Start → Control Panel→ Hardware and Sound→ Sound. 2. Select Speakers and click Configure. Dell desktops may support 5.1/7.1 audio. Click Start , type Sound in speakers, play the media and set the volume to connect external speakers. NOTE: For best results, place the speakers as specified in speakers that shipped with a discrete sound card, connect the speakers to the connectors on the screen. The Speaker Setup window appears. 3. Click Next. 5. If you are setting up 5.1/7.1 audio, you setting up Audio Dell laptops and tablets...
.... Alternatively, click Start → Control Panel→ Hardware and Sound→ Sound. 2. Select Speakers and click Configure. Dell desktops may support 5.1/7.1 audio. Click Start , type Sound in speakers, play the media and set the volume to connect external speakers. NOTE: For best results, place the speakers as specified in speakers that shipped with a discrete sound card, connect the speakers to the connectors on the screen. The Speaker Setup window appears. 3. Click Next. 5. If you are setting up 5.1/7.1 audio, you setting up Audio Dell laptops and tablets...

3048 Me and My Dell
Page 42
... using the USB cable before performing these steps. If you are installing a wireless printer, follow the instruction on the screen. Select your printer. 42 Setting Up Your Computer For more information on the printer model. Click Add a Printer. NOTE: You may be prompted to install may also support Wi-Fi and Bluetooth connection. Windows 8 1. For more information, see the documentation of the device list. The Add...
... using the USB cable before performing these steps. If you are installing a wireless printer, follow the instruction on the screen. Select your printer. 42 Setting Up Your Computer For more information on the printer model. Click Add a Printer. NOTE: You may be prompted to install may also support Wi-Fi and Bluetooth connection. Windows 8 1. For more information, see the documentation of the device list. The Add...
3048 Me and My Dell
Page 43
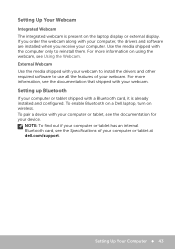
... device. To pair a device with a Bluetooth card, it is present on wireless. Setting Up Your Webcam Integrated Webcam The integrated webcam is already installed and configured. For more information, see Using the Webcam. For more information on using the webcam, see the documentation that shipped with your webcam. External Webcam Use the media shipped with your webcam to install the drivers and other required software...
... device. To pair a device with a Bluetooth card, it is present on wireless. Setting Up Your Webcam Integrated Webcam The integrated webcam is already installed and configured. For more information, see Using the Webcam. For more information on using the webcam, see the documentation that shipped with your webcam. External Webcam Use the media shipped with your webcam to install the drivers and other required software...
3048 Me and My Dell
Page 57
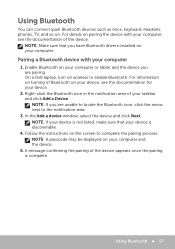
... device. Using Bluetooth 57 NOTE: Make sure that your computer 1. For information on turning of Bluetooth on the screen to enable Bluetooth. Enable Bluetooth on your computer, see the documentation for your computer or tablet and the device you are unable to locate the Bluetooth icon, click the arrow next to the notification area. 3. In the Add a device window, select the device...
... device. Using Bluetooth 57 NOTE: Make sure that your computer 1. For information on turning of Bluetooth on the screen to enable Bluetooth. Enable Bluetooth on your computer, see the documentation for your computer or tablet and the device you are unable to locate the Bluetooth icon, click the arrow next to the notification area. 3. In the Add a device window, select the device...
3048 Me and My Dell
Page 70
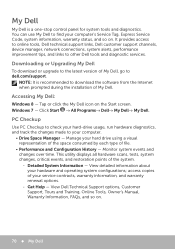
... - View Dell Technical Support options, Customer Support, Tours and Training, Online Tools, Owner's Manual, Warranty Information, FAQs, and so on the Start screen. NOTE: It is a one-stop control panel for system tools and diagnostics. PC Checkup Use PC Checkup to check your hard‑drive usage, run hardware diagnostics, and track the changes made to other Dell tools and diagnostic services. Monitor system events and changes over time. access copies of My Dell. Accessing My Dell: Windows 8 - Tap...
... - View Dell Technical Support options, Customer Support, Tours and Training, Online Tools, Owner's Manual, Warranty Information, FAQs, and so on the Start screen. NOTE: It is a one-stop control panel for system tools and diagnostics. PC Checkup Use PC Checkup to check your hard‑drive usage, run hardware diagnostics, and track the changes made to other Dell tools and diagnostic services. Monitor system events and changes over time. access copies of My Dell. Accessing My Dell: Windows 8 - Tap...
3048 Me and My Dell
Page 72
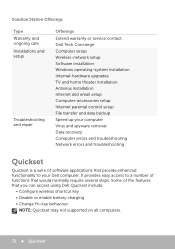
... setup Internet parental control setup File transfer and data backup Speed up your computer Virus and spyware removal Data recovery Computer errors and troubleshooting Network errors and troubleshooting Quickset Quickset is a suite of functions that would normally require several steps. Some of the features that provide enhanced functionality to a number of software applications that you can access using Dell Quickset include: • Configure wireless shortcut key • Disable or enable battery charging • Change...
... setup Internet parental control setup File transfer and data backup Speed up your computer Virus and spyware removal Data recovery Computer errors and troubleshooting Network errors and troubleshooting Quickset Quickset is a suite of functions that would normally require several steps. Some of the features that provide enhanced functionality to a number of software applications that you can access using Dell Quickset include: • Configure wireless shortcut key • Disable or enable battery charging • Change...
3048 Me and My Dell
Page 75
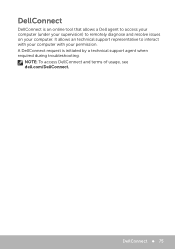
DellConnect 75 A DellConnect request is an online tool that allows a Dell agent to access your computer (under your supervision) to interact with your computer with your computer. NOTE: To access DellConnect and terms of usage, see dell.com/DellConnect. It allows an technical support representative to remotely diagnose and resolve issues on your permission. DellConnect DellConnect is initiated by a technical support agent when required during troubleshooting.
DellConnect 75 A DellConnect request is an online tool that allows a Dell agent to access your computer (under your supervision) to interact with your computer with your computer. NOTE: To access DellConnect and terms of usage, see dell.com/DellConnect. It allows an technical support representative to remotely diagnose and resolve issues on your permission. DellConnect DellConnect is initiated by a technical support agent when required during troubleshooting.
3048 Me and My Dell
Page 94
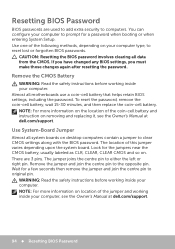
... BIOS settings, you must make those changes again after resetting the password. Remove the CMOS Battery WARNING: Read the safety instructions before working inside your computer type, to clear CMOS settings along with the BIOS password. The jumper joins the centre pin to the opposite pin. NOTE: For more information on the location of this jumper varies depending upon the system board. Use System‑Board Jumper Almost all system boards on removing and replacing it, see the Owner's Manual at dell.com/support...
... BIOS settings, you must make those changes again after resetting the password. Remove the CMOS Battery WARNING: Read the safety instructions before working inside your computer type, to clear CMOS settings along with the BIOS password. The jumper joins the centre pin to the opposite pin. NOTE: For more information on the location of this jumper varies depending upon the system board. Use System‑Board Jumper Almost all system boards on removing and replacing it, see the Owner's Manual at dell.com/support...


