Owners Manual
Page 8
Replacing the System Board 74 Procedure...74 Post-requisites 74 Removing the Camera 75 Prerequisites...75 Procedure...75 Replacing the Camera 81 Procedure...81 Post-requisites 82 Flashing the BIOS 83 Getting Help and Contacting Dell 84 Self-Help Resources 84 Contacting Dell 84
Replacing the System Board 74 Procedure...74 Post-requisites 74 Removing the Camera 75 Prerequisites...75 Procedure...75 Replacing the Camera 81 Procedure...81 Post-requisites 82 Flashing the BIOS 83 Getting Help and Contacting Dell 84 Self-Help Resources 84 Contacting Dell 84
Owners Manual
Page 62
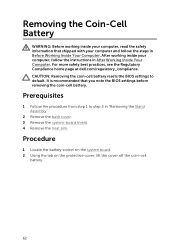
... the Coin-Cell Battery WARNING: Before working inside your computer, read the safety information that you note the BIOS settings before removing the coin-cell battery. CAUTION: Removing the coin-cell battery resets the BIOS settings to step 5 in Before Working Inside Your Computer. After working inside your computer, follow the steps... shield. 4 Remove the heat sink. Prerequisites 1 Follow the procedure from step 1 to default. For more safety best practices, see the Regulatory Compliance home page at dell.com/regulatory_compliance.
... the Coin-Cell Battery WARNING: Before working inside your computer, read the safety information that you note the BIOS settings before removing the coin-cell battery. CAUTION: Removing the coin-cell battery resets the BIOS settings to step 5 in Before Working Inside Your Computer. After working inside your computer, follow the steps... shield. 4 Remove the heat sink. Prerequisites 1 Follow the procedure from step 1 to default. For more safety best practices, see the Regulatory Compliance home page at dell.com/regulatory_compliance.
Owners Manual
Page 71
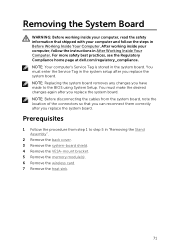
... must make the desired changes again after you replace the system board. NOTE: Before disconnecting the cables from step 1 to the BIOS using System Setup. You must enter the Service Tag in the system setup after you replace the system board. Prerequisites 1 Follow the... your computer, follow the steps in Before Working Inside Your Computer. For more safety best practices, see the Regulatory Compliance home page at dell.com/regulatory_compliance. NOTE: Your computer's Service Tag is stored in After Working Inside Your Computer. Removing the System Board WARNING: Before working ...
... must make the desired changes again after you replace the system board. NOTE: Before disconnecting the cables from step 1 to the BIOS using System Setup. You must enter the Service Tag in the system setup after you replace the system board. Prerequisites 1 Follow the... your computer, follow the steps in Before Working Inside Your Computer. For more safety best practices, see the Regulatory Compliance home page at dell.com/regulatory_compliance. NOTE: Your computer's Service Tag is stored in After Working Inside Your Computer. Removing the System Board WARNING: Before working ...
Owners Manual
Page 83
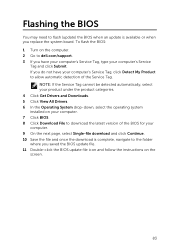
...the Operating System drop-down, select the operating system installed on the computer. 2 Go to dell.com/support. 3 If you have your computer's Service Tag, click Detect My Product to allow automatic detection of the BIOS for your computer. 9 On the next page, select Single-file download and click Continue.... download is available or when you do not have your computer's Service Tag, type your computer. 7 Click BIOS. 8 Click Download File to the folder where you saved the BIOS update file. 11 Double-click the BIOS update file icon and follow the instructions on the screen. 83 To flash the...
...the Operating System drop-down, select the operating system installed on the computer. 2 Go to dell.com/support. 3 If you have your computer's Service Tag, click Detect My Product to allow automatic detection of the BIOS for your computer. 9 On the next page, select Single-file download and click Continue.... download is available or when you do not have your computer's Service Tag, type your computer. 7 Click BIOS. 8 Click Download File to the folder where you saved the BIOS update file. 11 Double-click the BIOS update file icon and follow the instructions on the screen. 83 To flash the...
Me and My Dell
Page 4
Setting Up Your Webcam 22 Integrated Webcam 22 External Webcam 22 Setting up Bluetooth 22 About Your Computer 23 Power Adapter 23 Battery 24 Coin-Cell Battery 24 Touchpad 25 Display 25 Touchscreen 25 3D 25 3D Camera 26 Keyboard 26 Physical Keyboard 27 Keyboard Backlight 27 On-Screen Keyboard 28 Keyboard Connection Types 28 Wired 28 Wireless 28 Service Tag and Express-Service Code 29 Locating the Label on Your Computer 29 Dell Support Website 29 BIOS Setup Program 29 4 Contents
Setting Up Your Webcam 22 Integrated Webcam 22 External Webcam 22 Setting up Bluetooth 22 About Your Computer 23 Power Adapter 23 Battery 24 Coin-Cell Battery 24 Touchpad 25 Display 25 Touchscreen 25 3D 25 3D Camera 26 Keyboard 26 Physical Keyboard 27 Keyboard Backlight 27 On-Screen Keyboard 28 Keyboard Connection Types 28 Wired 28 Wireless 28 Service Tag and Express-Service Code 29 Locating the Label on Your Computer 29 Dell Support Website 29 BIOS Setup Program 29 4 Contents
Me and My Dell
Page 10
Troubleshooting 85 Basic Troubleshooting Steps 85 Diagnostics 85 Pre-Boot System Assessment 85 Invoking PSA 85 Enhanced PSA 86 LCD BIST 87 Starting LCD BIST 87 Invoking ePSA 88 Beep Codes 89 BIOS 90 Changing BIOS Settings 90 Entering BIOS Setup Program 90 Resetting BIOS Password 91 Remove the CMOS Battery 91 Use System‑Board Jumper 91 Changing the Boot Sequence 92 Using Boot Menu 92 Using BIOS Setup Program 92 Getting Help and Contacting Dell 93 Getting Help 93 Contacting Dell 93 10 Contents
Troubleshooting 85 Basic Troubleshooting Steps 85 Diagnostics 85 Pre-Boot System Assessment 85 Invoking PSA 85 Enhanced PSA 86 LCD BIST 87 Starting LCD BIST 87 Invoking ePSA 88 Beep Codes 89 BIOS 90 Changing BIOS Settings 90 Entering BIOS Setup Program 90 Resetting BIOS Password 91 Remove the CMOS Battery 91 Use System‑Board Jumper 91 Changing the Boot Sequence 92 Using Boot Menu 92 Using BIOS Setup Program 92 Getting Help and Contacting Dell 93 Getting Help 93 Contacting Dell 93 10 Contents
Me and My Dell
Page 29
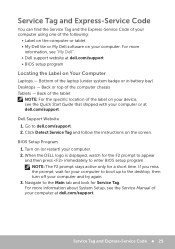
... using one of the following: • Label on the computer or tablet • My Dell tile or My Dell software on Your Computer Laptops - Bottom of the computer chassis Tablets - Dell Support Website 1. BIOS Setup Program 1. NOTE: The F2 prompt stays active only for Service Tag. For more information... Code 29 For more information about System Setup, see the Quick Start Guide that shipped with your computer or at dell.com/support • BIOS setup program Locating the Label on your computer. Back or top of the laptop (under system badge or in battery bay) Desktops...
... using one of the following: • Label on the computer or tablet • My Dell tile or My Dell software on Your Computer Laptops - Bottom of the computer chassis Tablets - Dell Support Website 1. BIOS Setup Program 1. NOTE: The F2 prompt stays active only for Service Tag. For more information... Code 29 For more information about System Setup, see the Quick Start Guide that shipped with your computer or at dell.com/support • BIOS setup program Locating the Label on your computer. Back or top of the laptop (under system badge or in battery bay) Desktops...
Me and My Dell
Page 34
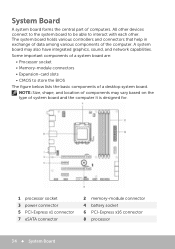
All other devices connect to the system board to be able to store the BIOS The figure below lists the basic components of a desktop system board. The system board holds various controllers and connectors that help in exchange of data ...
All other devices connect to the system board to be able to store the BIOS The figure below lists the basic components of a desktop system board. The system board holds various controllers and connectors that help in exchange of data ...
Me and My Dell
Page 37
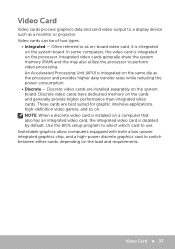
... may also utilize the processor to use. Often referred to as a monitor or projector. These cards are installed separately on the system board. Use the BIOS setup program to select which card to perform video processing. Video cards can be of two types: • Integrated - In some computers, the video card...
... may also utilize the processor to use. Often referred to as a monitor or projector. These cards are installed separately on the system board. Use the BIOS setup program to select which card to perform video processing. Video cards can be of two types: • Integrated - In some computers, the video card...

Me and My Dell
Page 44
... (not on an integrated display. Allow the battery to charge the battery. Keyboard Shortcuts Some keys on improving the battery life of the key using BIOS setup program or using keyboard shortcuts. and up-arrow key and down for it from overcharging. NOTE: If the battery becomes too hot due to...
... (not on an integrated display. Allow the battery to charge the battery. Keyboard Shortcuts Some keys on improving the battery life of the key using BIOS setup program or using keyboard shortcuts. and up-arrow key and down for it from overcharging. NOTE: If the battery becomes too hot due to...
Me and My Dell
Page 61
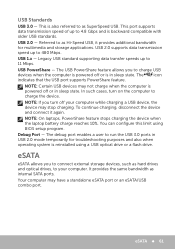
... again. NOTE: If you to connect external storage devices, such as internal SATA ports. Your computer may not charge when the computer is reinstalled using BIOS setup program. USB Standards USB 3.0 - This is also referred to 4.8 Gbps and is in sleep state. This port supports data transmission speed of up to...
... again. NOTE: If you to connect external storage devices, such as internal SATA ports. Your computer may not charge when the computer is reinstalled using BIOS setup program. USB Standards USB 3.0 - This is also referred to 4.8 Gbps and is in sleep state. This port supports data transmission speed of up to...
Me and My Dell
Page 66
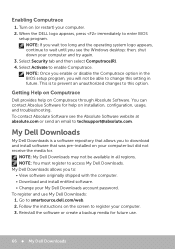
... on (or restart) your computer and try again. 3. Follow the instructions on Computrace through Absolute Software. When the DELL logo appears, press immediately to access My Dell Downloads. NOTE: You must register to enter BIOS setup program. Enabling Computrace 1. You can contact Absolue Software for . To contact Absolute Software see the Windows desktop...
... on (or restart) your computer and try again. 3. Follow the instructions on Computrace through Absolute Software. When the DELL logo appears, press immediately to access My Dell Downloads. NOTE: You must register to enter BIOS setup program. Enabling Computrace 1. You can contact Absolue Software for . To contact Absolute Software see the Windows desktop...
Me and My Dell
Page 89
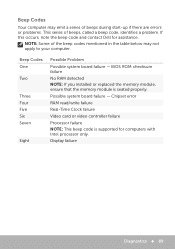
...Video card or video controller failure Processor failure NOTE: This beep code is seated properly. If this occurs, note the beep code and contact Dell for computers with Intel processor only. NOTE: Some of beeps, called a beep code, identifies a problem. Beep Codes One Two Three ...Four Five Six Seven Eight Possible Problem Possible system board failure - BIOS ROM checksum failure No RAM detected NOTE: If you installed or replaced the memory module, ensure that the memory module is supported for assistance. ...
...Video card or video controller failure Processor failure NOTE: This beep code is seated properly. If this occurs, note the beep code and contact Dell for computers with Intel processor only. NOTE: Some of beeps, called a beep code, identifies a problem. Beep Codes One Two Three ...Four Five Six Seven Eight Possible Problem Possible system board failure - BIOS ROM checksum failure No RAM detected NOTE: If you installed or replaced the memory module, ensure that the memory module is supported for assistance. ...
Me and My Dell
Page 90
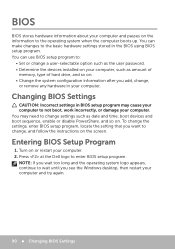
... program, locate the setting that you add, change, or remove any hardware in the BIOS using BIOS setup program. BIOS BIOS stores hardware information about your computer and try again. 90 Changing BIOS Settings NOTE: If you wait too long and the operating system logo appears, continue to not boot, work...screen. You may cause your computer to wait until you see the Windows desktop, then restart your computer and passes on . Entering BIOS Setup Program 1. Press at the Dell logo to : • Set or change , and follow the instructions on your computer. You can use...
... program, locate the setting that you add, change, or remove any hardware in the BIOS using BIOS setup program. BIOS BIOS stores hardware information about your computer and try again. 90 Changing BIOS Settings NOTE: If you wait too long and the operating system logo appears, continue to not boot, work...screen. You may cause your computer to wait until you see the Windows desktop, then restart your computer and passes on . Entering BIOS Setup Program 1. Press at the Dell logo to : • Set or change , and follow the instructions on your computer. You can use...
Me and My Dell
Page 91
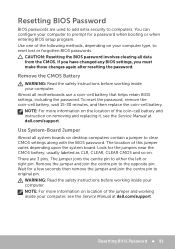
... pin to original pin. NOTE: For more information on removing and replacing it, see the Service Manual at dell.com/support. If you have changed any BIOS settings, you must make those changes again after resetting the password. Wait for a few seconds then remove the...your computer, see the Service Manual at dell.com/support. CAUTION: Resetting the BIOS password involves clearing all motherboards use a coin‑cell battery that helps retain BIOS settings, including the password. Look for a password when booting or when entering BIOS setup program. WARNING: Read the safety ...
... pin to original pin. NOTE: For more information on removing and replacing it, see the Service Manual at dell.com/support. If you have changed any BIOS settings, you must make those changes again after resetting the password. Wait for a few seconds then remove the...your computer, see the Service Manual at dell.com/support. CAUTION: Resetting the BIOS password involves clearing all motherboards use a coin‑cell battery that helps retain BIOS settings, including the password. Look for a password when booting or when entering BIOS setup program. WARNING: Read the safety ...
Me and My Dell
Page 92
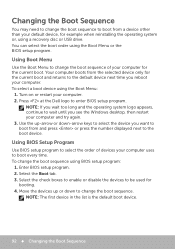
... returns to select the order of your default device, for booting. 4. Select the check boxes to enable or disable the devices to enter BIOS setup program. Changing the Boot Sequence You may need to change the boot sequence to boot from a device other than your computer for the...time. You can select the boot order using the Boot Menu: 1. Press at the Dell logo to be used for example when reinstalling the operating system or, using BIOS setup program: 1. Using BIOS Setup Program Use BIOS setup program to the default device next time you see the Windows desktop, then restart...
... returns to select the order of your default device, for booting. 4. Select the check boxes to enable or disable the devices to enter BIOS setup program. Changing the Boot Sequence You may need to change the boot sequence to boot from a device other than your computer for the...time. You can select the boot order using the Boot Menu: 1. Press at the Dell logo to be used for example when reinstalling the operating system or, using BIOS setup program: 1. Using BIOS Setup Program Use BIOS setup program to the default device next time you see the Windows desktop, then restart...
Me and My Dell
Page 94
...air vents. • Back up your data regularly. • Perform a virus scan regularly. • Check your computer for errors using My Dell and other tools available on your computer. • Clean your computer by regulating power supply to address software issues and improve computer security. Not ... using a soft, dry cloth. Sleep is recommended that there is enough free space on your computer. 94 Computer Maintenance The BIOS setup program and the operating system allow dust to certain components should be reduced or cut off your hard disk, and then turns off ...
...air vents. • Back up your data regularly. • Perform a virus scan regularly. • Check your computer for errors using My Dell and other tools available on your computer. • Clean your computer by regulating power supply to address software issues and improve computer security. Not ... using a soft, dry cloth. Sleep is recommended that there is enough free space on your computer. 94 Computer Maintenance The BIOS setup program and the operating system allow dust to certain components should be reduced or cut off your hard disk, and then turns off ...


