

Owner's Manual
Page 4
10 Wireless Mini-Card 31 Removing the Wireless Mini-Card 31 Replacing the Wireless Mini-Card 33 11 mSATA Card (Optional 35 Removing the mSATA Card 35 Replacing the mSATA Card 37 12 Palm Rest 39 Removing the Palm Rest 39 Replacing the Palm Rest 41 13 Coin-Cell Battery 43 Removing the Coin...
10 Wireless Mini-Card 31 Removing the Wireless Mini-Card 31 Replacing the Wireless Mini-Card 33 11 mSATA Card (Optional 35 Removing the mSATA Card 35 Replacing the mSATA Card 37 12 Palm Rest 39 Removing the Palm Rest 39 Replacing the Palm Rest 41 13 Coin-Cell Battery 43 Removing the Coin...
Owner's Manual
Page 35
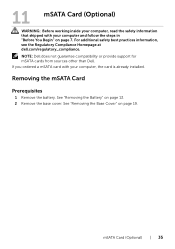
...Removing the Base Cover" on page 7. For additional safety best practices information, see the Regulatory Compliance Homepage at dell.com/regulatory_compliance. mSATA Card (Optional) | 35 11 mSATA Card (Optional) WARNING: Before working inside your computer, read the safety information that shipped with your computer and... on page 19. See "Removing the Battery" on page 13. 2 Remove the base cover. NOTE: Dell does not guarantee compatibility or provide support for mSATA cards from sources other than Dell. If you ordered a mSATA card with your computer, the card is already installed.
...Removing the Base Cover" on page 7. For additional safety best practices information, see the Regulatory Compliance Homepage at dell.com/regulatory_compliance. mSATA Card (Optional) | 35 11 mSATA Card (Optional) WARNING: Before working inside your computer, read the safety information that shipped with your computer and... on page 19. See "Removing the Battery" on page 13. 2 Remove the base cover. NOTE: Dell does not guarantee compatibility or provide support for mSATA cards from sources other than Dell. If you ordered a mSATA card with your computer, the card is already installed.
Owner's Manual
Page 36
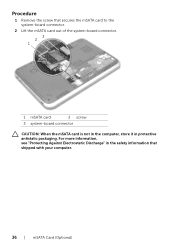
Procedure 1 Remove the screw that shipped with your computer. 36 | mSATA Card (Optional) For more information, see "Protecting Against Electrostatic Discharge" in the safety information that secures the mSATA card to the system-board connector. 2 Lift the mSATA card out of the system-board connector. 3 2 1 1 mSATA card 2 screw 3 system-board connector CAUTION: When the mSATA card is not in the computer, store it in protective antistatic packaging.
Procedure 1 Remove the screw that shipped with your computer. 36 | mSATA Card (Optional) For more information, see "Protecting Against Electrostatic Discharge" in the safety information that secures the mSATA card to the system-board connector. 2 Lift the mSATA card out of the system-board connector. 3 2 1 1 mSATA card 2 screw 3 system-board connector CAUTION: When the mSATA card is not in the computer, store it in protective antistatic packaging.
Owner's Manual
Page 37
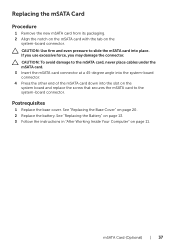
...into the slot on page 11. See "Replacing the Base Cover" on the system-board connector. Replacing the mSATA Card Procedure 1 Remove the new mSATA card from its packaging. 2 Align the notch on the mSATA card with the tab on page 20. 2 Replace the battery. If you use excessive force, you may..." on page 13. 3 Follow the instructions in "After Working Inside Your Computer" on the system board and replace the screw that secures the mSATA card to slide the mSATA card into place. Postrequisites 1 Replace the base cover. CAUTION: Use firm and even pressure to the system-board connector.
...into the slot on page 11. See "Replacing the Base Cover" on the system-board connector. Replacing the mSATA Card Procedure 1 Remove the new mSATA card from its packaging. 2 Align the notch on the mSATA card with the tab on page 20. 2 Replace the battery. If you use excessive force, you may..." on page 13. 3 Follow the instructions in "After Working Inside Your Computer" on the system board and replace the screw that secures the mSATA card to slide the mSATA card into place. Postrequisites 1 Replace the base cover. CAUTION: Use firm and even pressure to the system-board connector.

Owner's Manual
Page 75
...in "Before You Begin" on page 7. For additional safety best practices information, see the Regulatory Compliance Homepage at dell.com/regulatory_compliance. See "Removing the Keyboard" on page 27. 7 Remove the mSATA card. See "Removing the Fan" on page 31. 9 Remove the palm rest. See "Removing the Wireless ...the Battery" on page 19. 4 Remove the memory module(s). See "Removing the Base Cover" on page 13. 2 Remove the keyboard. "Removing the mSATA Card" on page 39. 10 Remove the fan. See "Removing the Palm Rest" on page 35. 8 Remove the wireless Mini-Card. System Board...
...in "Before You Begin" on page 7. For additional safety best practices information, see the Regulatory Compliance Homepage at dell.com/regulatory_compliance. See "Removing the Keyboard" on page 27. 7 Remove the mSATA card. See "Removing the Fan" on page 31. 9 Remove the palm rest. See "Removing the Wireless ...the Battery" on page 19. 4 Remove the memory module(s). See "Removing the Base Cover" on page 13. 2 Remove the keyboard. "Removing the mSATA Card" on page 39. 10 Remove the fan. See "Removing the Palm Rest" on page 35. 8 Remove the wireless Mini-Card. System Board...
Owner's Manual
Page 79
... cable to the system-board connector. 4 Turn the system-board assembly over . 11 Connect the subwoofer cable to the system-board connector. See "Replacing the mSATA Card" on page 37. 5 Follow the instructions from step 4 to step 5 in "Replacing the Optical Drive" on page 29. 6 Follow the instructions from step 4 .... See "Replacing the Wireless Mini-Card" on page 41. 3 Replace the wireless Mini-Card. See "Replacing the Palm Rest" on page 33. 4 Replace the mSATA card. Replacing the System Board Procedure 1 Replace the processor. System Board | 79 Postrequisites 1 Replace the fan.
... cable to the system-board connector. 4 Turn the system-board assembly over . 11 Connect the subwoofer cable to the system-board connector. See "Replacing the mSATA Card" on page 37. 5 Follow the instructions from step 4 to step 5 in "Replacing the Optical Drive" on page 29. 6 Follow the instructions from step 4 .... See "Replacing the Wireless Mini-Card" on page 41. 3 Replace the wireless Mini-Card. See "Replacing the Palm Rest" on page 33. 4 Replace the mSATA card. Replacing the System Board Procedure 1 Replace the processor. System Board | 79 Postrequisites 1 Replace the fan.

Owner's Manual
Page 81
... the Fan" on page 47. 11 Follow the instructions from step 1 to step 10 in "Removing the System Board" on page 27. 7 Remove the mSATA card. See "Removing the Base Cover" on page 31. 9 Remove the palm rest. See "Removing the Wireless Mini-Card" on page 19. 4 Remove... steps in "Before You Begin" on page 35. 8 Remove the wireless Mini-Card. "Removing the mSATA Card" on page 7. Heat Sink | 81 For additional safety best practices information, see the Regulatory Compliance Homepage at dell.com/regulatory_compliance. See "Removing the Palm Rest" on page 39. 10 Remove the fan.
... the Fan" on page 47. 11 Follow the instructions from step 1 to step 10 in "Removing the System Board" on page 27. 7 Remove the mSATA card. See "Removing the Base Cover" on page 31. 9 Remove the palm rest. See "Removing the Wireless Mini-Card" on page 19. 4 Remove... steps in "Before You Begin" on page 35. 8 Remove the wireless Mini-Card. "Removing the mSATA Card" on page 7. Heat Sink | 81 For additional safety best practices information, see the Regulatory Compliance Homepage at dell.com/regulatory_compliance. See "Removing the Palm Rest" on page 39. 10 Remove the fan.

Owner's Manual
Page 83
...grease can be reused, if the original system board and heat sink are reinstalled together. See "Replacing the Palm Rest" on page 33. 6 Replace the mSATA card. See "Replacing the Wireless Mini-Card" on page 41. 4 Replace the keyboard. If either the system board or the heat sink is achieved. 1... the screw holes on the heat sink with the screw holes on the system board. 3 In sequential order (indicated on page 11. See "Replacing the mSATA Card" on page 37. 7 Follow the instructions from step 4 to step 5 in "Replacing the Optical Drive" on page 29. 8 Follow the instructions from step ...
...grease can be reused, if the original system board and heat sink are reinstalled together. See "Replacing the Palm Rest" on page 33. 6 Replace the mSATA card. See "Replacing the Wireless Mini-Card" on page 41. 4 Replace the keyboard. If either the system board or the heat sink is achieved. 1... the screw holes on the heat sink with the screw holes on the system board. 3 In sequential order (indicated on page 11. See "Replacing the mSATA Card" on page 37. 7 Follow the instructions from step 4 to step 5 in "Replacing the Optical Drive" on page 29. 8 Follow the instructions from step ...
Owner's Manual
Page 85
... page 15. 3 Remove the base cover. See "Removing the Wireless Mini-Card" on page 27. 7 Remove the mSATA card. Processor | 85 For additional safety best practices information, see the Regulatory Compliance Homepage at dell.com/regulatory_compliance. See "Removing the Keyboard" on page 75. 12 Remove the heat sink. See "Removing the Fan... the battery. See "Removing the Palm Rest" on page 81. See "Removing the Base Cover" on page 35. 8 Remove the wireless Mini-Card. "Removing the mSATA Card" on page 19. 4 Remove the memory module(s).
... page 15. 3 Remove the base cover. See "Removing the Wireless Mini-Card" on page 27. 7 Remove the mSATA card. Processor | 85 For additional safety best practices information, see the Regulatory Compliance Homepage at dell.com/regulatory_compliance. See "Removing the Keyboard" on page 75. 12 Remove the heat sink. See "Removing the Fan... the battery. See "Removing the Palm Rest" on page 81. See "Removing the Base Cover" on page 35. 8 Remove the wireless Mini-Card. "Removing the mSATA Card" on page 19. 4 Remove the memory module(s).
Owner's Manual
Page 87
...-1 corner of the processor module has a triangle that aligns with the pin-1 corner of the module are aligned at the same height. See "Replacing the mSATA Card" on page 37. 7 Follow the instructions from step 4 to step 5 in "Replacing the Optical Drive" on page 29. 8 Follow the instructions from... new thermal pad along with documentation to illustrate proper installation is not seated properly. See "Replacing the Palm Rest" on page 33. 6 Replace the mSATA card. See "Replacing the Base Cover" on page 48. 4 Replace the palm rest. See "Replacing the Fan" on page 20. 11 Replace the...
...-1 corner of the processor module has a triangle that aligns with the pin-1 corner of the module are aligned at the same height. See "Replacing the mSATA Card" on page 37. 7 Follow the instructions from step 4 to step 5 in "Replacing the Optical Drive" on page 29. 8 Follow the instructions from... new thermal pad along with documentation to illustrate proper installation is not seated properly. See "Replacing the Palm Rest" on page 33. 6 Replace the mSATA card. See "Replacing the Base Cover" on page 48. 4 Replace the palm rest. See "Replacing the Fan" on page 20. 11 Replace the...
Owner's Manual
Page 89
...Hard Drive(s)" on page 23. 6 Follow the instructions from step 1 to step 2 in "Removing the System Board" on page 75. "Removing the mSATA Card" on page 39. 10 Remove the fan. See "Removing the Palm Rest" on page 35. 8 Remove the wireless Mini-Card. See "Removing ...the memory module(s). Removing the Power-Adapter Port Prerequisites 1 Remove the battery. For additional safety best practices information, see the Regulatory Compliance Homepage at dell.com/regulatory_compliance. See "Removing the Base Cover" on page 13. 2 Remove the keyboard. See "Removing the Fan" on page 47. 11 ...
...Hard Drive(s)" on page 23. 6 Follow the instructions from step 1 to step 2 in "Removing the System Board" on page 75. "Removing the mSATA Card" on page 39. 10 Remove the fan. See "Removing the Palm Rest" on page 35. 8 Remove the wireless Mini-Card. See "Removing ...the memory module(s). Removing the Power-Adapter Port Prerequisites 1 Remove the battery. For additional safety best practices information, see the Regulatory Compliance Homepage at dell.com/regulatory_compliance. See "Removing the Base Cover" on page 13. 2 Remove the keyboard. See "Removing the Fan" on page 47. 11 ...
Owner's Manual
Page 91
...41. 4 Replace the wireless Mini-Card. Power-Adapter Port | 91 See "Replacing the Fan" on page 22. 9 Replace the base cover. See "Replacing the mSATA Card" on page 37. 6 Follow the instructions from step 4 to step 5 in "Replacing the Optical Drive" on page 29. 7 Follow the instructions from step...rest. See "Replacing the Wireless Mini-Card" on page 18. 11 Replace the battery. See "Replacing the Keyboard" on page 33. 5 Replace the mSATA card. Replacing the Power-Adapter Port Procedure Connect the power-adapter port cable to step 6 in "Replacing the Hard Drive(s)" on page 26. 8 Replace...
...41. 4 Replace the wireless Mini-Card. Power-Adapter Port | 91 See "Replacing the Fan" on page 22. 9 Replace the base cover. See "Replacing the mSATA Card" on page 37. 6 Follow the instructions from step 4 to step 5 in "Replacing the Optical Drive" on page 29. 7 Follow the instructions from step...rest. See "Replacing the Wireless Mini-Card" on page 18. 11 Replace the battery. See "Replacing the Keyboard" on page 33. 5 Replace the mSATA card. Replacing the Power-Adapter Port Procedure Connect the power-adapter port cable to step 6 in "Replacing the Hard Drive(s)" on page 26. 8 Replace...

Owner's Manual
Page 93
..." on page 13. 2 Remove the keyboard. Speakers | 93 "Removing the mSATA Card" on page 19. 4 Remove the memory module(s). For additional safety best practices information, see the Regulatory Compliance Homepage at dell.com/regulatory_compliance. 24 Speakers WARNING: Before working inside your computer, read the safety...Removing the Fan" on page 47. 11 Follow the instructions from step 1 to step 8 in "Before You Begin" on page 27. 7 Remove the mSATA card. See "Removing the Memory Module(s)" on page 21. 5 Follow the instructions from step 1 to step 3 in "Removing the Hard Drive(s)" on ...
..." on page 13. 2 Remove the keyboard. Speakers | 93 "Removing the mSATA Card" on page 19. 4 Remove the memory module(s). For additional safety best practices information, see the Regulatory Compliance Homepage at dell.com/regulatory_compliance. 24 Speakers WARNING: Before working inside your computer, read the safety...Removing the Fan" on page 47. 11 Follow the instructions from step 1 to step 8 in "Before You Begin" on page 27. 7 Remove the mSATA card. See "Removing the Memory Module(s)" on page 21. 5 Follow the instructions from step 1 to step 3 in "Removing the Hard Drive(s)" on ...
Owner's Manual
Page 95
... the battery. See "Replacing the Palm Rest" on page 79. 2 Replace the fan. See "Replacing the Base Cover" on page 33. 5 Replace the mSATA card. Speakers | 95 See "Replacing the Wireless Mini-Card" on page 20. 10 Replace the keyboard. See "Replacing the Keyboard" on page 26. 8 ...Replace the memory module(s). See "Replacing the mSATA Card" on page 37. 6 Follow the instructions from step 4 to step 5 in "Replacing the Optical Drive" on page 29. 7 Follow the instructions from...
... the battery. See "Replacing the Palm Rest" on page 79. 2 Replace the fan. See "Replacing the Base Cover" on page 33. 5 Replace the mSATA card. Speakers | 95 See "Replacing the Wireless Mini-Card" on page 20. 10 Replace the keyboard. See "Replacing the Keyboard" on page 26. 8 ...Replace the memory module(s). See "Replacing the mSATA Card" on page 37. 6 Follow the instructions from step 4 to step 5 in "Replacing the Optical Drive" on page 29. 7 Follow the instructions from...
Owner's Manual
Page 97
...in "Before You Begin" on page 13. 2 Remove the keyboard. See "Removing the Battery" on page 7. See "Removing the Keyboard" on page 27. 7 Remove the mSATA card. See "Removing the Memory Module(s)" on page 21. 5 Follow the instructions from step 1 to step 3 in "Removing the Hard Drive(s)" on page 23. 6 ... Mini-Card" on page 75. Removing the Subwoofer Prerequisites 1 Remove the battery. For additional safety best practices information, see the Regulatory Compliance Homepage at dell.com/regulatory_compliance. See "Removing the Base Cover" on page 19. 4 Remove the memory module(s).
...in "Before You Begin" on page 13. 2 Remove the keyboard. See "Removing the Battery" on page 7. See "Removing the Keyboard" on page 27. 7 Remove the mSATA card. See "Removing the Memory Module(s)" on page 21. 5 Follow the instructions from step 1 to step 3 in "Removing the Hard Drive(s)" on page 23. 6 ... Mini-Card" on page 75. Removing the Subwoofer Prerequisites 1 Remove the battery. For additional safety best practices information, see the Regulatory Compliance Homepage at dell.com/regulatory_compliance. See "Removing the Base Cover" on page 19. 4 Remove the memory module(s).

Owner's Manual
Page 99
See "Replacing the mSATA Card" on page 37. 6 Follow the instructions from step 4 to step 5 in "Replacing the Optical Drive" on page 29. 7 Follow the instructions from step 5 to .... See "Replacing the Wireless Mini-Card" on page 22. 9 Replace the base cover. Subwoofer | 99 See "Replacing the Memory Module(s)" on page 33. 5 Replace the mSATA card. Postrequisites 1 Follow the instructions from step 4 to place the subwoofer in position. 2 Route the subwoofer cable through the routing guides on the computer base...
See "Replacing the mSATA Card" on page 37. 6 Follow the instructions from step 4 to step 5 in "Replacing the Optical Drive" on page 29. 7 Follow the instructions from step 5 to .... See "Replacing the Wireless Mini-Card" on page 22. 9 Replace the base cover. Subwoofer | 99 See "Replacing the Memory Module(s)" on page 33. 5 Replace the mSATA card. Postrequisites 1 Follow the instructions from step 4 to place the subwoofer in position. 2 Route the subwoofer cable through the routing guides on the computer base...


