
Me and My Dell
Page 23
... of system board, temperature, the time for several years. Battery 23 The following activities significantly reduce the operating time of your battery: • Using optical drives. • Using wireless communications devices, ExpressCards, media cards, or USB devices. • Using high-brightness display settings, 3D screen savers, or other configuration settings and...
... of system board, temperature, the time for several years. Battery 23 The following activities significantly reduce the operating time of your battery: • Using optical drives. • Using wireless communications devices, ExpressCards, media cards, or USB devices. • Using high-brightness display settings, 3D screen savers, or other configuration settings and...
Me and My Dell
Page 36
...; Portable computers: Bottom of the portable computer • Desktop computer: Back or top of the storage devices store data till you to support.dell.com. -- Storage About Storage Devices Storage devices allow you manually delete the data. To scan for the Service Tag follow the instructions on the...access to the Internet, you can use Dell's online System Profiler to scan for later use. Service Code You can be internal or external. Storage devices can locate the Service Tag and the Express-Service Code of storage devices are hard drives, optical drives, USB memory keys, and so on ...
...; Portable computers: Bottom of the portable computer • Desktop computer: Back or top of the storage devices store data till you to support.dell.com. -- Storage About Storage Devices Storage devices allow you manually delete the data. To scan for the Service Tag follow the instructions on the...access to the Internet, you can use Dell's online System Profiler to scan for later use. Service Code You can be internal or external. Storage devices can locate the Service Tag and the Express-Service Code of storage devices are hard drives, optical drives, USB memory keys, and so on ...
Me and My Dell
Page 70
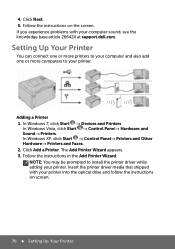
... sound, see the knowledge base article 266424 at support.dell.com. The Add Printer Wizard appears. 3. Click Next. 5. Adding a Printer 1. Click Add a Printer. NOTE: You may be prompted to your printer. Insert the printer driver media that shipped with your printer into the optical drive and follow the instructions on the screen. 4. In...
... sound, see the knowledge base article 266424 at support.dell.com. The Add Printer Wizard appears. 3. Click Next. 5. Adding a Printer 1. Click Add a Printer. NOTE: You may be prompted to your printer. Insert the printer driver media that shipped with your printer into the optical drive and follow the instructions on the screen. 4. In...
Me and My Dell
Page 71
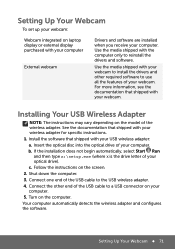
... with your wireless adapter for specific instructions. 1. b. Setting Up Your Webcam 71 Shut down the computer. 3. Insert the optical disc into the optical drive of your optical drive). If the installation does not begin automatically, select Start Run and then type x:\setup.exe (where x is the... drive letter of your computer. Setting Up Your Webcam To set up your webcam: Webcam integrated on laptop display or ...
... with your wireless adapter for specific instructions. 1. b. Setting Up Your Webcam 71 Shut down the computer. 3. Insert the optical disc into the optical drive of your optical drive). If the installation does not begin automatically, select Start Run and then type x:\setup.exe (where x is the... drive letter of your computer. Setting Up Your Webcam To set up your webcam: Webcam integrated on laptop display or ...
Me and My Dell
Page 75
...charging. Battery 75 If the battery is the time the battery can hold a charge, varies depending on how you use : • Optical drives. • Wireless communications devices, ExpressCards, media cards, or USB devices. • High-brightness display settings, 3D screen savers, or other power...Management). • Enabling the Sleep/Standby and Hibernation features of your computer's power usage (see the Article ID: 405686 at support.dell.com. Battery Charging Laptop Battery When you connect the computer with the number of times the battery is turned off. If necessary,...
...charging. Battery 75 If the battery is the time the battery can hold a charge, varies depending on how you use : • Optical drives. • Wireless communications devices, ExpressCards, media cards, or USB devices. • High-brightness display settings, 3D screen savers, or other power...Management). • Enabling the Sleep/Standby and Hibernation features of your computer's power usage (see the Article ID: 405686 at support.dell.com. Battery Charging Laptop Battery When you connect the computer with the number of times the battery is turned off. If necessary,...
Me and My Dell
Page 94
... mass storage devices, such as hard drives and optical drives, to your home theater receiver. Enables devices to the S/PDIF input on . 94 eSATA Connector eSATA Connector eSATA is a standard for special drivers or perform complicated set up by optical fiber with RCA connectors IEEE 1394 The...computer to be added and removed while the device and computer are two kinds of S/PDIF connections: • Optical - You can be extended to 100 meters or more over CAT5, fiber optic, or coaxial cables. • Easy to set -ups. • Hot pluggable - Eliminates the need ...
... mass storage devices, such as hard drives and optical drives, to your home theater receiver. Enables devices to the S/PDIF input on . 94 eSATA Connector eSATA Connector eSATA is a standard for special drivers or perform complicated set up by optical fiber with RCA connectors IEEE 1394 The...computer to be added and removed while the device and computer are two kinds of S/PDIF connections: • Optical - You can be extended to 100 meters or more over CAT5, fiber optic, or coaxial cables. • Easy to set -ups. • Hot pluggable - Eliminates the need ...
Me and My Dell
Page 131
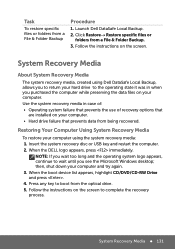
...; System Recovery Media 131 When the boot device list appears, highlight CD/DVD/CD-RW Drive and press . 4. Task To restore specific files or folders from being recovered. When the DELL logo appears, press immediately. Press any key to the operating state it was in case of: •...; Operating system failure that prevents the use of recovery options that are installed on your hard drive to boot from a File & Folder Backup. 3. Launch Dell DataSafe Local Backup. 2. Click Restore→ Restore specific files or folders from the optical drive. 5.
...; System Recovery Media 131 When the boot device list appears, highlight CD/DVD/CD-RW Drive and press . 4. Task To restore specific files or folders from being recovered. When the DELL logo appears, press immediately. Press any key to the operating state it was in case of: •...; Operating system failure that prevents the use of recovery options that are installed on your hard drive to boot from a File & Folder Backup. 3. Launch Dell DataSafe Local Backup. 2. Click Restore→ Restore specific files or folders from the optical drive. 5.
Me and My Dell
Page 147
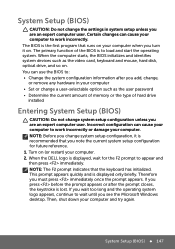
...such as the user password • Determine the current amount of memory or the type of the BIOS is displayed only briefly. When the DELL logo is the first program that runs on your computer and try again. This prompt appears quickly and is to work incorrectly. System Setup ...not change the settings in your computer • Set or change a user-selectable option such as the video card, keyboard and mouse, hard disk, optical drive, and so on. Therefore you note the current system setup configuration for the F2 prompt to work incorrectly or damage your computer. 2. If you wait...
...such as the user password • Determine the current amount of memory or the type of the BIOS is displayed only briefly. When the DELL logo is the first program that runs on your computer and try again. This prompt appears quickly and is to work incorrectly. System Setup ...not change the settings in your computer • Set or change a user-selectable option such as the video card, keyboard and mouse, hard disk, optical drive, and so on. Therefore you note the current system setup configuration for the F2 prompt to work incorrectly or damage your computer. 2. If you wait...
Me and My Dell
Page 149
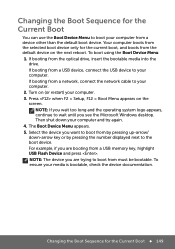
NOTE: The device you are trying to boot from the optical drive, insert the bootable media into the drive. If booting from must be bootable. Press when F2 = Setup, F12 = Boot Menu appears on (or restart) your computer. 3. To ensure your computer. Your computer ...
NOTE: The device you are trying to boot from the optical drive, insert the bootable media into the drive. If booting from must be bootable. Press when F2 = Setup, F12 = Boot Menu appears on (or restart) your computer. 3. To ensure your computer. Your computer ...

Owner's Manual
Page 3
... 19 Removing the Base Cover 19 Replacing the Base Cover 20 7 Memory Module(s 21 Removing the Memory Module(s 21 Replacing the Memory Module(s 22 8 Hard Drive(s 23 Removing the Hard Drive(s 23 Replacing the Hard Drive(s 26 9 Optical Drive 27 Removing the Optical Drive 27 Replacing the Optical Drive 29 Contents | 3
... 19 Removing the Base Cover 19 Replacing the Base Cover 20 7 Memory Module(s 21 Removing the Memory Module(s 21 Replacing the Memory Module(s 22 8 Hard Drive(s 23 Removing the Hard Drive(s 23 Replacing the Hard Drive(s 26 9 Optical Drive 27 Removing the Optical Drive 27 Replacing the Optical Drive 29 Contents | 3
Owner's Manual
Page 27
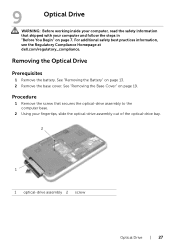
... the screw that shipped with your fingertips, slide the optical-drive assembly out of the optical-drive bay. 2 1 1 optical-drive assembly 2 screw Optical Drive | 27 See "Removing the Base Cover" on page 13. 2 Remove the base cover. For additional safety best practices information, see the Regulatory Compliance Homepage at dell.com/regulatory_compliance. See "Removing the Battery" on page 19...
... the screw that shipped with your fingertips, slide the optical-drive assembly out of the optical-drive bay. 2 1 1 optical-drive assembly 2 screw Optical Drive | 27 See "Removing the Base Cover" on page 13. 2 Remove the base cover. For additional safety best practices information, see the Regulatory Compliance Homepage at dell.com/regulatory_compliance. See "Removing the Battery" on page 19...
Owner's Manual
Page 28
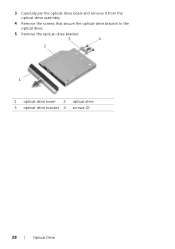
3 Carefully pry the optical-drive bezel and remove it from the optical-drive assembly. 4 Remove the screws that secure the optical-drive bracket to the optical drive. 5 Remove the optical-drive bracket. 3 4 2 1 1 optical-drive bezel 2 optical drive 3 optical-drive bracket 4 screws (2) 28 | Optical Drive
3 Carefully pry the optical-drive bezel and remove it from the optical-drive assembly. 4 Remove the screws that secure the optical-drive bracket to the optical drive. 5 Remove the optical-drive bracket. 3 4 2 1 1 optical-drive bezel 2 optical drive 3 optical-drive bracket 4 screws (2) 28 | Optical Drive
Owner's Manual
Page 29
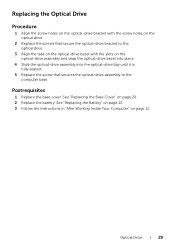
... seated. 5 Replace the screw that secures the optical-drive assembly to the computer base. Optical Drive | 29 Replacing the Optical Drive Procedure 1 Align the screw holes on the optical-drive bracket with the screw holes on the optical drive. 2 Replace the screws that secure the optical-drive bracket to the optical drive. 3 Align the tabs on the optical-drive bezel with the slots on page 20...
... seated. 5 Replace the screw that secures the optical-drive assembly to the computer base. Optical Drive | 29 Replacing the Optical Drive Procedure 1 Align the screw holes on the optical-drive bracket with the screw holes on the optical drive. 2 Replace the screws that secure the optical-drive bracket to the optical drive. 3 Align the tabs on the optical-drive bezel with the slots on page 20...

Owner's Manual
Page 30
30 | Optical Drive
30 | Optical Drive

Owner's Manual
Page 39
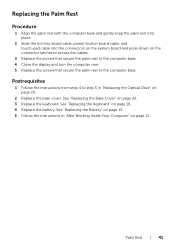
... Cover" on page 19. 4 Follow the instructions from step 1 to the computer base. For additional safety best practices information, see the Regulatory Compliance Homepage at dell.com/regulatory_compliance. See "Removing the Keyboard" on page 13. 2 Remove the keyboard. Palm Rest | 39 Removing the Palm Rest Prerequisites 1 Remove the battery. Procedure 1 Remove... rest to step 2 in "Before You Begin" on page 7. 12 Palm Rest WARNING: Before working inside your computer and follow the steps in "Removing the Optical Drive" on page 27.
... Cover" on page 19. 4 Follow the instructions from step 1 to the computer base. For additional safety best practices information, see the Regulatory Compliance Homepage at dell.com/regulatory_compliance. See "Removing the Keyboard" on page 13. 2 Remove the keyboard. Palm Rest | 39 Removing the Palm Rest Prerequisites 1 Remove the battery. Procedure 1 Remove... rest to step 2 in "Before You Begin" on page 7. 12 Palm Rest WARNING: Before working inside your computer and follow the steps in "Removing the Optical Drive" on page 27.
Owner's Manual
Page 40
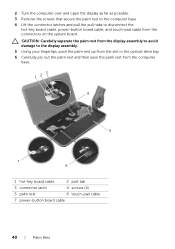
... the connector latches and pull the pull-tabs to the display assembly. 5 Using your fingertips, push the palm rest up from the slot in the optical-drive bay. 6 Carefully pry out the palm rest and then ease the palm rest from the connectors on the system board. CAUTION: Carefully separate the palm...
... the connector latches and pull the pull-tabs to the display assembly. 5 Using your fingertips, push the palm rest up from the slot in the optical-drive bay. 6 Carefully pry out the palm rest and then ease the palm rest from the connectors on the system board. CAUTION: Carefully separate the palm...
Owner's Manual
Page 41
Palm Rest | 41 See "Replacing the Battery" on page 13. 5 Follow the instructions in "Replacing the Optical Drive" on page 29. 2 Replace the base cover. Postrequisites 1 Follow the instructions from step 4 to the computer base. Replacing the Palm Rest Procedure 1 Align the palm ...
Palm Rest | 41 See "Replacing the Battery" on page 13. 5 Follow the instructions in "Replacing the Optical Drive" on page 29. 2 Replace the base cover. Postrequisites 1 Follow the instructions from step 4 to the computer base. Replacing the Palm Rest Procedure 1 Align the palm ...
Owner's Manual
Page 43
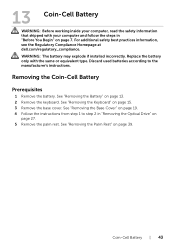
... information, see the Regulatory Compliance Homepage at dell.com/regulatory_compliance. See "Removing the Base Cover" on page 19. 4 Follow the instructions from step 1 to the manufacturer's instructions. 13 Coin-Cell Battery WARNING: Before working inside your computer and follow the steps in "Removing the Optical Drive" on page 27. 5 Remove the palm rest...
... information, see the Regulatory Compliance Homepage at dell.com/regulatory_compliance. See "Removing the Base Cover" on page 19. 4 Follow the instructions from step 1 to the manufacturer's instructions. 13 Coin-Cell Battery WARNING: Before working inside your computer and follow the steps in "Removing the Optical Drive" on page 27. 5 Remove the palm rest...

Owner's Manual
Page 45
... the battery. See "Replacing the Keyboard" on page 20. 4 Replace the keyboard. See "Replacing the Battery" on page 13. 6 Follow the instructions in "Replacing the Optical Drive" on page 29. 3 Replace the base cover. See "Replacing the Palm Rest" on page 41. 2 Follow the instructions from step 4 to step 5 in "After Working...
... the battery. See "Replacing the Keyboard" on page 20. 4 Replace the keyboard. See "Replacing the Battery" on page 13. 6 Follow the instructions in "Replacing the Optical Drive" on page 29. 3 Replace the base cover. See "Replacing the Palm Rest" on page 41. 2 Follow the instructions from step 4 to step 5 in "After Working...
Owner's Manual
Page 47
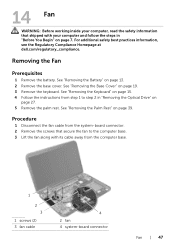
... additional safety best practices information, see the Regulatory Compliance Homepage at dell.com/regulatory_compliance. See "Removing the Palm Rest" on page 19. 3 Remove the keyboard. 14 Fan WARNING: Before working inside your computer and follow the steps in "Removing the Optical Drive" on page 13. 2 Remove the base cover. See "Removing the Base...
... additional safety best practices information, see the Regulatory Compliance Homepage at dell.com/regulatory_compliance. See "Removing the Palm Rest" on page 19. 3 Remove the keyboard. 14 Fan WARNING: Before working inside your computer and follow the steps in "Removing the Optical Drive" on page 13. 2 Remove the base cover. See "Removing the Base...


