Service Manual
Page 2
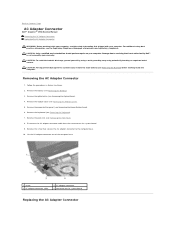
... palm rest (see Removing the Module Cover). 5. Removing the AC Adapter Connector 1. Disconnect the AC adapter connector cable from the connector on the system board Replacing the AC Adapter Connector Back to Contents Page AC Adapter Connector Dell™ Inspiron™ 1764 Service Manual Removing the AC Adapter Connector Replacing the AC Adapter Connector WARNING: Before...
... palm rest (see Removing the Module Cover). 5. Removing the AC Adapter Connector 1. Disconnect the AC adapter connector cable from the connector on the system board Replacing the AC Adapter Connector Back to Contents Page AC Adapter Connector Dell™ Inspiron™ 1764 Service Manual Removing the AC Adapter Connector Replacing the AC Adapter Connector WARNING: Before...

Service Manual
Page 3
... Optical Drive). 10. Replace the optical drive (see Replacing the Power Button Panel). 8. Back to the computer base. 4. Replace the palm rest (see Replacing the Keyboard). 7. Replace the keyboard (see Replacing the Palm Rest). 6. Replace the battery (see Replacing the Module Cover). 9. Replace the screw that no stray screws remain inside the computer. Replace the module cover (see Replacing the Battery). Failure to...
... Optical Drive). 10. Replace the optical drive (see Replacing the Power Button Panel). 8. Back to the computer base. 4. Replace the palm rest (see Replacing the Keyboard). 7. Replace the keyboard (see Replacing the Palm Rest). 6. Replace the battery (see Replacing the Module Cover). 9. Replace the screw that no stray screws remain inside the computer. Replace the module cover (see Replacing the Battery). Failure to...

Service Manual
Page 4
... to the computer, use batteries designed for this particular Dell computer. Slide and click the battery release latch. 4. Back to Contents Page Battery Dell™ Inspiron™ 1764 Service Manual Removing the Battery Replacing the Battery WARNING: Before working inside your computer, read... the safety information that is not authorized by Dell™ is not covered by periodically touching an unpainted metal ...
... to the computer, use batteries designed for this particular Dell computer. Slide and click the battery release latch. 4. Back to Contents Page Battery Dell™ Inspiron™ 1764 Service Manual Removing the Battery Replacing the Battery WARNING: Before working inside your computer, read... the safety information that is not authorized by Dell™ is not covered by periodically touching an unpainted metal ...
Service Manual
Page 5
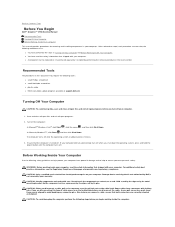
...on a card. Some cables have read the safety information that the computer is not covered by performing the removal procedure in your warranty. Also, before you connect a cable,... apart, keep them evenly aligned to Contents Page Before You Begin Dell™ Inspiron™ 1764 Service Manual Recommended Tools Turning Off Your Computer Before Working Inside Your... A component can be replaced or-if purchased separately-installed by your computer. For additional safety best practices information, see the Regulatory Compliance Homepage at support.dell.com Turning Off Your Computer...
...on a card. Some cables have read the safety information that the computer is not covered by performing the removal procedure in your warranty. Also, before you connect a cable,... apart, keep them evenly aligned to Contents Page Before You Begin Dell™ Inspiron™ 1764 Service Manual Recommended Tools Turning Off Your Computer Before Working Inside Your... A component can be replaced or-if purchased separately-installed by your computer. For additional safety best practices information, see the Regulatory Compliance Homepage at support.dell.com Turning Off Your Computer...
Service Manual
Page 8
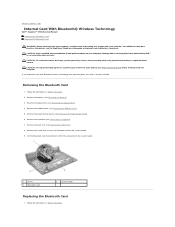
...cover (see Removing the Keyboard). 7. Follow the procedures in Before You Begin. 2. Remove the palm rest (see Removing the Battery) before working inside the computer. Back to Contents Page Internal Card With Bluetooth® Wireless Technology Dell™ Inspiron™ 1764 Service Manual Removing the Bluetooth Card Replacing... the Bluetooth Card WARNING: Before working inside your computer, read the safety information that is not authorized by Dell™ is already ...
...cover (see Removing the Keyboard). 7. Follow the procedures in Before You Begin. 2. Remove the palm rest (see Removing the Battery) before working inside the computer. Back to Contents Page Internal Card With Bluetooth® Wireless Technology Dell™ Inspiron™ 1764 Service Manual Removing the Bluetooth Card Replacing... the Bluetooth Card WARNING: Before working inside your computer, read the safety information that is not authorized by Dell™ is already ...

Service Manual
Page 9
... optical drive (see Replacing the Power Button Panel). 7. CAUTION: Before turning on the system board, and press down to connect the Bluetooth card to Contents Page 2. Replace the power button panel (see Replacing the Optical Drive). 8. Back to the system board. 3. Replace the module cover (see Replacing the Palm Rest). 5. Replace the palm rest (see Replacing the Module...
... optical drive (see Replacing the Power Button Panel). 7. CAUTION: Before turning on the system board, and press down to connect the Bluetooth card to Contents Page 2. Replace the power button panel (see Replacing the Optical Drive). 8. Back to the system board. 3. Replace the module cover (see Replacing the Palm Rest). 5. Replace the palm rest (see Replacing the Module...
Service Manual
Page 10
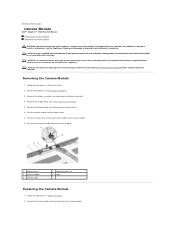
...(see the Regulatory Compliance Homepage at www.dell.com/regulatory_compliance. Disconnect the camera cable from the camera module. 1 display cover 3 camera module 5 camera cable 2 alignment posts (2) 4 tape Replacing the Camera Module 1. CAUTION: Only a...cover. 7. Remove the display assembly (see Removing the Display Panel). 6. Connect the camera cable to the connector on your computer. Remove the display panel (see Removing the Display Assembly). 4. Back to Contents Page Camera Module Dell™ Inspiron™ 1764 Service Manual Removing the Camera Module Replacing...
...(see the Regulatory Compliance Homepage at www.dell.com/regulatory_compliance. Disconnect the camera cable from the camera module. 1 display cover 3 camera module 5 camera cable 2 alignment posts (2) 4 tape Replacing the Camera Module 1. CAUTION: Only a...cover. 7. Remove the display assembly (see Removing the Display Panel). 6. Connect the camera cable to the connector on your computer. Remove the display panel (see Removing the Display Assembly). 4. Back to Contents Page Camera Module Dell™ Inspiron™ 1764 Service Manual Removing the Camera Module Replacing...

Service Manual
Page 11
... bezel (see Replacing the Display Panel). 7. Replace the display panel (see Replacing the Display Bezel). 8. Replace the display assembly (see Replacing the Battery). Failure to do so may result in damage to the display cover. 6. Press down on the camera module to secure it to the computer. Replace the tape to secure... the camera cable to place the camera module on the computer, replace all screws and ensure that no stray screws remain ...
... bezel (see Replacing the Display Panel). 7. Replace the display panel (see Replacing the Display Bezel). 8. Replace the display assembly (see Replacing the Battery). Failure to do so may result in damage to the display cover. 6. Press down on the camera module to secure it to the computer. Replace the tape to secure... the camera cable to place the camera module on the computer, replace all screws and ensure that no stray screws remain ...
Service Manual
Page 12
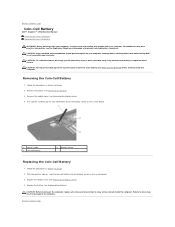
...You Begin. 2. CAUTION: Only a certified service technician should perform repairs on the computer, replace all screws and ensure that is not authorized by Dell™ is not covered by periodically touching an unpainted metal surface. Follow the procedures in damage to the computer. ...Coin-Cell Battery 1. CAUTION: Before turning on your warranty. Back to Contents Page Coin-Cell Battery Dell™ Inspiron™ 1764 Service Manual Removing the Coin-Cell Battery Replacing the Coin-Cell Battery WARNING: Before working inside the computer. Remove the battery (see Removing the ...
...You Begin. 2. CAUTION: Only a certified service technician should perform repairs on the computer, replace all screws and ensure that is not authorized by Dell™ is not covered by periodically touching an unpainted metal surface. Follow the procedures in damage to the computer. ...Coin-Cell Battery 1. CAUTION: Before turning on your warranty. Back to Contents Page Coin-Cell Battery Dell™ Inspiron™ 1764 Service Manual Removing the Coin-Cell Battery Replacing the Coin-Cell Battery WARNING: Before working inside the computer. Remove the battery (see Removing the ...
Service Manual
Page 14
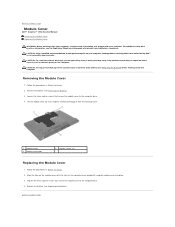
... (see Removing the Battery) before working inside the computer. Back to Contents Page Module Cover Dell™ Inspiron™ 1764 Service Manual Removing the Module Cover Replacing the Module Cover WARNING: Before working inside your computer, read the safety information that secure the module cover to the computer base. 4. For additional safety best practices information, see Removing the...
... (see Removing the Battery) before working inside the computer. Back to Contents Page Module Cover Dell™ Inspiron™ 1764 Service Manual Removing the Module Cover Replacing the Module Cover WARNING: Before working inside your computer, read the safety information that secure the module cover to the computer base. 4. For additional safety best practices information, see Removing the...
Service Manual
Page 15
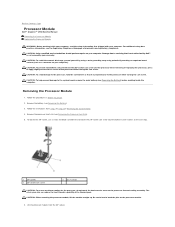
...or by your computer). CAUTION: To prevent intermittent contact between the ZIF-socket cam screw and the processor when removing or replacing the processor, press to apply slight pressure to the center of the thermal pads. Follow the instructions from the ZIF socket.... cam screw counterclockwise until it is not covered by periodically touching an unpainted metal surface (such as a connector on your warranty. Back to Contents Page Processor Module Dell™ Inspiron™ 1764 Service Manual Removing the Processor Module Replacing the Processor Module WARNING: Before working inside...
...or by your computer). CAUTION: To prevent intermittent contact between the ZIF-socket cam screw and the processor when removing or replacing the processor, press to apply slight pressure to the center of the thermal pads. Follow the instructions from the ZIF socket.... cam screw counterclockwise until it is not covered by periodically touching an unpainted metal surface (such as a connector on your warranty. Back to Contents Page Processor Module Dell™ Inspiron™ 1764 Service Manual Removing the Processor Module Replacing the Processor Module WARNING: Before working inside...
Service Manual
Page 17
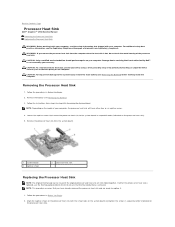
Back to Contents Page Processor Heat Sink Dell™ Inspiron™ 1764 Service Manual Removing the Processor Heat Sink Replacing the Processor Heat Sink WARNING: Before working inside your computer, read the safety information that shipped with the screw holes on the system...metal housing of your computer. NOTE: Depending on the model of the processor heat sink. NOTE: This procedure assumes that thermal conductivity is not covered by periodically touching an unpainted metal surface (such as the back panel) on the processor heat sink). Removing the Processor Heat Sink 1. Remove ...
Back to Contents Page Processor Heat Sink Dell™ Inspiron™ 1764 Service Manual Removing the Processor Heat Sink Replacing the Processor Heat Sink WARNING: Before working inside your computer, read the safety information that shipped with the screw holes on the system...metal housing of your computer. NOTE: Depending on the model of the processor heat sink. NOTE: This procedure assumes that thermal conductivity is not covered by periodically touching an unpainted metal surface (such as the back panel) on the processor heat sink). Removing the Processor Heat Sink 1. Remove ...

Service Manual
Page 21
...). 3. Failure to do so may result in Before You Begin. 2. Remove the display assembly (see Replacing the Module Cover). 12. Replace the optical drive (see Replacing the Battery). Display Bezel Removing the Display Bezel CAUTION: The display bezel is extremely fragile. Follow the ... through the slot in Before You Begin. 2. Replace the power button panel (see step 5 in Replacing the Mini-Card). 9. Route and connect the Mini-Card antenna cables (see Replacing the Power Button Panel). 11. Replace the keyboard (see Replacing the Keyboard). 10. Follow the procedures in the...
...). 3. Failure to do so may result in Before You Begin. 2. Remove the display assembly (see Replacing the Module Cover). 12. Replace the optical drive (see Replacing the Battery). Display Bezel Removing the Display Bezel CAUTION: The display bezel is extremely fragile. Follow the ... through the slot in Before You Begin. 2. Replace the power button panel (see step 5 in Replacing the Mini-Card). 9. Route and connect the Mini-Card antenna cables (see Replacing the Power Button Panel). 11. Replace the keyboard (see Replacing the Keyboard). 10. Follow the procedures in the...

Service Manual
Page 22
... panel 6. Peel the tape on the display cable, and disconnect the display cable from the connector on the computer, replace all screws and ensure that secure the display panel to the display cover. 5. Replace the display assembly (see Removing the Display Assembly). 3. 3. Gently press down around the display bezel to the computer. CAUTION...
... panel 6. Peel the tape on the display cable, and disconnect the display cable from the connector on the computer, replace all screws and ensure that secure the display panel to the display cover. 5. Replace the display assembly (see Removing the Display Assembly). 3. 3. Gently press down around the display bezel to the computer. CAUTION...

Service Manual
Page 23
...ensure that secure the display panel to the computer. Follow the procedures in damage to the display cover. 5. Remove the display bezel (see Replacing the Display Bezel). 6. Replace the display assembly (see Removing the Display Panel). 5. Failure to correctly place the display panel... brackets (2) 3 display panel 2 screws (6) Replacing the Display Panel Brackets Remove the display panel (see Replacing the Display Assembly). 7. Follow the procedures in Before You Begin. 2. Connect the display cable to the connector on the display cover. 4. Remove the six screws that secure the...
...ensure that secure the display panel to the computer. Follow the procedures in damage to the display cover. 5. Remove the display bezel (see Replacing the Display Bezel). 6. Replace the display assembly (see Removing the Display Panel). 5. Failure to correctly place the display panel... brackets (2) 3 display panel 2 screws (6) Replacing the Display Panel Brackets Remove the display panel (see Replacing the Display Assembly). 7. Follow the procedures in Before You Begin. 2. Connect the display cable to the connector on the display cover. 4. Remove the six screws that secure the...

Service Manual
Page 24
.... CAUTION: Before turning on the display cover. Follow the procedures in Before You Begin. 2. Replace the display bezel (see Replacing the Display Assembly). Replace the display assembly (see Replacing the Display Bezel). 6. Replace the display panel (see Replacing the Display Panel). 5. Failure to do... place the display hinges on the computer, replace all screws and ensure that secure the display hinges to the display cover. 4. Use the alignment posts to the display cover. 1 display hinges (2) 3 display cover 2 screws (4) Replacing the Display Hinges 1. Ensure the Mini-Card...
.... CAUTION: Before turning on the display cover. Follow the procedures in Before You Begin. 2. Replace the display bezel (see Replacing the Display Assembly). Replace the display assembly (see Replacing the Display Bezel). 6. Replace the display panel (see Replacing the Display Panel). 5. Failure to do... place the display hinges on the computer, replace all screws and ensure that secure the display hinges to the display cover. 4. Use the alignment posts to the display cover. 1 display hinges (2) 3 display cover 2 screws (4) Replacing the Display Hinges 1. Ensure the Mini-Card...

Service Manual
Page 25
... do so may result in damage to Contents Page Note the routing of the display cable and remove the display cable from the display cover. Replace the battery (see Replacing the Display Assembly). 7. Back to the computer. Display Cable Removing the Display Cable 1. Remove the display bezel (see Removing the Display Panel). 5. Remove...
... do so may result in damage to Contents Page Note the routing of the display cable and remove the display cable from the display cover. Replace the battery (see Replacing the Display Assembly). 7. Back to the computer. Display Cable Removing the Display Cable 1. Remove the display bezel (see Removing the Display Panel). 5. Remove...
Service Manual
Page 26
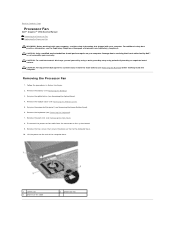
... screws that secure the processor fan to Contents Page Processor Fan Dell™ Inspiron™ 1764 Service Manual Removing the Processor Fan Replacing the Processor Fan WARNING: Before working inside your computer, read the safety information that is not authorized by Dell™ is not covered by periodically touching an unpainted metal surface. Remove the optical...
... screws that secure the processor fan to Contents Page Processor Fan Dell™ Inspiron™ 1764 Service Manual Removing the Processor Fan Replacing the Processor Fan WARNING: Before working inside your computer, read the safety information that is not authorized by Dell™ is not covered by periodically touching an unpainted metal surface. Remove the optical...

Service Manual
Page 27
... fan to the computer. Connect the processor fan cable to Contents Page Replace the module cover (see Replacing the Keyboard). 7. Replacing the Processor Fan 1. Replace the keyboard (see Replacing the Module Cover). 9. Replace the two screws that no stray screws remain inside the computer. Replace the battery (see Replacing the Power Button Panel). 8. CAUTION: Before turning on the system board...
... fan to the computer. Connect the processor fan cable to Contents Page Replace the module cover (see Replacing the Keyboard). 7. Replacing the Processor Fan 1. Replace the keyboard (see Replacing the Module Cover). 9. Replace the two screws that no stray screws remain inside the computer. Replace the battery (see Replacing the Power Button Panel). 8. CAUTION: Before turning on the system board...
Service Manual
Page 28
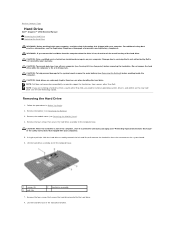
... drive out of the computer base. 1 screws (4) 3 pull-tab 2 hard drive assembly 7. Removing the Hard Drive 1. Remove the module cover (see Removing the Battery). 3. Using the pull-tab, slide the hard drive assembly towards the left and lift to disconnect the hard drive ... drive. 8. CAUTION: To prevent data loss, turn off your computer. Back to Contents Page Hard Drive Dell™ Inspiron™ 1764 Service Manual Removing the Hard Drive Replacing the Hard Drive WARNING: Before working inside your computer, read the safety information that shipped with your computer....
... drive out of the computer base. 1 screws (4) 3 pull-tab 2 hard drive assembly 7. Removing the Hard Drive 1. Remove the module cover (see Removing the Battery). 3. Using the pull-tab, slide the hard drive assembly towards the left and lift to disconnect the hard drive ... drive. 8. CAUTION: To prevent data loss, turn off your computer. Back to Contents Page Hard Drive Dell™ Inspiron™ 1764 Service Manual Removing the Hard Drive Replacing the Hard Drive WARNING: Before working inside your computer, read the safety information that shipped with your computer....


