Dell™ Technology Guide
Page 6
... Keyboard 66 Backlit Keyboard 66 Changing the Input Language of Your Keyboard 67 Using the Numeric Keypad on a Laptop Computer 68 General Keyboard Shortcuts 69 5 Printers-Settings and Drivers 71 Accessing Printer Information 71 Changing Printer Settings 72 For Windows Vista 72 For Windows® XP 72 Setting up Printers 73 Adding a Printer 73 Setting the Default Printer 74 Sharing Printers on a Network 74 Installing a Printer Driver 75 6 Drives and Media 77 Freeing up Hard Drive...
... Keyboard 66 Backlit Keyboard 66 Changing the Input Language of Your Keyboard 67 Using the Numeric Keypad on a Laptop Computer 68 General Keyboard Shortcuts 69 5 Printers-Settings and Drivers 71 Accessing Printer Information 71 Changing Printer Settings 72 For Windows Vista 72 For Windows® XP 72 Setting up Printers 73 Adding a Printer 73 Setting the Default Printer 74 Sharing Printers on a Network 74 Installing a Printer Driver 75 6 Drives and Media 77 Freeing up Hard Drive...
Dell™ Technology Guide
Page 7
...-State Drive (SSD 78 Installing Drivers for Media Drives 79 Determining Whether a Device Driver is the Source of a Device Problem 79 Replacing a Driver With a Previous Version of the Driver 79 Using the Drivers and Utilities Media to Reinstall a Driver 80 Manually Reinstalling a Driver 80 Drive Problems 81 Optical Drive Problems 82 Hard Drive Problems 82 Working with RAID 83 RAID Level 0 83 RAID Level 1 84 RAID Level 0+1 Configuration 86 RAID Level 5 Configuration 87 Setting Your Computer to RAID-Enabled Mode 87 Configuring RAID...
...-State Drive (SSD 78 Installing Drivers for Media Drives 79 Determining Whether a Device Driver is the Source of a Device Problem 79 Replacing a Driver With a Previous Version of the Driver 79 Using the Drivers and Utilities Media to Reinstall a Driver 80 Manually Reinstalling a Driver 80 Drive Problems 81 Optical Drive Problems 82 Hard Drive Problems 82 Working with RAID 83 RAID Level 0 83 RAID Level 1 84 RAID Level 0+1 Configuration 86 RAID Level 5 Configuration 87 Setting Your Computer to RAID-Enabled Mode 87 Configuring RAID...
Dell™ Technology Guide
Page 20
... 1394 Device Problems 291 Keyboard Problems for External Keyboards . . . 292 Lockups and Software Problems 292 Memory Problems 294 Mouse Problems 295 Network Problems 296 Power Problems 296 Printer Problems 298 Scanner Problems 299 Sound and Speaker Problems 299 Touch Pad or Mouse Problems for Laptop Computers 301 Video and Monitor Problems 302 Power Lights 304 Dell Technical Update Service 305 21 System Setup 307 Viewing System Settings With the System Setup Program 307 Entering the System Setup Program 308 Working With Options on the System Setup Program Screen 308 Changing...
... 1394 Device Problems 291 Keyboard Problems for External Keyboards . . . 292 Lockups and Software Problems 292 Memory Problems 294 Mouse Problems 295 Network Problems 296 Power Problems 296 Printer Problems 298 Scanner Problems 299 Sound and Speaker Problems 299 Touch Pad or Mouse Problems for Laptop Computers 301 Video and Monitor Problems 302 Power Lights 304 Dell Technical Update Service 305 21 System Setup 307 Viewing System Settings With the System Setup Program 307 Entering the System Setup Program 308 Working With Options on the System Setup Program Screen 308 Changing...
Dell™ Technology Guide
Page 64
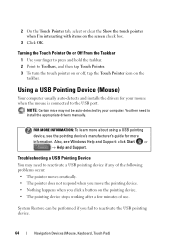
... your mouse when the mouse is connected to install the appropriate drivers manually. Using a USB Pointing Device (Mouse) Your computer usually auto-detects and installs the drivers for more about using a USB pointing device, see Windows Help and Support: click Start or → Help and Support. FOR MORE INFORMATION: To learn more information. Troubleshooting a USB Pointing Device You may not be performed if you click a button on the screen check box. 3 Click OK. Turning the Touch...
... your mouse when the mouse is connected to install the appropriate drivers manually. Using a USB Pointing Device (Mouse) Your computer usually auto-detects and installs the drivers for more about using a USB pointing device, see Windows Help and Support: click Start or → Help and Support. FOR MORE INFORMATION: To learn more information. Troubleshooting a USB Pointing Device You may not be performed if you click a button on the screen check box. 3 Click OK. Turning the Touch...
Dell™ Technology Guide
Page 79
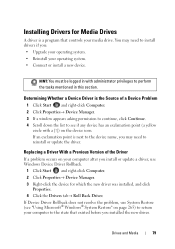
... controls your operating system. • Connect or install a new device. Replacing a Driver With a Previous Version of a Device Problem 1 Click Start and right-click Computer. 2 Click Properties→ Device Manager. 3 If a window appears asking permission to continue, click Continue. 4 Scroll down the list to see "Using Microsoft® Windows® System Restore" on the device icon. Installing Drivers for which the new driver was installed, and click Properties. 4 Click the Drivers tab→ Roll Back Driver. You may need...
... controls your operating system. • Connect or install a new device. Replacing a Driver With a Previous Version of a Device Problem 1 Click Start and right-click Computer. 2 Click Properties→ Device Manager. 3 If a window appears asking permission to continue, click Continue. 4 Scroll down the list to see "Using Microsoft® Windows® System Restore" on the device icon. Installing Drivers for which the new driver was installed, and click Properties. 4 Click the Drivers tab→ Roll Back Driver. You may need...
Dell™ Technology Guide
Page 81
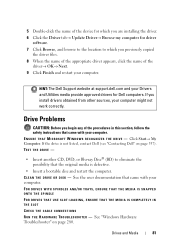
... a bootable disc and restart the computer. HINT: The Dell Support website at support.dell.com and your Drivers and Utilities media provide approved drivers for driver software. 7 Click Browse, and browse to the location to eliminate the possibility that came with your computer might not work correctly. 5 Double-click the name of the device for which you are installing the driver. 6 Click the Driver tab→ Update Driver→...
... a bootable disc and restart the computer. HINT: The Dell Support website at support.dell.com and your Drivers and Utilities media provide approved drivers for driver software. 7 Click Browse, and browse to the location to eliminate the possibility that came with your computer might not work correctly. 5 Double-click the name of the device for which you are installing the driver. 6 Click the Driver tab→ Update Driver→...
Dell™ Technology Guide
Page 94
... third hard drive. 6 In the Specify Volume Size window, click the Volume Size desired, and then click Next. 7 Click Finish to create the volume, or click Back to include in the Selected window. For RAID 1 Press the up - and down -arrow keys to RAID-Enabled Mode" on the main Intel RAID Option ROM utility screen. 9 Press the up - The default value is displayed on page 87). 2 Click Start...
... third hard drive. 6 In the Specify Volume Size window, click the Volume Size desired, and then click Next. 7 Click Finish to create the volume, or click Back to include in the Selected window. For RAID 1 Press the up - and down -arrow keys to RAID-Enabled Mode" on the main Intel RAID Option ROM utility screen. 9 Press the up - The default value is displayed on page 87). 2 Click Start...

Dell™ Technology Guide
Page 95
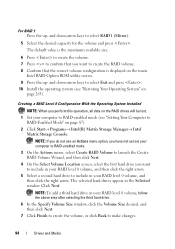
... make changes. 10 Follow the Microsoft Windows procedures for creating a partition on the new RAID volume. Creating a RAID Level 1 Configuration With the Operating System Installed NOTE: When you perform this operation, all data on the RAID drives is lost. 1 Set your computer. 2 Press when you are prompted to enter the Intel RAID Option ROM utility. 3 Under DEGRADED VOLUME DETECTED, confirm that the new (non-RAID) drive is listed and then press . 4 Under Disk/Volume...
... make changes. 10 Follow the Microsoft Windows procedures for creating a partition on the new RAID volume. Creating a RAID Level 1 Configuration With the Operating System Installed NOTE: When you perform this operation, all data on the RAID drives is lost. 1 Set your computer. 2 Press when you are prompted to enter the Intel RAID Option ROM utility. 3 Under DEGRADED VOLUME DETECTED, confirm that the new (non-RAID) drive is listed and then press . 4 Under Disk/Volume...
Dell™ Technology Guide
Page 245
... Video Display Resolution Problems For information about setting display properties through the Windows Display Properties menu, see the User's Guide for the video card installed in Windows Help and Support. Connecting Your Computer to increase the resolution above a certain level. For additional settings, click the Advanced button on the screen. From the Advanced tab, select the tab specific for the monitor. To view the rest of additional control features to resolve specific display problems. Accessing the Video Card Control...
... Video Display Resolution Problems For information about setting display properties through the Windows Display Properties menu, see the User's Guide for the video card installed in Windows Help and Support. Connecting Your Computer to increase the resolution above a certain level. For additional settings, click the Advanced button on the screen. From the Advanced tab, select the tab specific for the monitor. To view the rest of additional control features to resolve specific display problems. Accessing the Video Card Control...
Dell™ Technology Guide
Page 249
Troubleshooting Display Settings Where to a TV and Adjusting Display Settings 249 Getting Help for Video Card Control Panels Depending on the video card installed in your computer, your computer may have a special video card control panel with extensive help information. Resolving Common Problems Computer Does not Recognize the TV as a Display Device 1 Turn off the TV. 2 Turn off the computer. 3 Disconnect the video cable from a variety of the help that category. EXAMPLE: The Nvidia Control Panel provides...
Troubleshooting Display Settings Where to a TV and Adjusting Display Settings 249 Getting Help for Video Card Control Panels Depending on the video card installed in your computer, your computer may have a special video card control panel with extensive help information. Resolving Common Problems Computer Does not Recognize the TV as a Display Device 1 Turn off the TV. 2 Turn off the computer. 3 Disconnect the video cable from a variety of the help that category. EXAMPLE: The Nvidia Control Panel provides...
Dell™ Technology Guide
Page 276
... the boot sequence information is not listed in BIOS setup. See "Lockups and Software Problems" on page 292). K E Y B O A R D F A I O N - DELL RECOMMENDS THAT YOU BACK UP YOUR DATA REGULARLY. Keyboard failure or keyboard cable loose (see "Working With Options on the System Setup Program Screen" on page 337). N O T I M E R T I C K I L A B L E M E M O R Y - D E C R E A S I N G A V A I N T E R R U P T - MEMORY ADDRESS LINE FAILURE AT (ADDRESS), READ VALUE EXPECTING 276 Troubleshooting S.M.A.R.T error, possible HDD failure. G A T E A 2 0 F A I L A B L E - Enter the...
... the boot sequence information is not listed in BIOS setup. See "Lockups and Software Problems" on page 292). K E Y B O A R D F A I O N - DELL RECOMMENDS THAT YOU BACK UP YOUR DATA REGULARLY. Keyboard failure or keyboard cable loose (see "Working With Options on the System Setup Program Screen" on page 337). N O T I M E R T I C K I L A B L E M E M O R Y - D E C R E A S I N G A V A I N T E R R U P T - MEMORY ADDRESS LINE FAILURE AT (ADDRESS), READ VALUE EXPECTING 276 Troubleshooting S.M.A.R.T error, possible HDD failure. G A T E A 2 0 F A I L A B L E - Enter the...

Dell™ Technology Guide
Page 295
... any mouse extension cables, and connect the mouse directly to ensure that the memory you are using the mouse. Straighten any bent pins. • Remove any of memory supported by your computer. CHECK THE MOUSE SETTINGS - IF YOU EXPERIENCE OTHER MEMORY PROBLEMS - • Reseat the memory modules (see the documentation shipped with your computer) to the computer. • Verify that the mouse cable is connected as shown on the setup diagram. 4 Turn...
... any mouse extension cables, and connect the mouse directly to ensure that the memory you are using the mouse. Straighten any bent pins. • Remove any of memory supported by your computer. CHECK THE MOUSE SETTINGS - IF YOU EXPERIENCE OTHER MEMORY PROBLEMS - • Reseat the memory modules (see the documentation shipped with your computer) to the computer. • Verify that the mouse cable is connected as shown on the setup diagram. 4 Turn...
Dell™ Technology Guide
Page 348
... Computer Memory Card International Association - A method of transferring data between two devices through the processor as video, drives, and networks. A video resolution, such as 800 x 600, is expressed as the number of the data path. NVRAM - P partition - A removable I/O card adhering to automatically configure devices. Modems and network adapters are Plug and Play compliant. PCI Express - A modification to the PCI interface that is turned off or loses its external power...
... Computer Memory Card International Association - A method of transferring data between two devices through the processor as video, drives, and networks. A video resolution, such as 800 x 600, is expressed as the number of the data path. NVRAM - P partition - A removable I/O card adhering to automatically configure devices. Modems and network adapters are Plug and Play compliant. PCI Express - A modification to the PCI interface that is turned off or loses its external power...
Dell™ Technology Guide
Page 352
... or formatting functionality (the option to reduce the weight of the computer. A plastic device designed to fit inside the module bay of wires to protect against interference. A UPS keeps a computer running for video cards and controllers that when combined with security software enhances network and computer security by enabling features such as a USB-compatible keyboard, mouse, joystick, scanner, set of time when there is turned on...
... or formatting functionality (the option to reduce the weight of the computer. A plastic device designed to fit inside the module bay of wires to protect against interference. A UPS keeps a computer running for video cards and controllers that when combined with security software enhances network and computer security by enabling features such as a USB-compatible keyboard, mouse, joystick, scanner, set of time when there is turned on...
Setup Guide
Page 62
... the devices specified in the system setup program. 6. Click Exit if the Install Windows message appears. 4. On the next start-up, the computer boots according to complete. Use the Drivers and Utilities disc to Boot from CD-ROM. To reinstall Microsoft Windows operating system: 1. Save and close any open files and exit any key to install the drivers and utilities for one time only. Follow the instructions on the screen to...
... the devices specified in the system setup program. 6. Click Exit if the Install Windows message appears. 4. On the next start-up, the computer boots according to complete. Use the Drivers and Utilities disc to Boot from CD-ROM. To reinstall Microsoft Windows operating system: 1. Save and close any open files and exit any key to install the drivers and utilities for one time only. Follow the instructions on the screen to...
Setup Guide
Page 74
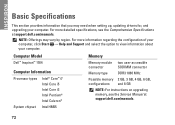
... HM55 Memory Memory module two user-accessible connector SODIMM connector Memory type DDR3 1066 MHz Possible memory 2 GB, 3 GB, 4 GB, 6 GB, configurations and 8 GB NOTE: For instructions on upgrading memory, see the Comprehensive Specifications at support.dell.com/manuals. 72 INSPIRON Basic Specifications This section provides information that you may vary by region. For more detailed specifications, see the Service Manual at support.dell.com/manuals. NOTE: Offerings may need when setting up, updating drivers for, and upgrading your...
... HM55 Memory Memory module two user-accessible connector SODIMM connector Memory type DDR3 1066 MHz Possible memory 2 GB, 3 GB, 4 GB, 6 GB, configurations and 8 GB NOTE: For instructions on upgrading memory, see the Comprehensive Specifications at support.dell.com/manuals. 72 INSPIRON Basic Specifications This section provides information that you may vary by region. For more detailed specifications, see the Service Manual at support.dell.com/manuals. NOTE: Offerings may need when setting up, updating drivers for, and upgrading your...
Comprehensive Specifications
Page 1
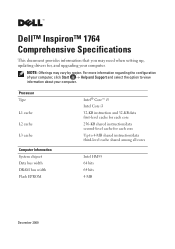
... configuration of your computer, click Start → Help and Support and select the option to 4-MB shared instruction/data third-level cache shared among all cores Intel HM55 64 bits 64 bits 4 MB December 2009 NOTE: Offerings may need when setting up, updating drivers for each core 256-KB shared instruction/data second-level cache for , and upgrading your computer. Processor Type...
... configuration of your computer, click Start → Help and Support and select the option to 4-MB shared instruction/data third-level cache shared among all cores Intel HM55 64 bits 64 bits 4 MB December 2009 NOTE: Offerings may need when setting up, updating drivers for each core 256-KB shared instruction/data second-level cache for , and upgrading your computer. Processor Type...
Service Manual
Page 28
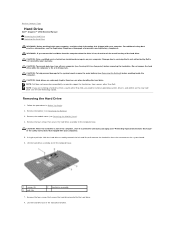
... by Dell is hot, do not touch the metal housing of the hard drive. CAUTION: Hard drives are installing a hard drive from sources other than Dell. NOTE: Dell does not guarantee compatibility or provide support for hard drives from a source other than Dell, you need to install an operating system, drivers, and utilities on the new hard drive (see the Dell Technology Guide). Removing the Hard Drive 1. Remove the battery (see the Regulatory Compliance Homepage at www.dell.com/regulatory_compliance. Remove the module cover (see...
... by Dell is hot, do not touch the metal housing of the hard drive. CAUTION: Hard drives are installing a hard drive from sources other than Dell. NOTE: Dell does not guarantee compatibility or provide support for hard drives from a source other than Dell, you need to install an operating system, drivers, and utilities on the new hard drive (see the Dell Technology Guide). Removing the Hard Drive 1. Remove the battery (see the Regulatory Compliance Homepage at www.dell.com/regulatory_compliance. Remove the module cover (see...
Service Manual
Page 29
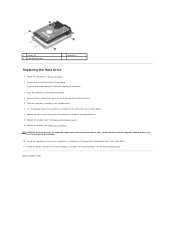
... the hard drive bracket to the computer. 10. Replace the module cover (see Replacing the Battery). CAUTION: Before turning on the system board. 7. Install the drivers and utilities for your computer, as needed . Back to the computer base. 8. See "Restoring Your Operating System" in the hard drive bracket. 4. Place the hard drive assembly in Before You Begin. 2. Install the operating system for storing or shipping the hard drive. 3. Remove the new hard drive from its packaging. Replace the...
... the hard drive bracket to the computer. 10. Replace the module cover (see Replacing the Battery). CAUTION: Before turning on the system board. 7. Install the drivers and utilities for your computer, as needed . Back to the computer base. 8. See "Restoring Your Operating System" in the hard drive bracket. 4. Place the hard drive assembly in Before You Begin. 2. Install the operating system for storing or shipping the hard drive. 3. Remove the new hard drive from its packaging. Replace the...
Service Manual
Page 34
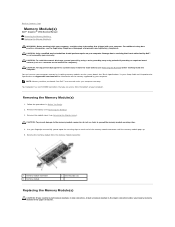
... apart the securing clips on the system board. CAUTION: To avoid electrostatic discharge, ground yourself by using a wrist grounding strap or by your warranty. Remove the module cover (see Removing the Battery). 3. Remove the memory module from the memory module connector. 1 memory module connector 3 memory module 2 securing clips (2) Replacing the Memory Module(s) CAUTION: If you need to install memory modules in two connectors, install a memory module in the upper connector. Back to Contents Page Memory Module(s) Dell™ Inspiron™ 1764 Service Manual Removing the Memory...
... apart the securing clips on the system board. CAUTION: To avoid electrostatic discharge, ground yourself by using a wrist grounding strap or by your warranty. Remove the module cover (see Removing the Battery). 3. Remove the memory module from the memory module connector. 1 memory module connector 3 memory module 2 securing clips (2) Replacing the Memory Module(s) CAUTION: If you need to install memory modules in two connectors, install a memory module in the upper connector. Back to Contents Page Memory Module(s) Dell™ Inspiron™ 1764 Service Manual Removing the Memory...


