Dell™ Technology Guide
Page 11
... Using Your Laptop Computer for the First Time 142 Preserving the Life of a Battery 142 Replacing a Battery 143 Checking the Battery Charge 143 Conserving Battery Power 145 Charging the Battery 145 Storing a Battery 146 US Department of Transportation (DOT) Notebook Battery Restrictions 146 Dell™ ControlPoint Power Manager 146 12 Networks (LAN, Wireless, Mobile Broadband 149 Overview 149 Local...
... Using Your Laptop Computer for the First Time 142 Preserving the Life of a Battery 142 Replacing a Battery 143 Checking the Battery Charge 143 Conserving Battery Power 145 Charging the Battery 145 Storing a Battery 146 US Department of Transportation (DOT) Notebook Battery Restrictions 146 Dell™ ControlPoint Power Manager 146 12 Networks (LAN, Wireless, Mobile Broadband 149 Overview 149 Local...
Dell™ Technology Guide
Page 107
... if you have shut down the message. You may want to remove and replace the battery for a laptop computer to run Windows are using. Shutting Down Your Computer 107 See "Replacing a Battery" on page 125 • Your system administrator • support.dell.com. Write down your computer, see: • Windows Help and Support: click Start...
... if you have shut down the message. You may want to remove and replace the battery for a laptop computer to run Windows are using. Shutting Down Your Computer 107 See "Replacing a Battery" on page 125 • Your system administrator • support.dell.com. Write down your computer, see: • Windows Help and Support: click Start...
Dell™ Technology Guide
Page 143
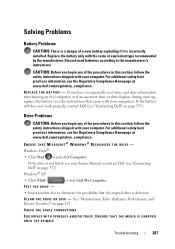
... see the Regulatory Compliance Homepage at www.dell.com/regulatory_compliance. CAUTION: Misuse of the bay. 4 Slide the new battery into the bay and until it . 2 Ensure that the computer is designed to replace the battery in the safety information that shipped with ... must remove all external cables from the computer to temperatures above 65°C (149°F). Replacing a Battery CAUTION: Using an incompatible battery may increase the risk of batteries with your computer. Handle damaged or leaking batteries with your Dell computer. Your battery will vary depending on disposing...
... see the Regulatory Compliance Homepage at www.dell.com/regulatory_compliance. CAUTION: Misuse of the bay. 4 Slide the new battery into the bay and until it . 2 Ensure that the computer is designed to replace the battery in the safety information that shipped with ... must remove all external cables from the computer to temperatures above 65°C (149°F). Replacing a Battery CAUTION: Using an incompatible battery may increase the risk of batteries with your computer. Handle damaged or leaking batteries with your Dell computer. Your battery will vary depending on disposing...
Dell™ Technology Guide
Page 144
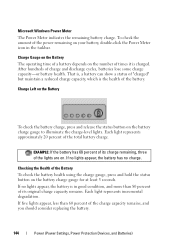
... to illuminate the charge-level lights. Each light represents approximately 20 percent of the charge capacity remains, and you should consider replacing the battery. 144 Power (Power Settings, Power Protection Devices, and Batteries) If five lights appear, less than 80 percent of its charge remaining, three of its original charge capacity remains. That...
... to illuminate the charge-level lights. Each light represents approximately 20 percent of the charge capacity remains, and you should consider replacing the battery. 144 Power (Power Settings, Power Protection Devices, and Batteries) If five lights appear, less than 80 percent of its charge remaining, three of its original charge capacity remains. That...
Dell™ Technology Guide
Page 275
... page 337 for the topic on the Dell Support website support.dell.com. If the computer malfunctions, you received is not listed in the table, see the documentation for Laptop Computers Typically laptop computers have keyboard status lights located above the keyboard. Replace the battery (see the documentation shipped with your computer for your...
... page 337 for the topic on the Dell Support website support.dell.com. If the computer malfunctions, you received is not listed in the table, see the documentation for Laptop Computers Typically laptop computers have keyboard status lights located above the keyboard. Replace the battery (see the documentation shipped with your computer for your...
Dell™ Technology Guide
Page 277
...ADDRESS) READ VALUE EXPECTING ( V A L U E) - M E M O R Y S I Z E I N C M O S I N V A L I V E - NO BOOT DEVICE AVAILABLE - Run the Dell Diagnostics (see "Running the Dell Diagnostics" on page 308. See "Entering the System Setup Program" on page 281). See "Drive Problems" on page 308). Enter the system setup... and Software Problems" on page 308). D I S K D R I N T E R R U P T - If the problem persists, replace the CMOS battery. Run the Dell Diagnostics (see "Entering the System Setup Program" on page 292. ( V A L U E) - See "Lockups and Software Problems" on page 281...
...ADDRESS) READ VALUE EXPECTING ( V A L U E) - M E M O R Y S I Z E I N C M O S I N V A L I V E - NO BOOT DEVICE AVAILABLE - Run the Dell Diagnostics (see "Running the Dell Diagnostics" on page 308. See "Entering the System Setup Program" on page 281). See "Drive Problems" on page 308). Enter the system setup... and Software Problems" on page 308). D I S K D R I N T E R R U P T - If the problem persists, replace the CMOS battery. Run the Dell Diagnostics (see "Entering the System Setup Program" on page 292. ( V A L U E) - See "Lockups and Software Problems" on page 281...
Dell™ Technology Guide
Page 278
Enter the system setup program and correct the date or time (see "Running the Dell Diagnostics" on page 308). If the problem persists, replace the CMOS battery. TI M E R C H I P C O U N T E R 2 F A I K E T H E F 1 K E Y T O S H U T D O W N . - THE AC POWER ADAPTER TYPE CANNOT BE DETERMINED. THE AC POWER ADAPTER WATTAGE AND TYPE CANNOT BE DETERMINED. U N S U P P O R T E ... CHANGED. If the problem persists, replace the CMOS battery. STRIKE THE F1 KEY TO SHUTDOWN. TO RESOLVE THIS ISSUE, TRY TO RESEAT THE MEMORY. Contact Dell for instructions, see the documentation shipped...
Enter the system setup program and correct the date or time (see "Running the Dell Diagnostics" on page 308). If the problem persists, replace the CMOS battery. TI M E R C H I P C O U N T E R 2 F A I K E T H E F 1 K E Y T O S H U T D O W N . - THE AC POWER ADAPTER TYPE CANNOT BE DETERMINED. THE AC POWER ADAPTER WATTAGE AND TYPE CANNOT BE DETERMINED. U N S U P P O R T E ... CHANGED. If the problem persists, replace the CMOS battery. STRIKE THE F1 KEY TO SHUTDOWN. TO RESOLVE THIS ISSUE, TRY TO RESEAT THE MEMORY. Contact Dell for instructions, see the documentation shipped...

Dell™ Technology Guide
Page 279
... U N A B L E T O C H A R G E B A T T E R I E S U N T I L T H I S B A T T E R Y I Z E D - WARNING! IT IS ADVISABLE TO IMMEDIATELY BACK UP YOUR DATA AND REPLACE YOUR HARD DRIVE BY CALLING YOUR SUPPORT DESK OR D E L L. - WARNING: THE BATTERY CANNOT BE IDENTIFIED. THE SYSTEM WILL NOT BOOT WITH THIS BATTERY PLUGGED IN. BATTERY IS CRITICALLY LOW. WA R N I N G : T H E T P M C O U L D N O T B E I N I T I A L I S R E M O V E D . - WARNING: DELL'S DISK MONITORING SYSTEM HAS DETECTED THAT DRIVE [0/1] ON THE [PRIMARY/SECONDARY...
... U N A B L E T O C H A R G E B A T T E R I E S U N T I L T H I S B A T T E R Y I Z E D - WARNING! IT IS ADVISABLE TO IMMEDIATELY BACK UP YOUR DATA AND REPLACE YOUR HARD DRIVE BY CALLING YOUR SUPPORT DESK OR D E L L. - WARNING: THE BATTERY CANNOT BE IDENTIFIED. THE SYSTEM WILL NOT BOOT WITH THIS BATTERY PLUGGED IN. BATTERY IS CRITICALLY LOW. WA R N I N G : T H E T P M C O U L D N O T B E I N I T I A L I S R E M O V E D . - WARNING: DELL'S DISK MONITORING SYSTEM HAS DETECTED THAT DRIVE [0/1] ON THE [PRIMARY/SECONDARY...
Dell™ Technology Guide
Page 287
... THE CABLE CONNECTIONS FOR DRIVES WITH SPINDLES AND/OR TRAYS, ENSURE THAT THE MEDIA IS SNAPPED ONTO THE SPINDLE Troubleshooting 287 Replace the battery only with your Service Manual or contact Dell (see the instructions that the original drive is incorrectly installed. R E P L A C E T H E B A T T E R Y - If the drive is not listed, see your computer. C L E A N T H E D R I V E O R D I S K - If you...
... THE CABLE CONNECTIONS FOR DRIVES WITH SPINDLES AND/OR TRAYS, ENSURE THAT THE MEDIA IS SNAPPED ONTO THE SPINDLE Troubleshooting 287 Replace the battery only with your Service Manual or contact Dell (see the instructions that the original drive is incorrectly installed. R E P L A C E T H E B A T T E R Y - If the drive is not listed, see your computer. C L E A N T H E D R I V E O R D I S K - If you...
Setup Guide
Page 5
...Inspiron Laptop 18 Right View Features 18 Left View Features 20 Front View Features 22 Computer Base and Keyboard Features 24 Touch Pad Gestures 26 Multimedia Control Keys 28 Using the Optical Drive 30 Display Features 32 Dell Extended Battery Life 34 Removing and Replacing the Battery 34 Software Features 36 Dell... DataSafe Online Backup 39 Dell Dock 40 Solving Problems 41 Beep Codes 41 Network Problems 42 ...
...Inspiron Laptop 18 Right View Features 18 Left View Features 20 Front View Features 22 Computer Base and Keyboard Features 24 Touch Pad Gestures 26 Multimedia Control Keys 28 Using the Optical Drive 30 Display Features 32 Dell Extended Battery Life 34 Removing and Replacing the Battery 34 Software Features 36 Dell... DataSafe Online Backup 39 Dell Dock 40 Solving Problems 41 Beep Codes 41 Network Problems 42 ...
Setup Guide
Page 13
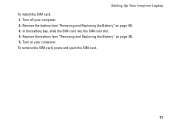
In the battery bay, slide the SIM card into the SIM card slot. 4. Setting Up Your Inspiron Laptop To install the SIM card: 1. Remove the battery (see "Removing and Replacing the Battery" on page 34). 5. To remove the SIM card, press and eject the SIM card. 11 Turn on page 34). 3. Turn off your computer. Replace the battery (see "Removing and Replacing the Battery" on your computer. 2.
In the battery bay, slide the SIM card into the SIM card slot. 4. Setting Up Your Inspiron Laptop To install the SIM card: 1. Remove the battery (see "Removing and Replacing the Battery" on page 34). 5. To remove the SIM card, press and eject the SIM card. 11 Turn on page 34). 3. Turn off your computer. Replace the battery (see "Removing and Replacing the Battery" on your computer. 2.
Setup Guide
Page 36
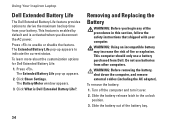
... the safety instructions that shipped with your battery. Removing and Replacing the Battery WARNING: Before you disconnect the AC power. This computer should only use batteries from Dell. To remove the battery: 1. Click Show Settings. Turn off the computer and turn it over. 2. Using Your Inspiron Laptop Dell Extended Battery Life The Dell Extended Battery Life feature provides options to indicate...
... the safety instructions that shipped with your battery. Removing and Replacing the Battery WARNING: Before you disconnect the AC power. This computer should only use batteries from Dell. To remove the battery: 1. Click Show Settings. Turn off the computer and turn it over. 2. Using Your Inspiron Laptop Dell Extended Battery Life The Dell Extended Battery Life feature provides options to indicate...
Setup Guide
Page 37
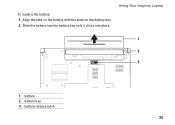
Using Your Inspiron Laptop 1 2 3 1 battery 2 battery bay 3 battery release latch 35 Slide the battery into the battery bay until it clicks into place. Align the tabs on the battery with the slots on the battery bay. 2. To replace the battery: 1.
Using Your Inspiron Laptop 1 2 3 1 battery 2 battery bay 3 battery release latch 35 Slide the battery into the battery bay until it clicks into place. Align the tabs on the battery with the slots on the battery bay. 2. To replace the battery: 1.

Setup Guide
Page 51
... display a system message that was running when the message appeared. Contact Dell (see "Contacting Dell" on page 68). Possible motherboard failure or Real Time Clock (RTC) battery low. Replace the coin-cell battery (see the Service Manual at support.dell.com/manuals) or contact Dell (see "Contacting Dell" on page 68). Hard-disk drive read failure - Keyboard failure...
... display a system message that was running when the message appeared. Contact Dell (see "Contacting Dell" on page 68). Possible motherboard failure or Real Time Clock (RTC) battery low. Replace the coin-cell battery (see the Service Manual at support.dell.com/manuals) or contact Dell (see "Contacting Dell" on page 68). Hard-disk drive read failure - Keyboard failure...
Service Manual
Page 2
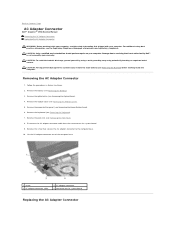
...connector 4 connector on the system board Replacing the AC Adapter Connector Back to Contents Page AC Adapter Connector Dell™ Inspiron™ 1764 Service Manual Removing the AC Adapter Connector Replacing the AC Adapter Connector WARNING: Before working... inside your computer, read the safety information that shipped with your computer. Removing the AC Adapter Connector 1. For additional safety best practices information, see Removing the Battery...
...connector 4 connector on the system board Replacing the AC Adapter Connector Back to Contents Page AC Adapter Connector Dell™ Inspiron™ 1764 Service Manual Removing the AC Adapter Connector Replacing the AC Adapter Connector WARNING: Before working... inside your computer, read the safety information that shipped with your computer. Removing the AC Adapter Connector 1. For additional safety best practices information, see Removing the Battery...

Service Manual
Page 3
...to the computer. Replace the power button panel (see Replacing the Battery). Replace the battery (see Replacing the Power Button Panel). 8. Failure to the connector on the computer, replace all screws and ensure that secures the AC adapter connector to Contents Page Replace the screw that ... cable to do so may result in Before You Begin. 2. Replace the optical drive (see Replacing the Module Cover). 9. Replace the module cover (see Replacing the Optical Drive). 10. Replace the palm rest (see Replacing the Keyboard). 7. Place the AC adapter connector in the computer base...
...to the computer. Replace the power button panel (see Replacing the Battery). Replace the battery (see Replacing the Power Button Panel). 8. Failure to the connector on the computer, replace all screws and ensure that secures the AC adapter connector to Contents Page Replace the screw that ... cable to do so may result in Before You Begin. 2. Replace the optical drive (see Replacing the Module Cover). 9. Replace the module cover (see Replacing the Optical Drive). 10. Replace the palm rest (see Replacing the Keyboard). 7. Place the AC adapter connector in the computer base...

Service Manual
Page 4
... the procedures in Before You Begin. 2. Slide the battery into the battery bay, then push to Contents Page Back to Contents Page Battery Dell™ Inspiron™ 1764 Service Manual Removing the Battery Replacing the Battery WARNING: Before working inside your computer, read the safety information that is not authorized by Dell™ is not covered by periodically touching an...
... the procedures in Before You Begin. 2. Slide the battery into the battery bay, then push to Contents Page Back to Contents Page Battery Dell™ Inspiron™ 1764 Service Manual Removing the Battery Replacing the Battery WARNING: Before working inside your computer, read the safety information that is not authorized by Dell™ is not covered by periodically touching an...
Service Manual
Page 8
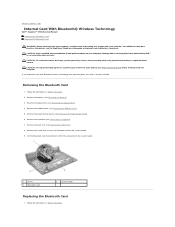
...connector on your computer. Back to Contents Page Internal Card With Bluetooth® Wireless Technology Dell™ Inspiron™ 1764 Service Manual Removing the Bluetooth Card Replacing the Bluetooth Card WARNING: Before working inside your computer, read the safety information that shipped ... You Begin. Remove the module cover (see Removing the Palm Rest). 8. Remove the battery (see Removing the Power Button Panel). 6. Remove the power button panel (see Removing the Battery). 3. CAUTION: To avoid electrostatic discharge, ground yourself by using a wrist grounding strap or...
...connector on your computer. Back to Contents Page Internal Card With Bluetooth® Wireless Technology Dell™ Inspiron™ 1764 Service Manual Removing the Bluetooth Card Replacing the Bluetooth Card WARNING: Before working inside your computer, read the safety information that shipped ... You Begin. Remove the module cover (see Removing the Palm Rest). 8. Remove the battery (see Removing the Power Button Panel). 6. Remove the power button panel (see Removing the Battery). 3. CAUTION: To avoid electrostatic discharge, ground yourself by using a wrist grounding strap or...

Service Manual
Page 9
... power button panel (see Replacing the Palm Rest). 5. Replace the keyboard (see Replacing the Optical Drive). 8. Replace the optical drive (see Replacing the Keyboard). 6. Replace the module cover (see Replacing the Battery). Replace the screw that no stray screws remain inside the computer. Failure to do so may result in damage to Contents Page Replace the battery (see Replacing the Module Cover...
... power button panel (see Replacing the Palm Rest). 5. Replace the keyboard (see Replacing the Optical Drive). 8. Replace the optical drive (see Replacing the Keyboard). 6. Replace the module cover (see Replacing the Battery). Replace the screw that no stray screws remain inside the computer. Failure to do so may result in damage to Contents Page Replace the battery (see Replacing the Module Cover...
Service Manual
Page 10
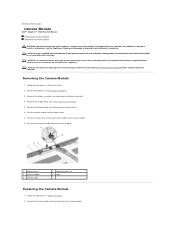
...display cover. 7. Connect the camera cable to the connector on the back of the computer). Remove the display bezel (see Removing the Battery) before working inside the computer. Follow the procedures in Before You Begin. 2. Disconnect the camera cable from the camera module. 1 display...that is not authorized by Dell™ is not covered by periodically touching an unpainted metal surface (such as a connector on the camera module. Back to Contents Page Camera Module Dell™ Inspiron™ 1764 Service Manual Removing the Camera Module Replacing the Camera Module WARNING: ...
...display cover. 7. Connect the camera cable to the connector on the back of the computer). Remove the display bezel (see Removing the Battery) before working inside the computer. Follow the procedures in Before You Begin. 2. Disconnect the camera cable from the camera module. 1 display...that is not authorized by Dell™ is not covered by periodically touching an unpainted metal surface (such as a connector on the camera module. Back to Contents Page Camera Module Dell™ Inspiron™ 1764 Service Manual Removing the Camera Module Replacing the Camera Module WARNING: ...


