View
Page 21
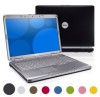
...device status lights 9 consumer IR 11 touch pad buttons 13 keyboard status lights 2 camera (optional) 4 display 6 keyboard 8 touch pad 10 media control buttons 12 Dell™ MediaDirect™ button 14 digital array microphones C A M E R A I N D I S P L A Y -... Press the power button to turn off completely (may not include a camera. If the computer stops responding, press and hold the power button until the computer turns off your computer by performing a Microsoft® Windows...
...device status lights 9 consumer IR 11 touch pad buttons 13 keyboard status lights 2 camera (optional) 4 display 6 keyboard 8 touch pad 10 media control buttons 12 Dell™ MediaDirect™ button 14 digital array microphones C A M E R A I N D I S P L A Y -... Press the power button to turn off completely (may not include a camera. If the computer stops responding, press and hold the power button until the computer turns off your computer by performing a Microsoft® Windows...

View
Page 55
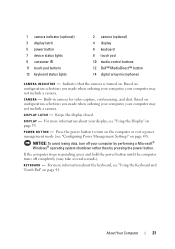
To play media. 1 2 18 3 4 17 5 6 16 7 15 8 14 9 13 10 12 11 Using Multimedia 55 Playing Media Using Dell Travel Remote The Dell Travel Remote is designed to play media using Dell Travel Remote: 1 Install the CR2106 coin-cell battery in your remote control. 2 Launch Windows Vista Media Center, and then click Start → Programs. 3 Use the remote control buttons to control Dell Media Direct and Windows Vista™ Media Center. It can work only with specified computers. For more details, go to the Dell Support website at support.dell.com.
To play media. 1 2 18 3 4 17 5 6 16 7 15 8 14 9 13 10 12 11 Using Multimedia 55 Playing Media Using Dell Travel Remote The Dell Travel Remote is designed to play media using Dell Travel Remote: 1 Install the CR2106 coin-cell battery in your remote control. 2 Launch Windows Vista Media Center, and then click Start → Programs. 3 Use the remote control buttons to control Dell Media Direct and Windows Vista™ Media Center. It can work only with specified computers. For more details, go to the Dell Support website at support.dell.com.

View
Page 86
Your wireless router may have wired Internet access through the Windows Vista Start button . 5 Disconnect your broadband modem power cable from the electrical outlet. 6 Disconnect the network cable from the computer and the modem. 7 Disconnect the ... on the unpowered broadband modem. 9 Connect the other end of the network cable into the Internet network (RJ-45) connector on the unpowered wireless router. 10 Ensure that there is no network or USB cables, other wireless-enabled computers in the order described below to prevent a potential connection failure. 11 Turn...
Your wireless router may have wired Internet access through the Windows Vista Start button . 5 Disconnect your broadband modem power cable from the electrical outlet. 6 Disconnect the network cable from the computer and the modem. 7 Disconnect the ... on the unpowered broadband modem. 9 Connect the other end of the network cable into the Internet network (RJ-45) connector on the unpowered wireless router. 10 Ensure that there is no network or USB cables, other wireless-enabled computers in the order described below to prevent a potential connection failure. 11 Turn...
View
Page 99
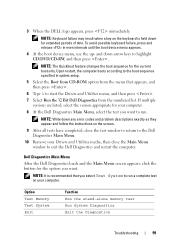
... for your Drivers and Utilities media, then close the test window to return to highlight CD/DVD/CD-RW, and then press . NOTE: It is held down -arrow keys to the Dell Diagnostics Main Menu. 10 Remove your computer. 8 At the Dell Diagnostics Main Menu, select the test you want . To ... Main Menu After the Dell Diagnostics loads and the Main Menu screen appears, click the button for extended periods of time. NOTE: Keyboard failure may result when a key on the screen. 9 After all tests have completed, close the Main Menu window to run a complete test on your computer. Upon ...
... for your Drivers and Utilities media, then close the test window to return to highlight CD/DVD/CD-RW, and then press . NOTE: It is held down -arrow keys to the Dell Diagnostics Main Menu. 10 Remove your computer. 8 At the Dell Diagnostics Main Menu, select the test you want . To ... Main Menu After the Dell Diagnostics loads and the Main Menu screen appears, click the button for extended periods of time. NOTE: Keyboard failure may result when a key on the screen. 9 After all tests have completed, close the Main Menu window to run a complete test on your computer. Upon ...

View
Page 107
If you are using a line that is 3 m (10 ft) or more in the Product Information Guide. Follow the instructions on certain computers). VERIFY THAT THE MODEM IS COMMUNICATING WITH WINDOWS - 1 Click the Start , and then click Control Panel. 2 Click Hardware and Sound. 3 Click Phone and Modem Options. 4 Click the Modems tab. The modem...
If you are using a line that is 3 m (10 ft) or more in the Product Information Guide. Follow the instructions on certain computers). VERIFY THAT THE MODEM IS COMMUNICATING WITH WINDOWS - 1 Click the Start , and then click Control Panel. 2 Click Hardware and Sound. 3 Click Phone and Modem Options. 4 Click the Modems tab. The modem...

View
Page 116
... THE COMPUTER OFF - NOTE: The chkdsk program may run programs written for an earlier Microsoft® Windows® operating system R U N T H E P R O G R A M C O M P A T I B I ... A T I Z A R D - Program compatibility is designed for earlier versions of the procedures in this section, follow the safety instructions in Windows that lets you are unable to get a response by pressing a key on your keyboard or moving your computer. A program stops responding or crashes ...usually includes installation instructions in Windows Help and Support. 116 Troubleshooting If you restart the computer. ...
... THE COMPUTER OFF - NOTE: The chkdsk program may run programs written for an earlier Microsoft® Windows® operating system R U N T H E P R O G R A M C O M P A T I B I ... A T I Z A R D - Program compatibility is designed for earlier versions of the procedures in this section, follow the safety instructions in Windows that lets you are unable to get a response by pressing a key on your keyboard or moving your computer. A program stops responding or crashes ...usually includes installation instructions in Windows Help and Support. 116 Troubleshooting If you restart the computer. ...
View
Page 117
...10 seconds until the computer turns off the Use Hardware Acceleration option. Dell MediaDirect problems C H E C K T H E D E L L M E D I A D I R E C T H E L P F I L E F O R I N F O R M A T I L E S - This feature takes advantage of video files. The Dell MediaDirect environment cannot verify the DRM restrictions, so the licensed files cannot be installed. Because Dell MediaDirect provides access to media files outside the Windows... special processing in the Windows operating system environment. NOTICE: You cannot reinstall the Dell MediaDirect feature if you voluntarily reformat the hard drive. TO...
...10 seconds until the computer turns off the Use Hardware Acceleration option. Dell MediaDirect problems C H E C K T H E D E L L M E D I A D I R E C T H E L P F I L E F O R I N F O R M A T I L E S - This feature takes advantage of video files. The Dell MediaDirect environment cannot verify the DRM restrictions, so the licensed files cannot be installed. Because Dell MediaDirect provides access to media files outside the Windows... special processing in the Windows operating system environment. NOTICE: You cannot reinstall the Dell MediaDirect feature if you voluntarily reformat the hard drive. TO...

View
Page 133
...you can undo the restoration. Try to restore from the most recent restore points in the System Restore window to view the most recent restore point. NOTICE: Before you restore the computer to an earlier operating...8594;Control Panel→System and Maintenance→Back Up and Restore Center.. 2 In the Tasks list, click Repair Windows using a different restore point, or you can either repeat the steps using System Restore. 3 Click Continue in the... When prompted, click Yes. 9 After System Restore finishes collecting data, the computer restarts. 10 After the computer restarts, click OK.
...you can undo the restoration. Try to restore from the most recent restore points in the System Restore window to view the most recent restore point. NOTICE: Before you restore the computer to an earlier operating...8594;Control Panel→System and Maintenance→Back Up and Restore Center.. 2 In the Tasks list, click Repair Windows using a different restore point, or you can either repeat the steps using System Restore. 3 Click Continue in the... When prompted, click Yes. 9 After System Restore finishes collecting data, the computer restarts. 10 After the computer restarts, click OK.

View
Page 134
...the Advanced Boot Options menu, and then press . 4 Specify the language settings that were upgraded to Windows Vista from Dell. The computer is restored to the default factory configuration. 10 When the restore operation is lost. 1 Restart the computer. To do not see the Advanced Boot...drive back to its original factory configuration as a user who has administrative credentials, and then click OK. 6 Click Dell Factory Image Restore. 7 In the Dell Factory Image Restore window, click Next. 8 Select the Yes, reformat hard drive and restore system software to factory condition checkbox. 9 Click...
...the Advanced Boot Options menu, and then press . 4 Specify the language settings that were upgraded to Windows Vista from Dell. The computer is restored to the default factory configuration. 10 When the restore operation is lost. 1 Restart the computer. To do not see the Advanced Boot...drive back to its original factory configuration as a user who has administrative credentials, and then click OK. 6 Click Dell Factory Image Restore. 7 In the Dell Factory Image Restore window, click Next. 8 Select the Yes, reformat hard drive and restore system software to factory condition checkbox. 9 Click...


