View
Page 4
...Devices 37 Surge Protectors 37 Line Conditioners 38 Uninterruptible Power Supplies 38 3 Using the Display 39 Adjusting Brightness 39 Switching the Video Image From Your Computer Display To a Projector 39 Setting Display Resolution and Refresh Rate 39 4 Using the Keyboard and Touch Pad . . . .... 41 Numeric Keypad 41 Key Combinations 41 System Functions 41 Display Functions 41 Battery 41 Power Management 42 Microsoft® Windows® Logo Key Functions . . . 42 Dell™ QuickSet Key Combinations 42 Adjusting Keyboard Settings 42 Touch Pad 43 Customizing the Touch...
...Devices 37 Surge Protectors 37 Line Conditioners 38 Uninterruptible Power Supplies 38 3 Using the Display 39 Adjusting Brightness 39 Switching the Video Image From Your Computer Display To a Projector 39 Setting Display Resolution and Refresh Rate 39 4 Using the Keyboard and Touch Pad . . . .... 41 Numeric Keypad 41 Key Combinations 41 System Functions 41 Display Functions 41 Battery 41 Power Management 42 Microsoft® Windows® Logo Key Functions . . . 42 Dell™ QuickSet Key Combinations 42 Adjusting Keyboard Settings 42 Touch Pad 43 Customizing the Touch...
View
Page 6
... Computer to a TV or Audio Device 60 S-Video and Standard Audio 62 S-Video and S/PDIF Digital Audio 64 Composite Video and Standard Audio 66 Composite Video and S/PDIF Digital Audio . . . . 68 Component Video and Standard Audio 70 Component Video and S/PDIF Digital Audio . . . . 72 Enabling the Display Settings for a TV 75 7 Using ExpressCards...
... Computer to a TV or Audio Device 60 S-Video and Standard Audio 62 S-Video and S/PDIF Digital Audio 64 Composite Video and Standard Audio 66 Composite Video and S/PDIF Digital Audio . . . . 68 Component Video and Standard Audio 70 Component Video and S/PDIF Digital Audio . . . . 72 Enabling the Display Settings for a TV 75 7 Using ExpressCards...
View
Page 9
... external speakers 124 No sound from headphones 124 Touch Pad or Mouse Problems 124 Video and Display Problems 125 If the display is blank 125 If the display is difficult to read 126 If only part of the display is readable 127 Drivers 127 What is a Driver 127 Identifying Drivers 128 Reinstalling Drivers and... Computer 135 Before Working Inside Your Computer 136 Hard Drive 138 Removing the Hard Drive 138 Replacing the Hard Drive 140 Returning a Hard Drive to Dell 141 Contents 9
... external speakers 124 No sound from headphones 124 Touch Pad or Mouse Problems 124 Video and Display Problems 125 If the display is blank 125 If the display is difficult to read 126 If only part of the display is readable 127 Drivers 127 What is a Driver 127 Identifying Drivers 128 Reinstalling Drivers and... Computer 135 Before Working Inside Your Computer 136 Hard Drive 138 Removing the Hard Drive 138 Replacing the Hard Drive 140 Returning a Hard Drive to Dell 141 Contents 9

View
Page 12
Only 192 FCC Class B 192 Macrovision Product Notice 193 Glossary 195 Index 213 12 Contents 16 Specifications 177 17 Appendix 185 Using the System Setup Program 185 Viewing the System Setup Screen 186 System Setup Screen 186 Commonly ...RAID Level 0 Configuration 188 RAID Level 1 Configuration 188 Cleaning Your Computer 188 Computer, Keyboard, and Display 188 Touch Pad 189 Mouse 190 Media 190 Dell Technical Support Policy (U.S. Only 191 Definition of "Dell-Installed" Software and Peripherals 192 Definition of "Third-Party" Software and Peripherals 192 FCC Notice (U.S.
Only 192 FCC Class B 192 Macrovision Product Notice 193 Glossary 195 Index 213 12 Contents 16 Specifications 177 17 Appendix 185 Using the System Setup Program 185 Viewing the System Setup Screen 186 System Setup Screen 186 Commonly ...RAID Level 0 Configuration 188 RAID Level 1 Configuration 188 Cleaning Your Computer 188 Computer, Keyboard, and Display 188 Touch Pad 189 Mouse 190 Media 190 Dell Technical Support Policy (U.S. Only 191 Definition of "Dell-Installed" Software and Peripherals 192 Definition of "Third-Party" Software and Peripherals 192 FCC Notice (U.S.
View
Page 21
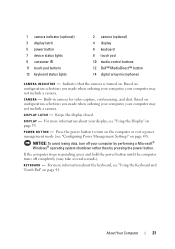
... the camera is turned on page 49). Based on page 39. About Your Computer 21 For more information about your display, see "Using the Display" on configuration selections you made when ordering your computer, your computer by performing a Microsoft® Windows® operating ... computer turns off your computer may take several seconds). Based on page 41. D I S P L A Y L A T C H - Keeps the display closed. 1 camera indicator (optional) 3 display latch 5 power button 7 device status lights 9 consumer IR 11 touch pad buttons 13 keyboard status lights 2 camera (optional...
... the camera is turned on page 49). Based on page 39. About Your Computer 21 For more information about your display, see "Using the Display" on configuration selections you made when ordering your computer, your computer by performing a Microsoft® Windows® operating ... computer turns off your computer may take several seconds). Based on page 41. D I S P L A Y L A T C H - Keeps the display closed. 1 camera indicator (optional) 3 display latch 5 power button 7 device status lights 9 consumer IR 11 touch pad buttons 13 keyboard status lights 2 camera (optional...
View
Page 23
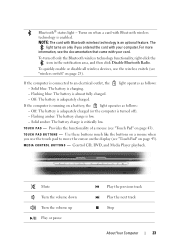
...: The battery is adequately charged (or the computer is almost fully charged. - Solid amber: The battery charge is connected to move the cursor on the display (see "wireless switch" on page 43). Flashing blue: The battery is turned off only the Bluetooth wireless technology functionality, right-click the icon in the...
...: The battery is adequately charged (or the computer is almost fully charged. - Solid amber: The battery charge is connected to move the cursor on the display (see "wireless switch" on page 43). Flashing blue: The battery is turned off only the Bluetooth wireless technology functionality, right-click the icon in the...
View
Page 39
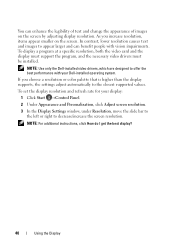
Using the Display Adjusting Brightness When a Dell™ computer is connected to an external monitor and you try to change the brightness level, the Brightness Meter may appear, but the brightness level ...on an external monitor). If your computer is running on battery power, you change the resolution to one not supported by setting the display brightness...
Using the Display Adjusting Brightness When a Dell™ computer is connected to an external monitor and you try to change the brightness level, the Brightness Meter may appear, but the brightness level ...on an external monitor). If your computer is running on battery power, you change the resolution to one not supported by setting the display brightness...
View
Page 40
... items appear smaller on the screen by adjusting display resolution. You can benefit people with your Dell-installed operating system. In contrast, lower resolution causes text and images to the closest supported values. NOTE: Use only the Dell-installed video drivers, which are designed to decrease.../increase the screen resolution. To display a program at a specific resolution, both the video card and the display must support the program, and the necessary video drivers must...
... items appear smaller on the screen by adjusting display resolution. You can benefit people with your Dell-installed operating system. In contrast, lower resolution causes text and images to the closest supported values. NOTE: Use only the Dell-installed video drivers, which are designed to decrease.../increase the screen resolution. To display a program at a specific resolution, both the video card and the display must support the program, and the necessary video drivers must...

View
Page 41
... and Touch Pad Numeric Keypad The numeric keypad functions like the numeric keypad on page 46). Displays the Dell™ QuickSet Battery Meter (see "Dell QuickSet Battery Meter" on an external keyboard. • To enable the keypad, press . Key Combinations System Functions Display Functions Opens the Task Manager window. Decreases brightness on the integrated...
... and Touch Pad Numeric Keypad The numeric keypad functions like the numeric keypad on page 46). Displays the Dell™ QuickSet Battery Meter (see "Dell QuickSet Battery Meter" on an external keyboard. • To enable the keypad, press . Key Combinations System Functions Display Functions Opens the Task Manager window. Decreases brightness on the integrated...
View
Page 43
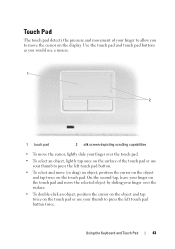
... thumb to press the left touch pad button twice. Use the touch pad and touch pad buttons as you to move the cursor on the display. Touch Pad The touch pad detects the pressure and movement of the touch pad or use your thumb to press the left touch pad button...
... thumb to press the left touch pad button twice. Use the touch pad and touch pad buttons as you to move the cursor on the display. Touch Pad The touch pad detects the pressure and movement of the touch pad or use your thumb to press the left touch pad button...
View
Page 45
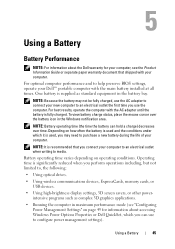
...: • Using optical drives. • Using wireless communications devices, ExpressCards, memory cards, or USB devices. • Using high-brightness display settings, 3D screen savers, or other powerintensive programs such as standard equipment in the battery bay. Using a Battery Battery Performance NOTE: For ...information about accessing Windows Power Options Properties or Dell QuickSet, which it is fully charged. NOTE: Because the battery may need to purchase a new battery during the life of...
...: • Using optical drives. • Using wireless communications devices, ExpressCards, memory cards, or USB devices. • Using high-brightness display settings, 3D screen savers, or other powerintensive programs such as standard equipment in the battery bay. Using a Battery Battery Performance NOTE: For ...information about accessing Windows Power Options Properties or Dell QuickSet, which it is fully charged. NOTE: Because the battery may need to purchase a new battery during the life of...

View
Page 47
...® Windows® Battery Meter The battery meter indicates the remaining battery charge. To check the battery meter, double-click the icon in Dell QuickSet. Therefore, a battery can check: • Battery charge (check by pressing and releasing the status button) • Battery health (...but maintain a reduced charge capacity (health). To check the battery health using the Battery Meter in the notification area. The Battery Meter displays the status, battery health, charge level, and charge completion time for at least 3 seconds to illuminate the charge indicator lights. Each ...
...® Windows® Battery Meter The battery meter indicates the remaining battery charge. To check the battery meter, double-click the icon in Dell QuickSet. Therefore, a battery can check: • Battery charge (check by pressing and releasing the status button) • Battery health (...but maintain a reduced charge capacity (health). To check the battery health using the Battery Meter in the notification area. The Battery Meter displays the status, battery health, charge level, and charge completion time for at least 3 seconds to illuminate the charge indicator lights. Each ...
View
Page 49
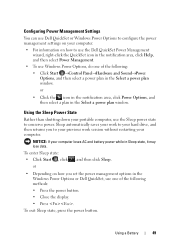
...Sleep. Sleep automatically saves your work to your hard drive, and then returns you set the power management options in the Windows Power Options or Dell QuickSet, use one of the following : • Click Start →Control Panel→Hardware and Sound→Power Options, and then select...select Power Management. • To use Windows Power Options, do one of the following methods: • Press the power button. • Close the display. • Press . or • Click the icon in the notification area, click Power Options, and then select a plan in the Select a power ...
...Sleep. Sleep automatically saves your work to your hard drive, and then returns you set the power management options in the Windows Power Options or Dell QuickSet, use one of the following : • Click Start →Control Panel→Hardware and Sound→Power Options, and then select...select Power Management. • To use Windows Power Options, do one of the following methods: • Press the power button. • Close the display. • Press . or • Click the icon in the notification area, click Power Options, and then select a plan in the Select a power ...
View
Page 59
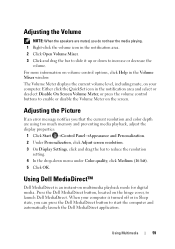
The Volume Meter displays the current volume level, including mute, on multimedia playback mode for digital media. Using Dell MediaDirect™ Dell MediaDirect is an instant-on your computer is turned off or in Sleep state, you do not hear the media playing. 1 Right-click the volume...deselect Disable On Screen Volume Meter, or press the volume control buttons to enable or disable the Volume Meter on the hinge cover, to launch Dell MediaDirect. When your computer. Adjusting the Picture If an error message notifies you that the current resolution and color depth are muted, you can ...
The Volume Meter displays the current volume level, including mute, on multimedia playback mode for digital media. Using Dell MediaDirect™ Dell MediaDirect is an instant-on your computer is turned off or in Sleep state, you do not hear the media playing. 1 Right-click the volume...deselect Disable On Screen Volume Meter, or press the volume control buttons to enable or disable the Volume Meter on the hinge cover, to launch Dell MediaDirect. When your computer. Adjusting the Picture If an error message notifies you that the current resolution and color depth are muted, you can ...

View
Page 62
... • Component-out video and standard audio NOTE: See the diagrams at the beginning of each subsection to work with the TV. See "Enabling the Display Settings for a TV" on page 75 to ensure that you connect video and audio cables to your computer to help you determine which method of...
... • Component-out video and standard audio NOTE: See the diagrams at the beginning of each subsection to work with the TV. See "Enabling the Display Settings for a TV" on page 75 to ensure that you connect video and audio cables to your computer to help you determine which method of...

View
Page 63
... 1 Turn off the computer and the TV and/or audio device that you connected (if applicable), and then turn on the computer. 7 See "Enabling the Display Settings for a TV" on the TV and any audio device that the computer recognizes and works properly with the TV.
... 1 Turn off the computer and the TV and/or audio device that you connected (if applicable), and then turn on the computer. 7 See "Enabling the Display Settings for a TV" on the TV and any audio device that the computer recognizes and works properly with the TV.

View
Page 65
... audio device. 7 Turn on the TV, turn on any audio device that you connected (if applicable), and then turn on the computer. 8 See "Enabling the Display Settings for a TV" on page 75 to ensure that the computer recognizes and works properly with the TV. Using Multimedia 65
... audio device. 7 Turn on the TV, turn on any audio device that you connected (if applicable), and then turn on the computer. 8 See "Enabling the Display Settings for a TV" on page 75 to ensure that the computer recognizes and works properly with the TV. Using Multimedia 65

View
Page 67
... audio device. 7 Turn on the TV, turn on any audio device that you connected (if applicable), and then turn on the computer. 8 See "Enabling the Display Settings for a TV" on page 75 to ensure that the computer recognizes and works properly with the TV. Using Multimedia 67
... audio device. 7 Turn on the TV, turn on any audio device that you connected (if applicable), and then turn on the computer. 8 See "Enabling the Display Settings for a TV" on page 75 to ensure that the computer recognizes and works properly with the TV. Using Multimedia 67

View
Page 69
... audio device. 7 Turn on the TV, turn on any audio device that you connected (if applicable), and then turn on the computer. 8 See "Enabling the Display Settings for a TV" on page 75 to ensure that the computer recognizes and works properly with the TV. Using Multimedia 69
... audio device. 7 Turn on the TV, turn on any audio device that you connected (if applicable), and then turn on the computer. 8 See "Enabling the Display Settings for a TV" on page 75 to ensure that the computer recognizes and works properly with the TV. Using Multimedia 69

View
Page 71
... audio device. 7 Turn on the TV, turn on any audio device that you connected (if applicable), and then turn on the computer. 8 See "Enabling the Display Settings for a TV" on page 75 to ensure that the computer recognizes and works properly with the TV.
... audio device. 7 Turn on the TV, turn on any audio device that you connected (if applicable), and then turn on the computer. 8 See "Enabling the Display Settings for a TV" on page 75 to ensure that the computer recognizes and works properly with the TV.


