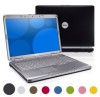
View
Page 9
... Windows Vista™ Operating System 130 Restoring Your Operating System 131 Using Windows Vista System Restore 132 12 Adding and Replacing Parts 135 Before You Begin 135 Recommended Tools 135 Turning Off Your Computer 135 Before Working Inside Your Computer 136 Hard Drive 138 Removing the Hard Drive 138 Replacing the Hard Drive 140 Returning a Hard Drive to Dell 141 Contents 9
... Windows Vista™ Operating System 130 Restoring Your Operating System 131 Using Windows Vista System Restore 132 12 Adding and Replacing Parts 135 Before You Begin 135 Recommended Tools 135 Turning Off Your Computer 135 Before Working Inside Your Computer 136 Hard Drive 138 Removing the Hard Drive 138 Replacing the Hard Drive 140 Returning a Hard Drive to Dell 141 Contents 9
View
Page 109
..., if necessary, replace them (see "Hard Drive" on page 146). The message is unable to a different disk or use these characters in the Dell Diagnostics (see "Dell Diagnostics" on page 105). Then, shut down the computer, remove the hard drive (see "Drive Problems" on page 97). Troubleshooting 109 D E C R E A S I N G A V A I O N E R R O R - The hard drive failed initialization. Run the hard drive tests in the hard drive bay (see...
..., if necessary, replace them (see "Hard Drive" on page 146). The message is unable to a different disk or use these characters in the Dell Diagnostics (see "Dell Diagnostics" on page 105). Then, shut down the computer, remove the hard drive (see "Drive Problems" on page 97). Troubleshooting 109 D E C R E A S I N G A V A I O N E R R O R - The hard drive failed initialization. Run the hard drive tests in the hard drive bay (see...

View
Page 111
... A L L O C A T I L U R E - A memory module may be faulty or improperly seated. Reinstall the memory modules and, if necessary, replace them (see "Memory" on page 97). A memory module may be faulty or improperly seated. The computer cannot find the hard drive. Contact Dell (see "Memory" on page 175). N O T I M E R T I C K I V E - Try to run the program again. If the error message...
... A L L O C A T I L U R E - A memory module may be faulty or improperly seated. Reinstall the memory modules and, if necessary, replace them (see "Memory" on page 97). A memory module may be faulty or improperly seated. The computer cannot find the hard drive. Contact Dell (see "Memory" on page 175). N O T I M E R T I C K I V E - Try to run the program again. If the error message...
View
Page 138
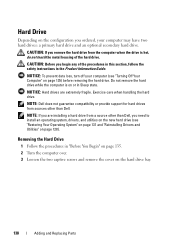
... the hard drive bay. 138 Adding and Replacing Parts Exercise care when handling the hard drive. NOTE: If you ordered, your computer may have two hard drives: a primary hard drive and an optional secondary hard drive. Removing the Hard Drive 1 Follow the procedures in Sleep state. CAUTION: If you begin any of the hard drive. CAUTION: Before you remove the hard drive from sources other than Dell. Hard Drive Depending...
... the hard drive bay. 138 Adding and Replacing Parts Exercise care when handling the hard drive. NOTE: If you ordered, your computer may have two hard drives: a primary hard drive and an optional secondary hard drive. Removing the Hard Drive 1 Follow the procedures in Sleep state. CAUTION: If you begin any of the hard drive. CAUTION: Before you remove the hard drive from sources other than Dell. Hard Drive Depending...

View
Page 139
Adding and Replacing Parts 139 1 2 1 captive screws (2) 2 hard drive cover NOTICE: When the hard drive is not in the computer, store it in protective antistatic packaging (see "Protecting Against Electrostatic Discharge" in the Product Information Guide). 4 Using the pull-tab on the hard drive, pull the hard drive out of the hard drive bay.
Adding and Replacing Parts 139 1 2 1 captive screws (2) 2 hard drive cover NOTICE: When the hard drive is not in the computer, store it in protective antistatic packaging (see "Protecting Against Electrostatic Discharge" in the Product Information Guide). 4 Using the pull-tab on the hard drive, pull the hard drive out of the hard drive bay.

View
Page 140
NOTICE: Use firm and even pressure to slide the drive into the bay and press down to fully seat it. 3 Replace and tighten the screws on the hard drive. 4 Replace the hard drive cover and tighten the screws. 5 Install the operating system for your computer, as needed (see "Restoring Your ...Operating System" on page 131). 6 Install the drivers and utilities for storing or shipping the hard drive. NOTICE: If you are installing only one hard drive,...
NOTICE: Use firm and even pressure to slide the drive into the bay and press down to fully seat it. 3 Replace and tighten the screws on the hard drive. 4 Replace the hard drive cover and tighten the screws. 5 Install the operating system for your computer, as needed (see "Restoring Your ...Operating System" on page 131). 6 Install the drivers and utilities for storing or shipping the hard drive. NOTICE: If you are installing only one hard drive,...
View
Page 141
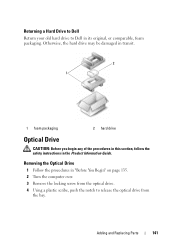
... Replacing Parts 141 Otherwise, the hard drive may be damaged in transit. 2 1 1 foam packaging 2 hard drive Optical Drive CAUTION: Before you begin any of the procedures in this section, follow the safety instructions in "Before You Begin" on page 135. 2 Turn the computer over. 3 Remove the locking screw from the bay. Returning a Hard Drive to Dell Return your old hard drive...
... Replacing Parts 141 Otherwise, the hard drive may be damaged in transit. 2 1 1 foam packaging 2 hard drive Optical Drive CAUTION: Before you begin any of the procedures in this section, follow the safety instructions in "Before You Begin" on page 135. 2 Turn the computer over. 3 Remove the locking screw from the bay. Returning a Hard Drive to Dell Return your old hard drive...

View
Page 188
... capacities of the procedures in this section, follow the safety instructions located in the Product Information Guide. A replacement drive can then be rebuilt using two 120-GB hard drives collectively has a maximum of data sequentially across the physical drives to provide a high data access rate. RAID Level 1 Configuration RAID level 1 uses a data-redundancy storage technique...
... capacities of the procedures in this section, follow the safety instructions located in the Product Information Guide. A replacement drive can then be rebuilt using two 120-GB hard drives collectively has a maximum of data sequentially across the physical drives to provide a high data access rate. RAID Level 1 Configuration RAID level 1 uses a data-redundancy storage technique...

View
Page 215
..., 14 ergonomics information, 14 error messages, 108 ExpressCard slot description, 25 ExpressCards, 77 blanks, 77, 79 installing, 78 removing, 79 H hard drive description, 25, 32 problems, 106 replacing, 138 returning to Dell, 141 hardware Dell Diagnostics, 97 Hardware Troubleshooter, 130 hinge cover removing, 142 I icons adjusting the size, 165 IEEE 1394 connector description, 28 problems...
..., 14 ergonomics information, 14 error messages, 108 ExpressCard slot description, 25 ExpressCards, 77 blanks, 77, 79 installing, 78 removing, 79 H hard drive description, 25, 32 problems, 106 replacing, 138 returning to Dell, 141 hardware Dell Diagnostics, 97 Hardware Troubleshooter, 130 hinge cover removing, 142 I icons adjusting the size, 165 IEEE 1394 connector description, 28 problems...


