View
Page 4
... Display 39 Adjusting Brightness 39 Switching the Video Image From Your Computer Display To a Projector 39 Setting Display Resolution and Refresh Rate 39 4 Using the Keyboard and Touch Pad . . . . 41 Numeric Keypad 41 Key Combinations 41 System Functions 41 Display Functions 41 Battery 41 Power Management 42 Microsoft® Windows®...
... Display 39 Adjusting Brightness 39 Switching the Video Image From Your Computer Display To a Projector 39 Setting Display Resolution and Refresh Rate 39 4 Using the Keyboard and Touch Pad . . . . 41 Numeric Keypad 41 Key Combinations 41 System Functions 41 Display Functions 41 Battery 41 Power Management 42 Microsoft® Windows®...
View
Page 8
... 114 External Keyboard problems 114 Unexpected characters 115 Lockups and Software Problems 116 The computer does not start 116 The computer stops responding 116 A program stops responding or crashes repeatedly 116 A program is designed for an earlier Microsoft® Windows® operating system . . . . . 116 A solid blue screen appears 117 Dell MediaDirect problems...
... 114 External Keyboard problems 114 Unexpected characters 115 Lockups and Software Problems 116 The computer does not start 116 The computer stops responding 116 A program stops responding or crashes repeatedly 116 A program is designed for an earlier Microsoft® Windows® operating system . . . . . 116 A solid blue screen appears 117 Dell MediaDirect problems...

View
Page 10
... the Optical Drive 141 Replacing the Optical Drive 142 Hinge Cover 142 Removing the Hinge Cover 143 Replacing the Hinge Cover 143 Keyboard 144 Removing the Keyboard 144 Replacing the Keyboard 145 Memory 146 Removing the DIMM A Memory Module 147 Replacing the DIMM A Memory Module . . . . . 148 Removing the DIMM B Memory Module 149 Replacing...
... the Optical Drive 141 Replacing the Optical Drive 142 Hinge Cover 142 Removing the Hinge Cover 143 Replacing the Hinge Cover 143 Keyboard 144 Removing the Keyboard 144 Replacing the Keyboard 145 Memory 146 Removing the DIMM A Memory Module 147 Replacing the DIMM A Memory Module . . . . . 148 Removing the DIMM B Memory Module 149 Replacing...

View
Page 12
Only 192 FCC Class B 192 Macrovision Product Notice 193 Glossary 195 Index 213 12 Contents 16 Specifications 177 17 Appendix 185 Using the System Setup Program 185 Viewing the System Setup Screen 186 System Setup Screen 186 Commonly Used... 188 RAID Level 0 Configuration 188 RAID Level 1 Configuration 188 Cleaning Your Computer 188 Computer, Keyboard, and Display 188 Touch Pad 189 Mouse 190 Media 190 Dell Technical Support Policy (U.S. Only 191 Definition of "Dell-Installed" Software and Peripherals 192 Definition of "Third-Party" Software and Peripherals 192 FCC Notice ...
Only 192 FCC Class B 192 Macrovision Product Notice 193 Glossary 195 Index 213 12 Contents 16 Specifications 177 17 Appendix 185 Using the System Setup Program 185 Viewing the System Setup Screen 186 System Setup Screen 186 Commonly Used... 188 RAID Level 0 Configuration 188 RAID Level 1 Configuration 188 Cleaning Your Computer 188 Computer, Keyboard, and Display 188 Touch Pad 189 Mouse 190 Media 190 Dell Technical Support Policy (U.S. Only 191 Definition of "Dell-Installed" Software and Peripherals 192 Definition of "Third-Party" Software and Peripherals 192 FCC Notice ...
View
Page 21
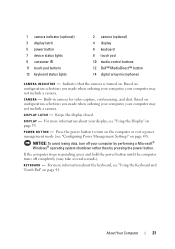
... Keeps the display closed. Press the power button to turn off completely (may not include a camera. For more information about the keyboard, see "Using the Keyboard and Touch Pad" on page 39. NOTICE: To avoid losing data, turn on the computer or exit a power management mode (see... (optional) 3 display latch 5 power button 7 device status lights 9 consumer IR 11 touch pad buttons 13 keyboard status lights 2 camera (optional) 4 display 6 keyboard 8 touch pad 10 media control buttons 12 Dell™ MediaDirect™ button 14 digital array microphones C A M E R A I N D I C A T O R -
... Keeps the display closed. Press the power button to turn off completely (may not include a camera. For more information about the keyboard, see "Using the Keyboard and Touch Pad" on page 39. NOTICE: To avoid losing data, turn on the computer or exit a power management mode (see... (optional) 3 display latch 5 power button 7 device status lights 9 consumer IR 11 touch pad buttons 13 keyboard status lights 2 camera (optional) 4 display 6 keyboard 8 touch pad 10 media control buttons 12 Dell™ MediaDirect™ button 14 digital array microphones C A M E R A I N D I C A T O R -
View
Page 22
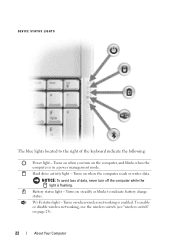
... when the computer reads or writes data. DEVICE STATUS LIGHTS The blue lights located to indicate battery charge status. NOTICE: To avoid loss of the keyboard indicate the following: Power light - Turns on when you turn off the computer while the light is flashing. Turns on page 25). 22 About Your...
... when the computer reads or writes data. DEVICE STATUS LIGHTS The blue lights located to indicate battery charge status. NOTICE: To avoid loss of the keyboard indicate the following: Power light - Turns on when you turn off the computer while the light is flashing. Turns on page 25). 22 About Your...
View
Page 24
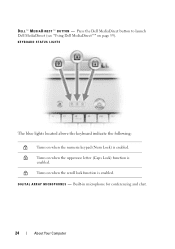
Built-in microphone for conferencing and chat. 24 About Your Computer Turns on when the numeric keypad (Num Lock) is enabled. KEYBOARD STATUS LIGHTS The blue lights located above the keyboard indicate the following: 9 Turns on when the scroll lock function is enabled. D I G I T A L A R R A Y M I R E C T ™ B U T T O N - D E L L ™ M E D I A D I C R O P H O N E S - A Turns on page 59). Press the Dell MediaDirect button to launch Dell MediaDirect (see "Using Dell MediaDirect™" on when the uppercase letter (Caps Lock) function is enabled.
Built-in microphone for conferencing and chat. 24 About Your Computer Turns on when the numeric keypad (Num Lock) is enabled. KEYBOARD STATUS LIGHTS The blue lights located above the keyboard indicate the following: 9 Turns on when the scroll lock function is enabled. D I G I T A L A R R A Y M I R E C T ™ B U T T O N - D E L L ™ M E D I A D I C R O P H O N E S - A Turns on page 59). Press the Dell MediaDirect button to launch Dell MediaDirect (see "Using Dell MediaDirect™" on when the uppercase letter (Caps Lock) function is enabled.
View
Page 28
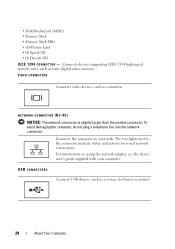
Connects devices supporting IEEE 1394 high-speed transfer rates, such as a mouse, keyboard, or printer. 28 About Your Computer USB CONNECTORS Connect USB devices, such as some digital video cameras. To avoid damaging the computer, do not plug a ...
Connects devices supporting IEEE 1394 high-speed transfer rates, such as a mouse, keyboard, or printer. 28 About Your Computer USB CONNECTORS Connect USB devices, such as some digital video cameras. To avoid damaging the computer, do not plug a ...
View
Page 29
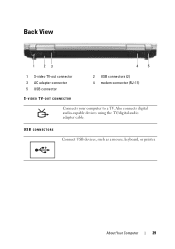
About Your Computer 29 Also connects digital audio-capable devices using the TV/digital audio adapter cable. Back View 1 23 4 5 1 S-video TV-out connector 3 AC adapter connector 5 USB connector 2 USB connectors (2) 4 modem connector (RJ-11) S-VIDEO TV-OUT CONNECTOR Connects your computer to a TV. USB CONNECTORS Connect USB devices, such as a mouse, keyboard, or printer.
About Your Computer 29 Also connects digital audio-capable devices using the TV/digital audio adapter cable. Back View 1 23 4 5 1 S-video TV-out connector 3 AC adapter connector 5 USB connector 2 USB connectors (2) 4 modem connector (RJ-11) S-VIDEO TV-OUT CONNECTOR Connects your computer to a TV. USB CONNECTORS Connect USB devices, such as a mouse, keyboard, or printer.

View
Page 41
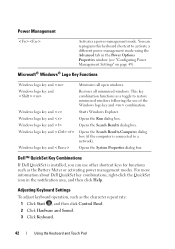
...Meter (see "Dell QuickSet Battery Meter" on an external monitor). Decreases brightness on the integrated display only (not on page 46). Key Combinations System Functions Display Functions Opens the Task Manager window. Increases brightness on the integrated display only (not on an external keyboard. •... To enable the keypad, press . Using the Keyboard and Touch Pad Numeric Keypad The numeric keypad functions like the numeric keypad on an external monitor)....
...Meter (see "Dell QuickSet Battery Meter" on an external monitor). Decreases brightness on the integrated display only (not on page 46). Key Combinations System Functions Display Functions Opens the Task Manager window. Increases brightness on the integrated display only (not on an external keyboard. •... To enable the keypad, press . Using the Keyboard and Touch Pad Numeric Keypad The numeric keypad functions like the numeric keypad on an external monitor)....
View
Page 42
... Using the Keyboard and Touch Pad Opens the System Properties dialog box. Opens the Run dialog box. Opens the Search Results dialog box. For more information about Dell QuickSet key combinations, right-...Dell QuickSet is connected to activate a different power management mode using the Advanced tab in the notification area, and then click Help. Opens the Search Results-Computer dialog box (if the computer is installed, you can reprogram this keyboard shortcut to a network). Power Management Activates a power management mode. Adjusting Keyboard Settings To adjust keyboard...
... Using the Keyboard and Touch Pad Opens the System Properties dialog box. Opens the Run dialog box. Opens the Search Results dialog box. For more information about Dell QuickSet key combinations, right-...Dell QuickSet is connected to activate a different power management mode using the Advanced tab in the notification area, and then click Help. Opens the Search Results-Computer dialog box (if the computer is installed, you can reprogram this keyboard shortcut to a network). Power Management Activates a power management mode. Adjusting Keyboard Settings To adjust keyboard...
View
Page 43
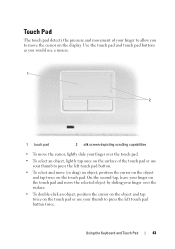
Using the Keyboard and Touch Pad 43 On the second tap, leave your finger on the touch pad and move the selected object by sliding your finger over ...
Using the Keyboard and Touch Pad 43 On the second tap, leave your finger on the touch pad and move the selected object by sliding your finger over ...
View
Page 44
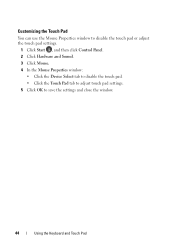
Customizing the Touch Pad You can use the Mouse Properties window to disable the touch pad or adjust the touch pad settings. 1 Click Start , and then click Control Panel. 2 Click Hardware and Sound. 3 Click Mouse. 4 In the Mouse Properties window: • Click the Device Select tab to disable the touch pad. • Click the Touch Pad tab to adjust touch pad settings. 5 Click OK to save the settings and close the window. 44 Using the Keyboard and Touch Pad
Customizing the Touch Pad You can use the Mouse Properties window to disable the touch pad or adjust the touch pad settings. 1 Click Start , and then click Control Panel. 2 Click Hardware and Sound. 3 Click Mouse. 4 In the Mouse Properties window: • Click the Device Select tab to disable the touch pad. • Click the Touch Pad tab to adjust touch pad settings. 5 Click OK to save the settings and close the window. 44 Using the Keyboard and Touch Pad
View
Page 98
... (or restart) your computer. 3 Start the Dell Diagnostics in one of your Drivers and Utilities media. 2 Shut down the error code(s) and contact Dell. Starting the Dell Diagnostics From the Drivers and Utilities Media 1 Insert your system board, keyboard, hard drive, and display. • During... the assessment, answer any key to start the Dell Diagnostics from the diagnostics utility partition on ...
... (or restart) your computer. 3 Start the Dell Diagnostics in one of your Drivers and Utilities media. 2 Shut down the error code(s) and contact Dell. Starting the Dell Diagnostics From the Drivers and Utilities Media 1 Insert your system board, keyboard, hard drive, and display. • During... the assessment, answer any key to start the Dell Diagnostics from the diagnostics utility partition on ...
View
Page 99
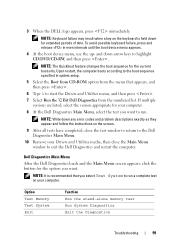
...down -arrow keys to run . If multiple versions are listed, select the version appropriate for the option you want to run a complete test on the keyboard is recommended that appears, and then press . 6 Type 1 to the boot sequence specified in even intervals until the boot device menu appears. 4 ... CD-ROM option from the numbered list. NOTE: Keyboard failure may result when a key on your computer. 8 At the Dell Diagnostics Main Menu, select the test you select Test System to highlight CD/DVD/CD-RW, and then press . 3 When the DELL logo appears, press immediately. NOTE: It is held...
...down -arrow keys to run . If multiple versions are listed, select the version appropriate for the option you want to run a complete test on the keyboard is recommended that appears, and then press . 6 Type 1 to the boot sequence specified in even intervals until the boot device menu appears. 4 ... CD-ROM option from the numbered list. NOTE: Keyboard failure may result when a key on your computer. 8 At the Dell Diagnostics Main Menu, select the test you select Test System to highlight CD/DVD/CD-RW, and then press . 3 When the DELL logo appears, press immediately. NOTE: It is held...

View
Page 110
...operating system is trying to boot to commands from a CD. The message is installed. Run the Keyboard Controller test in the Dell Diagnostics (see "Dell Diagnostics" on page 97). For external keyboards, check the cable connection. If the problem persists, try another drive. HA R D - The... system configuration information does not match the hardware configuration. Run the Keyboard Controller test in the Dell Diagnostics (see "Dell Diagnostics" on page 97). Shut down the computer, remove the hard drive (see "Hard Drive" on page 138...
...operating system is trying to boot to commands from a CD. The message is installed. Run the Keyboard Controller test in the Dell Diagnostics (see "Dell Diagnostics" on page 97). For external keyboards, check the cable connection. If the problem persists, try another drive. HA R D - The... system configuration information does not match the hardware configuration. Run the Keyboard Controller test in the Dell Diagnostics (see "Dell Diagnostics" on page 97). Shut down the computer, remove the hard drive (see "Hard Drive" on page 138...

View
Page 111
...S T U C K KEY F A I R E C T - For external keyboards or keypads, check the cable connection. L I C E N S E D C O N T E N T I S N O T A C C E S S I B L E I N M E D I A D I L U R E - N O B O O T S E C T O R O N H A R D D R I C E AVAILABLE - A chip on page 146). Dell MediaDirect™ cannot verify the Digital Rights Management (DRM) restrictions on the file, so... - A memory module may be faulty or improperly seated. Restart the computer, and avoid touching the keyboard or keys during the boot routine. Try to run the program again. If the error message still ...
...S T U C K KEY F A I R E C T - For external keyboards or keypads, check the cable connection. L I C E N S E D C O N T E N T I S N O T A C C E S S I B L E I N M E D I A D I L U R E - N O B O O T S E C T O R O N H A R D D R I C E AVAILABLE - A chip on page 146). Dell MediaDirect™ cannot verify the Digital Rights Management (DRM) restrictions on the file, so... - A memory module may be faulty or improperly seated. Restart the computer, and avoid touching the keyboard or keys during the boot routine. Try to run the program again. If the error message still ...
View
Page 113
... battery is properly inserted into the drive and try again. Contact Dell (see "Dell Diagnostics" on page 175). Replace the battery, or connect the computer to charge the battery. Ensure that supports the system configuration settings may be loose. I F Y O U H A V E P R O B L E M S W I D E D E X P R E S S C A R D - O F - T H E D E V I C E I N P R O T E C T E D M O D E - O F-D A Y CLOCK STOPPED - The keyboard controller may be malfunctioning, or a memory module may be malfunctioning...
... battery is properly inserted into the drive and try again. Contact Dell (see "Dell Diagnostics" on page 175). Replace the battery, or connect the computer to charge the battery. Ensure that supports the system configuration settings may be loose. I F Y O U H A V E P R O B L E M S W I D E D E X P R E S S C A R D - O F - T H E D E V I C E I N P R O T E C T E D M O D E - O F-D A Y CLOCK STOPPED - The keyboard controller may be malfunctioning, or a memory module may be malfunctioning...
View
Page 114
... continue the desired action. IF YOU HAVE PROBLEMS WITH AN IEEE 1394 DEVICE NOT PROVIDED BY DELL - If you attach an external keyboard, the integrated keyboard remains fully functional. Contact Dell or the IEEE 1394 device manufacturer (see "Contacting Dell" on page 175). P R O V I D E D I E E E 1 3 9 4 D E V I T H A D E L L - Keyboard Problems CAUTION: Before you perform the various checks. NOTE: Use the integrated...
... continue the desired action. IF YOU HAVE PROBLEMS WITH AN IEEE 1394 DEVICE NOT PROVIDED BY DELL - If you attach an external keyboard, the integrated keyboard remains fully functional. Contact Dell or the IEEE 1394 device manufacturer (see "Contacting Dell" on page 175). P R O V I D E D I E E E 1 3 9 4 D E V I T H A D E L L - Keyboard Problems CAUTION: Before you perform the various checks. NOTE: Use the integrated...
View
Page 115
... the characters appear now, but did not with the external keyboard, you may have a defective external keyboard. R U N T H E K E Y B O A R D D I A G N O S T I C K E Y P A D - Run the PC-AT Compatible Keyboards tests in the Dell Diagnostics (see "Contacting Dell" on page 175). Verify that the numbers lock light is not lit. Contact Dell (see "Contacting Dell" on page 175). Press to disable the numeric keypad if...
... the characters appear now, but did not with the external keyboard, you may have a defective external keyboard. R U N T H E K E Y B O A R D D I A G N O S T I C K E Y P A D - Run the PC-AT Compatible Keyboards tests in the Dell Diagnostics (see "Contacting Dell" on page 175). Verify that the numbers lock light is not lit. Contact Dell (see "Contacting Dell" on page 175). Press to disable the numeric keypad if...


