
Owners Manual
Page 3
... Tools 8 2 After Working Inside Your Computer 9 3 Removing the Battery 11 Procedure 11 4 Replacing the Battery 13 Procedure 13 Postrequisites 13 5 Removing the Memory Module(s 15 Prerequisites 15 Procedure 15 6 Replacing the Memory Module(s 17 Procedure 17 Postrequisites 17 7 Removing the Optical-Drive Assembly . . . . . 19 Prerequisites 19 Procedure 19 8 Replacing the Optical-Drive Assembly...
... Tools 8 2 After Working Inside Your Computer 9 3 Removing the Battery 11 Procedure 11 4 Replacing the Battery 13 Procedure 13 Postrequisites 13 5 Removing the Memory Module(s 15 Prerequisites 15 Procedure 15 6 Replacing the Memory Module(s 17 Procedure 17 Postrequisites 17 7 Removing the Optical-Drive Assembly . . . . . 19 Prerequisites 19 Procedure 19 8 Replacing the Optical-Drive Assembly...
Owners Manual
Page 4
... 29 Procedure 29 Postrequisites 29 13 Removing the Palm-Rest 31 Prerequisites 31 Procedure 31 14 Replacing the Palm-Rest 35 Procedure 35 Postrequisites 35 15 Removing the Wireless Mini-Card 37 Prerequisites 37 Procedure 38 16 Replacing the Wireless Mini-Card 39 Procedure 39 Postrequisites 40 17 Removing the I/O Board...
... 29 Procedure 29 Postrequisites 29 13 Removing the Palm-Rest 31 Prerequisites 31 Procedure 31 14 Replacing the Palm-Rest 35 Procedure 35 Postrequisites 35 15 Removing the Wireless Mini-Card 37 Prerequisites 37 Procedure 38 16 Replacing the Wireless Mini-Card 39 Procedure 39 Postrequisites 40 17 Removing the I/O Board...
Owners Manual
Page 15
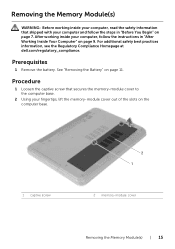
..."Removing the Battery" on page 7. Prerequisites 1 Remove the battery. For additional safety best practices information, see the Regulatory Compliance Homepage at dell.com/regulatory_compliance. Removing the Memory Module(s) WARNING: Before working inside your computer, read the safety information that secures the memory-module cover to... the memory-module cover out of the slots on the computer base. 1 captive screw 2 1 2 memory-module cover Removing the Memory Module(s) | 15 After working inside your computer, follow the steps in "After Working Inside Your Computer" on page 9.
..."Removing the Battery" on page 7. Prerequisites 1 Remove the battery. For additional safety best practices information, see the Regulatory Compliance Homepage at dell.com/regulatory_compliance. Removing the Memory Module(s) WARNING: Before working inside your computer, read the safety information that secures the memory-module cover to... the memory-module cover out of the slots on the computer base. 1 captive screw 2 1 2 memory-module cover Removing the Memory Module(s) | 15 After working inside your computer, follow the steps in "After Working Inside Your Computer" on page 9.
Owners Manual
Page 23
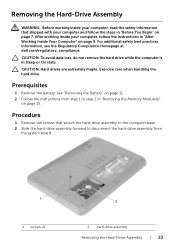
For additional safety best practices information, see the Regulatory Compliance Homepage at dell.com/regulatory_compliance. CAUTION: To avoid data loss, do not remove the hard drive while the computer is in "Before You Begin" on page 7. Procedure 1 Remove ... secure the hard-drive assembly to the computer base. 2 Slide the hard-drive assembly forward to step 2 in "After Working Inside Your Computer" on page 15. Exercise care when handling the hard drive.
For additional safety best practices information, see the Regulatory Compliance Homepage at dell.com/regulatory_compliance. CAUTION: To avoid data loss, do not remove the hard drive while the computer is in "Before You Begin" on page 7. Procedure 1 Remove ... secure the hard-drive assembly to the computer base. 2 Slide the hard-drive assembly forward to step 2 in "After Working Inside Your Computer" on page 15. Exercise care when handling the hard drive.
Owners Manual
Page 31
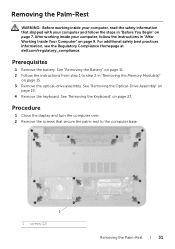
... "Removing the Keyboard" on page 19. 4 Remove the keyboard. For additional safety best practices information, see the Regulatory Compliance Homepage at dell.com/regulatory_compliance. Procedure 1 Close the display and turn the computer over. 2 Remove the screws that shipped with your computer, follow the... Before working inside your computer, read the safety information that secure the palm-rest to step 2 in "Removing the Memory Module(s)" on page 15. 3 Remove the optical-drive assembly. See "Removing the Battery" on page 11. 2 Follow the instructions from step 1 to the computer ...
... "Removing the Keyboard" on page 19. 4 Remove the keyboard. For additional safety best practices information, see the Regulatory Compliance Homepage at dell.com/regulatory_compliance. Procedure 1 Close the display and turn the computer over. 2 Remove the screws that shipped with your computer, follow the... Before working inside your computer, read the safety information that secure the palm-rest to step 2 in "Removing the Memory Module(s)" on page 15. 3 Remove the optical-drive assembly. See "Removing the Battery" on page 11. 2 Follow the instructions from step 1 to the computer ...
Owners Manual
Page 37
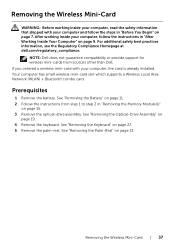
...half wireless mini-card slot which supports a Wireless Local Area Network (WLAN) + Bluetooth combo card. See "Removing the Keyboard" on page 15. 3 Remove the optical-drive assembly. Removing the Wireless Mini-Card | 37 See "Removing the Battery" on page 11. 2 Follow the... instructions from sources other than Dell. For additional safety best practices information, see the Regulatory Compliance Homepage at dell.com/regulatory_compliance. NOTE: Dell does not guarantee compatibility or provide support for wireless mini-cards from step 1 to...
...half wireless mini-card slot which supports a Wireless Local Area Network (WLAN) + Bluetooth combo card. See "Removing the Keyboard" on page 15. 3 Remove the optical-drive assembly. Removing the Wireless Mini-Card | 37 See "Removing the Battery" on page 11. 2 Follow the... instructions from sources other than Dell. For additional safety best practices information, see the Regulatory Compliance Homepage at dell.com/regulatory_compliance. NOTE: Dell does not guarantee compatibility or provide support for wireless mini-cards from step 1 to...
Owners Manual
Page 41
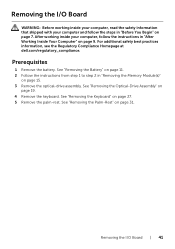
... Remove the keyboard. See "Removing the Keyboard" on page 9. For additional safety best practices information, see the Regulatory Compliance Homepage at dell.com/regulatory_compliance. After working inside your computer and follow the instructions in "Removing the Memory Module(s)" on page 7. Removing the I /O...Before working inside your computer, read the safety information that shipped with your computer, follow the steps in "Before You Begin" on page 15. 3 Remove the optical-drive assembly. See "Removing the Battery" on page 11. 2 Follow the instructions from step 1 to step ...
... Remove the keyboard. See "Removing the Keyboard" on page 9. For additional safety best practices information, see the Regulatory Compliance Homepage at dell.com/regulatory_compliance. After working inside your computer and follow the instructions in "Removing the Memory Module(s)" on page 7. Removing the I /O...Before working inside your computer, read the safety information that shipped with your computer, follow the steps in "Before You Begin" on page 15. 3 Remove the optical-drive assembly. See "Removing the Battery" on page 11. 2 Follow the instructions from step 1 to step ...
Owners Manual
Page 45
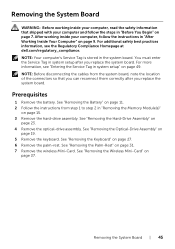
..., see "Entering the Service Tag in system setup after you replace the system board. You must enter the Service Tag in system setup" on page 15. 3 Remove the hard-drive assembly. NOTE: Before disconnecting the cables from step 1 to step 2 in the system board. See "Removing the Hard-Drive Assembly" on... the instructions in "After Working Inside Your Computer" on page 23. 4 Remove the optical-drive assembly. For more information, see the Regulatory Compliance Homepage at dell.com/regulatory_compliance.
..., see "Entering the Service Tag in system setup after you replace the system board. You must enter the Service Tag in system setup" on page 15. 3 Remove the hard-drive assembly. NOTE: Before disconnecting the cables from step 1 to step 2 in the system board. See "Removing the Hard-Drive Assembly" on... the instructions in "After Working Inside Your Computer" on page 23. 4 Remove the optical-drive assembly. For more information, see the Regulatory Compliance Homepage at dell.com/regulatory_compliance.
Owners Manual
Page 51
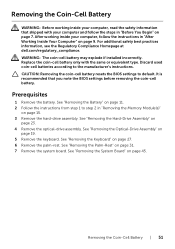
... according to default. It is recommended that shipped with the same or equivalent type. See "Removing the Hard-Drive Assembly" on page 15. 3 Remove the hard-drive assembly. WARNING: The coin-cell battery may explode if installed incorrectly. See "Removing the Battery" on ...the optical-drive assembly. Removing the Coin-Cell Battery | 51 For additional safety best practices information, see the Regulatory Compliance Homepage at dell.com/regulatory_compliance. Replace the coin-cell battery only with your computer and follow the instructions in "Before You Begin" on page 7. See...
... according to default. It is recommended that shipped with the same or equivalent type. See "Removing the Hard-Drive Assembly" on page 15. 3 Remove the hard-drive assembly. WARNING: The coin-cell battery may explode if installed incorrectly. See "Removing the Battery" on ...the optical-drive assembly. Removing the Coin-Cell Battery | 51 For additional safety best practices information, see the Regulatory Compliance Homepage at dell.com/regulatory_compliance. Replace the coin-cell battery only with your computer and follow the instructions in "Before You Begin" on page 7. See...
Owners Manual
Page 55
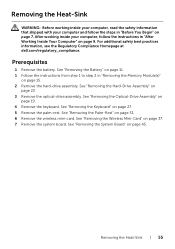
... 37. 7 Remove the system board. See "Removing the Wireless Mini-Card" on page 19. 4 Remove the keyboard. See "Removing the Hard-Drive Assembly" on page 15. 2 Remove the hard-drive assembly. Removing the Heat-Sink | 55 See "Removing the Battery" on page 11. 1 Follow the instructions from step 1 to step 2 in... page 9. See "Removing the Palm-Rest" on page 27. 5 Remove the palm-rest. For additional safety best practices information, see the Regulatory Compliance Homepage at dell.com/regulatory_compliance. See "Removing the System Board" on page 7.
... 37. 7 Remove the system board. See "Removing the Wireless Mini-Card" on page 19. 4 Remove the keyboard. See "Removing the Hard-Drive Assembly" on page 15. 2 Remove the hard-drive assembly. Removing the Heat-Sink | 55 See "Removing the Battery" on page 11. 1 Follow the instructions from step 1 to step 2 in... page 9. See "Removing the Palm-Rest" on page 27. 5 Remove the palm-rest. For additional safety best practices information, see the Regulatory Compliance Homepage at dell.com/regulatory_compliance. See "Removing the System Board" on page 7.
Owners Manual
Page 59
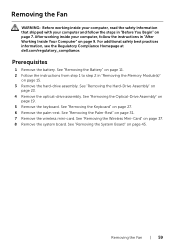
... 1 to step 2 in "Removing the Memory Module(s)" on page 31. 7 Remove the wireless mini-card. See "Removing the Palm-Rest" on page 15. 3 Remove the hard-drive assembly. See "Removing the Wireless Mini-Card" on page 27. 6 Remove the palm-rest. Removing the Fan | 59 ... See "Removing the Keyboard" on page 37. 8 Remove the system board. For additional safety best practices information, see the Regulatory Compliance Homepage at dell.com/regulatory_compliance. See "Removing the System Board" on page 19. 5 Remove the keyboard. See "Removing the Optical-Drive Assembly" on page 45....
... 1 to step 2 in "Removing the Memory Module(s)" on page 31. 7 Remove the wireless mini-card. See "Removing the Palm-Rest" on page 15. 3 Remove the hard-drive assembly. See "Removing the Wireless Mini-Card" on page 27. 6 Remove the palm-rest. Removing the Fan | 59 ... See "Removing the Keyboard" on page 37. 8 Remove the system board. For additional safety best practices information, see the Regulatory Compliance Homepage at dell.com/regulatory_compliance. See "Removing the System Board" on page 19. 5 Remove the keyboard. See "Removing the Optical-Drive Assembly" on page 45....

Owners Manual
Page 63
.... See "Removing the Hard-Drive Assembly" on page 45. See "Removing the Wireless Mini-Card" on page 15. 3 Remove the hard-drive assembly. For additional safety best practices information, see the Regulatory Compliance Homepage at dell.com/regulatory_compliance. Prerequisites 1 Remove the battery. See "Removing the Battery" on page 11. 2 Follow the instructions...
.... See "Removing the Hard-Drive Assembly" on page 45. See "Removing the Wireless Mini-Card" on page 15. 3 Remove the hard-drive assembly. For additional safety best practices information, see the Regulatory Compliance Homepage at dell.com/regulatory_compliance. Prerequisites 1 Remove the battery. See "Removing the Battery" on page 11. 2 Follow the instructions...
Owners Manual
Page 69
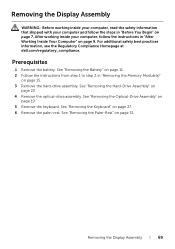
...Follow the instructions from step 1 to step 2 in "Removing the Memory Module(s)" on page 31. See "Removing the Palm-Rest" on page 15. 3 Remove the hard-drive assembly. Removing the Display Assembly | 69 Prerequisites 1 Remove the battery. See "Removing the Hard-Drive Assembly" on... instructions in "After Working Inside Your Computer" on page 9. For additional safety best practices information, see the Regulatory Compliance Homepage at dell.com/regulatory_compliance. See "Removing the Keyboard" on page 23. 4 Remove the optical-drive assembly. See "Removing the Optical-Drive Assembly...
...Follow the instructions from step 1 to step 2 in "Removing the Memory Module(s)" on page 31. See "Removing the Palm-Rest" on page 15. 3 Remove the hard-drive assembly. Removing the Display Assembly | 69 Prerequisites 1 Remove the battery. See "Removing the Hard-Drive Assembly" on... instructions in "After Working Inside Your Computer" on page 9. For additional safety best practices information, see the Regulatory Compliance Homepage at dell.com/regulatory_compliance. See "Removing the Keyboard" on page 23. 4 Remove the optical-drive assembly. See "Removing the Optical-Drive Assembly...
Owners Manual
Page 75
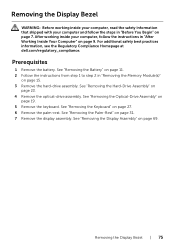
... "Removing the Optical-Drive Assembly" on page 23. 4 Remove the optical-drive assembly. For additional safety best practices information, see the Regulatory Compliance Homepage at dell.com/regulatory_compliance. After working inside your computer and follow the instructions in "After Working Inside Your Computer" on page 9. See "Removing the Palm-Rest" on...
... "Removing the Optical-Drive Assembly" on page 23. 4 Remove the optical-drive assembly. For additional safety best practices information, see the Regulatory Compliance Homepage at dell.com/regulatory_compliance. After working inside your computer and follow the instructions in "After Working Inside Your Computer" on page 9. See "Removing the Palm-Rest" on...

Owners Manual
Page 79
For additional safety best practices information, see the Regulatory Compliance Homepage at dell.com/regulatory_compliance. See "Removing the Hard-Drive Assembly" on page 9. Removing the Display Hinges | 79 After working inside your computer and follow the instructions in "... the instructions from step 1 to step 2 in "Removing the Memory Module(s)" on page 69. 8 Remove the display bezel. See "Removing the Display Assembly" on page 15. 3 Remove the hard-drive assembly. See "Removing the Keyboard" on page 27. 6 Remove the palm-rest.
For additional safety best practices information, see the Regulatory Compliance Homepage at dell.com/regulatory_compliance. See "Removing the Hard-Drive Assembly" on page 9. Removing the Display Hinges | 79 After working inside your computer and follow the instructions in "... the instructions from step 1 to step 2 in "Removing the Memory Module(s)" on page 69. 8 Remove the display bezel. See "Removing the Display Assembly" on page 15. 3 Remove the hard-drive assembly. See "Removing the Keyboard" on page 27. 6 Remove the palm-rest.
Owners Manual
Page 83
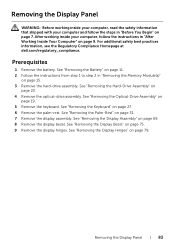
... Hinges" on page 75. 9 Remove the display hinges. For additional safety best practices information, see the Regulatory Compliance Homepage at dell.com/regulatory_compliance. See "Removing the Hard-Drive Assembly" on page 15. 3 Remove the hard-drive assembly. Removing the Display Panel | 83 See "Removing the Battery" on page 11. 2 Follow the instructions...
... Hinges" on page 75. 9 Remove the display hinges. For additional safety best practices information, see the Regulatory Compliance Homepage at dell.com/regulatory_compliance. See "Removing the Hard-Drive Assembly" on page 15. 3 Remove the hard-drive assembly. Removing the Display Panel | 83 See "Removing the Battery" on page 11. 2 Follow the instructions...
Owners Manual
Page 89
... the instructions from step 1 to step 2 in "Removing the Memory Module(s)" on page 69. 8 Remove the display bezel. See "Removing the Display Assembly" on page 15. 3 Remove the hard-drive assembly. See "Removing the Hard-Drive Assembly" on page 31. 7 Remove the display assembly. See "Removing the Palm-Rest" on page... computer and follow the instructions in "After Working Inside Your Computer" on page 9. For additional safety best practices information, see the Regulatory Compliance Homepage at dell.com/regulatory_compliance.
... the instructions from step 1 to step 2 in "Removing the Memory Module(s)" on page 69. 8 Remove the display bezel. See "Removing the Display Assembly" on page 15. 3 Remove the hard-drive assembly. See "Removing the Hard-Drive Assembly" on page 31. 7 Remove the display assembly. See "Removing the Palm-Rest" on page... computer and follow the instructions in "After Working Inside Your Computer" on page 9. For additional safety best practices information, see the Regulatory Compliance Homepage at dell.com/regulatory_compliance.
Me and My Dell
Page 3
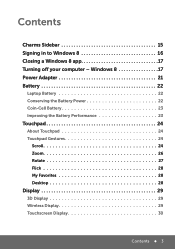
Contents Charms Sidebar 15 Signing in to Windows 8 16 Closing a Windows 8 app 17 Turning off your computer - Windows 8 17 Power Adapter 21 Battery 22 Laptop Battery 22 Conserving the Battery Power 22 Coin-Cell Battery 23 Improving the Battery Performance 23 Touchpad 24 About Touchpad 24 Touchpad Gestures 24 Scroll 24 Zoom 26 Rotate 27 Flick 28 My Favorites 28 Desktop 28 Display 29 3D Display 29 Wireless Display 29 Touchscreen Display 30 Contents 3
Contents Charms Sidebar 15 Signing in to Windows 8 16 Closing a Windows 8 app 17 Turning off your computer - Windows 8 17 Power Adapter 21 Battery 22 Laptop Battery 22 Conserving the Battery Power 22 Coin-Cell Battery 23 Improving the Battery Performance 23 Touchpad 24 About Touchpad 24 Touchpad Gestures 24 Scroll 24 Zoom 26 Rotate 27 Flick 28 My Favorites 28 Desktop 28 Display 29 3D Display 29 Wireless Display 29 Touchscreen Display 30 Contents 3
Me and My Dell
Page 15
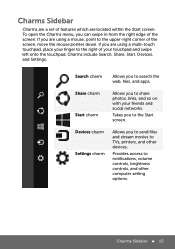
... down. If you are using a multi-touch touchpad, place your finger to the upper-right corner of your friends and social networks. Charms Sidebar 15 Charms Sidebar Charms are a set of the screen.
... down. If you are using a multi-touch touchpad, place your finger to the upper-right corner of your friends and social networks. Charms Sidebar 15 Charms Sidebar Charms are a set of the screen.
Me and My Dell
Page 93
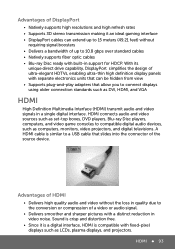
..., DisplayPort simplifies the design of ultra‑elegant HDTVs, enabling ultra-thin high definition display panels with separate electronics units that can extend up to 15 meters (49.21 feet) without the loss in quality due to the conversion or compression of up to 10.8 gbps over standard cables • Natively...
..., DisplayPort simplifies the design of ultra‑elegant HDTVs, enabling ultra-thin high definition display panels with separate electronics units that can extend up to 15 meters (49.21 feet) without the loss in quality due to the conversion or compression of up to 10.8 gbps over standard cables • Natively...


