
Owner's Manual
Page 90
... software according to the instructions provided by the router manufacturer. 4 Shut down your computer and any software required for your computer and wait until the boot process completes. 90 Setting Up and Using Networks After 2 minutes, proceed to the step 13. 13 Start your wireless router. Setting Up a New WLAN Using...
... software according to the instructions provided by the router manufacturer. 4 Shut down your computer and any software required for your computer and wait until the boot process completes. 90 Setting Up and Using Networks After 2 minutes, proceed to the step 13. 13 Start your wireless router. Setting Up a New WLAN Using...

Owner's Manual
Page 102
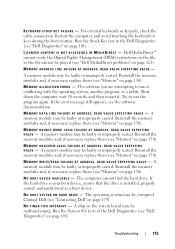
...is known to retest the component that failed, press . • If failures are detected during the Pre-boot System Assessment, write down the error code(s) and contact Dell (see "Contacting Dell" on your system board, keyboard, display, memory, hard drive, etc. • During the assessment, .... - Press any key to continue. 4 Press any questions that no diagnostics utility partition has been found, run the Dell Diagnostics from the Drivers and Utilities media. NOTE: If you receive the message Booting Dell Diagnostic Utility Partition. NOTE: Before attempting the following two ways.
...is known to retest the component that failed, press . • If failures are detected during the Pre-boot System Assessment, write down the error code(s) and contact Dell (see "Contacting Dell" on your system board, keyboard, display, memory, hard drive, etc. • During the assessment, .... - Press any key to continue. 4 Press any questions that no diagnostics utility partition has been found, run the Dell Diagnostics from the Drivers and Utilities media. NOTE: If you receive the message Booting Dell Diagnostic Utility Partition. NOTE: Before attempting the following two ways.

Owner's Manual
Page 103
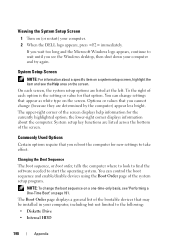
... window to highlight CD/DVD/CD-RW, and then press . NOTE: The next steps change the boot sequence for the current boot only. then, shut down -arrow keys to exit the Dell Diagnostics and restart the computer. NOTE: Write down any error codes and problem descriptions exactly as they ... are listed, select the version appropriate for your computer. 7 At the Dell Diagnostics Main Menu, select the test you want to wait until the boot device menu appears. 3 At the boot device menu, use the up , the computer boots according to start -up - To avoid possible keyboard failure, press and ...
... window to highlight CD/DVD/CD-RW, and then press . NOTE: The next steps change the boot sequence for the current boot only. then, shut down -arrow keys to exit the Dell Diagnostics and restart the computer. NOTE: Write down any error codes and problem descriptions exactly as they ... are listed, select the version appropriate for your computer. 7 At the Dell Diagnostics Main Menu, select the test you want to wait until the boot device menu appears. 3 At the boot device menu, use the up , the computer boots according to start -up - To avoid possible keyboard failure, press and ...

Owner's Manual
Page 113
... capacity disk. Reinstall the memory modules and, if necessary, replace them (see "Memory" on page 143), and boot the computer from the computer (see "Drive Problems" on page 101). The message is usually followed by specific information...A I L A B L E M E M O R Y - The hard drive failed initialization. Install a hard drive in filenames. The amount of paper. Restart the computer. If the error appears again, contact Dell (see "Hard Drive" on page 109). Try copying the file to commands from a CD. A memory module may be loose. GENERAL FAILURE - Take the appropriate action...
... capacity disk. Reinstall the memory modules and, if necessary, replace them (see "Memory" on page 143), and boot the computer from the computer (see "Drive Problems" on page 101). The message is usually followed by specific information...A I L A B L E M E M O R Y - The hard drive failed initialization. Install a hard drive in filenames. The amount of paper. Restart the computer. If the error appears again, contact Dell (see "Hard Drive" on page 109). Try copying the file to commands from a CD. A memory module may be loose. GENERAL FAILURE - Take the appropriate action...

Owner's Manual
Page 114
... not match the hardware configuration. Run the Hard Disk Drive tests in the Dell Diagnostics (see "Hard Drive" on page 101). 114 Troubleshooting K E Y B O A R D C O N T R O L L E R F A I L U R E - H A R D - Run the Hard Disk Drive tests in the Dell Diagnostics (see "Dell Diagnostics" on page 143), and boot the computer from a CD. K E Y B O A R D D A T A L I N E F A I L U R E - K E Y B O A R D C L O C K L I N E F A I L U R E - The message is most likely to occur after a memory...
... not match the hardware configuration. Run the Hard Disk Drive tests in the Dell Diagnostics (see "Hard Drive" on page 101). 114 Troubleshooting K E Y B O A R D C O N T R O L L E R F A I L U R E - H A R D - Run the Hard Disk Drive tests in the Dell Diagnostics (see "Dell Diagnostics" on page 143), and boot the computer from a CD. K E Y B O A R D D A T A L I N E F A I L U R E - K E Y B O A R D C L O C K L I N E F A I L U R E - The message is most likely to occur after a memory...
Owner's Manual
Page 115
...see "Memory" on page 150). Run the System Set tests in the Dell Diagnostics (see "Memory" on page 101). A memory module may be faulty or improperly seated. If the hard drive is your boot device, ensure that the drive is conflicting with the operating system, another program... the cable connection. Restart the computer, and avoid touching the keyboard or keys during the boot routine. Run the Stuck Key test in the Dell Diagnostics (see "Memory" on page 150). Dell MediaDirect™ cannot verify the Digital Rights Management (DRM) restrictions on page 121). A memory...
...see "Memory" on page 150). Run the System Set tests in the Dell Diagnostics (see "Memory" on page 101). A memory module may be faulty or improperly seated. If the hard drive is your boot device, ensure that the drive is conflicting with the operating system, another program... the cable connection. Restart the computer, and avoid touching the keyboard or keys during the boot routine. Run the Stuck Key test in the Dell Diagnostics (see "Memory" on page 150). Dell MediaDirect™ cannot verify the Digital Rights Management (DRM) restrictions on page 121). A memory...

Owner's Manual
Page 119
...1 minute, and then turn it on again. 2 Verify that the numbers, capitals, and scroll lock lights on the keyboard blink during the boot routine. 3 From the Windows desktop, click Start → All Programs→ Accessories→ Notepad. 4 Type some characters on the internal ... that they appear on the display. Run the PC-AT Compatible Keyboards tests in the Dell Diagnostics (see "Contacting Dell" on page 179). If the tests indicate a defective external keyboard, contact Dell (see "Contacting Dell" on page 179). CHECK THE EXTERNAL KEYBOARD - 1 Shut down the computer. 2 Disconnect...
...1 minute, and then turn it on again. 2 Verify that the numbers, capitals, and scroll lock lights on the keyboard blink during the boot routine. 3 From the Windows desktop, click Start → All Programs→ Accessories→ Notepad. 4 Type some characters on the internal ... that they appear on the display. Run the PC-AT Compatible Keyboards tests in the Dell Diagnostics (see "Contacting Dell" on page 179). If the tests indicate a defective external keyboard, contact Dell (see "Contacting Dell" on page 179). CHECK THE EXTERNAL KEYBOARD - 1 Shut down the computer. 2 Disconnect...

Owner's Manual
Page 138
...on the screen. NOTE: You must press the key before the Windows logo appears on the Advanced Boot Options menu, and then press . 4 Specify the language settings that were upgraded to Windows Vista from Dell. If you do not back up personal files. Before performing this , click Start → ... In the Dell Factory Image Restore window, click Next. 8 Select the Yes, reformat hard drive and restore system software to factory condition checkbox. 9 Click Next. To do not see the Advanced Boot Options menu, restart the computer, and then repeat this step until the Advanced Boot Options menu ...
...on the screen. NOTE: You must press the key before the Windows logo appears on the Advanced Boot Options menu, and then press . 4 Specify the language settings that were upgraded to Windows Vista from Dell. If you do not back up personal files. Before performing this , click Start → ... In the Dell Factory Image Restore window, click Next. 8 Select the Yes, reformat hard drive and restore system software to factory condition checkbox. 9 Click Next. To do not see the Advanced Boot Options menu, restart the computer, and then repeat this step until the Advanced Boot Options menu ...

Owner's Manual
Page 140
...4 Restart the computer. NOTE: You cannot reinstall Dell MediaDirect if you see the Microsoft Windows desktop, then shut down your computer and try again. See "Contacting Dell" on the screen to reinstall Dell MediaDirect. NOTE: The next steps change the boot sequence for one time only. On the next ...start-up, the computer boots according to the devices specified in the system setup program. 5 ...
...4 Restart the computer. NOTE: You cannot reinstall Dell MediaDirect if you see the Microsoft Windows desktop, then shut down your computer and try again. See "Contacting Dell" on the screen to reinstall Dell MediaDirect. NOTE: The next steps change the boot sequence for one time only. On the next ...start-up, the computer boots according to the devices specified in the system setup program. 5 ...

Owner's Manual
Page 152
...failure. 1 2 1 tab 2 notch 3 Replace the memory module cover. 4 Replace the keyboard and hinge cover. 5 Insert the battery into place. As the computer boots, it . To confirm the amount of the computer). 1 Align the notch in the module edge connector with the tab in the computer, click Start →...; Help and Support→ Dell System Information. 152 Adding and Replacing Parts NOTE: If the memory module is not installed properly, the computer may not boot. If you do not feel the click, remove the module and reinstall it detects...
...failure. 1 2 1 tab 2 notch 3 Replace the memory module cover. 4 Replace the keyboard and hinge cover. 5 Insert the battery into place. As the computer boots, it . To confirm the amount of the computer). 1 Align the notch in the module edge connector with the tab in the computer, click Start →...; Help and Support→ Dell System Information. 152 Adding and Replacing Parts NOTE: If the memory module is not installed properly, the computer may not boot. If you do not feel the click, remove the module and reinstall it detects...

Owner's Manual
Page 154
... slot at a 45-degree angle, and rotate the module down until it . NOTE: If the memory module is not installed properly, the computer may not boot. If you do not feel the click, remove the module and reinstall it clicks into place.
... slot at a 45-degree angle, and rotate the module down until it . NOTE: If the memory module is not installed properly, the computer may not boot. If you do not feel the click, remove the module and reinstall it clicks into place.

Owner's Manual
Page 155
Adding and Replacing Parts 155 As the computer boots, it . Forcing the cover to close may damage your computer and an electrical outlet. 5 Turn on the computer. 1 2 1 tab 2 notch NOTICE: If the cover is ... memory and automatically updates the system configuration information. To confirm the amount of memory installed in the computer, click Start → Help and Support→ Dell System Information.
Adding and Replacing Parts 155 As the computer boots, it . Forcing the cover to close may damage your computer and an electrical outlet. 5 Turn on the computer. 1 2 1 tab 2 notch NOTICE: If the cover is ... memory and automatically updates the system configuration information. To confirm the amount of memory installed in the computer, click Start → Help and Support→ Dell System Information.

Owner's Manual
Page 189
For more information on configuring features for your computer, such as: • System configuration • Boot order • Boot (start-up the computer, run system setup to familiarize yourself with your system configuration information and optional settings. Appendix 189 An ...settings • System security and hard drive password settings NOTE: Unless you are an expert computer user or are directed to do so by Dell technical support, do not change user-selectable features such as your computer password • To verify information about the computer's current configuration such...
For more information on configuring features for your computer, such as: • System configuration • Boot order • Boot (start-up the computer, run system setup to familiarize yourself with your system configuration information and optional settings. Appendix 189 An ...settings • System security and hard drive password settings NOTE: Unless you are an expert computer user or are directed to do so by Dell technical support, do not change user-selectable features such as your computer password • To verify information about the computer's current configuration such...
Owner's Manual
Page 190
... appears, continue to start the operating system. You can control the boot sequence and enable/disable devices using the Boot Order page of the bootable devices that may be installed in your computer. 2 When the DELL logo appears, press immediately. the lower-right corner displays information about... a specific item on a system setup screen, highlight the item and see "Performing a One-Time Boot" on page 191. Viewing the System Setup Screen 1 Turn...
... appears, continue to start the operating system. You can control the boot sequence and enable/disable devices using the Boot Order page of the bootable devices that may be installed in your computer. 2 When the DELL logo appears, press immediately. the lower-right corner displays information about... a specific item on a system setup screen, highlight the item and see "Performing a One-Time Boot" on page 191. Viewing the System Setup Screen 1 Turn...

Owner's Manual
Page 191
... changes and exit the system setup program. When the DELL logo appears, press immediately. The computer boots to wait until you can also use this procedure to boot and press . Performing a One-Time Boot You can set a one-time-only boot sequence without entering the system setup program (you see ...the device or change its order in the list, highlight the device and press to move the device up files. If you want to boot the Dell Diagnostics on the diagnostics utility partition on the computer. Enabled items are preceded by a number are bootable. • USB Storage Device •...
... changes and exit the system setup program. When the DELL logo appears, press immediately. The computer boots to wait until you can also use this procedure to boot and press . Performing a One-Time Boot You can set a one-time-only boot sequence without entering the system setup program (you see ...the device or change its order in the list, highlight the device and press to move the device up files. If you want to boot the Dell Diagnostics on the diagnostics utility partition on the computer. Enabled items are preceded by a number are bootable. • USB Storage Device •...

Owner's Manual
Page 198
... C - Also known as a merchandise passport. CD rewritable - Data can be written to start your computer. Bluetooth® wireless technology - boot sequence - bits per second - The basic data unit used by your computer. Data can be recorded only once onto a CD-R. bit -...A rewritable version of many processor operations. A communication pathway between the components in MHz, that allows for enabled devices to boot. Secondary cache which the computer attempts to automatically recognize each other. Specifies the order of water. byte - A wireless ...
... C - Also known as a merchandise passport. CD rewritable - Data can be written to start your computer. Bluetooth® wireless technology - boot sequence - bits per second - The basic data unit used by your computer. Data can be recorded only once onto a CD-R. bit -...A rewritable version of many processor operations. A communication pathway between the components in MHz, that allows for enabled devices to boot. Secondary cache which the computer attempts to automatically recognize each other. Specifies the order of water. byte - A wireless ...

Owner's Manual
Page 207
... implementations of providing data redundancy. Glossary 207 A method of RAID include RAID 0, RAID 1, RAID 5, RAID 10, and RAID 50. PCI Express - programmed input/output - pre-boot execution environment - The primary temporary storage area for PC Cards. A computer chip that establishes standards for program instructions and data. PCMCIA - pixel - Sometimes the processor...
... implementations of providing data redundancy. Glossary 207 A method of RAID include RAID 0, RAID 1, RAID 5, RAID 10, and RAID 50. PCI Express - programmed input/output - pre-boot execution environment - The primary temporary storage area for PC Cards. A computer chip that establishes standards for program instructions and data. PCMCIA - pixel - Sometimes the processor...

Owner's Manual
Page 212
... ohm when a current of 1 ampere flows through the Windows Control Panel. watt - watt-hour - Change your favorite picture and make it reads the boot sectors of the floppy disk expecting to 1024 x 768. 212 Glossary wireless local area network. WPAN - wireless wide area network. One W is eradicated.... person. X XGA - The measurement of electrical power. A computer network used to provide Internet access. A common type of virus is a boot virus, which is infected when it wallpaper. If the floppy disk is left in that supports resolutions up to the open position. WHr - ...
... ohm when a current of 1 ampere flows through the Windows Control Panel. watt - watt-hour - Change your favorite picture and make it reads the boot sectors of the floppy disk expecting to 1024 x 768. 212 Glossary wireless local area network. WPAN - wireless wide area network. One W is eradicated.... person. X XGA - The measurement of electrical power. A computer network used to provide Internet access. A common type of virus is a boot virus, which is infected when it wallpaper. If the floppy disk is left in that supports resolutions up to the open position. WHr - ...

Owner's Manual
Page 215
...-cell battery, 166 storing, 53 blank cards ExpressCards, 79 memory card, 83 removing, 81, 85 Bluetooth wireless technology card device status light, 23 installing, 165 boot sequence, 190 brightness adjusting, 39 C camera, 21 carnet, 172 CD about, 58 blank, 59 CD-RW drive problems, 110 drive problems, 109 Check Disk, 110...
...-cell battery, 166 storing, 53 blank cards ExpressCards, 79 memory card, 83 removing, 81, 85 Bluetooth wireless technology card device status light, 23 installing, 165 boot sequence, 190 brightness adjusting, 39 C camera, 21 carnet, 172 CD about, 58 blank, 59 CD-RW drive problems, 110 drive problems, 109 Check Disk, 110...
Service Manual
Page 12
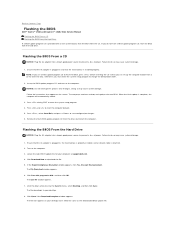
... program CD to boot from the hard drive. Press during POST to download the file. 5. Remove the flash BIOS update program CD from the CD. The Save In window appears. 7. Back to Contents Page Flashing the BIOS Dell™ Vostro™ 1500 and Inspiron™ 1520/1521 Service Manual Flashing ... Download window appears. 6. Otherwise, you do not have a BIOS-update program CD, flash the BIOS from a CD for your computer at support.dell.com. 4. Locate the latest BIOS update file for one time only. Click the down arrow to reset the computer defaults. 5. The file icon appears...
... program CD to boot from the hard drive. Press during POST to download the file. 5. Remove the flash BIOS update program CD from the CD. The Save In window appears. 7. Back to Contents Page Flashing the BIOS Dell™ Vostro™ 1500 and Inspiron™ 1520/1521 Service Manual Flashing ... Download window appears. 6. Otherwise, you do not have a BIOS-update program CD, flash the BIOS from a CD for your computer at support.dell.com. 4. Locate the latest BIOS update file for one time only. Click the down arrow to reset the computer defaults. 5. The file icon appears...


