
Owner's Manual
Page 5
5 Using a Battery 45 Battery Performance 45 Checking the Battery Charge 46 Dell QuickSet Battery Meter 46 Microsoft® Windows® Battery Meter 47 Charge Gauge 47 Low-Battery Warning 48 Conserving Battery Power 48 Configuring Power Management Settings . . . . . 48 Using the Sleep Power State 49 Charging the Battery 49 Replacing the Battery 50 Storing a Battery 50 6 Using the Optional Camera 51 Accessing the...
5 Using a Battery 45 Battery Performance 45 Checking the Battery Charge 46 Dell QuickSet Battery Meter 46 Microsoft® Windows® Battery Meter 47 Charge Gauge 47 Low-Battery Warning 48 Conserving Battery Power 48 Configuring Power Management Settings . . . . . 48 Using the Sleep Power State 49 Charging the Battery 49 Replacing the Battery 50 Storing a Battery 50 6 Using the Optional Camera 51 Accessing the...

Owner's Manual
Page 11
... Card 151 Flash Cache Module 152 Removing the FCM 152 Replacing the FCM 153 Coin-Cell Battery 154 Removing the Coin-Cell Battery 154 Replacing the Coin-Cell Battery 155 13 Dell™ QuickSet Features 157 14 Traveling With Your Computer 159 Identifying Your Computer 159 Packing the Computer 159 Travel Tips 160 Traveling by Air...
... Card 151 Flash Cache Module 152 Removing the FCM 152 Replacing the FCM 153 Coin-Cell Battery 154 Removing the Coin-Cell Battery 154 Replacing the Coin-Cell Battery 155 13 Dell™ QuickSet Features 157 14 Traveling With Your Computer 159 Identifying Your Computer 159 Packing the Computer 159 Travel Tips 160 Traveling by Air...

Owner's Manual
Page 32
..." on page 50 for instructions). MEMORY MODULE/COIN-CELL/BLUETOOTH/MODEM BATTERY COMPARTMENT - For additional information, see "Replacing the Battery" on page 129. H A R D D R I V E - B A T T E R Y C H A R G E / H E A L T H G A U G E - Provides information on the battery charge (see "Using a Battery" on page 46). P R O C E S S O R A N D T H E R M A L M O D U L E C O V E R - B A Y L A T C H R E L E A S E S - When a battery is optional and may not be included in your computer. 32 About Your Computer Compartment that contains the memory...
..." on page 50 for instructions). MEMORY MODULE/COIN-CELL/BLUETOOTH/MODEM BATTERY COMPARTMENT - For additional information, see "Replacing the Battery" on page 129. H A R D D R I V E - B A T T E R Y C H A R G E / H E A L T H G A U G E - Provides information on the battery charge (see "Using a Battery" on page 46). P R O C E S S O R A N D T H E R M A L M O D U L E C O V E R - B A Y L A T C H R E L E A S E S - When a battery is optional and may not be included in your computer. 32 About Your Computer Compartment that contains the memory...

Owner's Manual
Page 46
... the Dell QuickSet Battery Meter: • Double-click the Dell QuickSet icon in the taskbar, and then click Battery Meter or • Press The Battery Meter displays the status, battery health, charge level, and charge completion time for the battery in your local waste disposal or environmental agency for advice on disposing of fire or explosion. Replace the battery...
... the Dell QuickSet Battery Meter: • Double-click the Dell QuickSet icon in the taskbar, and then click Battery Meter or • Press The Battery Meter displays the status, battery health, charge level, and charge completion time for the battery in your local waste disposal or environmental agency for advice on disposing of fire or explosion. Replace the battery...

Owner's Manual
Page 47
... pressing and holding the status button on the battery charge gauge, you should consider replacing the battery (see "Battery" on page 172 for at least 3 seconds to illuminate the charge indicator lights. Therefore, a battery can check battery health in Dell QuickSet. Each light represents incremental degradation. To check the battery health using the charge gauge, press and hold...
... pressing and holding the status button on the battery charge gauge, you should consider replacing the battery (see "Battery" on page 172 for at least 3 seconds to illuminate the charge indicator lights. Therefore, a battery can check battery health in Dell QuickSet. Each light represents incremental degradation. To check the battery health using the charge gauge, press and hold...

Owner's Manual
Page 50
... and loses any other computers with a compatible battery purchased from the computer to keep them open. 4 Slide the battery out of the bay. 1 2 1 battery 2 battery release latches (2) To replace the battery, follow the removal procedure in Sleep state, you have up to 1 minute to work with your Dell computer. The battery is turned off the computer, disconnect the...
... and loses any other computers with a compatible battery purchased from the computer to keep them open. 4 Slide the battery out of the bay. 1 2 1 battery 2 battery release latches (2) To replace the battery, follow the removal procedure in Sleep state, you have up to 1 minute to work with your Dell computer. The battery is turned off the computer, disconnect the...

Owner's Manual
Page 106
... are corrupted. Correct the settings for the Date and Time options (see "Dell Diagnostics" on the system board may be malfunctioning. U N E X P E C T E D I N T E R R U P T I S N O T R E A D Y - T H E D E V I C E I N P R O T E C T E D M O D E - Replace the battery, or connect the computer to charge the battery. Run the System Set tests in the Dell Diagnostics (see "Contacting Dell" on page 93). TI M E - A chip on page 93). Run the System Memory...
... are corrupted. Correct the settings for the Date and Time options (see "Dell Diagnostics" on the system board may be malfunctioning. U N E X P E C T E D I N T E R R U P T I S N O T R E A D Y - T H E D E V I C E I N P R O T E C T E D M O D E - Replace the battery, or connect the computer to charge the battery. Run the System Set tests in the Dell Diagnostics (see "Contacting Dell" on page 93). TI M E - A chip on page 93). Run the System Memory...

Owner's Manual
Page 130
... a processor by its edges, not by its pins. Do not use only the battery designed for other Dell computers. 5 Turn the computer over. 6 Slide and click the battery release latches. 130 Adding and Replacing Parts CAUTION: Handle components and cards with locking tabs; Do not touch the components or... connectors apart, keep them evenly aligned to servicing that the work surface is not covered by Dell is flat and clean to the system board, you must remove the battery from the battery bay before you service the computer. Also, before you connect a cable, ensure that both ...
... a processor by its edges, not by its pins. Do not use only the battery designed for other Dell computers. 5 Turn the computer over. 6 Slide and click the battery release latches. 130 Adding and Replacing Parts CAUTION: Handle components and cards with locking tabs; Do not touch the components or... connectors apart, keep them evenly aligned to servicing that the work surface is not covered by Dell is flat and clean to the system board, you must remove the battery from the battery bay before you service the computer. Also, before you connect a cable, ensure that both ...

Owner's Manual
Page 131
...Dell. Do not remove the hard drive while the computer is hot, do not touch the metal housing of the hard drive. NOTE: If you need to ground the system board. 9 Remove any of the procedures in this section, follow the safety instructions in Sleep state. Adding and Replacing...drives are installing a hard drive from the computer when the drive is on or in the Product Information Guide. 7 Slide the battery out of the battery bay. 1 2 1 battery 2 battery release latch (2) 8 Turn the computer top-side up, open the display, and press the power button to install an operating system...
...Dell. Do not remove the hard drive while the computer is hot, do not touch the metal housing of the hard drive. NOTE: If you need to ground the system board. 9 Remove any of the procedures in this section, follow the safety instructions in Sleep state. Adding and Replacing...drives are installing a hard drive from the computer when the drive is on or in the Product Information Guide. 7 Slide the battery out of the battery bay. 1 2 1 battery 2 battery release latch (2) 8 Turn the computer top-side up, open the display, and press the power button to install an operating system...

Owner's Manual
Page 135
... 135 Hinge Cover CAUTION: Before you begin any of the computer). 1 3 2 1 optical drive 2 locking screw 3 notch Replacing the Optical Drive 1 Slide the optical drive into the bay. 2 Replace and tighten the locking screw. NOTICE: To avoid electrostatic discharge, ground yourself by using a wrist grounding strap or by periodically touching an unpainted ...in this section, follow the safety instructions in the Product Information Guide. NOTICE: To help prevent damage to the system board, you must remove the battery from the battery bay before you begin working inside the computer.
... 135 Hinge Cover CAUTION: Before you begin any of the computer). 1 3 2 1 optical drive 2 locking screw 3 notch Replacing the Optical Drive 1 Slide the optical drive into the bay. 2 Replace and tighten the locking screw. NOTICE: To avoid electrostatic discharge, ground yourself by using a wrist grounding strap or by periodically touching an unpainted ...in this section, follow the safety instructions in the Product Information Guide. NOTICE: To help prevent damage to the system board, you must remove the battery from the battery bay before you begin working inside the computer.

Owner's Manual
Page 137
... connector. 5 Rotate the keyboard connector latch towards the front of the computer to disconnect the keyboard cable from the battery bay before you must remove the battery from the keyboard connector on the system board. 6 Slide the keyboard cable out of the computer). Keyboard For more... information about the keyboard, see "Hinge Cover" on page 135). 3 Remove the two screws at the top of the keyboard. NOTICE: To help prevent damage to replace....
... connector. 5 Rotate the keyboard connector latch towards the front of the computer to disconnect the keyboard cable from the battery bay before you must remove the battery from the keyboard connector on the system board. 6 Slide the keyboard cable out of the computer). Keyboard For more... information about the keyboard, see "Hinge Cover" on page 135). 3 Remove the two screws at the top of the keyboard. NOTICE: To help prevent damage to replace....

Owner's Manual
Page 142
... follow the safety instructions in the Product Information Guide. 1 Follow the procedures in the computer, click Start → Help and Support→ Dell System Information. Modem CAUTION: Before you begin any of memory installed in "Before You Begin" on page 129. 2 Turn the computer over,... loosen the three captive screws on the computer. 1 2 3 1 tab 2 notch 3 memory module 3 Replace the memory module cover and tighten the three screws. 4 Insert the battery into the battery bay or connect the AC adapter to your computer and an electrical outlet. 5 Turn on the modem cover, and...
... follow the safety instructions in the Product Information Guide. 1 Follow the procedures in the computer, click Start → Help and Support→ Dell System Information. Modem CAUTION: Before you begin any of memory installed in "Before You Begin" on page 129. 2 Turn the computer over,... loosen the three captive screws on the computer. 1 2 3 1 tab 2 notch 3 memory module 3 Replace the memory module cover and tighten the three screws. 4 Insert the battery into the battery bay or connect the AC adapter to your computer and an electrical outlet. 5 Turn on the modem cover, and...

Owner's Manual
Page 144
...International Mobile Subscriber Identity. EVDO cards do not use a SIM. 1 Follow the procedures in "Before You Begin" on page 129. 2 In the battery bay, locate the SIM compartment at the base. 3 Slide in the SIM into the compartment with the cut -off corner of the procedures in ...this section, follow the safety instructions in the SIM compartment. 2 1 1 battery bay 2 SIM 144 Adding and Replacing Parts CAUTION: Before you begin any of the card aligning with the cut -off corner in the Product Information Guide. NOTE: Only...
...International Mobile Subscriber Identity. EVDO cards do not use a SIM. 1 Follow the procedures in "Before You Begin" on page 129. 2 In the battery bay, locate the SIM compartment at the base. 3 Slide in the SIM into the compartment with the cut -off corner of the procedures in ...this section, follow the safety instructions in the SIM compartment. 2 1 1 battery bay 2 SIM 144 Adding and Replacing Parts CAUTION: Before you begin any of the card aligning with the cut -off corner in the Product Information Guide. NOTE: Only...

Owner's Manual
Page 145
... Disconnect the antenna cables from the battery bay before you ordered a wireless Mini Card with Bluetooth® wireless technology Removing a WLAN Card 1 Follow the procedures in the Product Information Guide. If you begin working inside the computer. Adding and Replacing Parts 145 Your computer supports three ... "Removing the Keyboard" on page 137). 4 Loosen the screw that secures the Mini Card to the system board, you must remove the battery from the WLAN card. Wireless Mini Cards CAUTION: Before you begin any of wireless Mini Cards: • Wireless Local Area Network (WLAN)...
... Disconnect the antenna cables from the battery bay before you ordered a wireless Mini Card with Bluetooth® wireless technology Removing a WLAN Card 1 Follow the procedures in the Product Information Guide. If you begin working inside the computer. Adding and Replacing Parts 145 Your computer supports three ... "Removing the Keyboard" on page 137). 4 Loosen the screw that secures the Mini Card to the system board, you must remove the battery from the WLAN card. Wireless Mini Cards CAUTION: Before you begin any of wireless Mini Cards: • Wireless Local Area Network (WLAN)...

Owner's Manual
Page 154
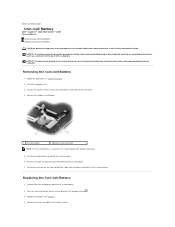
NOTICE: To help prevent damage to the system board, you must remove the battery from the system board. 1 1 coin-cell battery 6 Lift the battery out. 2 2 battery cable connector 154 Adding and Replacing Parts NOTICE: To avoid electrostatic discharge, ground yourself by using a wrist grounding strap or by periodically touching an unpainted metal surface (such as a connector...
NOTICE: To help prevent damage to the system board, you must remove the battery from the system board. 1 1 coin-cell battery 6 Lift the battery out. 2 2 battery cable connector 154 Adding and Replacing Parts NOTICE: To avoid electrostatic discharge, ground yourself by using a wrist grounding strap or by periodically touching an unpainted metal surface (such as a connector...

Owner's Manual
Page 155
Adding and Replacing Parts 155 Replacing the Coin-Cell Battery 1 Connect the coin-cell battery cable to the system board. 2 Place the coin-cell battery on the system board in the location marked . 3 Replace the modem (see "Modem" on page 142). 4 Replace the cover and tighten the screws.
Adding and Replacing Parts 155 Replacing the Coin-Cell Battery 1 Connect the coin-cell battery cable to the system board. 2 Place the coin-cell battery on the system board in the location marked . 3 Replace the modem (see "Modem" on page 142). 4 Replace the cover and tighten the screws.

Owner's Manual
Page 181
...outside casing of the mouse with a cloth moistened with isopropyl alcohol. 6 Recenter the rollers in their electrical outlets. 3 Remove any installed batteries (see "Battery Performance" on the underside of your screen cursor skips or moves abnormally, clean the mouse. Appendix 181 Mouse NOTICE: Disconnect the mouse from...to seep between the touch pad and the surrounding palm rest. Ensure that fluff from the swab is not left on the rollers. 7 Replace the ball and retainer ring, and turn off your computer (see "Turning Off Your Computer" on page 129). 2 Disconnect any attached ...
...outside casing of the mouse with a cloth moistened with isopropyl alcohol. 6 Recenter the rollers in their electrical outlets. 3 Remove any installed batteries (see "Battery Performance" on the underside of your screen cursor skips or moves abnormally, clean the mouse. Appendix 181 Mouse NOTICE: Disconnect the mouse from...to seep between the touch pad and the surrounding palm rest. Ensure that fluff from the swab is not left on the rollers. 7 Replace the ball and retainer ring, and turn off your computer (see "Turning Off Your Computer" on page 129). 2 Disconnect any attached ...

Owner's Manual
Page 203
... gauge, 47 charging, 49 checking the charge, 46 performance, 45 power meter, 47 removing, 50 replacing coin-cell battery, 154 storing, 50 blank cards ExpressCards, 76 memory card, 79 removing, 77, 80 Bluetooth wireless technology card device status light, 25 installing, 148 boot ...23 carnet, 160 CD about, 56 blank, 57 CD-RW drive problems, 99 drive problems, 99 Check Disk, 100 cleaning touch pad, 181 coin-cell battery replacing, 154 computer crashes, 109-110 restore to previous operating state, 124 slow performance, 101, 112 specifications, 167 stops responding, 109 connecting audio device, 60 ...
... gauge, 47 charging, 49 checking the charge, 46 performance, 45 power meter, 47 removing, 50 replacing coin-cell battery, 154 storing, 50 blank cards ExpressCards, 76 memory card, 79 removing, 77, 80 Bluetooth wireless technology card device status light, 25 installing, 148 boot ...23 carnet, 160 CD about, 56 blank, 57 CD-RW drive problems, 99 drive problems, 99 Check Disk, 100 cleaning touch pad, 181 coin-cell battery replacing, 154 computer crashes, 109-110 restore to previous operating state, 124 slow performance, 101, 112 specifications, 167 stops responding, 109 connecting audio device, 60 ...

Service Manual
Page 5
... when removing the card to Contents Page Internal Card With Bluetooth® Wireless Technology Dell™ Inspiron™ 1420/Dell Vostro™ 1400 Service Manual Removing and Replacing Internal Card With Bluetooth® Wireless Technology CAUTION: Before you must remove the battery from the card cable. 6. Back to gently pry and lift the Bluetooth card up...
... when removing the card to Contents Page Internal Card With Bluetooth® Wireless Technology Dell™ Inspiron™ 1420/Dell Vostro™ 1400 Service Manual Removing and Replacing Internal Card With Bluetooth® Wireless Technology CAUTION: Before you must remove the battery from the card cable. 6. Back to gently pry and lift the Bluetooth card up...
Service Manual
Page 7
... the system board. 6. Disconnect and remove the coin-cell battery cable from the battery bay before you begin working inside the computer. Replace the modem (see Modem). 1 coin-cell battery 2 battery cable connector NOTE: The coin-cell battery is secured to Contents Page Coin-Cell Battery Dell™ Inspiron™ 1420/Dell Vostro™ 1400 Service Manual Removing the Coin-Cell...
... the system board. 6. Disconnect and remove the coin-cell battery cable from the battery bay before you begin working inside the computer. Replace the modem (see Modem). 1 coin-cell battery 2 battery cable connector NOTE: The coin-cell battery is secured to Contents Page Coin-Cell Battery Dell™ Inspiron™ 1420/Dell Vostro™ 1400 Service Manual Removing the Coin-Cell...


