
Owner's Manual
Page 33
... battery. Exercise care when handling the hard drive. See "Removing the Battery" on page 13. 3 Follow the instructions from sources other than Dell. NOTE: Dell does not guarantee compatibility or provide support for hard drives from step 3 to the system board, remove the main battery, see "Removing the Battery... is On or in Sleep state. NOTE: If you remove the hard drive from a source other than Dell, you must install an operating system, drivers, and utilities on the new hard drive. For additional safety best practices information, see "Turning Off Your Computer" on page 10, before...
... battery. Exercise care when handling the hard drive. See "Removing the Battery" on page 13. 3 Follow the instructions from sources other than Dell. NOTE: Dell does not guarantee compatibility or provide support for hard drives from step 3 to the system board, remove the main battery, see "Removing the Battery... is On or in Sleep state. NOTE: If you remove the hard drive from a source other than Dell, you must install an operating system, drivers, and utilities on the new hard drive. For additional safety best practices information, see "Turning Off Your Computer" on page 10, before...
Owner's Manual
Page 35
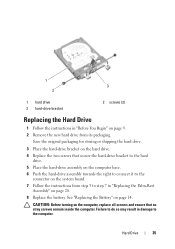
1 3 2 1 hard drive 3 hard-drive bracket 2 screws (2) Replacing the Hard Drive 1 Follow the instructions in "Before You Begin" on page 14. See "Replacing the Battery" on page 9. 2 Remove the new hard drive from step 3 to step 7 in damage to the computer. Failure to the connector on the system board. 7 Follow the instructions from its...
1 3 2 1 hard drive 3 hard-drive bracket 2 screws (2) Replacing the Hard Drive 1 Follow the instructions in "Before You Begin" on page 14. See "Replacing the Battery" on page 9. 2 Remove the new hard drive from step 3 to step 7 in damage to the computer. Failure to the connector on the system board. 7 Follow the instructions from its...

Owner's Manual
Page 38
CAUTION: When the Mini-Card is not in the computer, store it in "Before You Begin" on the system board. 6 Lift the Mini-Card out of the connector on page 9. 2 Remove the new Mini-Card from its packaging. 38 Wireless Mini-Card For more information, see "Protecting Against Electrostatic Discharge" in the safety information that shipped with your computer. 1 2 1 Mini-Card antenna cables (2) 2 tab Replacing the Mini-Card 1 Follow the instructions in protective antistatic packaging.
CAUTION: When the Mini-Card is not in the computer, store it in "Before You Begin" on the system board. 6 Lift the Mini-Card out of the connector on page 9. 2 Remove the new Mini-Card from its packaging. 38 Wireless Mini-Card For more information, see "Protecting Against Electrostatic Discharge" in the safety information that shipped with your computer. 1 2 1 Mini-Card antenna cables (2) 2 tab Replacing the Mini-Card 1 Follow the instructions in protective antistatic packaging.
Owner's Manual
Page 52
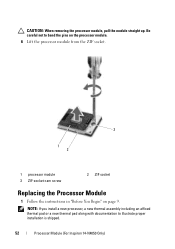
Be careful not to illustrate proper installation is shipped. 52 Processor Module (For Inspiron 14-N4050 Only) NOTE: If you install a new processor, a new thermal assembly including an affixed thermal pad or a new thermal pad along with documentation to bend the pins on the processor module. 6 Lift the processor module from the ZIF socket. 3 1 2 1 processor module 3 ZIF-socket cam screw 2 ZIF socket Replacing the Processor Module 1 Follow the instructions in "Before You Begin" on page 9. CAUTION: When removing the processor module, pull the module straight up.
Be careful not to illustrate proper installation is shipped. 52 Processor Module (For Inspiron 14-N4050 Only) NOTE: If you install a new processor, a new thermal assembly including an affixed thermal pad or a new thermal pad along with documentation to bend the pins on the processor module. 6 Lift the processor module from the ZIF socket. 3 1 2 1 processor module 3 ZIF-socket cam screw 2 ZIF socket Replacing the Processor Module 1 Follow the instructions in "Before You Begin" on page 9. CAUTION: When removing the processor module, pull the module straight up.

