Owner's Manual
Page 4
... 25 Setting Display Resolution 26 4 Using the Keyboard and Touch Pad Numeric Keypad 27 Key Combinations 28 System Functions 28 CD or DVD Tray 28 Display Functions 28 Radios (Including Wireless Networking 28 Power Management 28 Speaker Functions 29 Microsoft® Windows® Logo Key... Functions 29 Touch Pad 30 Customizing the Touch Pad 30 5 Using a Battery Battery Performance 31 Checking the Battery Charge 32 Dell™ QuickSet Battery Meter 32 Microsoft® Windows® Power Meter 32 Low-Battery Warning 32 Conserving Battery Power 32 Power Management Modes ...
... 25 Setting Display Resolution 26 4 Using the Keyboard and Touch Pad Numeric Keypad 27 Key Combinations 28 System Functions 28 CD or DVD Tray 28 Display Functions 28 Radios (Including Wireless Networking 28 Power Management 28 Speaker Functions 29 Microsoft® Windows® Logo Key... Functions 29 Touch Pad 30 Customizing the Touch Pad 30 5 Using a Battery Battery Performance 31 Checking the Battery Charge 32 Dell™ QuickSet Battery Meter 32 Microsoft® Windows® Power Meter 32 Low-Battery Warning 32 Conserving Battery Power 32 Power Management Modes ...
Owner's Manual
Page 5
... Adjusting the Volume 42 Adjusting the Picture 43 Copying CDs and DVDs 43 How to Copy a CD or DVD 43 Using Blank CDs and DVDs 44 Helpful Tips 45 7 Using ExpressCards ExpressCard Types 47 ExpressCard Blanks 47 Installing an ExpressCard 47 Removing an ExpressCard or Blank 48 8 Setting ... to a Wireless Local Area Network 50 Determining Your Network Type 50 Connecting to a Wireless Network in Microsoft® Windows® XP . . . . . 50 9 Dell™ QuickSet Features Clicking the QuickSet Icon 53 Double-Clicking the QuickSet Icon 53 Right-Clicking the QuickSet Icon 53 Contents 5
... Adjusting the Volume 42 Adjusting the Picture 43 Copying CDs and DVDs 43 How to Copy a CD or DVD 43 Using Blank CDs and DVDs 44 Helpful Tips 45 7 Using ExpressCards ExpressCard Types 47 ExpressCard Blanks 47 Installing an ExpressCard 47 Removing an ExpressCard or Blank 48 8 Setting ... to a Wireless Local Area Network 50 Determining Your Network Type 50 Connecting to a Wireless Network in Microsoft® Windows® XP . . . . . 50 9 Dell™ QuickSet Features Clicking the QuickSet Icon 53 Double-Clicking the QuickSet Icon 53 Right-Clicking the QuickSet Icon 53 Contents 5
Owner's Manual
Page 6
10 Solving Problems Dell Diagnostics 55 Drive Problems 58 CD and DVD drive problems 58 Hard drive problems 59 E-Mail, Modem, and Internet Problems 59 Error Messages 60 Keyboard Problems 64 External Keyboard problems 64 Unexpected characters ...
10 Solving Problems Dell Diagnostics 55 Drive Problems 58 CD and DVD drive problems 58 Hard drive problems 59 E-Mail, Modem, and Internet Problems 59 Error Messages 60 Keyboard Problems 64 External Keyboard problems 64 Unexpected characters ...
Owner's Manual
Page 7
... Drivers and Utilities 73 Resolving Software and Hardware Incompatibilities 75 Restoring Your Operating System 75 Using Microsoft Windows XP System Restore 76 Using Dell PC Restore by Symantec 77 Using the Operating System CD 79 11 Adding and Replacing Parts Before You Begin 81 Recommended Tools 81 ...Turning Off Your Computer 81 Before Working Inside Your Computer 81 Hard Drive 83 Returning a Hard Drive to Dell 85 CD/DVD Drive 85 Memory 86 Wireless Mini PCI Card 90 Hinge Cover 94 Keyboard 95 12 Appendix Specifications 97 Using the System Setup Program...
... Drivers and Utilities 73 Resolving Software and Hardware Incompatibilities 75 Restoring Your Operating System 75 Using Microsoft Windows XP System Restore 76 Using Dell PC Restore by Symantec 77 Using the Operating System CD 79 11 Adding and Replacing Parts Before You Begin 81 Recommended Tools 81 ...Turning Off Your Computer 81 Before Working Inside Your Computer 81 Hard Drive 83 Returning a Hard Drive to Dell 85 CD/DVD Drive 85 Memory 86 Wireless Mini PCI Card 90 Hinge Cover 94 Keyboard 95 12 Appendix Specifications 97 Using the System Setup Program...
Owner's Manual
Page 8
..." Software and Peripherals 109 Definition of "Third-Party" Software and Peripherals 109 Contacting Dell 110 Glossary 127 Index 137 8 Contents Only 108 FCC Class B 108 Macrovision Product Notice 109 Dell Technical Support Policy (U.S. System Setup Screen 103 Commonly Used Options 103 Travelling With Your Computer 105 Identifying Your Computer 105 Packing the... by Air 106 If Your Computer Is Lost or Stolen 106 Cleaning Your Computer 107 Computer, Keyboard, and Display 107 Touch Pad 107 CDs and DVDs 107 FCC Notices (U.S.
..." Software and Peripherals 109 Definition of "Third-Party" Software and Peripherals 109 Contacting Dell 110 Glossary 127 Index 137 8 Contents Only 108 FCC Class B 108 Macrovision Product Notice 109 Dell Technical Support Policy (U.S. System Setup Screen 103 Commonly Used Options 103 Travelling With Your Computer 105 Identifying Your Computer 105 Packing the... by Air 106 If Your Computer Is Lost or Stolen 106 Cleaning Your Computer 107 Computer, Keyboard, and Display 107 Touch Pad 107 CDs and DVDs 107 FCC Notices (U.S.

Owner's Manual
Page 16
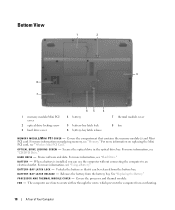
For more information, see the instructions included with the security cable slot. 16 A Tour of Your Computer T R A Y EJECT BUTTON - For more information, see "CD/DVD Drive." OPTICAL -DRIVE- S E C U R I T Y C A B L E S L O T - Lets you buy an antitheft device, ensure that it will work with the ...device. NOTICE: Before you attach a commercially available antitheft device to eject a CD or DVD from the optical drive. Right Side View 1 2 3 1 optical drive bay 2 optical drive-tray eject button 3 security cable slot ...
For more information, see the instructions included with the security cable slot. 16 A Tour of Your Computer T R A Y EJECT BUTTON - For more information, see "CD/DVD Drive." OPTICAL -DRIVE- S E C U R I T Y C A B L E S L O T - Lets you buy an antitheft device, ensure that it will work with the ...device. NOTICE: Before you attach a commercially available antitheft device to eject a CD or DVD from the optical drive. Right Side View 1 2 3 1 optical drive bay 2 optical drive-tray eject button 3 security cable slot ...
Owner's Manual
Page 18
Stores software and data. For more information, see "CD/DVD Drive." Covers the processor and thermal module. B A T T E R Y - Secures the optical drive in the optical drive bay. B A Y L A T C H R E L E A S E - F A N - The computer uses fans to an electrical outlet. For ...
Stores software and data. For more information, see "CD/DVD Drive." Covers the processor and thermal module. B A T T E R Y - Secures the optical drive in the optical drive bay. B A Y L A T C H R E L E A S E - F A N - The computer uses fans to an electrical outlet. For ...
Owner's Manual
Page 28
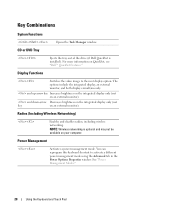
... management mode. See "Power Management Modes." 28 Using the Keyboard and Touch Pad CD or DVD Tray Ejects the tray out of the drive (if Dell QuickSet is optional and may not be available on QuickSet, see "Dell™ QuickSet Features." Display Functions Switches the video image to activate a different power management mode...
... management mode. See "Power Management Modes." 28 Using the Keyboard and Touch Pad CD or DVD Tray Ejects the tray out of the drive (if Dell QuickSet is optional and may not be available on QuickSet, see "Dell™ QuickSet Features." Display Functions Switches the video image to activate a different power management mode...
Owner's Manual
Page 31
...the battery may need to purchase a new battery during the life of your computer to an electrical outlet when writing to a CD or DVD. • Using wireless communications devices, ExpressCards, or USB devices • Using high-brightness display settings, 3D screen savers, or other computers with ...: Using an incompatible battery may leak and cause personal injury or equipment damage. Using a Battery Battery Performance NOTE: For information about the Dell warranty for advice on how often the battery is used and the conditions under which it is used, you may increase the risk of fire...
...the battery may need to purchase a new battery during the life of your computer to an electrical outlet when writing to a CD or DVD. • Using wireless communications devices, ExpressCards, or USB devices • Using high-brightness display settings, 3D screen savers, or other computers with ...: Using an incompatible battery may leak and cause personal injury or equipment damage. Using a Battery Battery Performance NOTE: For information about the Dell warranty for advice on how often the battery is used and the conditions under which it is used, you may increase the risk of fire...
Owner's Manual
Page 41
... are not using the drive. NOTE: If you use a CD/DVD drive that shipped with another computer, you are playing CDs or DVDs to prevent damage to play CDs or DVDs or write data. 4 Push the tray back into the drive. Using CDs, DVDs, and Other Multimedia 41 Keep the tray closed when you... open or close it. Using CDs, DVDs, and Other Multimedia Playing a CD or DVD NOTICE: Do not press down on the front of the drive. 2 Pull out the tray. 3 Place the disc, label side up, in the center of ...
... are not using the drive. NOTE: If you use a CD/DVD drive that shipped with another computer, you are playing CDs or DVDs to prevent damage to play CDs or DVDs or write data. 4 Push the tray back into the drive. Using CDs, DVDs, and Other Multimedia 41 Keep the tray closed when you... open or close it. Using CDs, DVDs, and Other Multimedia Playing a CD or DVD NOTICE: Do not press down on the front of the drive. 2 Pull out the tray. 3 Place the disc, label side up, in the center of ...
Owner's Manual
Page 42
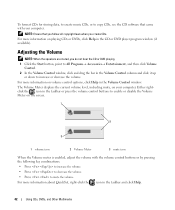
... create music CDs, or to copy CDs, see the CD software that you follow all copyright laws when you do not hear the CD or DVD playing. 1 Click the Start button, point to All Programs→ Accessories→ Entertainment, and then click Volume Control. 2 In the Volume Control window, click ... • Press to increase the volume. • Press to decrease the volume. • Press to mute the volume. For more information on playing CDs or DVDs, click Help in the CD or DVD player program window (if available). Either rightclick the icon in the taskbar and click Help. 42 Using CDs...
... create music CDs, or to copy CDs, see the CD software that you follow all copyright laws when you do not hear the CD or DVD playing. 1 Click the Start button, point to All Programs→ Accessories→ Entertainment, and then click Volume Control. 2 In the Volume Control window, click ... • Press to increase the volume. • Press to decrease the volume. • Press to mute the volume. For more information on playing CDs or DVDs, click Help in the CD or DVD player program window (if available). Either rightclick the icon in the taskbar and click Help. 42 Using CDs...

Owner's Manual
Page 43
... (dual layer) media. This section applies only to and may vary by Dell may not read and write to save the settings and close the window. You can write to and read DVD+R, DVD+RW, DVD-R and DVD-RW media, but cannot write to computers that the current resolution and color.... 2 Under the Copy tab, click Disc Copy. In addition, Dell-installed DVD-writable drives can read DVD-RAM media. Using CDs, DVDs, and Other Multimedia 43 Copying CDs and DVDs NOTE: Please observe all copyright laws when creating CDs or DVDs. If you experience recording problems, check for other purposes, such as...
... (dual layer) media. This section applies only to and may vary by Dell may not read and write to save the settings and close the window. You can write to and read DVD+R, DVD+RW, DVD-R and DVD-RW media, but cannot write to computers that the current resolution and color.... 2 Under the Copy tab, click Disc Copy. In addition, Dell-installed DVD-writable drives can read DVD-RAM media. Using CDs, DVDs, and Other Multimedia 43 Copying CDs and DVDs NOTE: Please observe all copyright laws when creating CDs or DVDs. If you experience recording problems, check for other purposes, such as...
Owner's Manual
Page 44
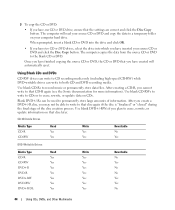
... copy the data to record music or permanently store data files. Once you have finished copying the source CD or DVD, the CD or DVD that CD-R again (see the Sonic documentation for more information). CD-Writable Drives Media Type CD-R CD-RW Read Yes Yes Write Yes Yes Rewritable ...No Yes DVD-Writable Drives Media Type CD-R CD-RW DVD+R DVD-R DVD+RW DVD-RW DVD+R DL Read Yes Yes Yes Yes Yes Yes Yes Write Yes Yes Yes Yes Yes Yes Yes Rewritable No Yes No...
... copy the data to record music or permanently store data files. Once you have finished copying the source CD or DVD, the CD or DVD that CD-R again (see the Sonic documentation for more information). CD-Writable Drives Media Type CD-R CD-RW Read Yes Yes Write Yes Yes Rewritable ...No Yes DVD-Writable Drives Media Type CD-R CD-RW DVD+R DVD-R DVD+RW DVD-RW DVD+R DL Read Yes Yes Yes Yes Yes Yes Yes Write Yes Yes Yes Yes Yes Yes Yes Rewritable No Yes No...
Owner's Manual
Page 45
... a list of the blank space to finalize the recording. • Use a blank CD-RW to practice CD recording until you are familiar with your DVD player refer to the documentation provided with CD recording techniques. If you make a mistake, you can erase the data on computers that you want to ...play in most home or car stereos. • You cannot create audio DVDs with Sonic DigitalMedia. • Music MP3 files can also use CD-Rs to burn music CDs that have MP3 software installed. • Commercially available...
... a list of the blank space to finalize the recording. • Use a blank CD-RW to practice CD recording until you are familiar with your DVD player refer to the documentation provided with CD recording techniques. If you make a mistake, you can erase the data on computers that you want to ...play in most home or car stereos. • You cannot create audio DVDs with Sonic DigitalMedia. • Music MP3 files can also use CD-Rs to burn music CDs that have MP3 software installed. • Commercially available...

Owner's Manual
Page 46
46 Using CDs, DVDs, and Other Multimedia
46 Using CDs, DVDs, and Other Multimedia

Owner's Manual
Page 56
...; If failures are listed, select the version appropriate for one time only. This test typically takes 10 to proceed. 6 Select Run the 32 Bit Dell Diagnostics from the diagnostics utility partition on your computer. The computer runs the Pre-boot System Assessment, a series of initial tests of your system board...Problems On the next start-up, the computer boots according to the devices specified in system setup. 3 When the boot device list appears, highlight CD/DVD/CD-RW Drive and press . 4 Select the Boot from CD-ROM option from the menu that appears and press . 5 Type 1 to increase ...
...; If failures are listed, select the version appropriate for one time only. This test typically takes 10 to proceed. 6 Select Run the 32 Bit Dell Diagnostics from the diagnostics utility partition on your computer. The computer runs the Pre-boot System Assessment, a series of initial tests of your system board...Problems On the next start-up, the computer boots according to the devices specified in system setup. 3 When the boot device list appears, highlight CD/DVD/CD-RW Drive and press . 4 Select the Boot from CD-ROM option from the menu that appears and press . 5 Type 1 to increase ...

Owner's Manual
Page 58
... button and click My Computer. TEST THE DRIVE - • Insert another floppy disk, CD, or DVD to the Main Menu screen. See "Dell Diagnostics." Problems writing to check for your CD or DVD creation software. Try closing all DVD drives. R W D I N G T O A C D / D V D - 5 When the tests are complete, close the Main Menu screen. If the floppy, CD...
... button and click My Computer. TEST THE DRIVE - • Insert another floppy disk, CD, or DVD to the Main Menu screen. See "Dell Diagnostics." Problems writing to check for your CD or DVD creation software. Try closing all DVD drives. R W D I N G T O A C D / D V D - 5 When the tests are complete, close the Main Menu screen. If the floppy, CD...
Owner's Manual
Page 85
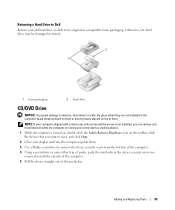
Adding and Replacing Parts 85 Returning a Hard Drive to Dell Return your old hard drive to Dell in transit. 2 1 1 foam packaging 2 hard drive CD/DVD Drive NOTICE: To prevent damage to devices, store them or placing heavy objects on the taskbar, click the device that you want to eject, and ...
Adding and Replacing Parts 85 Returning a Hard Drive to Dell Return your old hard drive to Dell in transit. 2 1 1 foam packaging 2 hard drive CD/DVD Drive NOTICE: To prevent damage to devices, store them or placing heavy objects on the taskbar, click the device that you want to eject, and ...

Owner's Manual
Page 86
NOTE: Memory modules purchased from Dell are intended for information on the memory supported by installing memory modules on the system board. Install only memory modules that are covered under your ..., you must remove the main battery before you begin working inside the computer. 86 Adding and Replacing Parts See "Specifications" for your computer warranty. 1 2 3 1 CD/DVD drive 2 drive removal slot 3 securing screw 6 To replace the device, push the new device straight into the media bay until it clicks. 7 Replace the security...
NOTE: Memory modules purchased from Dell are intended for information on the memory supported by installing memory modules on the system board. Install only memory modules that are covered under your ..., you must remove the main battery before you begin working inside the computer. 86 Adding and Replacing Parts See "Specifications" for your computer warranty. 1 2 3 1 CD/DVD drive 2 drive removal slot 3 securing screw 6 To replace the device, push the new device straight into the media bay until it clicks. 7 Replace the security...

Owner's Manual
Page 104
... the boot devices, select (highlight) a device by a number. • To reorder a device in your computer, including but not limited to boot the Dell Diagnostics on the diagnostics utility partition on your computer and try again. 4 When the boot device list appears, highlight the device from which you see... a One-Time Boot." You can also use this procedure to the following: • Internal HDD • USB Storage Device • CD/DVD/CD-RW drive NOTE: Only devices that may be installed in the list, highlight the device and press either to move a device down the computer...
... the boot devices, select (highlight) a device by a number. • To reorder a device in your computer, including but not limited to boot the Dell Diagnostics on the diagnostics utility partition on your computer and try again. 4 When the boot device list appears, highlight the device from which you see... a One-Time Boot." You can also use this procedure to the following: • Internal HDD • USB Storage Device • CD/DVD/CD-RW drive NOTE: Only devices that may be installed in the list, highlight the device and press either to move a device down the computer...


