Inspiron 13 7347 Specifications
Page 18
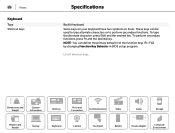
... be used to type alternate characters or to perform secondary functions. To perform secondary functions, press Fn and the desired key. List of the function keys (F1-F12) by changing Function Key Behavior in BIOS setup program. These keys can define the primary behavior of shortcut keys. To type the alternate character, press Shift and the desired key. Dimensions and Weight System Information Memory Ports and Connectors Communications Video Audio Storage Media-Card Reader Display Keyboard Camera Touchpad Battery Power Adapter...
... be used to type alternate characters or to perform secondary functions. To perform secondary functions, press Fn and the desired key. List of the function keys (F1-F12) by changing Function Key Behavior in BIOS setup program. These keys can define the primary behavior of shortcut keys. To type the alternate character, press Shift and the desired key. Dimensions and Weight System Information Memory Ports and Connectors Communications Video Audio Storage Media-Card Reader Display Keyboard Camera Touchpad Battery Power Adapter...
Inspiron 13 7347 Specifications
Page 19
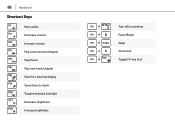
Keyboard Shortcut Keys Mute audio Decrease volume Increase volume Play previous track/chapter Play/Pause Play next track/chapter Switch to external display Open Search charm Toggle keyboard backlight Decrease brightness Increase brightness Turn off/on wireless Pause/Break Sleep Scroll lock Toggle Fn-key lock
Keyboard Shortcut Keys Mute audio Decrease volume Increase volume Play previous track/chapter Play/Pause Play next track/chapter Switch to external display Open Search charm Toggle keyboard backlight Decrease brightness Increase brightness Turn off/on wireless Pause/Break Sleep Scroll lock Toggle Fn-key lock
Inspiron 13 7347 Service Manual
Page 3
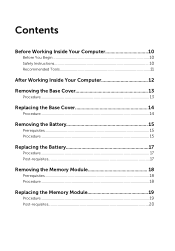
Contents Before Working Inside Your Computer 10 Before You Begin 10 Safety Instructions 10 Recommended Tools 11 After Working Inside Your Computer 12 Removing the Base Cover 13 Procedure...13 Replacing the Base Cover 14 Procedure...14 Removing the Battery 15 Prerequisites...15 Procedure...15 Replacing the Battery 17 Procedure...17 Post-requisites 17 Removing the Memory Module 18 Prerequisites...18 Procedure...18 Replacing the Memory Module 19 Procedure...19 Post-requisites 20
Contents Before Working Inside Your Computer 10 Before You Begin 10 Safety Instructions 10 Recommended Tools 11 After Working Inside Your Computer 12 Removing the Base Cover 13 Procedure...13 Replacing the Base Cover 14 Procedure...14 Removing the Battery 15 Prerequisites...15 Procedure...15 Replacing the Battery 17 Procedure...17 Post-requisites 17 Removing the Memory Module 18 Prerequisites...18 Procedure...18 Replacing the Memory Module 19 Procedure...19 Post-requisites 20
Inspiron 13 7347 Service Manual
Page 11
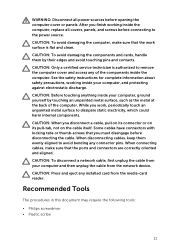
... instructions for complete information about safety precautions, working inside your computer and then unplug the cable from the media-card reader. CAUTION: Press and eject any connector pins. CAUTION: Before touching anything inside the computer, replace all power sources before disconnecting the cable. CAUTION: To avoid damaging the computer, make sure that the work , periodically touch an unpainted metal surface to remove the computer cover...
... instructions for complete information about safety precautions, working inside your computer and then unplug the cable from the media-card reader. CAUTION: Press and eject any connector pins. CAUTION: Before touching anything inside the computer, replace all power sources before disconnecting the cable. CAUTION: To avoid damaging the computer, make sure that the work , periodically touch an unpainted metal surface to remove the computer cover...
Inspiron 13 7347 Service Manual
Page 18
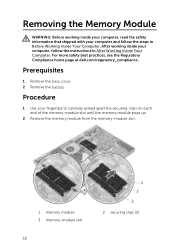
... the steps in After Working Inside Your Computer. After working inside your fingertips to carefully spread apart the securing-clips on each end of the memory-module slot until the memory module pops up. 2 Remove the memory module from the memory-module slot. 1 memory module 3 memory-module slot 18 2 securing clips (2) For more safety best practices, see the Regulatory Compliance home page at dell.com/regulatory_compliance. Prerequisites 1 Remove the base cover. 2 Remove the battery.
... the steps in After Working Inside Your Computer. After working inside your fingertips to carefully spread apart the securing-clips on each end of the memory-module slot until the memory module pops up. 2 Remove the memory module from the memory-module slot. 1 memory module 3 memory-module slot 18 2 securing clips (2) For more safety best practices, see the Regulatory Compliance home page at dell.com/regulatory_compliance. Prerequisites 1 Remove the base cover. 2 Remove the battery.
Inspiron 13 7347 Service Manual
Page 19
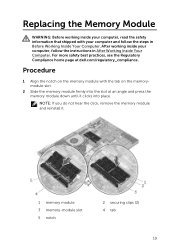
... press the memory module down until it . 1 memory module 3 memory-module slot 5 notch 2 securing clips (2) 4 tab 19 Procedure 1 Align the notch on the memory module with your computer, follow the steps in After Working Inside Your Computer. NOTE: If you do not hear the click, remove the memory module and reinstall it clicks into the slot at dell.com/regulatory_compliance. Replacing the Memory Module WARNING: Before working inside your...
... press the memory module down until it . 1 memory module 3 memory-module slot 5 notch 2 securing clips (2) 4 tab 19 Procedure 1 Align the notch on the memory module with your computer, follow the steps in After Working Inside Your Computer. NOTE: If you do not hear the click, remove the memory module and reinstall it clicks into the slot at dell.com/regulatory_compliance. Replacing the Memory Module WARNING: Before working inside your...
Inspiron 13 7347 Service Manual
Page 24
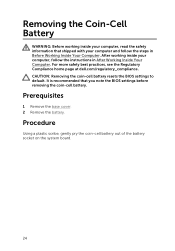
...-cell battery resets the BIOS settings to default. Prerequisites 1 Remove the base cover. 2 Remove the battery. After working inside your computer, follow the steps in After Working Inside Your Computer. For more safety best practices, see the Regulatory Compliance home page at dell.com/regulatory_compliance. It is recommended that shipped with your computer and follow the instructions in Before Working Inside Your Computer. Procedure Using...
...-cell battery resets the BIOS settings to default. Prerequisites 1 Remove the base cover. 2 Remove the battery. After working inside your computer, follow the steps in After Working Inside Your Computer. For more safety best practices, see the Regulatory Compliance home page at dell.com/regulatory_compliance. It is recommended that shipped with your computer and follow the instructions in Before Working Inside Your Computer. Procedure Using...
Inspiron 13 7347 Service Manual
Page 55
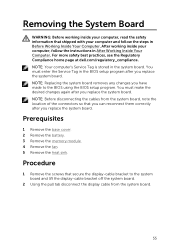
... board. 2 Using the pull tab disconnect the display cable from the system board, note the location of the connectors so that secure the display-cable bracket to the BIOS using the BIOS setup program. Prerequisites 1 Remove the base cover. 2 Remove the battery. 3 Remove the memory module. 4 Remove the fan. 5 Remove the heat sink. NOTE: Replacing the system board removes any changes you replace the system board. NOTE: Before disconnecting the cables from the system board. 55 You must make the desired changes...
... board. 2 Using the pull tab disconnect the display cable from the system board, note the location of the connectors so that secure the display-cable bracket to the BIOS using the BIOS setup program. Prerequisites 1 Remove the base cover. 2 Remove the battery. 3 Remove the memory module. 4 Remove the fan. 5 Remove the heat sink. NOTE: Replacing the system board removes any changes you replace the system board. NOTE: Before disconnecting the cables from the system board. 55 You must make the desired changes...

Me and My Dell
Page 4
Setting Up Your Webcam 22 Integrated Webcam 22 External Webcam 22 Setting up Bluetooth 22 About Your Computer 23 Power Adapter 23 Battery 24 Coin-Cell Battery 24 Touchpad 25 Display 25 Touchscreen 25 3D 25 3D Camera 26 Keyboard 26 Physical Keyboard 27 Keyboard Backlight 27 On-Screen Keyboard 28 Keyboard Connection Types 28 Wired 28 Wireless 28 Service Tag and Express-Service Code 29 Locating the Label on Your Computer 29 Dell Support Website 29 BIOS Setup Program 29 4 Contents
Setting Up Your Webcam 22 Integrated Webcam 22 External Webcam 22 Setting up Bluetooth 22 About Your Computer 23 Power Adapter 23 Battery 24 Coin-Cell Battery 24 Touchpad 25 Display 25 Touchscreen 25 3D 25 3D Camera 26 Keyboard 26 Physical Keyboard 27 Keyboard Backlight 27 On-Screen Keyboard 28 Keyboard Connection Types 28 Wired 28 Wireless 28 Service Tag and Express-Service Code 29 Locating the Label on Your Computer 29 Dell Support Website 29 BIOS Setup Program 29 4 Contents
Me and My Dell
Page 12
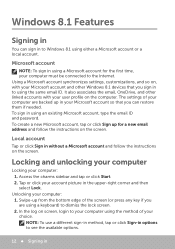
..., type the email ID and password. Unlocking your choice. Using a Microsoft account synchronizes settings, customizations, and so on, with your computer: 1. Access the charms sidebar and tap or click Start. 2. In the log on the screen. It also associates the email, OneDrive, and other Windows 8.1 devices that you sign in without a Microsoft account and follow the instructions on screen, login to the Internet...
..., type the email ID and password. Unlocking your choice. Using a Microsoft account synchronizes settings, customizations, and so on, with your computer: 1. Access the charms sidebar and tap or click Start. 2. In the log on the screen. It also associates the email, OneDrive, and other Windows 8.1 devices that you sign in without a Microsoft account and follow the instructions on screen, login to the Internet...

Me and My Dell
Page 13
... send video and audio to find apps, settings, and files on the Start screen. like in from the right edge of the touchpad. tap or click the Desktop tile on your friends and social networks. Toggles between the Start screen and last used app. Search Share Start Devices Settings Allows you are Search, Share, Start, Devices, and Settings. The charms sidebar displays a list of Windows - Accessing the desktop To access the...
... send video and audio to find apps, settings, and files on the Start screen. like in from the right edge of the touchpad. tap or click the Desktop tile on your friends and social networks. Toggles between the Start screen and last used app. Search Share Start Devices Settings Allows you are Search, Share, Start, Devices, and Settings. The charms sidebar displays a list of Windows - Accessing the desktop To access the...
Me and My Dell
Page 17
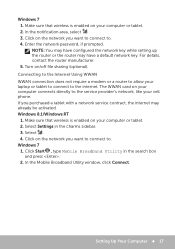
... Connect. Enter the network password, if prompted. Windows 8.1/Windows RT 1. Click Start , type Mobile Broadband Utility in the charms sidebar. 3. For details, contact the router manufacturer. 5. If you want to connect to . Select Settings in the search box and press . 2. Make sure that wireless is enabled on your computer or tablet. 2. Setting Up Your Computer 17 Turn on the network you purchased a tablet with a network service contract, the internet...
... Connect. Enter the network password, if prompted. Windows 8.1/Windows RT 1. Click Start , type Mobile Broadband Utility in the charms sidebar. 3. For details, contact the router manufacturer. 5. If you want to connect to . Select Settings in the search box and press . 2. Make sure that wireless is enabled on your computer or tablet. 2. Setting Up Your Computer 17 Turn on the network you purchased a tablet with a network service contract, the internet...

Me and My Dell
Page 18
... may support 5.1/7.1 audio. Click Settings and type Audio in the search box and press . Click Manage Audio Devices. 4. Click Finish. Click Next and follow the instructions on the card. NOTE: On computers with your desired level. You should hear a tone from every speaker. 7. Click Start , type Sound in the search box. 3. Alternatively, click Start → Control Panel→ Hardware and Sound→ Sound. 2. Select Speakers and click Configure. The Speaker Setup window...
... may support 5.1/7.1 audio. Click Settings and type Audio in the search box and press . Click Manage Audio Devices. 4. Click Finish. Click Next and follow the instructions on the card. NOTE: On computers with your desired level. You should hear a tone from every speaker. 7. Click Start , type Sound in the search box. 3. Alternatively, click Start → Control Panel→ Hardware and Sound→ Sound. 2. Select Speakers and click Configure. The Speaker Setup window...

Me and My Dell
Page 21
...; 21 If you are installing a wireless printer, follow the instruction on setting up the printer, see the documentation that is shipped with your computer using the USB cable before performing these steps. Windows 8.1 1. For more information on the screen. Access the Search charm. 2. Select your printer. For more information on the printer model. NOTE: The features supported by your printer and the...
...; 21 If you are installing a wireless printer, follow the instruction on setting up the printer, see the documentation that is shipped with your computer using the USB cable before performing these steps. Windows 8.1 1. For more information on the screen. Access the Search charm. 2. Select your printer. For more information on the printer model. NOTE: The features supported by your printer and the...
Me and My Dell
Page 26
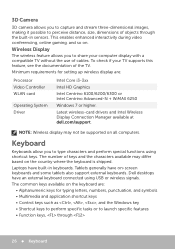
... Wireless Display Connection Manager available at dell.com/support. Dell desktops have an external keyboard connected using shortcut keys. Wireless Display The wireless feature allows you to type characters and perform special functions using USB or wireless signals. Keyboard Keyboards allow you to share your TV supports this feature, see the documentation of cables. The number of objects through 26 Keyboard The common keys available on the keyboard are: • Alphanumeric keys for setting up wireless display are: Processor Video Controller WLAN card Operating...
... Wireless Display Connection Manager available at dell.com/support. Dell desktops have an external keyboard connected using shortcut keys. Wireless Display The wireless feature allows you to type characters and perform special functions using USB or wireless signals. Keyboard Keyboards allow you to share your TV supports this feature, see the documentation of cables. The number of objects through 26 Keyboard The common keys available on the keyboard are: • Alphanumeric keys for setting up wireless display are: Processor Video Controller WLAN card Operating...
Me and My Dell
Page 69
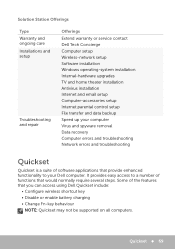
... warranty or service contact Dell Tech Concierge Computer setup Wireless‑network setup Software installation Windows operating‑system installation Internal‑hardware upgrades TV and home theater installation Antivirus installation Internet and email setup Computer‑accessories setup Internet parental control setup File transfer and data backup Speed up your Dell computer. Some of functions that you can access using Dell Quickset include: • Configure wireless shortcut key • Disable or enable battery charging • Change Fn‑key behaviour NOTE...
... warranty or service contact Dell Tech Concierge Computer setup Wireless‑network setup Software installation Windows operating‑system installation Internal‑hardware upgrades TV and home theater installation Antivirus installation Internet and email setup Computer‑accessories setup Internet parental control setup File transfer and data backup Speed up your Dell computer. Some of functions that you can access using Dell Quickset include: • Configure wireless shortcut key • Disable or enable battery charging • Change Fn‑key behaviour NOTE...

Me and My Dell
Page 72
It allows an technical support representative to remotely diagnose and resolve issues on your permission. DellConnect DellConnect is initiated by a technical support agent when required during troubleshooting. NOTE: To access DellConnect and terms of usage, see dell.com/DellConnect. 72 DellConnect A DellConnect request is an online tool that allows a Dell agent to access your computer (under your supervision) to interact with your computer with your computer.
It allows an technical support representative to remotely diagnose and resolve issues on your permission. DellConnect DellConnect is initiated by a technical support agent when required during troubleshooting. NOTE: To access DellConnect and terms of usage, see dell.com/DellConnect. 72 DellConnect A DellConnect request is an online tool that allows a Dell agent to access your computer (under your supervision) to interact with your computer with your computer.
Me and My Dell
Page 85
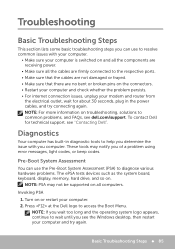
... information on troubleshooting, solutions to diagnose various hardware problems. The ePSA tests devices such as the system board, keyboard, display, memory, hard drive, and so on. see "Contacting Dell". Pre-Boot System Assessment You can use the Pre-Boot System Assessment (PSA) to common problems, and FAQs, see dell.com/support. These tools may not be supported on all the cables are firmly connected to the respective ports. • Make sure that...
... information on troubleshooting, solutions to diagnose various hardware problems. The ePSA tests devices such as the system board, keyboard, display, memory, hard drive, and so on. see "Contacting Dell". Pre-Boot System Assessment You can use the Pre-Boot System Assessment (PSA) to common problems, and FAQs, see dell.com/support. These tools may not be supported on all the cables are firmly connected to the respective ports. • Make sure that...
Me and My Dell
Page 91
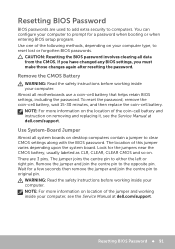
.... Use System‑Board Jumper Almost all system boards on removing and replacing it, see the Service Manual at dell.com/support. The location of the coin‑cell battery and instruction on desktop computers contain a jumper to clear CMOS settings along with the BIOS password. The jumper joins the centre pin to the opposite pin. If you have changed any BIOS settings, you must make those changes again after resetting the password. Wait...
.... Use System‑Board Jumper Almost all system boards on removing and replacing it, see the Service Manual at dell.com/support. The location of the coin‑cell battery and instruction on desktop computers contain a jumper to clear CMOS settings along with the BIOS password. The jumper joins the centre pin to the opposite pin. If you have changed any BIOS settings, you must make those changes again after resetting the password. Wait...
Me and My Dell
Page 99
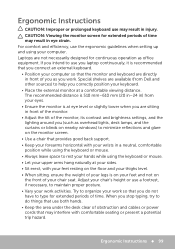
...) from Dell and other sources) to type for extended periods of you correctly position your work activities. For comfort and efficiency, use the ergonomic guidelines when setting up and using the keyboard or mouse. • Let your upper arms hang naturally at a comfortable viewing distance. Ergonomic Instructions 99 CAUTION: Viewing the monitor screen for extended periods of obstruction and cables or power cords...
...) from Dell and other sources) to type for extended periods of you correctly position your work activities. For comfort and efficiency, use the ergonomic guidelines when setting up and using the keyboard or mouse. • Let your upper arms hang naturally at a comfortable viewing distance. Ergonomic Instructions 99 CAUTION: Viewing the monitor screen for extended periods of obstruction and cables or power cords...


