
Service Manual
Page 1
... 2008 Rev. A00 Dell™ Inspiron™ 1210 Service Manual Before You Begin Replacing the Hinge Cover Replacing the Keyboard Replacing the Palm Rest Replacing the Display Replacing the Internal Card With Bluetooth® Wireless Technology Replacing the Hard Drive Replacing the Power Button Board Replacing the Speaker Communication Cards Replacing the Power Cable Replacing the 2-in-1 Processor and Memory Board Replacing the Coin-Cell...
... 2008 Rev. A00 Dell™ Inspiron™ 1210 Service Manual Before You Begin Replacing the Hinge Cover Replacing the Keyboard Replacing the Palm Rest Replacing the Display Replacing the Internal Card With Bluetooth® Wireless Technology Replacing the Hard Drive Replacing the Power Button Board Replacing the Speaker Communication Cards Replacing the Power Cable Replacing the 2-in-1 Processor and Memory Board Replacing the Coin-Cell...
Service Manual
Page 20
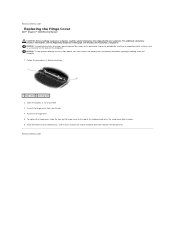
... 5. Back to Contents Page Replacing the Hinge Cover Dell™ Inspiron™ 1210 Service Manual CAUTION: Before working inside your computer, read the safety information that shipped with your computer. To replace the hinge cover, align the tabs on the back of the keyboard and press the hinge cover ...touching an unpainted metal surface (such as possible. 3. For additional safety best practices information, see the Regulatory Compliance Homepage at www.dell.com/regulatory_compliance. NOTICE: To help prevent damage to the system board, you must remove the battery from side to side. 4....
... 5. Back to Contents Page Replacing the Hinge Cover Dell™ Inspiron™ 1210 Service Manual CAUTION: Before working inside your computer, read the safety information that shipped with your computer. To replace the hinge cover, align the tabs on the back of the keyboard and press the hinge cover ...touching an unpainted metal surface (such as possible. 3. For additional safety best practices information, see the Regulatory Compliance Homepage at www.dell.com/regulatory_compliance. NOTICE: To help prevent damage to the system board, you must remove the battery from side to side. 4....
Service Manual
Page 22
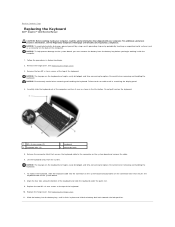
... the battery-lock latch towards the lock position. NOTICE: The keycaps on the keyboard are fragile, easily dislodged, and time-consuming to the connector on the keyboard are fragile, easily dislodged, and time-consuming to Contents Page Replacing the Keyboard Dell™ Inspiron™ 1210 Service Manual CAUTION: Before working inside your computer. NOTICE: To avoid electrostatic...
... the battery-lock latch towards the lock position. NOTICE: The keycaps on the keyboard are fragile, easily dislodged, and time-consuming to the connector on the keyboard are fragile, easily dislodged, and time-consuming to Contents Page Replacing the Keyboard Dell™ Inspiron™ 1210 Service Manual CAUTION: Before working inside your computer. NOTICE: To avoid electrostatic...
Service Manual
Page 29
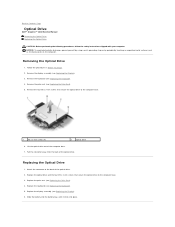
... drive and the four M2 x 3-mm screws that secure the optical drive to Contents Page Optical Drive Dell™ Inspiron™ 1210 Service Manual Removing the Optical Drive Replacing the Optical Drive CAUTION: Before performing the following procedures, follow the safety instructions shipped with your computer. Replacing the Optical Drive 1. Replace the keyboard (see Replacing the Palm Rest). 4.
... drive and the four M2 x 3-mm screws that secure the optical drive to Contents Page Optical Drive Dell™ Inspiron™ 1210 Service Manual Removing the Optical Drive Replacing the Optical Drive CAUTION: Before performing the following procedures, follow the safety instructions shipped with your computer. Replacing the Optical Drive 1. Replace the keyboard (see Replacing the Palm Rest). 4.
Service Manual
Page 31
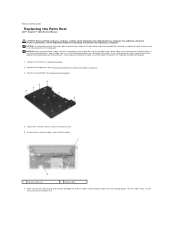
... the Regulatory Compliance Homepage at www.dell.com/regulatory_compliance. As you disconnect a cable, pull on its connector or on its pull-tab, not on the cable itself. Follow the instructions in on page 9.. 3. See Replacing the Keyboard. 4. if you disconnect the cable...keyboard. See Follow the procedures in "Before You Begin" on the locking tabs before you connect a cable, ensure that both connectors are correctly oriented and aligned. 1. NOTICE: When you pull connectors apart, keep them evenly aligned to Contents Page Replacing the Palm Rest Dell™ Inspiron™ 1210...
... the Regulatory Compliance Homepage at www.dell.com/regulatory_compliance. As you disconnect a cable, pull on its connector or on its pull-tab, not on the cable itself. Follow the instructions in on page 9.. 3. See Replacing the Keyboard. 4. if you disconnect the cable...keyboard. See Follow the procedures in "Before You Begin" on the locking tabs before you connect a cable, ensure that both connectors are correctly oriented and aligned. 1. NOTICE: When you pull connectors apart, keep them evenly aligned to Contents Page Replacing the Palm Rest Dell™ Inspiron™ 1210...
Service Manual
Page 32
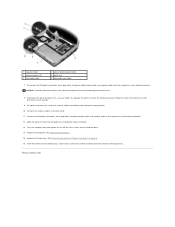
...8. Starting at the top of the palm rest, use your fingers to separate the palm rest from the respective system board connectors. See Replacing the Keyboard. 15. Replace the hinge cover. Slide the battery into the battery bay, until it into place. 13. NOTICE: Carefully separate the palm rest from ...the computer base to avoid damage to the respective system board connectors. 12. Replace the keyboard. 1 speaker cable 3 antenna cables (2) 5 touch pad cable 2 power button board cable 4 palm rest 6 bluetooth card cable 7.
...8. Starting at the top of the palm rest, use your fingers to separate the palm rest from the respective system board connectors. See Replacing the Keyboard. 15. Replace the hinge cover. Slide the battery into the battery bay, until it into place. 13. NOTICE: Carefully separate the palm rest from ...the computer base to avoid damage to the respective system board connectors. 12. Replace the keyboard. 1 speaker cable 3 antenna cables (2) 5 touch pad cable 2 power button board cable 4 palm rest 6 bluetooth card cable 7.
Service Manual
Page 35
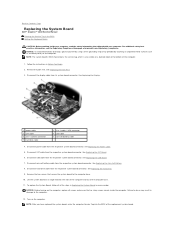
... Hard Drive. 9. Disconnect hard drive cable from the respective system board connector. Back to Contents Page Replacing the System Board Dell™ Inspiron™ 1210 Service Manual Entering the Service Tag in the BIOS Setting the Keyboard Matrix CAUTION: Before working inside the computer. Disconnect CRT cable from the respective system board connector. NOTICE: To...
... Hard Drive. 9. Disconnect hard drive cable from the respective system board connector. Back to Contents Page Replacing the System Board Dell™ Inspiron™ 1210 Service Manual Entering the Service Tag in the BIOS Setting the Keyboard Matrix CAUTION: Before working inside the computer. Disconnect CRT cable from the respective system board connector. NOTICE: To...
Service Manual
Page 36
... Page Release the key combination. Back to enter the system setup program. 3. The keyboard matrix may not ship with an external optical drive. Connect the AC adapter to your country, see Setting the... Keyboard Matrix. Use an external optical drive or any external storage device for the desired keyboard matrix: ¡ All countries except Brazil: ¡ Brazil only: 4. Turn off...Tag in and that involve discs. NOTE: Your computer may or may change after you replace the system board.
... Page Release the key combination. Back to enter the system setup program. 3. The keyboard matrix may not ship with an external optical drive. Connect the AC adapter to your country, see Setting the... Keyboard Matrix. Use an external optical drive or any external storage device for the desired keyboard matrix: ¡ All countries except Brazil: ¡ Brazil only: 4. Turn off...Tag in and that involve discs. NOTE: Your computer may or may change after you replace the system board.
Setup Guide
Page 5
...Windows Vista® Setup 9 Connect to the Internet (Optional 10 Using Your Inspiron Laptop 14 Left Side Features 16 Computer Base and Keyboard Features 18 Display Features 20 Removing and Replacing the Battery 21 Software Features 22 Solving Problems 24 Network Problems 24 Power Problems ...25 Memory Problems 26 Lockups and Software Problems 27 Dell Support Center 29 Using Support Tools 29 System Messages 30 Hardware Troubleshooter 31 Dell Diagnostics 32 Restoring Your Operating System 34 System Restore 34 Dell Factory Image Restore 36 Operating System Reinstallation 37 3
...Windows Vista® Setup 9 Connect to the Internet (Optional 10 Using Your Inspiron Laptop 14 Left Side Features 16 Computer Base and Keyboard Features 18 Display Features 20 Removing and Replacing the Battery 21 Software Features 22 Solving Problems 24 Network Problems 24 Power Problems ...25 Memory Problems 26 Lockups and Software Problems 27 Dell Support Center 29 Using Support Tools 29 System Messages 30 Hardware Troubleshooter 31 Dell Diagnostics 32 Restoring Your Operating System 34 System Restore 34 Dell Factory Image Restore 36 Operating System Reinstallation 37 3
Setup Guide
Page 32
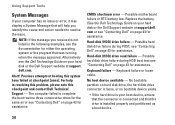
... page 43 for assistance. Possible hard disk drive failure during HDD boot test see "Contacting Dell" on your hard disk or the Dell Support website at support.dell. Keyboard failure or loose cable. No boot device available - NOTE: If the message you identify the cause and action ...For help you received is not listed in resolving this problem, please note this system have failed at checkpoint [nnnn]. dell.com. Replace the battery. (See the Dell Technology Guide on page 43 for assistance. Using Support Tools System Messages If your boot device, ensure that the connector...
... page 43 for assistance. Possible hard disk drive failure during HDD boot test see "Contacting Dell" on your hard disk or the Dell Support website at support.dell. Keyboard failure or loose cable. No boot device available - NOTE: If the message you identify the cause and action ...For help you received is not listed in resolving this problem, please note this system have failed at checkpoint [nnnn]. dell.com. Replace the battery. (See the Dell Technology Guide on page 43 for assistance. Using Support Tools System Messages If your boot device, ensure that the connector...


