
Service Manual
Page 1
... 2008 Rev. Dell™ Inspiron™ 1210 Service Manual Before You Begin Replacing the Hinge Cover Replacing the Keyboard Replacing the Palm Rest Replacing the Display Replacing the Internal Card With Bluetooth® Wireless Technology Replacing the Hard Drive Replacing the Power Button Board Replacing the Speaker Communication Cards Replacing the Power Cable Replacing the 2-in-1 Processor and Memory Board Replacing the Coin-Cell Battery Replacing the CRT Board Replacing the Camera Replacing the Inverter Board Replacing the USB Board Replacing the System Board Flashing the BIOS Notes...
... 2008 Rev. Dell™ Inspiron™ 1210 Service Manual Before You Begin Replacing the Hinge Cover Replacing the Keyboard Replacing the Palm Rest Replacing the Display Replacing the Internal Card With Bluetooth® Wireless Technology Replacing the Hard Drive Replacing the Power Button Board Replacing the Speaker Communication Cards Replacing the Power Cable Replacing the 2-in-1 Processor and Memory Board Replacing the Coin-Cell Battery Replacing the CRT Board Replacing the Camera Replacing the Inverter Board Replacing the USB Board Replacing the System Board Flashing the BIOS Notes...
Service Manual
Page 2
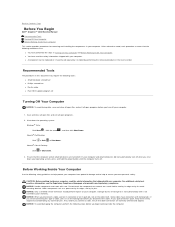
... computer. 1. As you connect a cable, ensure that the computer and all open files and exit all attached devices are correctly oriented and aligned. l A component can be replaced or-if purchased separately-installed by its pull-tab, not on a card. Back to Contents Page Before You Begin Dell™ Inspiron™ 1210 Service Manual Recommended Tools Turning Off Your Computer Before Working Inside Your Computer...
... computer. 1. As you connect a cable, ensure that the computer and all open files and exit all attached devices are correctly oriented and aligned. l A component can be replaced or-if purchased separately-installed by its pull-tab, not on a card. Back to Contents Page Before You Begin Dell™ Inspiron™ 1210 Service Manual Recommended Tools Turning Off Your Computer Before Working Inside Your Computer...
Service Manual
Page 3
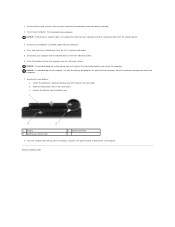
... battery bay. 1 battery 3 battery-bay release latch 2 battery-lock latch 8. Turn the computer top-side up, open the display, and press the power button to Contents Page Unlock the battery by sliding the battery-lock latch towards the outer edge. Disconnect all attached devices from your computer. NOTICE: To avoid damaging the system board, you must remove the main battery before you service the computer. Remove the battery from the 3-in-1 memory card reader...
... battery bay. 1 battery 3 battery-bay release latch 2 battery-lock latch 8. Turn the computer top-side up, open the display, and press the power button to Contents Page Unlock the battery by sliding the battery-lock latch towards the outer edge. Disconnect all attached devices from your computer. NOTICE: To avoid damaging the system board, you must remove the main battery before you service the computer. Remove the battery from the 3-in-1 memory card reader...

Service Manual
Page 4
... a BIOS-update program CD, flash the BIOS from the drive and restart the computer. Use an external optical drive or any external storage device for your desktop. 8. Flashing the BIOS in , the main battery is properly installed, and a network cable is complete, the computer will automatically reboot. 3. Back to Contents Page Flashing the BIOS Dell™ Inspiron™ 1210 Service Manual Flashing the BIOS From a CD Flashing the BIOS From the Hard Drive Flashing the BIOS in Ubuntu If a BIOS-update program CD is installed...
... a BIOS-update program CD, flash the BIOS from the drive and restart the computer. Use an external optical drive or any external storage device for your desktop. 8. Flashing the BIOS in , the main battery is properly installed, and a network cable is complete, the computer will automatically reboot. 3. Back to Contents Page Flashing the BIOS Dell™ Inspiron™ 1210 Service Manual Flashing the BIOS From a CD Flashing the BIOS From the Hard Drive Flashing the BIOS in Ubuntu If a BIOS-update program CD is installed...
Service Manual
Page 6
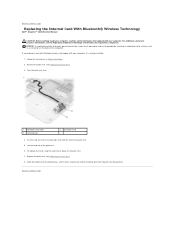
... Begin. 2. Turn the palm rest over. 1 bluetooth card cable 3 securing tabs 2 bluetooth card 4. Slide the battery into its place on the back of the palm rest. 6. Back to the palm rest. 5. Back to Contents Page Replacing the Internal Card With Bluetooth® Wireless Technology Dell™ Inspiron™ 1210 Service Manual CAUTION: Before working inside your computer, read the safety information that hold the card to Contents Page Remove the...
... Begin. 2. Turn the palm rest over. 1 bluetooth card cable 3 securing tabs 2 bluetooth card 4. Slide the battery into its place on the back of the palm rest. 6. Back to the palm rest. 5. Back to Contents Page Replacing the Internal Card With Bluetooth® Wireless Technology Dell™ Inspiron™ 1210 Service Manual CAUTION: Before working inside your computer, read the safety information that hold the card to Contents Page Remove the...
Service Manual
Page 7
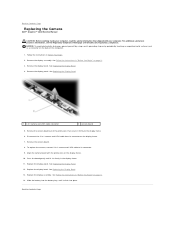
... on the back of the protrusions that shipped with the protrusions on the display frame. 7. See Follow the instructions in -1 camera and LVDS cable to its connector on the display frame. 10. See Replacing the Display Panel. 1 2-in1 camera and LVDS cable connector 2 camera board 5. Replace the display bezel. Back to Contents Page Replacing the Camera Dell™ Inspiron™ 1210 Service Manual CAUTION: Before working inside your computer. See Replacing the Display Panel. 12.
... on the back of the protrusions that shipped with the protrusions on the display frame. 7. See Follow the instructions in -1 camera and LVDS cable to its connector on the display frame. 10. See Replacing the Display Panel. 1 2-in1 camera and LVDS cable connector 2 camera board 5. Replace the display bezel. Back to Contents Page Replacing the Camera Dell™ Inspiron™ 1210 Service Manual CAUTION: Before working inside your computer. See Replacing the Display Panel. 12.

Service Manual
Page 10
...dell.com/regulatory_compliance. NOTE: The thermal pads may stick to carefully spread apart the securing clips on the new 2-in -1 memory and processor board. 6. Remove the two thermal pads on the back of the palm rest. 1 M2x4-mm screw (2) 3 tab in the safety instructions... connector slot 2 thermal pads (2) 4 securing clips (2) 3. Remove the thermal pads from the bottom of the computer). 1. Back to Contents Page Replacing the 2-in Before You Begin. 2. Follow the instructions in -1 Processor and Memory Board Dell™ Inspiron™ 1210 Service Manual CAUTION: Before working inside ...
...dell.com/regulatory_compliance. NOTE: The thermal pads may stick to carefully spread apart the securing clips on the new 2-in -1 memory and processor board. 6. Remove the two thermal pads on the back of the palm rest. 1 M2x4-mm screw (2) 3 tab in the safety instructions... connector slot 2 thermal pads (2) 4 securing clips (2) 3. Remove the thermal pads from the bottom of the computer). 1. Back to Contents Page Replacing the 2-in Before You Begin. 2. Follow the instructions in -1 Processor and Memory Board Dell™ Inspiron™ 1210 Service Manual CAUTION: Before working inside ...
Service Manual
Page 18
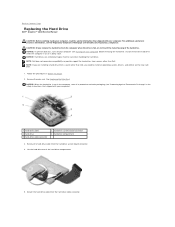
... hard drive cable from the hard-drive system board connector. 4. NOTICE: Hard drives are installing a hard drive from a source other than Dell, you remove the hard drive from sources other than Dell. CAUTION: If you need to Contents Page Replacing the Hard Drive Dell™ Inspiron™ 1210 Service Manual CAUTION: Before working inside your computer, read the safety information that shipped with your computer. Exercise care when handling the hard drive. NOTICE: When the hard drive is hot, do not touch...
... hard drive cable from the hard-drive system board connector. 4. NOTICE: Hard drives are installing a hard drive from a source other than Dell, you remove the hard drive from sources other than Dell. CAUTION: If you need to Contents Page Replacing the Hard Drive Dell™ Inspiron™ 1210 Service Manual CAUTION: Before working inside your computer, read the safety information that shipped with your computer. Exercise care when handling the hard drive. NOTICE: When the hard drive is hot, do not touch...
Service Manual
Page 24
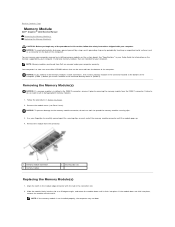
.... Remove the module from Dell are intended for information on the system board. NOTE: If the memory module is installed in the DIMM 2 connector, remove it . Back to Contents Page Memory Module Dell™ Inspiron™ 1210 Service Manual Removing the Memory Module(s) Replacing the Memory Module(s) CAUTION: Before you begin any of the procedures in this section, follow the safety instructions shipped with the tab in the connector slot. 2. See "Specifications" in your Setup Guide...
.... Remove the module from Dell are intended for information on the system board. NOTE: If the memory module is installed in the DIMM 2 connector, remove it . Back to Contents Page Memory Module Dell™ Inspiron™ 1210 Service Manual Removing the Memory Module(s) Replacing the Memory Module(s) CAUTION: Before you begin any of the procedures in this section, follow the safety instructions shipped with the tab in the connector slot. 2. See "Specifications" in your Setup Guide...
Service Manual
Page 31
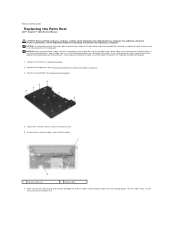
... apart, keep them evenly aligned to Contents Page Replacing the Palm Rest Dell™ Inspiron™ 1210 Service Manual CAUTION: Before working inside your computer. Disconnect the antenna cables from their routing guides. Pull the cables away, so that they are correctly oriented and aligned. 1. Remove the keyboard. Make note of the cable routing and carefully dislodge the antenna cables and the display cable from the Mini-Card(s). 1 antenna cables (2) 2 display cable...
... apart, keep them evenly aligned to Contents Page Replacing the Palm Rest Dell™ Inspiron™ 1210 Service Manual CAUTION: Before working inside your computer. Disconnect the antenna cables from their routing guides. Pull the cables away, so that they are correctly oriented and aligned. 1. Remove the keyboard. Make note of the cable routing and carefully dislodge the antenna cables and the display cable from the Mini-Card(s). 1 antenna cables (2) 2 display cable...
Service Manual
Page 33
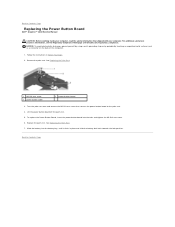
... remove the M2.5x3-mm screw that shipped with your computer, read the safety information that secures the power button board to the palm rest. 4. Back to Contents Page Replacing the Power Button Board Dell™ Inspiron™ 1210 Service Manual CAUTION: Before working inside your computer. Follow the instructions in place and slide the battery-lock latch towards the lock position. To replace the Power Button Board, insert the power button board into the battery...
... remove the M2.5x3-mm screw that shipped with your computer, read the safety information that secures the power button board to the palm rest. 4. Back to Contents Page Replacing the Power Button Board Dell™ Inspiron™ 1210 Service Manual CAUTION: Before working inside your computer. Follow the instructions in place and slide the battery-lock latch towards the lock position. To replace the Power Button Board, insert the power button board into the battery...
Service Manual
Page 34
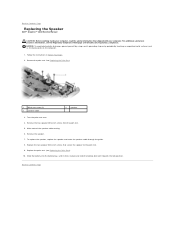
Back to Contents Page Replacing the Speaker Dell™ Inspiron™ 1210 Service Manual CAUTION: Before working inside your computer. Remove the two speaker M2x4-mm screws from the palm rest. 5. To replace the speaker, replace the speaker and route the speaker cable through the guide. 8. Slide the battery into the battery bay, until it clicks in Before You Begin. 2. Replace the two speaker M2x4-mm...
Back to Contents Page Replacing the Speaker Dell™ Inspiron™ 1210 Service Manual CAUTION: Before working inside your computer. Remove the two speaker M2x4-mm screws from the palm rest. 5. To replace the speaker, replace the speaker and route the speaker cable through the guide. 8. Slide the battery into the battery bay, until it clicks in Before You Begin. 2. Replace the two speaker M2x4-mm...
Service Manual
Page 35
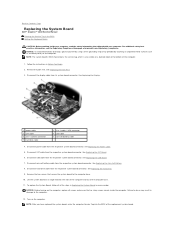
Back to Contents Page Replacing the System Board Dell™ Inspiron™ 1210 Service Manual Entering the Service Tag in the BIOS Setting the Keyboard Matrix CAUTION: Before working inside your computer. Disconnect CRT cable from the respective system board connector. See Replacing the CRT Board. 6. Disconnect coin-cell battery cable from the respective system board connector. To replace the System Board, follow all screws and ensure that shipped with your computer, read...
Back to Contents Page Replacing the System Board Dell™ Inspiron™ 1210 Service Manual Entering the Service Tag in the BIOS Setting the Keyboard Matrix CAUTION: Before working inside your computer. Disconnect CRT cable from the respective system board connector. See Replacing the CRT Board. 6. Disconnect coin-cell battery cable from the respective system board connector. To replace the System Board, follow all screws and ensure that shipped with your computer, read...
Service Manual
Page 37
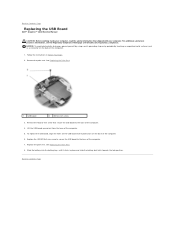
... of the computer. 5. Slide the battery into the battery bay, until it clicks in Before You Begin. 2. Replace the palm rest. Follow the instructions in place and slide the battery-lock latch towards the lock position. Remove the M2.5x3-mm screw that secure the USB board to Contents Page Replacing the USB Board Dell™ Inspiron™ 1210 Service Manual CAUTION: Before working inside your computer, read the...
... of the computer. 5. Slide the battery into the battery bay, until it clicks in Before You Begin. 2. Replace the palm rest. Follow the instructions in place and slide the battery-lock latch towards the lock position. Remove the M2.5x3-mm screw that secure the USB board to Contents Page Replacing the USB Board Dell™ Inspiron™ 1210 Service Manual CAUTION: Before working inside your computer, read the...
Setup Guide
Page 5
... Setting Up Your Computer 5 Connect the AC Adapter 6 Connect the Network Cable (optional 7 Press the Power Button 8 Ubuntu® Information 9 Windows Vista® Setup 9 Connect to the Internet (Optional 10 Using Your Inspiron Laptop 14 Left Side Features 16 Computer Base and Keyboard Features 18 Display Features 20 Removing and Replacing the Battery 21 Software Features 22 Solving Problems 24 Network Problems 24 Power Problems 25 Memory Problems 26 Lockups and Software Problems 27 Dell Support Center 29 Using Support Tools 29 System Messages 30 Hardware Troubleshooter...
... Setting Up Your Computer 5 Connect the AC Adapter 6 Connect the Network Cable (optional 7 Press the Power Button 8 Ubuntu® Information 9 Windows Vista® Setup 9 Connect to the Internet (Optional 10 Using Your Inspiron Laptop 14 Left Side Features 16 Computer Base and Keyboard Features 18 Display Features 20 Removing and Replacing the Battery 21 Software Features 22 Solving Problems 24 Network Problems 24 Power Problems 25 Memory Problems 26 Lockups and Software Problems 27 Dell Support Center 29 Using Support Tools 29 System Messages 30 Hardware Troubleshooter...
Setup Guide
Page 28
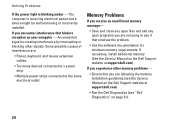
...: • Power, keyboard, and mouse extension cables. • Too many devices connected to a power strip. • Multiple power strips connected to see if that resolves the problem. • See the software documentation for minimum memory requirements. Solving Problems If the power light is creating interference by interrupting or blocking other memory problems - • Ensure that you are following the memory installation guidelines (see the Service Manual on the Dell Support website at support.dell.com). Memory Problems If...
...: • Power, keyboard, and mouse extension cables. • Too many devices connected to a power strip. • Multiple power strips connected to see if that resolves the problem. • See the software documentation for minimum memory requirements. Solving Problems If the power light is creating interference by interrupting or blocking other memory problems - • Ensure that you are following the memory installation guidelines (see the Service Manual on the Dell Support website at support.dell.com). Memory Problems If...
Setup Guide
Page 40
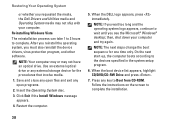
.... 2. On the next start-up, the computer boots according to complete. When the DELL logo appears, press immediately. Restoring Your Operating System or whether you requested the media, the Dell Drivers and Utilities media and Operating System media may not have an optical drive. Follow the instructions on the screen to Boot from CD-ROM. Click Exit if the Install Windows message appears. 4. Insert the Operating System disc. 3. then, shut down...
.... 2. On the next start-up, the computer boots according to complete. When the DELL logo appears, press immediately. Restoring Your Operating System or whether you requested the media, the Dell Drivers and Utilities media and Operating System media may not have an optical drive. Follow the instructions on the screen to Boot from CD-ROM. Click Exit if the Install Windows message appears. 4. Insert the Operating System disc. 3. then, shut down...
Setup Guide
Page 46
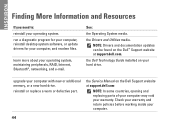
... or defective part. the Drivers and Utilities media. upgrade your computer. 44 See: the Operating System media. the Service Manual on the Dell™ Support website at support.dell.com NOTE: In some countries, opening and replacing parts of your computer may void your warranty. Check your warranty and return policies before working inside your computer with new or additional memory, or a new hard drive. the Dell Technology Guide installed on your operating system. INSPIRON Finding More...
... or defective part. the Drivers and Utilities media. upgrade your computer. 44 See: the Operating System media. the Service Manual on the Dell™ Support website at support.dell.com NOTE: In some countries, opening and replacing parts of your computer may void your warranty. Check your warranty and return policies before working inside your computer with new or additional memory, or a new hard drive. the Dell Technology Guide installed on your operating system. INSPIRON Finding More...
Setup Guide
Page 48
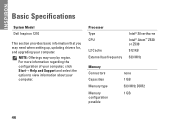
INSPIRON Basic Specifications System Model Dell Inspiron 1210 This section provides basic information that you may vary by region. Processor Type CPU L2 Cache External bus frequency Intel® Silverthorne Intel® Atom™ Z520 or Z530 512 KB 533 MHz Memory Connectors Capacities Memory type Memory configuration possible none 1 GB 533 MHz DDR2 1 GB 46 NOTE: Offerings may need when setting up, updating drivers for, and upgrading your computer...
INSPIRON Basic Specifications System Model Dell Inspiron 1210 This section provides basic information that you may vary by region. Processor Type CPU L2 Cache External bus frequency Intel® Silverthorne Intel® Atom™ Z520 or Z530 512 KB 533 MHz Memory Connectors Capacities Memory type Memory configuration possible none 1 GB 533 MHz DDR2 1 GB 46 NOTE: Offerings may need when setting up, updating drivers for, and upgrading your computer...
Ubuntu® Quick Reference Guide
Page 18
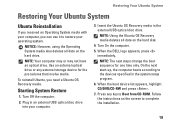
... procedures that involve media. NOTE: Using the Ubuntu OS Recovery media deletes all data on the screen to Boot from CD-ROM. When the boot device list appears, highlight CD/DVD/CD-RW and press . 7. Turn Off the computer. 2. Follow the instructions on the hard drive. Restoring Your Ubuntu System Restoring Your Ubuntu System Ubuntu Reinstallation If you received an Operating System media with your computer, you need a Ubuntu OS Recovery media.
... procedures that involve media. NOTE: Using the Ubuntu OS Recovery media deletes all data on the screen to Boot from CD-ROM. When the boot device list appears, highlight CD/DVD/CD-RW and press . 7. Turn Off the computer. 2. Follow the instructions on the hard drive. Restoring Your Ubuntu System Restoring Your Ubuntu System Ubuntu Reinstallation If you received an Operating System media with your computer, you need a Ubuntu OS Recovery media.


