Setup and Quick Reference Guide
Page 31
... and Peripherals (Canada Only) Third-Party Software and Peripherals Products Similar to Dell in as-new condition, and all of the manuals, floppy disk(s), CD(s), power cables, and other resellers of the system and records the transfer with it. For those products, please ...-current return policy (see the following section, "Dell Software and Peripherals (Canada Only)"). You may record your product documentation for a refund or credit of loss or damage during shipment. More information may have Internet access, call Dell Customer Service at 1-800-847-4096 (Home Consumer customers) ...
... and Peripherals (Canada Only) Third-Party Software and Peripherals Products Similar to Dell in as-new condition, and all of the manuals, floppy disk(s), CD(s), power cables, and other resellers of the system and records the transfer with it. For those products, please ...-current return policy (see the following section, "Dell Software and Peripherals (Canada Only)"). You may record your product documentation for a refund or credit of loss or damage during shipment. More information may have Internet access, call Dell Customer Service at 1-800-847-4096 (Home Consumer customers) ...
Setup and Quick Reference Guide
Page 32
...or invoice for a refund of one year from a Dell company or an authorized Dell distributor in as-new condition), prepay shipping charges, and insure the shipment or accept the risk of the manuals, floppy disk(s), CD(s), power cables, and other items included with it. ...One-Year End-User Manufacturer Guarantee (Latin America and the Caribbean Only) Guarantee Dell Computer Corporation ("Dell") warrants to the product you must call Dell Customer Service at Dell's expense. To determine...
...or invoice for a refund of one year from a Dell company or an authorized Dell distributor in as-new condition), prepay shipping charges, and insure the shipment or accept the risk of the manuals, floppy disk(s), CD(s), power cables, and other items included with it. ...One-Year End-User Manufacturer Guarantee (Latin America and the Caribbean Only) Guarantee Dell Computer Corporation ("Dell") warrants to the product you must call Dell Customer Service at Dell's expense. To determine...
Service Manual
Page 1
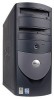
...and names or their products. A02 Trademarks used in this text: Dell, the DELL logo, and OptiPlex are trademarks of Dell Computer Corporation is subject to change without the written permission of Dell Computer Corporation. Other trademarks and trade names may be used in... or loss of your computer. CAUTION: A CAUTION indicates a potential for property damage, personal injury, or death. Dell™ OptiPlex™ GX260 Service Manual Before You Begin Computer Cover Inside Your Computer Badge Battery Chassis Intrusion Switch Control Panel Cards and Adapters Drives Front-Panel...
...and names or their products. A02 Trademarks used in this text: Dell, the DELL logo, and OptiPlex are trademarks of Dell Computer Corporation is subject to change without the written permission of Dell Computer Corporation. Other trademarks and trade names may be used in... or loss of your computer. CAUTION: A CAUTION indicates a potential for property damage, personal injury, or death. Dell™ OptiPlex™ GX260 Service Manual Before You Begin Computer Cover Inside Your Computer Badge Battery Chassis Intrusion Switch Control Panel Cards and Adapters Drives Front-Panel...
Service Manual
Page 2
... computer from the computer. Turn off the computer and unplugging the power cord before touching anything inside your online Dell documentation or otherwise provided to Contents Page Before You Begin Dell™ OptiPlex™ GX260 Service Manual Getting Started Recommended Tools Precautionary Measures Protecting Against Electrostatic Discharge Getting Started This section provides procedures for removing and...
... computer from the computer. Turn off the computer and unplugging the power cord before touching anything inside your online Dell documentation or otherwise provided to Contents Page Before You Begin Dell™ OptiPlex™ GX260 Service Manual Getting Started Recommended Tools Precautionary Measures Protecting Against Electrostatic Discharge Getting Started This section provides procedures for removing and...
Service Manual
Page 4
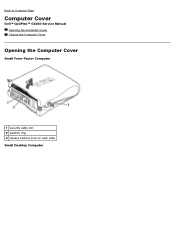
Back to Contents Page Computer Cover Dell™ OptiPlex™ GX260 Service Manual Opening the Computer Cover Closing the Computer Cover Opening the Computer Cover Small Form-Factor Computer 1 security cable slot 2 padlock ring 3 release buttons (one on each side) Small Desktop Computer
Back to Contents Page Computer Cover Dell™ OptiPlex™ GX260 Service Manual Opening the Computer Cover Closing the Computer Cover Opening the Computer Cover Small Form-Factor Computer 1 security cable slot 2 padlock ring 3 release buttons (one on each side) Small Desktop Computer
Service Manual
Page 7
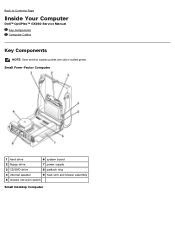
Back to Contents Page Inside Your Computer Dell™ OptiPlex™ GX260 Service Manual Key Components Computer Cables Key Components NOTE: User service access points are color-coded green. Small Form-Factor Computer 1 hard drive 6 system board 2 floppy drive 7 power supply 3 CD/DVD drive 8 padlock ring 4 internal speaker 9 heat sink and blower assembly 5 chassis intrusion switch Small Desktop Computer
Back to Contents Page Inside Your Computer Dell™ OptiPlex™ GX260 Service Manual Key Components Computer Cables Key Components NOTE: User service access points are color-coded green. Small Form-Factor Computer 1 hard drive 6 system board 2 floppy drive 7 power supply 3 CD/DVD drive 8 padlock ring 4 internal speaker 9 heat sink and blower assembly 5 chassis intrusion switch Small Desktop Computer
Service Manual
Page 13
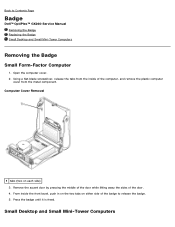
... the badge. 5. Remove the accent door by pressing the middle of the door while lifting away the sides of the badge to Contents Page Badge Dell™ OptiPlex™ GX260 Service Manual Removing the Badge Replacing the Badge Small Desktop and Small Mini-Tower Computers Removing the Badge Small Form-Factor Computer 1.
... the badge. 5. Remove the accent door by pressing the middle of the door while lifting away the sides of the badge to Contents Page Badge Dell™ OptiPlex™ GX260 Service Manual Removing the Badge Replacing the Badge Small Desktop and Small Mini-Tower Computers Removing the Badge Small Form-Factor Computer 1.
Service Manual
Page 16
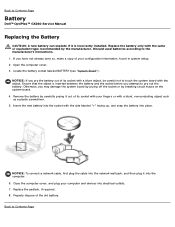
..., nonconducting object such as a plastic screwdriver. 5. Properly dispose of its socket with your computer and devices into the computer. 6. Back to Contents Page Battery Dell™ OptiPlex™ GX260 Service Manual Replacing the Battery CAUTION: A new battery can explode if it into electrical outlets. 7. If you may damage the system board by prying off the...
..., nonconducting object such as a plastic screwdriver. 5. Properly dispose of its socket with your computer and devices into the computer. 6. Back to Contents Page Battery Dell™ OptiPlex™ GX260 Service Manual Replacing the Battery CAUTION: A new battery can explode if it into electrical outlets. 7. If you may damage the system board by prying off the...
Service Manual
Page 18
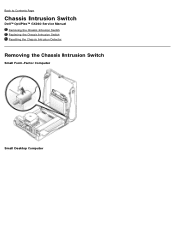
Back to Contents Page Chassis Intrusion Switch Dell™ OptiPlex™ GX260 Service Manual Removing the Chassis Intrusion Switch Replacing the Chassis Intrusion Switch Resetting the Chassis Intrusion Detector Removing the Chassis Intrusion Switch Small Form-Factor Computer Small Desktop Computer
Back to Contents Page Chassis Intrusion Switch Dell™ OptiPlex™ GX260 Service Manual Removing the Chassis Intrusion Switch Replacing the Chassis Intrusion Switch Resetting the Chassis Intrusion Detector Removing the Chassis Intrusion Switch Small Form-Factor Computer Small Desktop Computer
Service Manual
Page 21
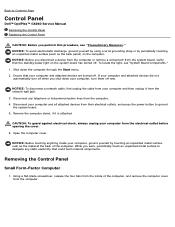
... down the computer through the Start menu. 2. Remove the computer stand, if it from the network wall jack. 3. Back to Contents Page Control Panel Dell™ OptiPlex™ GX260 Service Manual Removing the Control Panel Replacing the Control Panel CAUTION: Before you disconnect a device from the computer or remove a component from the system board, verify...
... down the computer through the Start menu. 2. Remove the computer stand, if it from the network wall jack. 3. Back to Contents Page Control Panel Dell™ OptiPlex™ GX260 Service Manual Removing the Control Panel Replacing the Control Panel CAUTION: Before you disconnect a device from the computer or remove a component from the system board, verify...
Service Manual
Page 28
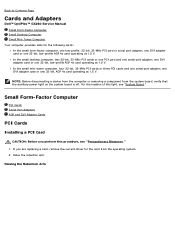
... DVI adapter card or one low-profile, 32-bit, 33-MHz PCI card or serial port adapter; Back to Contents Page Cards and Adapters Dell™ OptiPlex™ GX260 Service Manual Small Form-Factor Computer Small Desktop Computer Small Mini-Tower Computer Your computer provides slots for the card from the system board, verify that...
... DVI adapter card or one low-profile, 32-bit, 33-MHz PCI card or serial port adapter; Back to Contents Page Cards and Adapters Dell™ OptiPlex™ GX260 Service Manual Small Form-Factor Computer Small Desktop Computer Small Mini-Tower Computer Your computer provides slots for the card from the system board, verify that...
Service Manual
Page 35
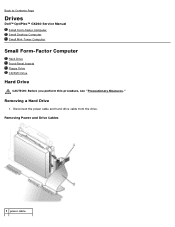
Removing a Hard Drive 1. Disconnect the power cable and hard-drive cable from the drive. Removing Power and Drive Cables 1 power cable Back to Contents Page Drives Dell™ OptiPlex™ GX260 Service Manual Small Form-Factor Computer Small Desktop Computer Small Mini-Tower Computer Small Form-Factor Computer Hard Drive Front-Panel Inserts Floppy Drive CD/DVD Drive Hard Drive CAUTION: Before you perform this procedure, see "Precautionary Measures."
Removing a Hard Drive 1. Disconnect the power cable and hard-drive cable from the drive. Removing Power and Drive Cables 1 power cable Back to Contents Page Drives Dell™ OptiPlex™ GX260 Service Manual Small Form-Factor Computer Small Desktop Computer Small Mini-Tower Computer Small Form-Factor Computer Hard Drive Front-Panel Inserts Floppy Drive CD/DVD Drive Hard Drive CAUTION: Before you perform this procedure, see "Precautionary Measures."
Service Manual
Page 63
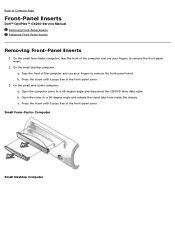
... and disconnect the CD/DVD drive data cable. Face the front of the front-panel cover. 3. Press the insert until it pops free of the computer and use your fingers to remove the front-panel insert. Open the computer cover to Contents Page Front-Panel Inserts Dell™ OptiPlex™ GX260 Service Manual Removing Front-Panel...
... and disconnect the CD/DVD drive data cable. Face the front of the front-panel cover. 3. Press the insert until it pops free of the computer and use your fingers to remove the front-panel insert. Open the computer cover to Contents Page Front-Panel Inserts Dell™ OptiPlex™ GX260 Service Manual Removing Front-Panel...

Service Manual
Page 66
... intrusion switch cable 3 control-panel cable 4 front audio cable 5 mounting screw 6 I /O panel to the computer, remove the hard drive. Back to Contents Page I/O Panel Dell™ OptiPlex™ GX260 Service Manual Removing the I/O Panel Replacing the I/O Panel Removing the I /O panel, such as the chassis intrusion switch and internal speaker cables. Remove all cables that holds...
... intrusion switch cable 3 control-panel cable 4 front audio cable 5 mounting screw 6 I /O panel to the computer, remove the hard drive. Back to Contents Page I/O Panel Dell™ OptiPlex™ GX260 Service Manual Removing the I/O Panel Replacing the I/O Panel Removing the I /O panel, such as the chassis intrusion switch and internal speaker cables. Remove all cables that holds...

Service Manual
Page 70
Lift the module away from the socket. 2. Installing a Memory Module 1 cutouts (2) 2 connector 3 memory module Press out the securing clip at each end of the memory module connector. Press the securing clips outward simultaneously until the memory module disengages and pops out slightly from the socket. Adding a Memory Module 1. Back to Contents Page Memory Dell™ OptiPlex™ GX260 Service Manual Removing a Memory Module Adding a Memory Module Removing a Memory Module CAUTION: Use a wrist grounding strap as explained in "Precautionary Measures." 1.
Lift the module away from the socket. 2. Installing a Memory Module 1 cutouts (2) 2 connector 3 memory module Press out the securing clip at each end of the memory module connector. Press the securing clips outward simultaneously until the memory module disengages and pops out slightly from the socket. Adding a Memory Module 1. Back to Contents Page Memory Dell™ OptiPlex™ GX260 Service Manual Removing a Memory Module Adding a Memory Module Removing a Memory Module CAUTION: Use a wrist grounding strap as explained in "Precautionary Measures." 1.

Service Manual
Page 72
... on the system board. 2. a. Gently rock the heat sink, and then slightly twist it as you lift it is attached to Contents Page Microprocessor Dell™ OptiPlex™ GX260 Service Manual Removing and Installing the Heat-Sink Assembly and Microprocessor Small Form-Factor and Small Desktop Computers Small Mini-Tower Computer Small Form-Factor and...
... on the system board. 2. a. Gently rock the heat sink, and then slightly twist it as you lift it is attached to Contents Page Microprocessor Dell™ OptiPlex™ GX260 Service Manual Removing and Installing the Heat-Sink Assembly and Microprocessor Small Form-Factor and Small Desktop Computers Small Mini-Tower Computer Small Form-Factor and...
Service Manual
Page 81
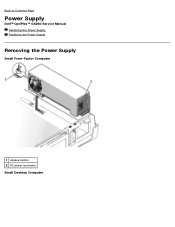
Back to Contents Page Power Supply Dell™ OptiPlex™ GX260 Service Manual Removing the Power Supply Replacing the Power Supply Removing the Power Supply Small Form-Factor Computer 1 release button 2 AC power connector Small Desktop Computer
Back to Contents Page Power Supply Dell™ OptiPlex™ GX260 Service Manual Removing the Power Supply Replacing the Power Supply Removing the Power Supply Small Form-Factor Computer 1 release button 2 AC power connector Small Desktop Computer

Service Manual
Page 84
Back to Contents Page System Board Dell™ OptiPlex™ GX260 Service Manual System Board Components Removing the System Board Replacing the System Board System Board Components 1 floppy drive connector (DSKT) 2 internal speaker (SPEAKER) 3 battery socket (BATTERY) 4 CD/DVD drive connector (IDE2) 5 hard drive connector (IDE1) 12 CD drive audio cable connector (CD_IN) 13 telephony connector (MODEM) 14 power connector (12VPOWER) 15 second serial connector (SER2) 16 microprocessor and heat-sink connector (CPU)
Back to Contents Page System Board Dell™ OptiPlex™ GX260 Service Manual System Board Components Removing the System Board Replacing the System Board System Board Components 1 floppy drive connector (DSKT) 2 internal speaker (SPEAKER) 3 battery socket (BATTERY) 4 CD/DVD drive connector (IDE2) 5 hard drive connector (IDE1) 12 CD drive audio cable connector (CD_IN) 13 telephony connector (MODEM) 14 power connector (12VPOWER) 15 second serial connector (SER2) 16 microprocessor and heat-sink connector (CPU)
Service Manual
Page 88
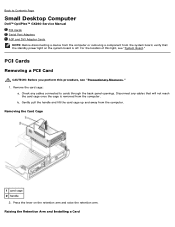
... arm and raise the retention arm. Back to cards through the back-panel openings. Disconnect any cables connected to Contents Page Small Desktop Computer Dell™ OptiPlex™ GX260 Service Manual PCI Cards Serial Port Adapters AGP and DVI Adapter Cards NOTE: Before disconnecting a device from the computer or removing a component from the system board...
... arm and raise the retention arm. Back to cards through the back-panel openings. Disconnect any cables connected to Contents Page Small Desktop Computer Dell™ OptiPlex™ GX260 Service Manual PCI Cards Serial Port Adapters AGP and DVI Adapter Cards NOTE: Before disconnecting a device from the computer or removing a component from the system board...

Service Manual
Page 95
... 6 filler bracket PCI Cards Installing a PCI Card CAUTION: Before you perform this light, see "Precautionary Measures." 1. Back to Contents Page Small Mini-Tower Computer Dell™ OptiPlex™ GX260 Service Manual PCI Cards Serial Port Adapters AGP and DVI Adapter Cards NOTE: Before disconnecting a device from the computer or removing a component from the system board...
... 6 filler bracket PCI Cards Installing a PCI Card CAUTION: Before you perform this light, see "Precautionary Measures." 1. Back to Contents Page Small Mini-Tower Computer Dell™ OptiPlex™ GX260 Service Manual PCI Cards Serial Port Adapters AGP and DVI Adapter Cards NOTE: Before disconnecting a device from the computer or removing a component from the system board...


