Dell User Guide
Page 4
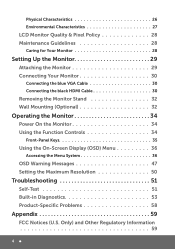
... Attaching the Monitor 29 Connecting Your Monitor 30 Connecting the blue VGA Cable 30 Connecting the black HDMI Cable 30 Removing the Monitor Stand 32 Wall Mounting (Optional 32 Operating the Monitor 34 Power On the Monitor 34 Using the Function Controls 34 Front-Panel Keys 35 Using the On-Screen Display...
... Attaching the Monitor 29 Connecting Your Monitor 30 Connecting the blue VGA Cable 30 Connecting the black HDMI Cable 30 Removing the Monitor Stand 32 Wall Mounting (Optional 32 Operating the Monitor 34 Power On the Monitor 34 Using the Function Controls 34 Front-Panel Keys 35 Using the On-Screen Display...
Dell User Guide
Page 17
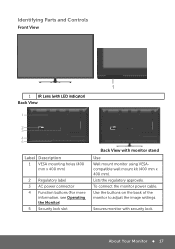
...tre branché sur une prise de courant munie d'une mise à la terre. Raheen Business Park Limerick Ireland www.dell.com Made in China Label Description 1 VESA mounting holes (400 mm x 400 mm) 2 Regulatory label 3 AC power connector 4 Function buttons (For more information, see ...ICES-3 (B)/NMB-3(B) The equipment must be connected to an earthed mains socket-outlet. Secures monitor with monitor stand Use Wall mount monitor using VESAcompatible wall mount kit (400 mm x 400 mm). Raheen Business Park Limerick Ireland www.dell.com Made in China Back View with security lock.
...tre branché sur une prise de courant munie d'une mise à la terre. Raheen Business Park Limerick Ireland www.dell.com Made in China Label Description 1 VESA mounting holes (400 mm x 400 mm) 2 Regulatory label 3 AC power connector 4 Function buttons (For more information, see ...ICES-3 (B)/NMB-3(B) The equipment must be connected to an earthed mains socket-outlet. Secures monitor with monitor stand Use Wall mount monitor using VESAcompatible wall mount kit (400 mm x 400 mm). Raheen Business Park Limerick Ireland www.dell.com Made in China Back View with security lock.
Dell User Guide
Page 26
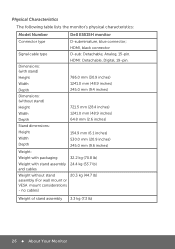
... stand assembly 24.4 kg (53.7 lb) and cables Weight without stand assembly (For wall mount or VESA mount considerations - HDMI, black connector Signal cable type D-sub: Detachable, Analog, 15-pin. Physical Characteristics The following table lists the monitor's physical characteristics: Model Number Dell E5515H monitor Connector type D-subminiature, blue connector; HDMI: Detachable, Digital, 19-pin.
... stand assembly 24.4 kg (53.7 lb) and cables Weight without stand assembly (For wall mount or VESA mount considerations - HDMI, black connector Signal cable type D-sub: Detachable, Analog, 15-pin. Physical Characteristics The following table lists the monitor's physical characteristics: Model Number Dell E5515H monitor Connector type D-subminiature, blue connector; HDMI: Detachable, Digital, 19-pin.

Dell User Guide
Page 32
Remove the stand from the monitor. Wall Mounting (Optional) (Screw dimension: M6 x 30 mm).* *Depending on a soft, clean surface. ModFlelat:NPo1a.0Dn:0Ee-lEL2L545M01oV5niHtco5r0//6M0oHnizte2.ur5Aécran plat MRaadàhelieL'aenatTnCpehhBrCpieruAanesrei....-001T Removing the Monitor Stand NOTE: To prevent scratches on the LCD screen while removing the stand, ensure that the monitor is placed on your mounting solution, you may need longer than 30mm screw. 32 Setting Up the Monitor Place the monitor on the back cover. 3. To remove the stand...
Remove the stand from the monitor. Wall Mounting (Optional) (Screw dimension: M6 x 30 mm).* *Depending on a soft, clean surface. ModFlelat:NPo1a.0Dn:0Ee-lEL2L545M01oV5niHtco5r0//6M0oHnizte2.ur5Aécran plat MRaadàhelieL'aenatTnCpehhBrCpieruAanesrei....-001T Removing the Monitor Stand NOTE: To prevent scratches on the LCD screen while removing the stand, ensure that the monitor is placed on your mounting solution, you may need longer than 30mm screw. 32 Setting Up the Monitor Place the monitor on the back cover. 3. To remove the stand...

Dell User Guide
Page 33
Mount the LCD on a stable, flat table. 2. Place the monitor panel on a soft cloth or cushion on the wall by following the instructions that come with minimum weight/load bearing capacity of 81.2 kg. Operating the Monitor 33 NOTE: For use only with UL-listed wall mount bracket with the VESA-compatible base mounting kit. 1. Attach the mounting bracket from the wall mounting kit to the instructions that came with the wall mounting kit. Remove the stand. 3. Refer to the LCD. 4.
Mount the LCD on a stable, flat table. 2. Place the monitor panel on a soft cloth or cushion on the wall by following the instructions that come with minimum weight/load bearing capacity of 81.2 kg. Operating the Monitor 33 NOTE: For use only with UL-listed wall mount bracket with the VESA-compatible base mounting kit. 1. Attach the mounting bracket from the wall mounting kit to the instructions that came with the wall mounting kit. Remove the stand. 3. Refer to the LCD. 4.


