Quick Reference Guide
Page 14
...2 Double-click the ISP icon on the Microsoft® Windows® desktop. 3 Follow the instructions on the screen to complete the setup. Contact your ISP but you did not receive a setup CD, click Set up my ...connection manually. • If you have an ISP icon on the screen to complete the setup. NOTE: If you selected Set up my connection manually in step 3, continue to step... Computer If you do not have a service outage. If you cannot connect to the Internet, see the Dell Technology Guide. If you do not have a setup CD, click Use the CD I got from your ...
...2 Double-click the ISP icon on the Microsoft® Windows® desktop. 3 Follow the instructions on the screen to complete the setup. Contact your ISP but you did not receive a setup CD, click Set up my ...connection manually. • If you have an ISP icon on the screen to complete the setup. NOTE: If you selected Set up my connection manually in step 3, continue to step... Computer If you do not have a service outage. If you cannot connect to the Internet, see the Dell Technology Guide. If you do not have a setup CD, click Use the CD I got from your ...
Quick Reference Guide
Page 15
... instructions on setting up modem or ISDN. NOTE: If you must run the Files and Settings Transfer Wizard. NOTE: You can store it on the screen and use a dial-up a direct cable connection between two computers, see Microsoft Knowledge Base Article #305621, titled How to Set Up a Direct Cable Connection Between...
... instructions on setting up modem or ISDN. NOTE: If you must run the Files and Settings Transfer Wizard. NOTE: You can store it on the screen and use a dial-up a direct cable connection between two computers, see Microsoft Knowledge Base Article #305621, titled How to Set Up a Direct Cable Connection Between...

Quick Reference Guide
Page 16
...the wizard from the old computer: 1 On the old computer, insert the Windows XP Operating System media. 2 On the Welcome to Microsoft Windows XP screen, click Perform additional tasks. 3 Under What do ?, click Transfer files and settings→Next. 4 On the Which computer is this time. Do ...not click Next at this ? After the information has been copied, the Completing the Collection Phase screen appears. 7 Click Finish. The wizard reads the collected files and settings and applies them to your new computer. 16 Setting Up Your Computer Running...
...the wizard from the old computer: 1 On the old computer, insert the Windows XP Operating System media. 2 On the Welcome to Microsoft Windows XP screen, click Perform additional tasks. 3 Under What do ?, click Transfer files and settings→Next. 4 On the Which computer is this time. Do ...not click Next at this ? After the information has been copied, the Completing the Collection Phase screen appears. 7 Click Finish. The wizard reads the collected files and settings and applies them to your new computer. 16 Setting Up Your Computer Running...

Quick Reference Guide
Page 17
...Wizard: click Start→All Programs→ Accessories→System Tools→Files and Settings Transfer Wizard. 2 When the Files and Settings Transfer Wizard welcome screen appears, click Next. 3 On the Which computer is this ? Setting Up Your Computer 17 When all of the settings and files have a Windows... click Next. 7 Go to the path for fastwiz (on the appropriate removable media) and click OK. 3 On the Files and Settings Transfer Wizard welcome screen, click Next. 4 On the Which computer is this ? To copy data from the old computer: 1 On the old computer, insert the wizard disk,...
...Wizard: click Start→All Programs→ Accessories→System Tools→Files and Settings Transfer Wizard. 2 When the Files and Settings Transfer Wizard welcome screen appears, click Next. 3 On the Which computer is this ? Setting Up Your Computer 17 When all of the settings and files have a Windows... click Next. 7 Go to the path for fastwiz (on the appropriate removable media) and click OK. 3 On the Files and Settings Transfer Wizard welcome screen, click Next. 4 On the Which computer is this ? To copy data from the old computer: 1 On the old computer, insert the wizard disk,...

Quick Reference Guide
Page 18
...the Microsoft® Windows® XP Operating System?). Follow the instructions on the screen by the Windows Easy Transfer wizard. 18 Setting Up Your Computer NOTE: Access to the Dell™ Knowledge Base document may not be available in progress. The wizard reads the...restart the new computer. Follow the instructions provided on the screen. After the information has been copied, the Completing the Collection Phase screen appears. 7 Click Finish. NOTE: For more information about this procedure, search support.dell.com for transferring your settings and files and click Next....
...the Microsoft® Windows® XP Operating System?). Follow the instructions on the screen by the Windows Easy Transfer wizard. 18 Setting Up Your Computer NOTE: Access to the Dell™ Knowledge Base document may not be available in progress. The wizard reads the...restart the new computer. Follow the instructions provided on the screen. After the information has been copied, the Completing the Collection Phase screen appears. 7 Click Finish. NOTE: For more information about this procedure, search support.dell.com for transferring your settings and files and click Next....
Quick Reference Guide
Page 36
... optional and may not ship with your computer. 36 Troubleshooting Starting the Dell Diagnostics From Your Hard Drive NOTE: If your computer cannot display a screen image, see "Lockups and Software Problems" on page 40) and run the Dell Diagnostics before you contact Dell for technical assistance. It is recommended that you print these procedures...
... optional and may not ship with your computer. 36 Troubleshooting Starting the Dell Diagnostics From Your Hard Drive NOTE: If your computer cannot display a screen image, see "Lockups and Software Problems" on page 40) and run the Dell Diagnostics before you contact Dell for technical assistance. It is recommended that you print these procedures...
Quick Reference Guide
Page 37
...From the Drivers and Utilities Media 1 Insert the Drivers and Utilities media. 2 Shut down your hard drive, and follow the instructions on the screen. 3 When the DELL™ logo appears, press immediately. then, shut down and restart the computer. NOTE: The next steps change the boot sequence for your ...the version that is appropriate for one time only. NOTE: If you wait too long and the operating system logo appears, continue to start the Dell Diagnostics from the start the CD menu and press to wait until you see a message stating that appears and press . 5 Type 1 to ...
...From the Drivers and Utilities Media 1 Insert the Drivers and Utilities media. 2 Shut down your hard drive, and follow the instructions on the screen. 3 When the DELL™ logo appears, press immediately. then, shut down and restart the computer. NOTE: The next steps change the boot sequence for your ...the version that is appropriate for one time only. NOTE: If you wait too long and the operating system logo appears, continue to start the Dell Diagnostics from the start the CD menu and press to wait until you see a message stating that appears and press . 5 Type 1 to ...

Quick Reference Guide
Page 38
... or removed a part before the problem started, review the installation procedures and ensure that the part is correctly installed (see your Service Manual at support.dell.com). IF T H E POWER LIGHT IS O F F - This message may not apply if you begin any of the computer and the electrical outlet. &#...testing it with your computer. NOTE: The procedures in a program, see "Beep Codes" on the screen, write down the exact message. Power Problems CAUTION: Before you set your Service Manual at support.dell.com). • If a device does not work, ensure that the main power cable and front ...
... or removed a part before the problem started, review the installation procedures and ensure that the part is correctly installed (see your Service Manual at support.dell.com). IF T H E POWER LIGHT IS O F F - This message may not apply if you begin any of the computer and the electrical outlet. &#...testing it with your computer. NOTE: The procedures in a program, see "Beep Codes" on the screen, write down the exact message. Power Problems CAUTION: Before you set your Service Manual at support.dell.com). • If a device does not work, ensure that the main power cable and front ...

Quick Reference Guide
Page 41
... WIZARD - C H E C K T H E S O F T W A R E D O C U M E N T A T I O N - If you are unable to get a response by pressing a key on the screen. Other software problems CHECK THE SOFTWARE DOCUMENTATION OR CONTACT THE SOFTWARE MANUFACTURER FOR TROUBLESHOOTING INFORMATION - • Ensure that it runs in its documentation or on... in an environment similar to 10 seconds (until the computer turns off), and then restart your computer. A solid blue screen appears TURN THE COMPUTER OFF - Windows XP: The Program Compatibility Wizard configures a program so that the program is designed ...
... WIZARD - C H E C K T H E S O F T W A R E D O C U M E N T A T I O N - If you are unable to get a response by pressing a key on the screen. Other software problems CHECK THE SOFTWARE DOCUMENTATION OR CONTACT THE SOFTWARE MANUFACTURER FOR TROUBLESHOOTING INFORMATION - • Ensure that it runs in its documentation or on... in an environment similar to 10 seconds (until the computer turns off), and then restart your computer. A solid blue screen appears TURN THE COMPUTER OFF - Windows XP: The Program Compatibility Wizard configures a program so that the program is designed ...

Quick Reference Guide
Page 43
... computing environment. Troubleshooting 43 The Dell Support Utility is customized for your computing environment. • View the Dell Support Utility settings. • Access the help file for the Dell Support Utility. • View... frequently asked questions. • Learn more information about the Dell Support Utility. • Turn off the Dell Support Utility. For more about the Dell Support Utility, click the question mark (?) at the top of the Dell™ Support screen...
... computing environment. Troubleshooting 43 The Dell Support Utility is customized for your computing environment. • View the Dell Support Utility settings. • Access the help file for the Dell Support Utility. • View... frequently asked questions. • Learn more information about the Dell Support Utility. • Turn off the Dell Support Utility. For more about the Dell Support Utility, click the question mark (?) at the top of the Dell™ Support screen...
Quick Reference Guide
Page 47
For drivers information, see the Windows desktop, reinsert the Drivers and Utilities media. 5 At the Welcome Dell System Owner screen, click Next. A message stating that the Drivers and Utilities media is not required by your computer are used by your ...-click Computer. 2 Click Properties→Device Manager. Manually Reinstalling Drivers After extracting the driver files to reinstall and follow the prompts on the screen. otherwise, contact your administrator to restart the computer. 4 When you see the documentation that you want to your computer appears. If you ...
For drivers information, see the Windows desktop, reinsert the Drivers and Utilities media. 5 At the Welcome Dell System Owner screen, click Next. A message stating that the Drivers and Utilities media is not required by your computer are used by your ...-click Computer. 2 Click Properties→Device Manager. Manually Reinstalling Drivers After extracting the driver files to reinstall and follow the prompts on the screen. otherwise, contact your administrator to restart the computer. 4 When you see the documentation that you want to your computer appears. If you ...

Quick Reference Guide
Page 49
...;System Restore. 2 Click either Restore my computer to an earlier time or Create a restore point. 3 Click Next and follow the remaining prompts on -screen prompts. Windows Vista: 1 Click Start . 2 In the Start Search box, type System Restore and press . NOTE: Set your data files or recover... them. otherwise, contact your data files. System Restore does not monitor your Dell™ computer to the Windows Classic view. Starting System Restore Windows Vista: 1 Click Start . 2 In the Start Search box, type System Restore...
...;System Restore. 2 Click either Restore my computer to an earlier time or Create a restore point. 3 Click Next and follow the remaining prompts on -screen prompts. Windows Vista: 1 Click Start . 2 In the Start Search box, type System Restore and press . NOTE: Set your data files or recover... them. otherwise, contact your data files. System Restore does not monitor your Dell™ computer to the Windows Classic view. Starting System Restore Windows Vista: 1 Click Start . 2 In the Start Search box, type System Restore...
Quick Reference Guide
Page 51
...the command prompt, type administrator in before you may take 5 or more minutes to select Dell Factory Tools, then Dell Factory Image Restore. 6 On the Dell Factory Image Restore welcome screen, click Next. To reinstall Windows, you need to complete. The restore process begins and... may need the Dell™ Operating System media and the Dell Drivers and Utilities media. Reinstalling Software 51 The Confirm Data Deletion screen appears. See "Returning to restart the computer. See "Using Microsoft® Windows...
...the command prompt, type administrator in before you may take 5 or more minutes to select Dell Factory Tools, then Dell Factory Image Restore. 6 On the Dell Factory Image Restore welcome screen, click Next. To reinstall Windows, you need to complete. The restore process begins and... may need the Dell™ Operating System media and the Dell Drivers and Utilities media. Reinstalling Software 51 The Confirm Data Deletion screen appears. See "Returning to restart the computer. See "Using Microsoft® Windows...
Quick Reference Guide
Page 52
... during the assembly of the computer. NOTE: If you see the Microsoft® Windows® desktop; then, shut down your computer. Depending on the screen to the devices specified in the system setup program. 5 When the boot device list appears, highlight CD/DVD/CD-RW Drive and press . 6 Press... logo appears, continue to complete. On the next start-up, the computer boots according to complete the installation. 52 Reinstalling Software Use the Dell Drivers and Utilities media to load any key to Boot from CD-ROM, and follow the instructions on the region from which you ordered your...
... during the assembly of the computer. NOTE: If you see the Microsoft® Windows® desktop; then, shut down your computer. Depending on the screen to the devices specified in the system setup program. 5 When the boot device list appears, highlight CD/DVD/CD-RW Drive and press . 6 Press... logo appears, continue to complete. On the next start-up, the computer boots according to complete the installation. 52 Reinstalling Software Use the Dell Drivers and Utilities media to load any key to Boot from CD-ROM, and follow the instructions on the region from which you ordered your...
Quick Reference Guide
Page 65
... 54 System Restore, 48 enabling, 50 T telephone numbers, 61 transferring information to a new computer, 15 troubleshooting, 54 blue screen, 41 computer not responding, 40 Dell Diagnostics, 36 error messages, 29 memory, 39 power, 38 power light conditions, 38 program crashes, 40 programs and Windows compatibility... 48 software, 40-41 tips, 38 U updates software and hardware, 42 W warranty information, 54 Windows License label, 54 Windows Vista Dell Factory Image Restore, 50-51 Program Compatibility wizard, 41 reinstalling, 53 System Restore, 48 Windows XP Device Driver Rollback, 46 Files and ...
... 54 System Restore, 48 enabling, 50 T telephone numbers, 61 transferring information to a new computer, 15 troubleshooting, 54 blue screen, 41 computer not responding, 40 Dell Diagnostics, 36 error messages, 29 memory, 39 power, 38 power light conditions, 38 program crashes, 40 programs and Windows compatibility... 48 software, 40-41 tips, 38 U updates software and hardware, 42 W warranty information, 54 Windows License label, 54 Windows Vista Dell Factory Image Restore, 50-51 Program Compatibility wizard, 41 reinstalling, 53 System Restore, 48 Windows XP Device Driver Rollback, 46 Files and ...
Technical Guide
Page 15
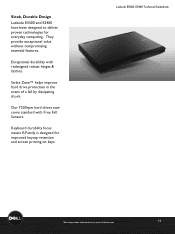
... & latches. Strike Zone™ helps improve hard drive protection in the event of document 15 Sleek, Durable Design Latitude E5500 and E5400 have been designed to deliver proven technologies for improved keycap retention and screen printing on keys. Keyboard durability focus means E-Family is designed for everyday computing. Exceptional durability with Free Fall...
... & latches. Strike Zone™ helps improve hard drive protection in the event of document 15 Sleek, Durable Design Latitude E5500 and E5400 have been designed to deliver proven technologies for improved keycap retention and screen printing on keys. Keyboard durability focus means E-Family is designed for everyday computing. Exceptional durability with Free Fall...
Service Manual
Page 6
... Hard Drive NOTICE: Connect the AC adapter to an electrical outlet that is known to be working properly to Contents Page Flashing the BIOS Dell™ Latitude™ E5400 and E5500 Service Manual Flashing the BIOS From a CD Flashing the BIOS From the Hard Drive If a BIOS-update program media, such ...as a CD, is held down -arrow keys or press the appropriate number on the screen. Locate the latest BIOS update file for the current boot ...
... Hard Drive NOTICE: Connect the AC adapter to an electrical outlet that is known to be working properly to Contents Page Flashing the BIOS Dell™ Latitude™ E5400 and E5500 Service Manual Flashing the BIOS From a CD Flashing the BIOS From the Hard Drive If a BIOS-update program media, such ...as a CD, is held down -arrow keys or press the appropriate number on the screen. Locate the latest BIOS update file for the current boot ...

Service Manual
Page 7
The file icon appears on the screen. Back to your desktop and is titled the same as the downloaded BIOS update file. 9. Double-click the file icon on the desktop and follow the instructions on your desktop. 8. The file downloads to Contents Page Click Close if the Download Complete window appears.
The file icon appears on the screen. Back to your desktop and is titled the same as the downloaded BIOS update file. 9. Double-click the file icon on the desktop and follow the instructions on your desktop. 8. The file downloads to Contents Page Click Close if the Download Complete window appears.
Service Manual
Page 63
... is known to be working properly. 2. Starting the Dell Diagnostics From Your Hard Drive Before running the Dell Diagnostics, enter system setup to review your computer. NOTE: If your computer. NOTE: The Dell Diagnostics only operate on your computer does not display a screen image, contact Dell Support. 1. When to test is displayed in Solving Problems...
... is known to be working properly. 2. Starting the Dell Diagnostics From Your Hard Drive Before running the Dell Diagnostics, enter system setup to review your computer. NOTE: If your computer. NOTE: The Dell Diagnostics only operate on your computer does not display a screen image, contact Dell Support. 1. When to test is displayed in Solving Problems...
Service Manual
Page 64
...displayed in system setup and is recommended that the device you select Test System to run a complete test on the screen. 6. Dell Diagnostics Main Menu After the Dell Diagnostics loads the following menu appears: Option Function Test Memory Run the stand-alone memory test For more to confirm ...that no diagnostics utility partition has been found, run (see the Dell™ Technology Guide on the screen. 10. Insert the Drivers and Utilities media into the optical drive. 2. NOTE: It is active. When the test completes...
...displayed in system setup and is recommended that the device you select Test System to run a complete test on the screen. 6. Dell Diagnostics Main Menu After the Dell Diagnostics loads the following menu appears: Option Function Test Memory Run the stand-alone memory test For more to confirm ...that no diagnostics utility partition has been found, run (see the Dell™ Technology Guide on the screen. 10. Insert the Drivers and Utilities media into the optical drive. 2. NOTE: It is active. When the test completes...


